5five F26 Bedienungsanleitung

USER’S MANUAL
T R U S T T H E S O U N D T R U S T T H E S O U N D T R U S T T H E S O U N D
T R U S T T H E S O U N D
C A R A U X / U S B / m i c r o S D R E C E I V E R W I T H B T F U N C T I O N
50Wx4
M A X P O W E R
B T M U S I C U S B I N P U T F M R A D I OM P 3 P L A Y E RA U X I N P U T
A P P C O N T R O L
S D S L O T
G/R/W


С O N T E N T
Precautions
Read Before Using
How to install and remove the player
Wired connections
Front Panel Description
Basic operations and receiver operation modes
Radio mode
Media player mode
Bluetooth mode
Troubleshooting guide
Specifications
4
5
6
9
10
11
12
12
14
15
16

P R E C A U T I O N S
4
A T T E N T I O N !
If you encounter any difficulties in using the device, contact an authorized
service center. The device has a built-in LCD monitor, so be careful when
transporting and installing.
It is not recommended to wipe the surface of the device with abrasive
detergents.
The operating voltage of the player is 12V (+/- 2V), direct current. At lower or
higher voltage it is not recommended to use the device, since it can be
easily damaged.
Before turning on the device, make sure that the temperature in the car is in
the range from 0 to +45 degrees.
Use fuses rated for the current indicated on the fuse holder for
replacement. If the fuse blows several times in a row, carefully check the
electrical connections for a short circuit. Also check the voltage on the
vehicle electrical system.
To prevent damage, do not expose the apparatus to direct sunlight, heat
radiation or hot air. If the temperature in the passenger compartment is too
high, do not turn on the unit until the temperature in the passenger
compartment drops. Do not expose the device to sudden changes in
temperature.

R E A D B E F O R E U S I N G
5
· Carefully read through this manual to familiarize yourself with this high-
quality sound system.
· The moment of unit installation is considered the start of its operation.
When using the device in winter it is recommended to heat the car interior
for 15 minutes or up to operating temperatures.
· Use the unit with the temperature that goes beyond the operation
temperature greatly decreases the operation resource of device.
· Disconnect the vehicle's negative battery terminal while mounting and
connecting the unit.
· When replacing the fuse, be sure to use one with an identical amperage
rating.
· Do not use the unit in places where it can be exposed to water, moisture
and dust.
· Do not open covers and do not repair yourself. Consult the dealer or an
experienced technician for help.
· Make sure you disconnect the power supply and aerial if you will not be
using the system for a long period or during a thunderstorm.
· Make sure you disconnect the power supply if the system appears to be
working incorrectly, is making an unusual sound, has a strange smell, has
smoke emitting from it or liquids have got inside it. Have a qualified
technician check the system.
· The unit is designed for negative terminal of the battery, which is
connected to the vehicle metal. Please confirm it before installation.
· Do not allow the speaker wires to be shorted together when the unit is
switched on. Otherwise it may overload or burn out the power amplifier.

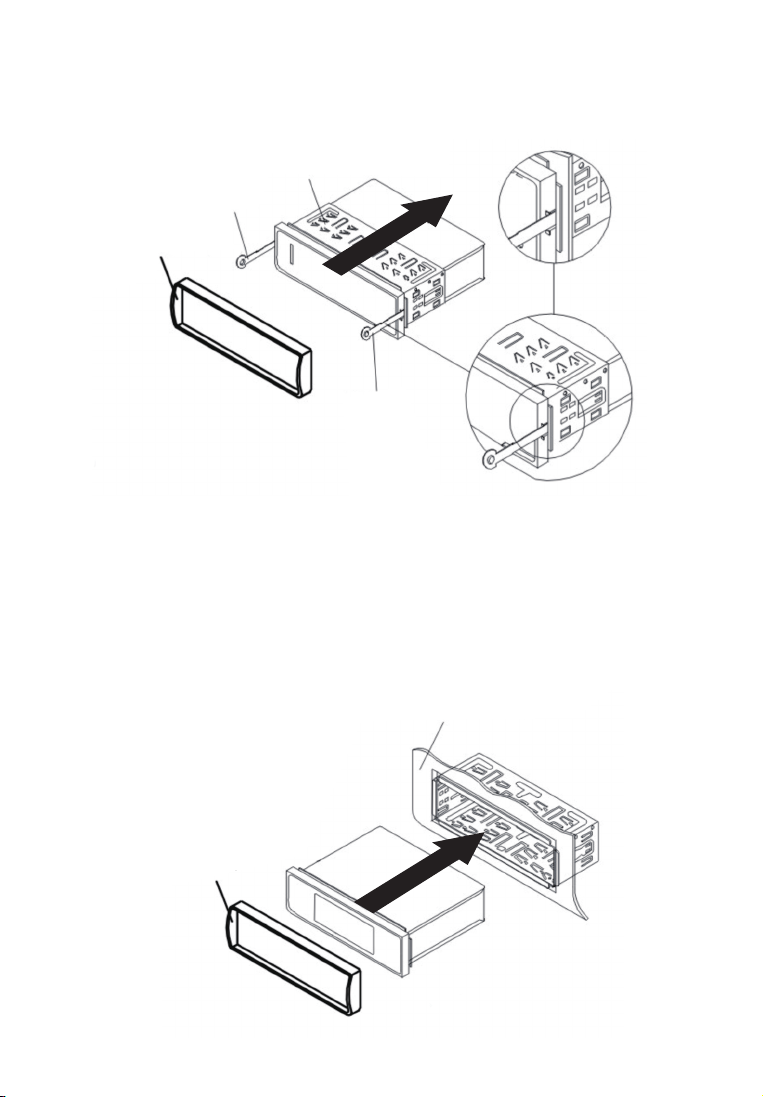
P L A Y E R I N S T A L L A T I O N
A N D R E M O V A L
6
· Before final installation, connect the wiring according to the time diagram
and make sure that it all works correctly.
· To ensure proper installation, use only the parts supplied with the device.
Using foreign parts may cause malfunction.
· In order to maintain warranty, this product must be installed at an
authorized dealer.
· Install the device in such a way that it does not interfere with the driver
and does not injure the passenger in case of a sudden stop, for example,
during emergency braking.
· Avoid installing the unit in places where it may be exposed to high
temperatures, such as direct sunlight or hot air from the heater, and where
it will be exposed to dust, dirt, or excessive vibration.
· Be sure to remove the front panel before installing the device.
For proper installation of the device, the compartment for installing radio
equipment in the dashboard must correspond to the following dimensions
In addition, you should check if the depth of the compartment is sufficient
to accommodate the receiver. Before starting work, make sure that the
vehicle’s ignition is off. It is recommended, if possible, to disconnect the wire
from the “-” terminal of the car battery.
53мм
182мм
7
Frame
Metal mantle
Key
Key
Frame
Instrument board
1) Insert the keys all the way into the grooves on the sides of the device.
Remove the player from the mounting frame.
2) Insert the mounting frame (without the player case) into the dashboard
compartment and bend the “tabs” with a screwdriver. Not all “tabs” fit the
design of the dashboard of a particular car, select the most suitable.
3) Connect the power and speaker connectors, the antenna connector to
the player. Make sure the wires are not pinched anywhere. Carefully insert
the player into the mounting frame until the latches click, while observing
the position of the connected wires so as not to accidentally damage
them.

8
Metal mantle
Key
Key
Removing the receiver
Make sure the ignition is off. Disconnect a wire from "-" plugs of the car
battery.
Remove the metal bracket from the back of the device (if installed
previously).
Insert the keys all the way into the slots on the sides of the front panel.
Pull the receiver out of the frame by pulling it towards you.

W I R E D C O N N E C T I O N S
To replace a fuse, remove the blown fuse from the socket and insert a new
one of the same rating.
F U S E R E P L A C E M E N T
9
1
2
3
4
ANTENNA
FUSE
15А
SPEAKERS
· Make sure your vehicle's on-board voltage is +12 volts with a negative
value on the chassis.
· Before starting installation, turn off the on-board power by removing the
fuse from the receiver. After connecting all the wires, install it in place.
· Connect the wires as shown.
· If your vehicle does not have an ISO connector, you can purchase it at an
auto accessories store.
Notes: Improper connection may damage the receiver and void the
warranty on this unit.
Front RCA Output(R)/Red
Front RCA Output(L)/White
Rear RCA Output (R)Red
Rear RCA Output(L)White
1.
2.
3.
4.
Rear Right SP.
Front Right SP.
Front Le SP.
Rear Le SP.
Purple
Purple Black
Grey
Grey Black
White
White Black
Green
Green Black
Red
Black
Blue
Yellow
ACC
GND
Auto ANT
+12V
1
B
2
3
4
5
6
7
8
1
A
2
3
4
5
6
7
8
B A

1. button ON/OFF the device, select the receiver modes
2. MUTE mute ON/OFF button, in Bluetooth mode, interrupts the call
3. VOL / SEL volume control / multi-select button sound modes
4. Button: switching to the next track in media player mode, search
next radio station in radio mode
5. Button: switching to the previous track in media player mode,
search previous radio station in radio mode
6. AMS button for automatic tuning of the radio, scanning stored stations
7. EQ (equalizer) button for selecting sound settings
8. CLK button to display and set the current time
9. BND button to select the frequency range of the receiver, answering a
mobile phone call in Bluetooth mode
10. LCD Display
11. 1 / button to turn on the installed radio station in radio mode,
in media player enable Play / Pause
12. 2 / INT button to turn on the installed radio station in radio mode,
in media player modeenabe demo mode
13. 3 / RPT button to turn on the installed radio station in radio mode,
in media player modeenable track repeat / repeat of all tracks
14. 4 / RDM button to turn on the installed radio station in radio mode,
in media player modeenable random playback.
15. 5 / -10 button to turn on the installed radio station in radio mode,
in media player modeenable transition of playback 10 tracks back
16. 6 / + 10 power button of the installed radio station in radio mode,
in media player modeenable playback transition 10 tracks forward
17. AUX IN - audio input for an additional device
18. RST device reboot button
19. MicroSD card reader
20. USB port for an additional device
21. Microphone
F R O N T P A N E L D E S C R I P T I O N
4
9 6 11 12 13 14 15 16 17
1
5
8
18
310
21
19
2
20
7
Dieses Handbuch passt für folgende Modelle
3
Inhaltsverzeichnis


