Almost Heaven Saunas KIP Betriebsanleitung

In addition to reading this manual through to the end before proceeding with assembly,
you may nd our instruction video helpful.
You can nd it at: youtube.com/user/almostheavensauna
KIP Heater Installation
& Owner’s Manual

Read this entire manual through to the end before proceeding with the installation.
KIP HEATER INSTALLATION MANUAL
HEATER INSTRUCTIONS
Your Almost Heaven Sauna is paired with a genuine Finnish heater manufactured by Harvia Oy, the world leader in sauna heaters.
Refer to this guide for installation and operation instructions. Please note, a licensed electrician should perform all electrical
work, and Almost Heaven Saunas sta is available to assist with any questions you or your electrician may have. Please call us at
888-355-3050 for technical assistance.
Information for your electrician:
4.5kW and 6.0kW KIP Heaters
• 30-ampdoublepolebreaker
• 240volts
• 1Phase
• 10/2wire.For6.0kWheaters,an8/2wireisrecommendedfordistancesgreaterthan30’frompowersource
• DonotuseGFCIwiththisheater
• Usecopperwirewith90Cinsulation
8.0kW KIP Heaters
• 40-ampdoublepolebreaker
• 240volts
• 1Phase
• 8/2wire
• DonotuseGFCIwiththisheater
• Usecopperwirewith90Cinsulation
POSITIONING YOUR HEATER
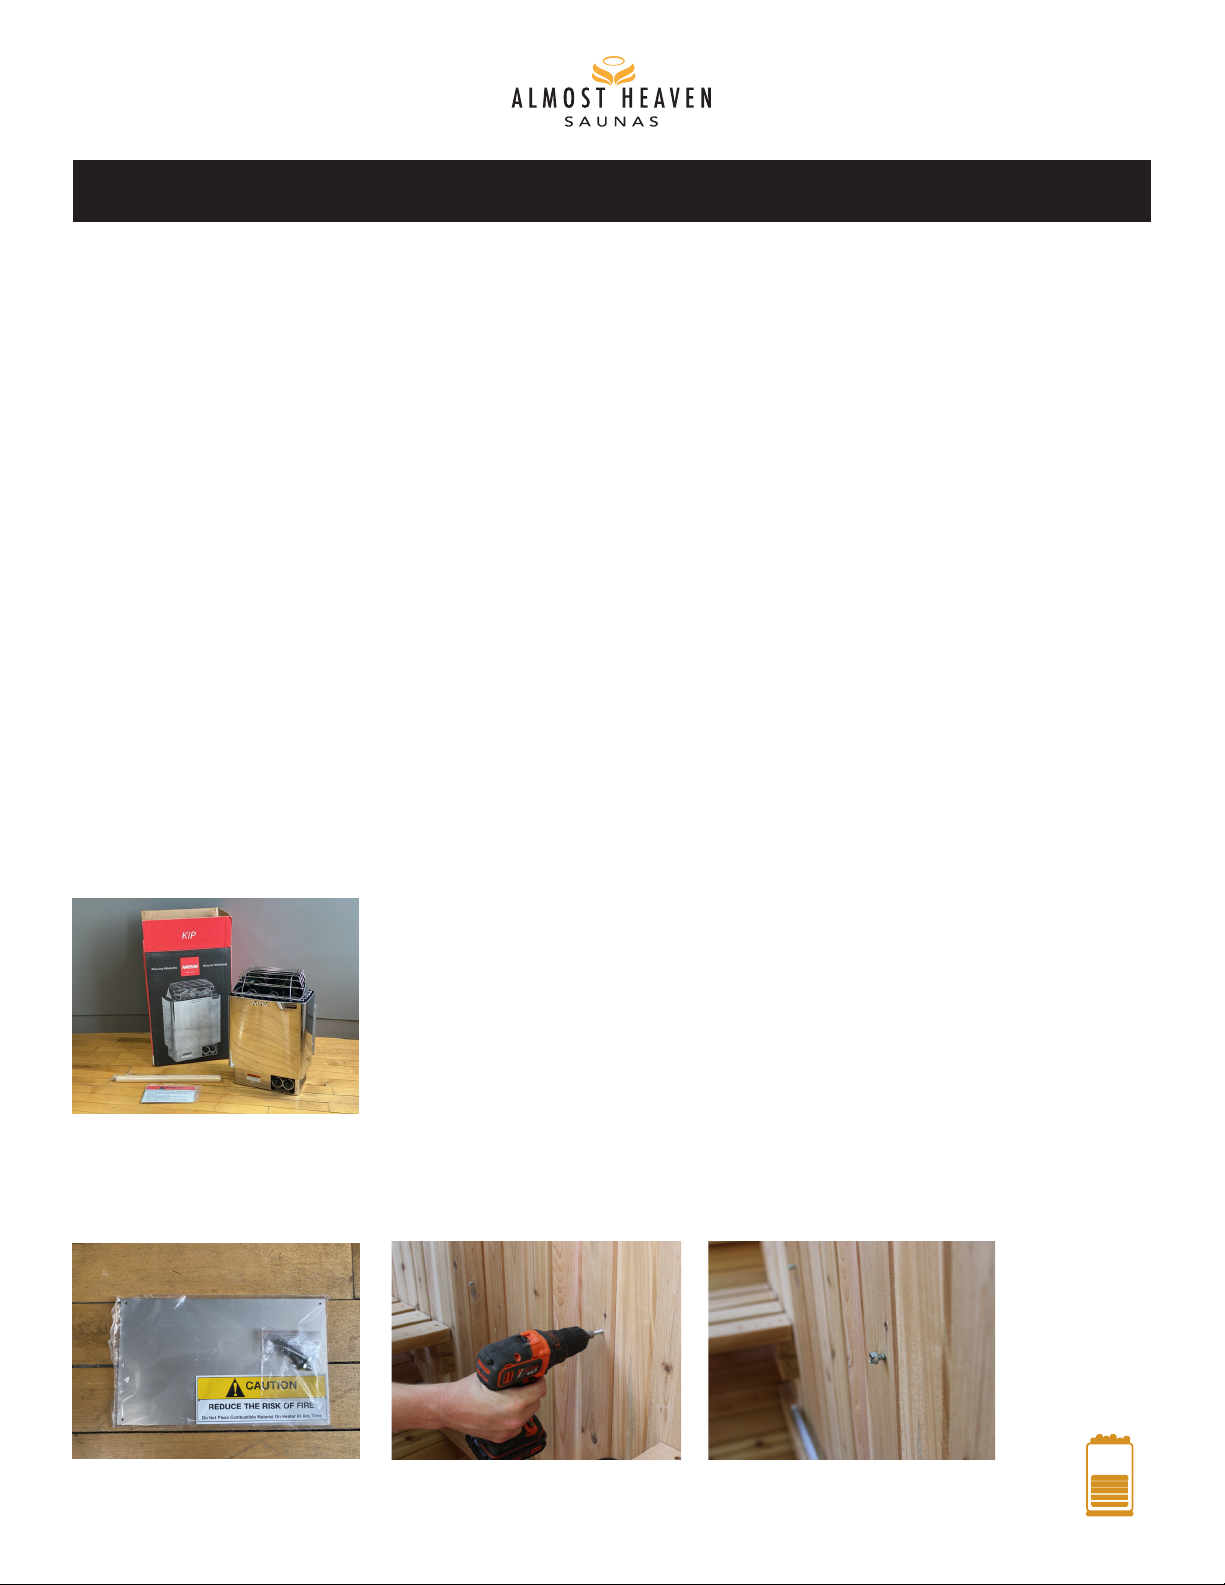
Unpackyourheater,settingasidethetrimpiecesandbagwithplacardsandscrews(1).
Removethehardwarebagfromthebaggiewiththesafetyplacards(2),selectingthetwolongerlagscrews(1.5”).Youwillsecure
theseintothesaunawallsothat¼”ofthescrewprotrudesfromthewall(3,4).
page2
Image1
Image2 Image3 Image4

a. For barrel saunas,theheatermountingholesarepre-drilled(5).
b. For indoor saunas,thescrewsshouldbemounted22”otheoor,andspaced15.25”apartapproximatelycenteredabovethe
ventholes(ifpresent).Itisnethattheheateriscoveringtheholesasventilationstilloccurs(6).
Hangtheheateronthemountingscrewstoensureitislevelandthatitsbasesits5-7”otheoorofthesauna.
If these criteria are met, make a mark on the wall of the sauna directly behind one of the rubber gaskets on the lower back of the
heater(7);thiswillbewherethepowerentersthesauna.Taketheheaterothewallandremovetherubbergasket,exposingthe
cutout.Itdoesnotmatterwhichgasketisremoved(8).
NOTE: While this location is the most common, the power can enter the sauna at any location. It is not recommended you use the
pre-drilled vent holes as an entrance for the conduit.
REMOVING THE STONE GUARD AND BOTTOM COVER
Removethetwoscrewsholdingthestoneguardinplace.Prytheguardbackandliftuptoremoveit.Cliptheziptieholdingthe
metalsensorhousingfromtheelementsandsetitasideforlaterinstallation(9–11).
KIP HEATER INSTALLATION MANUAL
page 3
Image 7 Image 8
Image 5
Image 6
Image9 Image10Image11
Pre-drilled holes
22”
15 ¼ ”

Fliptheheateronitsbackandremovethebottomcover.Locatethe4”temperaturesensor,uncoilingthelamentandwiringit
outthesmallnotchatthebaseoftheheater.Setthesensorasideforlaterinstallation(12–14).
CONNECTING TO POWER
All wiring should be done by a licensed electrician.
Boreaholeatthemarkyoumadeinstep2,beingsureitiswideenoughtoaccommodatethewire(15).Feedthewirethroughthis
holeandthenthroughthecutoutatthebaseoftheheater(16).Beingsurethebreakeriso,connectyourheatertopoweraccording
tothediagrambelow.TheonlyconnectionsthatshouldbemadearetwohotlinestoL1andL2,andthegroundlinetotheground
screw(17).Replacethebottomcoveroncewiringiscomplete,andrehangtheheateronthescrews(18).Turnthebreakeron.
KIP HEATER INSTALLATION MANUAL
page 4
Image12 Image13Image14
Image15 Image16Image17Image18
Image19
L1 L2 GND
Temperature
Sensor
NOTE: Thepowershouldnot enter the heater
throughthecutoutonthebottomcover–this
cutout is to allow access to the high-limit reset
button(19).

OPERATING THE HEATER
This heater is operated using two dials – the thermostat and the timer.
Thermostat (left) controls the temperature of the sauna. Set it according to your personal preference.
Timer (right) turns the heater on and o, and has the ability to delay the start.
If the heater has power, you should hear a loud “clunk” at both the 0 and the large 1. In between these “clunks” is one hour of heat time.
Toimmediatelyturntheheateron,werecommendturningthedialpastthetwoclunkstonumber1or2.Turnthetimerbackuntil
oneloud“clunk”isheard,immediatelystoppingtheturn.Thiswillbegintheonehourofheattime.
Theheaterwillautomaticallyshutoafteronehour.Youmayhavetorestartyourheaterwhileyouareinthesauna.
Thesmallernumbers1-8refertothenumberofhoursforthedelaystart.Forexample,ifyouturnthetimerto5,yourheaterwill
begin heating in ve hours.
Withyoursaunadooropen,turnonyourheaterforveminutestoallowthenon-toxicprotectivecoatingontheheating
elementsto“burno”.Itisnormaltoseesomelightsmokeasthiscoatingburnso.
PLACING THE STONES
While the heater is cooling, rinse your sauna stones to prepare them for placement.
Placethesmallerstonesinbetweenandaroundthethreeheatingelements.Thestonesshouldtouchtheelements,butnotbend
them. Reserve the larger stones for placement on top of the heating elements, covering them completely. Replace the stone
guard(21,22).
NOTE:Packingstonesintootightlywillrestrictairowandaecttheeciencyofyourheater.Looselypositionthestonesaround
andabovetheheatingelements.Itiscommontohave5-10stonesleftover.
KIP HEATER INSTALLATION MANUAL
page 5
Image21 Image22
P
R
E
S
E
T
.
.
.
D
E
L
A
Y
S
T
A
R
T

TEMPERATURE SENSOR PLACEMENT
Mountthesensorhousing(themetalcomponentziptiedtotheelementsinstep1)vertically,atleast18”tothesideoftheheater
and18”belowthehighestpointofthesauna.Ifitistoohighonthewallortooclosetotheheater,itwillsensethatthesaunais
hotterthanitactuallyis,triggeringaprematureshuto(23).
Placethesensorpininthehousingwiththebulbuprightandclosethewingsofthehousingoverthesensorpin(24,25).
Concealthesensorhousingandpinwiththesensorcoverandprovidedscrew(26).
Concealthesensorwirewiththegroovedtrimpiecesfromstep1(27).Youwilllikelyhavetocutseveraltrimpiecestotthedistance
betweenyourheaterandthesensorpin.Mountthemwiththescrewsprovidedinthehardwarebaggieyouremovedinstep1.
INSTALLING THE HEATER GUARD
YourKIPheatercomeswithacedarheaterguard.Usetheprovidedhardwaretoassemblethefencecomponentstogether(28-31),and
secureittothewallsothatitevenlysurroundstheheater(32).Itshouldbepositionednohigherthantheexposedsaunastones.
KIP HEATER INSTALLATION MANUAL
page 6
Image24 Image25Image26
Image23
Image28 Image29Image30Image31Image32
18”
18 ”
Image27

USING YOUR SAUNA HEATER
Yoursaunahasbeenpairedwithanappropriatelysizedheatertoconsistentlyachievetemperaturesof180°-195°F.Youshould
expectyoursaunatobeatauseabletemperaturein45-60minutes.
You have the option to pour water onto the stones to generate steam. Please note, little water is required to achieve this. For most
saunausers,aladlefullofwaterissucient.Iftoomuchwaterispouredontothestones,itwilldripoutthebaseoftheheaterand
should be wiped up with a towel after the sauna session.
If you’d like to continue the sauna session after the automatic one hour shuto, simply restart the heater.
Consultyoursaunamanualforthetypicalsaunaroutine,andenjoy!
TROUBLESHOOTING
If the sauna heater does not operate after the initial installation:
Checkthebreakertobesureitison
Verifywithyourelectricianthat240voltsisreachingtheheater
Doublecheckthatthetimerisbeingoperatedcorrectly(refertoinstructionsinstep5)
If the sauna heater operates but the sauna room does not come to temperature:
Verify the timer has not timed out. If it has, restart it.
Assesshowthestonesareplacedaroundtheheatingelements.Iftheyarepackedtootightly,itwillrestrictairowandaectthe
eciencyofyourheater.Repositionthestonesifneeded.
Checkthepositionofthetemperaturesensor(refertostep7a).Ifitistoohighinthesaunaortooclosetotheheater,itwilltrigger
a premature shuto in your heater.
Pressthehighlimitresetbuttonbelowtheheater–itmayneedresetting.
If none of the above recommendations get your heater working, please call Almost Heaven Saunas at 888-355-3050 to diagnose
further.
KIP HEATER INSTALLATION MANUAL
page 7

KIP Heater Installation & Owner’s Manual
almostheaven.com
Inhaltsverzeichnis
Andere Almost Heaven Saunas Heizung Handbücher

Almost Heaven Saunas
Almost Heaven Saunas Harvia Bedienungsanleitung

Almost Heaven Saunas
Almost Heaven Saunas Cilindro Xenio HPCS6U1H Betriebsanleitung

Almost Heaven Saunas
Almost Heaven Saunas Virta HL6U1 Betriebsanleitung

Almost Heaven Saunas
Almost Heaven Saunas Harvia Bedienungsanleitung

Almost Heaven Saunas
Almost Heaven Saunas KIP-30-B1/FLB-30 Betriebsanleitung
Beliebte Heizung Handbücher anderer Marken

Empire Heating Systems
Empire Heating Systems WCC65 Bedienungsanleitung

Wetekom
Wetekom 92 86 43 Bedienungsanleitung

Desa
Desa SPC170-F Bedienungsanleitung

Watlow
Watlow Watrod Electric Tubular Heaters Bedienungsanleitung

Haverland
Haverland ECO-DRY GPS Series Stücklistenhandbuch

Stelpro
Stelpro ASILVC2060 Series Bedienungsanleitung