AU Optronics G229HAF02.0 Bedienungsanleitung

LCD Display
LCD Display LCD Display
LCD Display
USER MANUAL
USER MANUALUSER MANUAL
USER MANUAL
G229HAF0
G229HAF0G229HAF0
G229HAF02
22
2.0
.0.0
.0
V1.0
V1.0V1.0
V1.0

2
22
2 | « Table f Contents »
Table f Contents
Table f ContentsTable f Contents
Table f Contents
SAFETY INSTRUCTI NS
SAFETY INSTRUCTI NSSAFETY INSTRUCTI NS
SAFETY INSTRUCTI NS
................................
................................................................
......................................................
............................................
......................
3
33
3
Declarations and Statements .......................................................... 4
WHAT’S IN THE B X
WHAT’S IN THE B XWHAT’S IN THE B X
WHAT’S IN THE B X
................................
................................................................
............................................................
........................................................
............................
6
66
6
Package Contents .............................................................................. 6
M VING THE DISPLAY
M VING THE DISPLAYM VING THE DISPLAY
M VING THE DISPLAY
................................
................................................................
.........................................................
..................................................
.........................
7
77
7
Unpacking the Display ...................................................................... 7
Carrying the Display ......................................................................... 9
Placing the Display ............................................................................ 9
Setting Down the Display ................................................................ 9
M UNTING THE DISPLAY
M UNTING THE DISPLAYM UNTING THE DISPLAY
M UNTING THE DISPLAY
................................
................................................................
.................................................
..................................
.................
10
1010
10
rienting the Display ..................................................................... 10
Wireless Antenna ............................................................................ 11
Wall Mount Specifications ............................................................. 11
SETTING UP THE DISPLAY
SETTING UP THE DISPLAYSETTING UP THE DISPLAY
SETTING UP THE DISPLAY
................................
................................................................
.................................................
..................................
.................
12
1212
12
Main Components ........................................................................... 12
Connecting the Power Cable ....................................................... 13
C NNECTING THE DISPLAY
C NNECTING THE DISPLAYC NNECTING THE DISPLAY
C NNECTING THE DISPLAY
................................
................................................................
...........................................
......................
...........
14
1414
14
Using the Micro-USB Port ............................................................ 14
Connecting a Second Display ....................................................... 15
Connecting to Wireless Internet ................................................. 16
Connecting to the Internet via a Wired Connection ............. 17
H ME SCREEN
H ME SCREENH ME SCREEN
H ME SCREEN
................................
................................................................
................................................................
................................................................
.....................................
..........
.....
18
1818
18
SETTINGS
SETTINGSSETTINGS
SETTINGS
................................
................................................................
................................................................
................................................................
...............................................
..............................
...............
19
1919
19
Adjusting the brightness ................................................................ 20
Changing the Display’s Language ................................................. 21
Changing the Date and Time ........................................................ 22
INSTALLING APPS
INSTALLING APPSINSTALLING APPS
INSTALLING APPS
................................
................................................................
................................................................
................................................................
.................................
..
.
2
22
23
33
3
PR DUCT SPECIFICATI NS
PR DUCT SPECIFICATI NSPR DUCT SPECIFICATI NS
PR DUCT SPECIFICATI NS
................................
................................................................
............................................
........................
............
24
2424
24

« SAFETY INSTRUCTI NS » |
3
33
3
SAFETY INSTRUCTI NS
SAFETY INSTRUCTI NSSAFETY INSTRUCTI NS
SAFETY INSTRUCTI NS
Please carefully read through and keep the following instructions for future reference before using
the display.
•
Before using the LCD display, please read this manual completely and follow the guidelines to
protect your own and other people’s property and avoid causing serious injury.
•
D N T use this apparatus near water or install in a high-humidity environment.
•
D N T place this apparatus in direct sunlight or install near any heat sources (such as
radiators, heat registers, or stoves).
•
D N T block any ventilation openings. Always leave a space of at least 10cm around this
apparatus. The slots and openings are provided to protect the display from overheating and to
help maintain reliable operation of the display.
•
NEVER place this apparatus on an unstable cart, stand, bracket, or table. It may cause serious
personal injury, death, or serious damage to the display.
•
When positioning the display, make sure the power plug and outlet are easily accessible and
protect the power cord from being walked on or pinched.
•
D N T overload the wall outlets and connect too many appliances to the same AC power
outlet.
•
D N T use any unapproved items or cables to connect to this apparatus.
•
D N T defeat the safety purpose of the polarized or grounding type plug.
•
NLY USE accessories specified by the manufacturer.
•
Clean only with a dry cloth and turn the power off before cleaning.
•
Keep this apparatus and all package contents (including the EPE foam packaging cushion and
protective board) out of the reach of children at all times.
•
Never attempt to repair or open the display by yourself. pening and removing the covers
may expose you to dangerous voltage or other hazards. Failure to follow this WARNING may
result in death or serious injury. Please contact your dealer or a service technician for
assistance.
•
To much screen time may hurt your eyesight. Rest your eyes for 10 minutes after 30 minutes
screen time.
•
Kids under 2 years old should not watch the screen, and kids over 2 years old should not
watch the screen for more than 1 hour per day.
WARNING
WARNINGWARNING
WARNING
:
::
:
If using a Class 1 adapter, connect only to a grounded electrical outlet.
Consult an authorized service technician if the display does not operate normally when you have
followed the instructions in this manual.

4
44
4 | « SAFETY INSTRUCTI NS »
Declarations and Statements
Declarations and StatementsDeclarations and Statements
Declarations and Statements
CE statement:
CE statement:CE statement:
CE statement:
EU Declaration of Conformity
EU Declaration of ConformityEU Declaration of Conformity
EU Declaration of Conformity
We, AU ptronics Corporation, declare that this product complies with the following Directives:
2014/35/EU
2014/53/EU
And the following standards have been applied:
EN 60950-1:2006+A1:2010+A11:2009+A12:2011+A2:2013
EN 62311:2008
EN 300 328 V2.1.1
EN 301 489-1 V2.1.1
EN 301 489-17 V3.1.1
Important:
Important:Important:
Important:
- This product must not be used in residential areas.
- This product may cause interference if used in residential areas. Such use must be avoided unless the user takes special measures
to reduce electromagnetic emissions to prevent interference to the reception of radio and television broadcasts.
The frequency and maximum transmitted power in EU are listed as below:
2412 – 2472 MHz: 17.98 dBm
MSIT (Ministry of Science and ICT) Statement
MSIT (Ministry of Science and ICT) StatementMSIT (Ministry of Science and ICT) Statement
MSIT (Ministry of Science and ICT) Statement
Name of the company: AU ptronics Corporation
Name of equipment (model name): LCD monitor (G229HAF02.0)
Date of manufacture: 2019.07
Manufacturer/Country of origin: AU / made in China
Services related to personal safety may not apply since radio interference may be caused by the wireless equipment.
This device has been evaluated for business use. If this device is used in home environments, radio interference may occur.
FCC (
FCC (FCC (
FCC (Fe
FeFe
Federal Communications Commission
deral Communications Commissionderal Communications Commission
deral Communications Commission)
))
)
Statement
StatementStatement
Statement
This device complies with Part 15 of the FCC Rules. peration is subject to the following two conditions: (1) this device may not
cause harmful interference, and (2) this device must accept any interference received, including interference that may cause
undesired operation.
15.21
15.21 15.21
15.21
You are cautioned that changes or modifications not expressly approved by the party responsible for compliance could void your
authority to operate the equipment.
15.105
15.105 15.105
15.105
This equipment has been tested and found to comply with the limits for a Class A digital device, pursuant to Part 15 of the FCC
Rules. These limits are designed to provide reasonable protection against harmful interference when the equipment is operated in a
commercial environment. This equipment generates, uses, and can radiate radio frequency energy and, if not installed and used in
accordance with the instructions manual, may cause harmful interference to radio communications. peration of this equipment in a
residential area is likely to cause harmful interference in which case the user will be required to correct the interference at his own
expense.
Radiation Exposure
Radiation Exposure Radiation Exposure
Radiation Exposure Statement
StatementStatement
Statement
This equipment complies with FCC radiation exposure limits set forth for an uncontrolled environment.
This equipment should be installed and operated with minimum distance 20cm between the radiator & your body.

« SAFETY INSTRUCTI NS » |
5
55
5
Declaration of the Presence Condition of the Restricted Substances Marking
Declaration of the Presence Condition of the Restricted Substances MarkingDeclaration of the Presence Condition of the Restricted Substances Marking
Declaration of the Presence Condition of the Restricted Substances Marking
Equipment Name: LCD Display Type Designation (Type): G229HAF02.0
Unit
Restricted substances and its chemical symbols
Lead
(Pb)
Mercury
(Hg)
Cadmium
(Cd)
Hexavalent
chromium
(Cr
+6
)
Polybrominated
biphenyls
(PBB)
Polybrominated
diphenyl ethers
(PBDE)
Printed circuit
board
-
○
○
○
○
○
Cover
○
○
○
○
○
○
LCD Panel
○
○
○
○
○
○
Power cable
-
○
○
○
○
○
Note 1
:
“Exceeding 0.1 wt %” and “exceeding 0.01 wt %” indicate that the
percentage content of the restricted substance
exceeds the reference percentage value of presence condition.
Note 2:
○
“ ” indicates that the percentage content of the restricted substance does not exceed the percentage of reference
value of presence.
Note 3:
−
The “ ” indicates that the restricted substance corresponds to the exemption.
AU ptronics Corporation (AU )
Address: No. 1, Li-Hsin Rd. 2, Hsinchu Science Park, Hsinchu 30078, Taiwan, R. .C.

6
66
6 | « WHAT’S IN THE B X »
WHAT’S IN THE B X
WHAT’S IN THE B XWHAT’S IN THE B X
WHAT’S IN THE B X
Package Contents
Package ContentsPackage Contents
Package Contents
Check your product box for the following items. If there are any missing accessories, contact the
local dealer where you purchased your display. The illustrations in this manual may differ from the
actual product and items.
Display x 6
Adapter x 6
Power Cord x 6
Micro-HDMI Cable x 6
Type-C USB Cable x 6

« M VING THE DISPLAY » |
7
77
7
M VING THE DISPLAY
M VING THE DISPLAYM VING THE DISPLAY
M VING THE DISPLAY
Unpacking the Display
Unpacking the DisplayUnpacking the Display
Unpacking the Display
Before unpacking the display, prepare a flat and stable surface near a wall outlet. Set the product
box in an upright position according to the arrow markings on the outside of the product box.
1.
1.1.
1. pen the product box from the top side.
2.
2.2.
2. Remove the top EPE cushion.
3.
3.3.
3. Remove two sets of accessories from the side compartments in the top layer.

8
88
8 | « M VING THE DISPLAY »
4.
4.4.
4. Remove two displays, one by one, from the center compartment of the top layer.
5.
5.5.
5. Remove the cardboard and EPE foam base of the top layer.
6.
6.6.
6. Repeat steps 3 to 5 for the second layer.
7.
7.7.
7. Repeat steps 3 to 4 for the third layer.
8.
8.8.
8. Remove the electrostatic bags covering each display.

« M VING THE DISPLAY » |
9
99
9
Carrying the Display
Carrying the DisplayCarrying the Display
Carrying the Display
When carrying the display, always
hold
the display securely using
both hands. When gripping the display do not put force to the
screen.
CAUTI N:
CAUTI N:CAUTI N:
CAUTI N:
Avoid applying force or using sharp objects on the
screen
at all times.
Placing the Display
Placing the DisplayPlacing the Display
Placing the Display
When placing the display, always put the screen face down as
illustrated in the Setting Down the Display section. Never stand the
display upright. Never tilt the display towards the left, right or
balanced on a single corner of the frame.
Setting Down the Display
Setting Down the DisplaySetting Down the Display
Setting Down the Display
When setting the display down, place the screen face down on a flat and stable surface covered by a
protective sheet and a table cushion as shown in the illustration provided.
CAUTI N:
CAUTI N:CAUTI N:
CAUTI N:
Never press or place anything on the back cover. This may damage the
internal parts of the display.
1
11
10
00
0 | « M UNTING THE DISPLAY »
M UNTING THE DISPLAY
M UNTING THE DISPLAYM UNTING THE DISPLAY
M UNTING THE DISPLAY
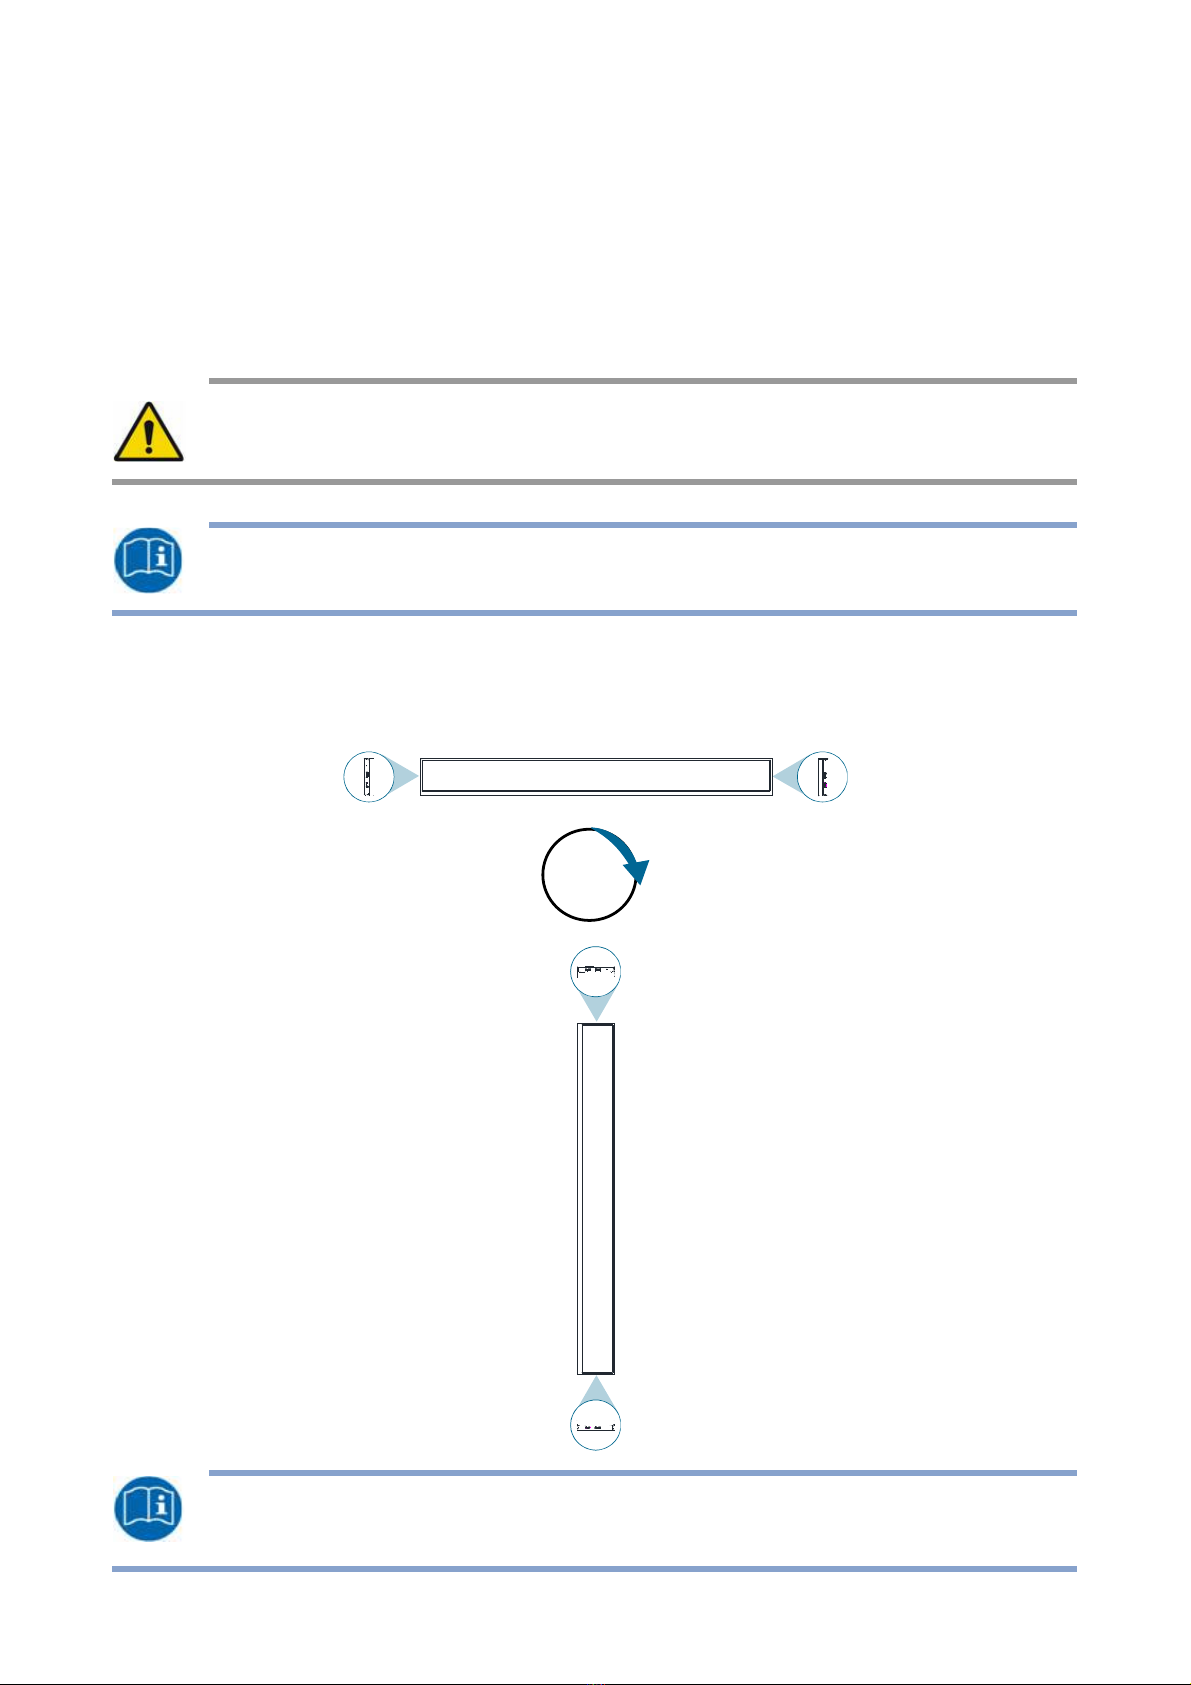
rienting the Display
rienting the Displayrienting the Display
rienting the Display
To avoid injuries, follow the installation instructions to safely install the display onto a wall.
It is recommended to allow a certified installation company conduct the wall mounting operation.
CAUTI N:
CAUTI N:CAUTI N:
CAUTI N:
Dropping the display may cause injuries to peop
le around it.
N TE:
N TE: N TE:
N TE: A wall mount may be purchased separately for easier installation.
If you want to use the display vertically or horizontally, adjust the display such that the output ports
on the back of the display are pointing downward and the input ports are pointing upward (as
illustrated below). If the display is not mounted in such a way the display may not function properly.
N TE:
N TE: N TE:
N TE: Before mounting, make sure there is space to connect your devices.
See “C NNECTING THE DISPLAY” on page 14.
90°
Inhaltsverzeichnis


