Autostopcock Plus Bedienungsanleitung

Autostopcock Plus
Ver 9c
© Autostopcock 2023
User Manual
English

QUICK START GUIDE
2
1
2
4
3
KEY
+
-
5V
SIG
GND
www.FlowReporter.com
SIG
GND
Or search FlowReporter
See p12
5s

CONTENTS
3
4Introduction
5Installation guide
Overview .....................................................................................................................5
Item checklist.............................................................................................................6
Before you begin ........................................................................................................7
Plumbing instructions................................................................................................8
Wall-mounting instructions .....................................................................................10
Wiring instructions...................................................................................................11
Connecting to the internet.......................................................................................14
17 User manual
Autostopcock Plus Base .........................................................................................17
Using the buttons and LEDs....................................................................................18
Oine mode .............................................................................................................19
Overview of software...............................................................................................21
Dashboard ................................................................................................................22
Congure Base.........................................................................................................23
Graphs.......................................................................................................................24
Device settings.........................................................................................................25
Thresholds and alerts..............................................................................................27
Sharing access.........................................................................................................28
29 Troubleshooting
30 Specications
31 Maintenance
32 Technical support

4
INTRODUCTION
Online capability
WARNING
First of all, thank you - you have made an excellent decision to go with Autostopcock Plus, the
complete online water management and leak detection system. A solid investment for the future of
your water.
Using Autostopcock Plus, water consumption can be visualised anytime from anywhere in the world.
If a leak is detected, an alert is immediately sent to the user via email. If desired, Autostopcock Plus
can automatically shut off the water supply, so no water damage is caused in the event of a leak.
The Autostopcock Plus Base (pictured) is mains supplied and contains the connection to the
Internet via WiFi. It can connect a meter, a valve, and a leak cable, as well as support for BMS inputs
and outputs. For water monitoring only (no valve), up to 4 meters can be supported to measure the
water ow through 4 different pipes. Using 1 meter, a valve can also be connected to turn off the
water supply. Almost any pipe size is accepted, and meters/valves supplied by Autostopcock come
in standard sizes.
You will manage and monitor your Autostopcock Plus online
using an app called FlowReporter.
Download the app from the iOS or Play store.
Register for your account at www.FlowReporter.com.
If equipment is installed or used in a manner not specied in this document,
the product may not work as expected, and the leak protection capabilities
may be impaired. Please contact us if you have any problems or are unsure.
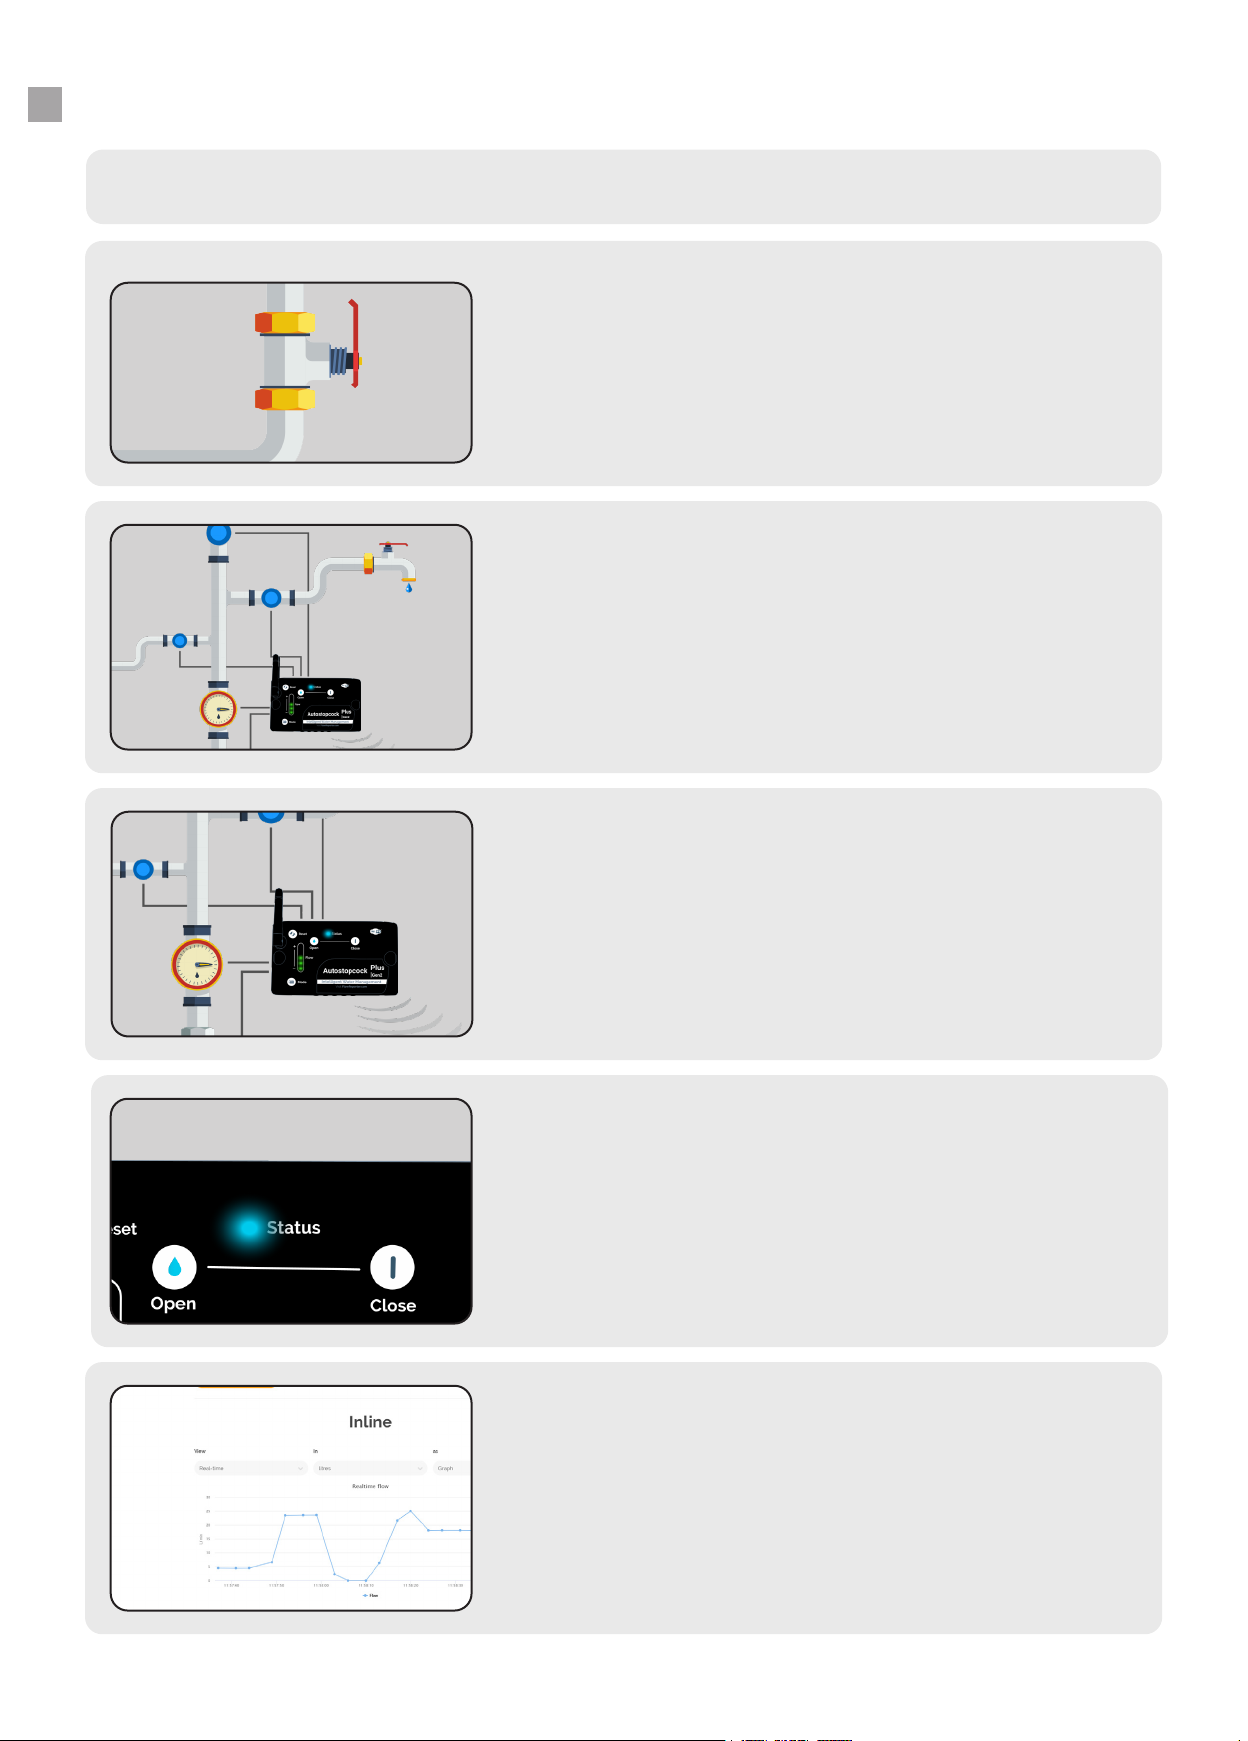
Find the stopcock
Decide where the Autostopcock Plus will be placed - this
will normally be just after the stopcock, where the water
enters the building. This will usually be coming up from the
ground.
1.
Install the Base
Choose a location to mount the Base and check WiFi
connectivity. Wire the cables from the meter(s) and valve to
the Base, making sure to use the cable grip. Screw on the
front of the Base, clip in the inserts which hide the screws,
and then connect the power adaptor.
3.
Test online
Run a nearby tap. Online, select the name of your new Base,
and then click “Close valve”. A few seconds later, the water
will stop owing. Click “View” then “Real time” then “Open
valve”. You will see the graph change as the water is turned
back on.
5.
Install valve and meter
Make sure the valve (optional) and meter are facing the
correct way (arrow pointing in the direction of ow) and
install in the proposed location.
2.
Connect to WiFi
With the “Status” light ashing blue, use your smartphone
to login to FlowReporter and select “Register new Base”.
Follow the on-screen instructions. Congure the Base
online by selecting the ttings used in the above step.
4.
5
INSTALLATION GUIDE
Overview

Lithium-ion rechargable battery giving
at least 24 hours of operation during a
power outage.
Backup battery (optional)
To extend the reach of the
power adaptor by 3m.
Autostopcock Plus Base front
Power adaptor
Autostopcock Plus Base back
box
Water meter
Cable grip, screws and inserts
Valve
With integrated circuit board.
Standard mains DC power
adaptor.
Wall mountable.
To measure water ow.
Different sizes are specied on
page 12.
To fasten cables, battery and
enclosure, and increase the
visual appeal.
To turn off water ow.
Different sizes are specied on
page 12.
Item checklist
6
INSTALLATION GUIDE
DC extension cable (optional)

7
INSTALLATION GUIDE
Before you begin
The Base uses WiFi to communicate over the internet, and requires mains power.
Before installing, decide where the Autostopcock Plus Base will be located:
●Within 3 meters of plumbed ttings,
●Within 1 meter of a 100-240V 50/60 Hz mains socket,
●Within range of WiFi (use your mobile phone to check for WiFi signal). Also ensure you have
access to the name of the WiFi connection and password.
If WiFi is not available, a standard 3G router can be supplied to provide the wireless connection. Data rates are 4MB
per day as a maximum.
Location Power WiFi
The Base should be wall-
mounted and located no more
than 3 meters aways from
plumbed ttings.
The Base should be located no
more than 1 meter away from a
mains plug socket.
The Base should be located
within range of WiFi. Use a
smartphone to check the
connection is at least 2 bars.
<1m
< 3m
Tools required
●Phillips head screwdriver
●Pipe cutter (suitable for your pipe size)
●Adjustable wrench/spanner (suitable for your plumbing ttings)
●PTFE tape and/or rubber washers
●Drill (if wall mounting)

INSTALLATION GUIDE
8
Plumbing instructions
1. Choose location for meter and valve. They will usually be installed together, but try
to place the meter as far upstream as possible.
The optimum conditions for placement of
a meter are as follows:
a) Straight length of 10 pipe diameters
upstream
b) Straight length of 5 pipe diameters
downstream
c) Direction of ow travelling upwards
Of course, it is usually very dicult to
conform to all of these so if you don’t manage it, do not worry, the meter will still
work but very low ows may not get caught and accuracy will slightly decrease.
2. Assemble all ttings.
With pusht ttings, use a rubber washer to make
watertight connections. Make sure the rubber
washer is clean, and hand tighten.
With compression ttings, use about 20 turns of
PTFE tape around the thread (wrapping around
clockwise), and then use a wrench to tighten.
Watertight connections between the valve and
meter can easily be achieved using 3 rubber
washers or 25 turns of PTFE tape.
If you are in any doubt, we recommend
professional installation by a qualied
plumber.

INSTALLATION GUIDE
Plumbing instructions (continued)
9
3. Turn the water supply off and drain the system (or up until the next
stopcock downstream).
4. Remove any dried paint on the pipes where the connections will be tted.
5. Plumb in the ttings, making sure the arrows on the ttings match the
direction of water ow. For the best accuracy, if using a solenoid valve,
it should be placed downstream of meter. Motorised valves are direction
independent.
6. Make sure the pipes and ttings are assembled securely, and turn the
water supply on.
7. Check for leaks and tighten any ttings.
8.
Optional: Earth bond either side of the installation together if necessary. Ask a
qualied electrician if you are unsure.
9.
Optional: Re-lag the pipework for insulation against freezing.

INSTALLATION GUIDE
10
Wall-mounting instructions
Autostopcock Plus should be wall mounted with 5mm screws at a minimum. Make
sure the appropriate wall plugs are used and that the length of the screws are not long
enough to protrude the other side of the wall.
A standard 2-gang pattress back box commonly found with merchants can also be
used to ush mount the device. If a 2-gang pattress is used, make sure it is 25mm or
deeper and do not overtighten the front screws.
The Autostopcock Plus Base and its power supply are not waterproof and should be installed in
an appropriately safe place. The plug socket should remain accessible after installation in case of
emergency.
1. Position the Autostopcock Plus Base back
box on the wall. To ensure maximum WiFi
exposure, position the Base at least 30cm away
from metal objects, including pipes, and other
electronics.
2. Using the appropriate drill bit, drill through the
plastic enclosure and wall.
3. Remove the Autostopcock Plus Base back box
and insert wall plugs.
4. Replace the Autostopcock Plus Base back box
and screw into the wall plugs.
Alternatively, you could also simply hang the
backbox with screws 90mm apart.
After mounting and wiring, use the small
inserts to cover any unused holes, and the
larger inserts to cover the 2 screw holes on
the front. If these need to be removed, use a
small athead screwdriver to lift out.
Inhaltsverzeichnis
Andere Autostopcock Sicherheitssensor Handbücher


