AVM FRITZ!DECT 400 Kurzanleitung

DECT
400
Configuration
and Operation
AVM GmbH, Alt-Moabit 95, 10559 Berlin, Germany
en.avm.de
411365xxx

32
English .............................................. 4
Deutsch ............................................ 14
Español ............................................ 24
Français ............................................ 34
Italiano ............................................ 44
Nederlands ............................................ 54

Device Features
Position Name Function
1DECT connection button
For connecting with a FRITZ!Box.
For this, please note “Connect Again“
on page 8.
2Smart Home button
For triggering switch events.
For this, please not “Confguration in the
FRITZ!Box” on page 8.
3LED
Indicates that a Smart Home button has been
pressed.
Flashes during registration.
Flashes fast to indicate errors and during
updates.
Security
Operate FRITZ!DECT 400 in a dry
place that is free of dust.
FRITZ!DECT 400 is intended for
indoor use only.
Never let liquids get inside the
device.
Clean the device using a moist
cloth.
FRITZ!DECT 400
FRITZ!DECT 400 is a switch for
operating FRITZ! Smart Home
devices and can swtich devices like
FRITZ!DECT 200 and 210 individually
or in groups.
1 FRITZ!DECT 400 1 battery(CR123A / 3V)2 adhesive strips
Package contents
2
3
1
5
4

Starting Operation
Insert the battery in FRITZ!DECT
400 within 2 minutes. FRITZ!DECT
400 and your FRITZ!Box connect
with each other automatically.
Close FRITZ!DECT 400.
FRITZ!DECT 400 is ready for opera-
tion and can be configured. For this,
please note “Confguration in the
FRITZ!Box” on page 8.
Press the DECT button on your
FRITZ!Box and hold it down for 6
seconds.
1
2
3
4
Power/ DSL
WLAN
Fon/DECT
Connect/ WPS
Info
76

Confguration in the FRITZ!Box
1. Open a web browser.
2. Enter http://fritz.box in the address field.
3. Open the Home Network / Smart Home menu.
4. Click on behind your FRITZ!DECT 400.
5. Set up a switching event for FRITZ!DECT 400 on the <DEVICE NAME> tab.
Connect Again
To re-register FRITZ!DECT 400, or to register it with another FRITZ!Box, work
through the following steps:
1. Push the DECT connection button and hold it down until you hear a signal tone.
2. Within 2 minutes, hold the DECT button on your FRITZ!Box down for at least
6 seconds.
The connection will be established.
Status Display
In order to maximize the battery life, FRITZ!DECT contacts the FRITZ!Box only every
15 minutes to update its status.
Factory Settings
1. Press and hold down the DECT connection button.
2. Within 2 minutes, press the Smart Home button and hold it down until it beeps
twice.
The factory settings are restored to FRITZ!DECT 400.
Please note that FRITZ!DECT 400 will continue to be listed in the FRITZ!Box
user interface even after it has been reset. Delete FRITZ!DECT 400 there
manually if desired.
98

Sticking to the Wall
1
2
3
4
1110

Legal Notice
AVM declares herewith that the device is compliant with the basic requirements
and the relevant rules in directives 2014/53/EU, 2009/125/EC and 2011/65/EU.
The long version of the declaration of CE conformity is available at http://en.avm.de/ce.
Disposal
In accordance with European di-
rectives, FRITZ!DECT400 and its
battery may not be disposed with
household waste. Please bring
these to your local collection
points for disposal.
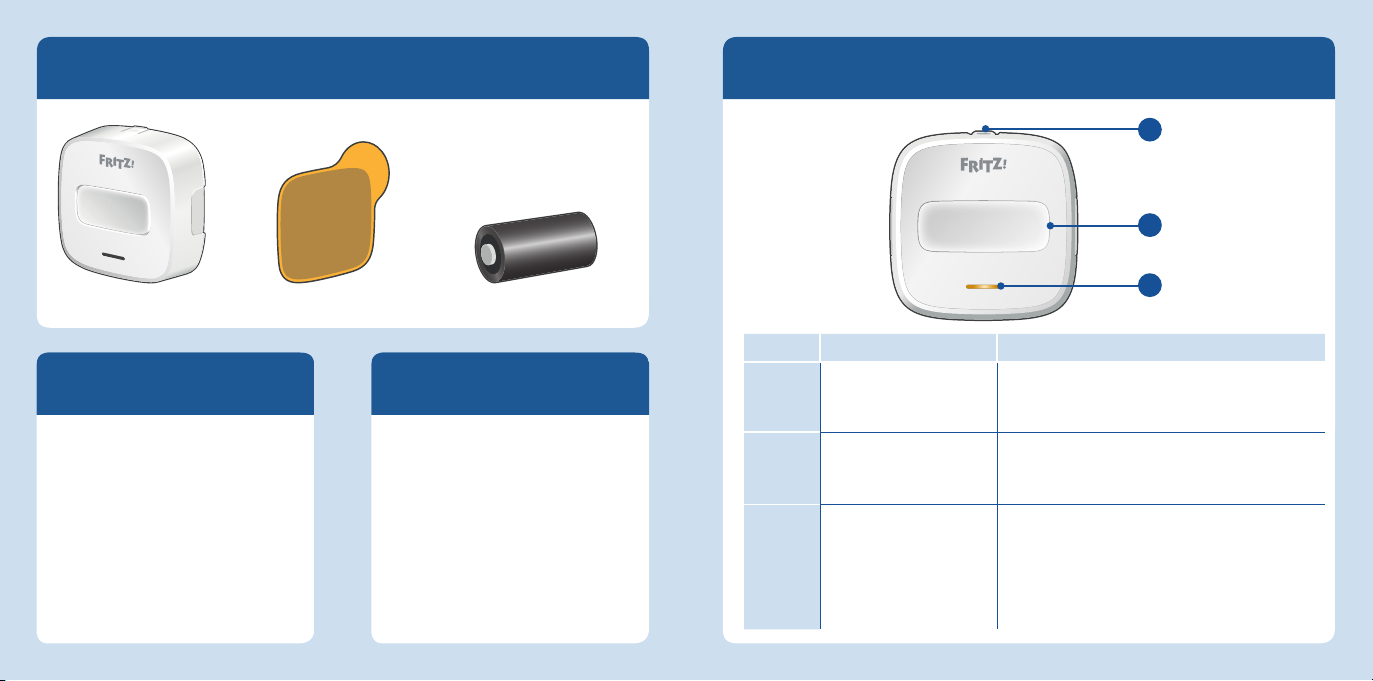
Technical specifications
Dimensions (W x H x D): approx. 52 x 52 x 27mm
Weight: 50 grams
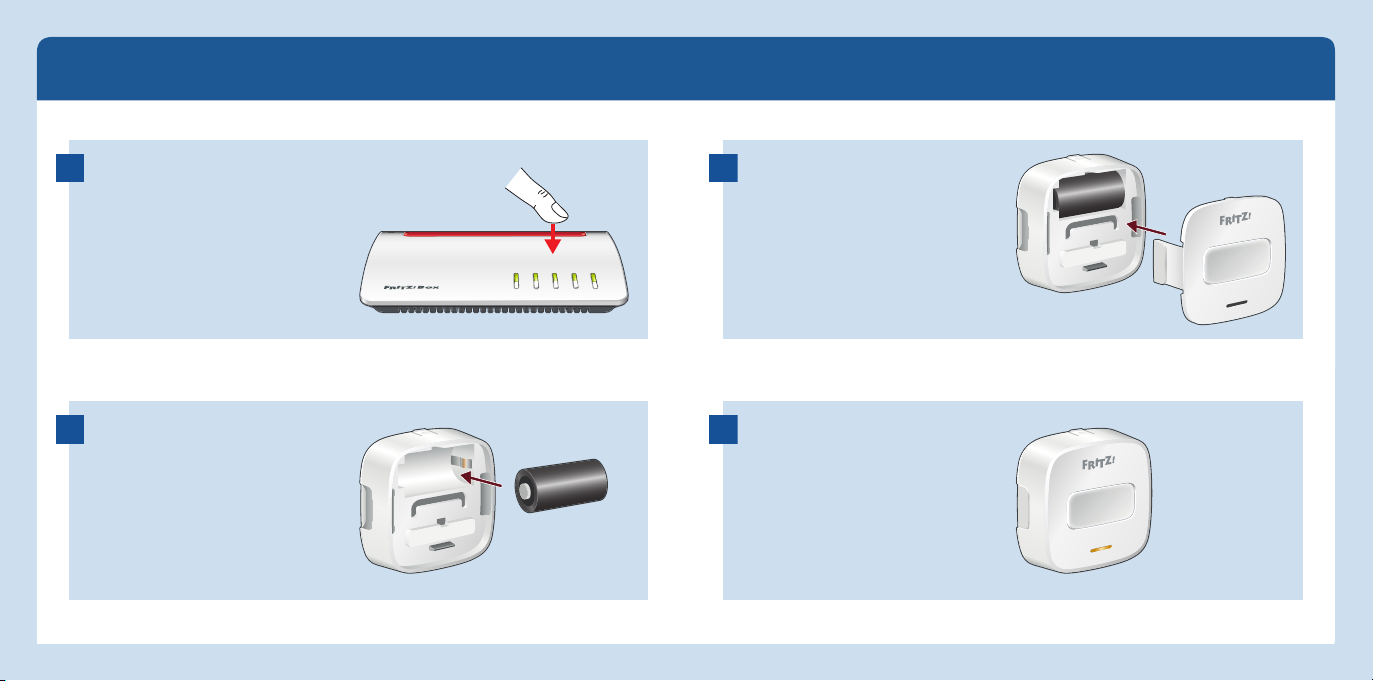
Battery operated with 1 x CR123A / 3V
Operational from 0 °C to 40 °C
Range: Up to 40 m indoors
Wireless standard: DECT
Frequency range: 1880MHz – 1900MHz
Maximum transmitter power: 250mW
Service
Service en.avm.de/service
Guide https://en.avm.de/guide/
Updates en.avm.de/nc/service/
downloads/
Support en.avm.de/service/support
Networks
Manufacturer’s Warranty
We offer a manufacturer’s warranty of 2 years for this original product. The warranty period begins with the purchase
date from the first end user. Compliance with the warranty period can be proven by submission of the original invoice or
comparable documents. This warranty does not restrict your warranty rights based on the contract of sale or other sta-
tutory rights. Within the warranty period, we will remove defects to the product which are demonstrably due to faults in
materials or manufacturing. Our warranty does not cover defects which occur due to incorrect installation, improper use,
non-observance of instructions in the operaring instructions, normal wear and tear or defects. We may, at our discretion,
repair or replace the defective product. Claims other than the right to the removal of defects which is mentioned in
these terms of warranty are not constituted. We guarantee that the software conforms with general specifications,
not, however, that the software meets your individual requirements. Delivery costs will not be reimbursed. Products
which have been replaced revert to our ownership. Claims recognized under warranty entail neither an extension or
recommencement of the warranty period. If we reject a warranty claim, this claim lapses no later than six months after
being rejected by us. This warranty shall be governed by German substantive law, to the exclusion of the United Nations
Convention on Contracts for the International Sale of Goods (CISG).
12

Lieferumfang Gerätemerkmale
Position Bezeichnung Funktion
1DECT-Verbindungstaste
Verbinden mit einer FRITZ!Box.
Beachten Sie dafür „Erneut verbinden“ auf
Seite 18.
2Smart-Home-Taste
Auslösen von Schaltvorgängen.
Beachten Sie dafür „In der FRITZ!Box einrich-
ten“ auf Seite 18.
3Leuchtdiode
Zeigt die Betätigung der Smart-Home-Taste.
Blinkt während der Anmeldung.
Blinkt schnell bei Fehlern und bei Updates.
Sicherheit
Betreiben Sie FRITZ!DECT 400 an
einem trockenen und staubfreien
Ort.
FRITZ!DECT 400 ist für die Ver-
wendung in Gebäuden vorgesehen.
Es dürfen keine Flüssigkeiten in
das Innere des Geräts eindringen.
Verwenden Sie für die Reinigung
ein feuchtes Tuch.
FRITZ!DECT 400
FRITZ!DECT 400 ist ein Taster für
die Bedienung von FRITZ! Smart-
Home-Geräten und kann Geräte wie
FRITZ!DECT 200 und 210 einzeln und
in Gruppen schalten.
1 FRITZ!DECT 400 1 Batterie (CR123A / 3V)2 Klebestreifen
2
3
1
15
14

In Betrieb nehmen
Legen Sie innerhalb von 2 Minuten
die Batterie in FRITZ!DECT 400 ein.
FRITZ!DECT 400 und Ihre FRITZ!Box
verbinden sich automatisch.
Schließen Sie FRITZ!DECT 400.
FRITZ!DECT 400 ist betriebsbereit
und kann eingerichtet werden.
Beachten Sie dafür „In der FRITZ!Box
einrichten“ auf Seite 18.
Drücken Sie die DECT-Taste Ihrer
FRITZ!Box für 6 Sekunden.
1
2
3
4
Power/ DSL
WLAN
Fon/DECT
Connect/ WPS
Info
1716

In der FRITZ!Box einrichten
1. Öffnen Sie einen Internetbrowser.
2. Geben Sie http://fritz.box ein.
3. Öffnen Sie das Menü Heimnetz / Smart Home.
4. Klicken Sie auf hinter Ihrem FRITZ!DECT 400.
5. Richten Sie auf dem Tab <GERÄTENAME> einen Schaltvorgang für
FRITZ!DECT 400 ein.
Erneut verbinden
Um FRITZ!DECT 400 erneut oder an einer anderen FRITZ!Box anzumelden, führen
Sie folgende Schritte aus:
1. Drücken Sie die DECT-Verbindungstaste und halten Sie sie gedrückt bis ein
Signalton erklingt.
2. Drücken Sie innerhalb von 2 Minuten für mindestens 6 Sekunden auf die
DECT-Taste Ihrer FRITZ!Box.
Die Verbindung wird hergestellt.
Statusanzeige
Um eine möglichst lange Batterielaufzeit zu erreichen, nimmt FRITZ!DECT 400
eigenständig nur alle 15 Minuten Kontakt zur FRITZ!Box auf und aktualisiert
den Status.
Werkseinstellungen
1. Drücken Sie die DECT-Verbindungstaste und halten Sie sie gedrückt.
2. Drücken Sie innerhalb von 2 Sekunden die Smart-Home-Taste und halten Sie
sie ebenfalls gedrückt bis ein Doppelton erklingt.
FRITZ!DECT 400 wird in die Werkseinstellungen zurückgesetzt.
Beachten Sie, dass FRITZ!DECT 400 nach dem Zurücksetzen weiterhin in der
FRITZ!Box-Benutzeroberfläche geführt wird. Löschen Sie
FRITZ!DECT 400 dort bei Bedarf manuell.
1918
Inhaltsverzeichnis
Sprachen:
Beliebte Sicherheitssystem Handbücher anderer Marken

EDM
EDM Solution 6+6 Wireless-AE Bedienungsanleitung

Highway Safety Group
Highway Safety Group EA401 Bedienungsanleitung

Siren
Siren LED GSM Bedienungsanleitung

Detection Systems
Detection Systems 7090i Montageanleitung

Se-Kure Controls
Se-Kure Controls MicroMini SK-4841 Bedienungsanleitung

Siemens
Siemens FDM273 Bedienungsanleitung


