Baumatic BW1000W Bedienungsanleitung

BW 1000W
BW 1200W
BWD 1300W

2
This appliance complies with the provisions of the 89/336/EC Directive
regarding electromagnetic compatibility and the 73/23/EC directive Low
Voltage regarding electrical safety and the 93/68/EC Directive for CE
marking.

3
1-SPECIFICATION
2- INSTALLATION
3- HANDLING
4- MAINTENANCE
5- CAUTIONS AND ADVICE
6- SAFETY FEATURES
7- CONTROLS
8- WASH PROGRAMME TABLE
INDEX

- Dimensions...........................................Height..................................85 cm
1 - SPECIFICATION
1.1 - Technical data
Width...................................60 cm
- Washing/Drying capacity.......................Cotton.....................5,5 kg/2,75 kg
Depth...................................55 cm
- Power supply voltage (m.f.)...............................................230 V ~ 50 Hz
- Maximum power consumption-washing/Drying................2.200 W/ 1.450 W
1.2 -Description of the washing machine & Washer-Dryer
- Water consumption, cotton
wash at 60ºC (without pre-w.)
- Energy consumption, cotton
wash at 60ºC (without pre-w.)
- Spin speed........................................................................
B- Detergent drawer
H- Filter door
L- Pilot lamp
P- Programme selector
T- Temperature selector
C- No spin push-button
R- 550/1000-1300 rpm push-button
U- Door opening handle
I- Adjustable feet
Y- Extra rinse push-button
- Energy consumption, drying (cotton 2,75 kg)...................................2 kWh
- Water consumption, drying (cotton 2,75 kg)........................................50 l
S- Drying time selector
X- ON/OFF push-button
4
Ap. 7 CONTROLS
M- Half load push-button
V- Spin speed selector
A- Rinse hand hold push-button
Wash/Dry
Synthetics...............2,75 kg/1,5 kg
Wool...........................1 kg
1wash cycle + drying .................................................5,03 kWh
{200 wash cycles + drying..........................................1.006 kWh
1wash cycle + drying..................................................150 l
200 wash cycles + drying.........................................30.000 l
{
1300
9.800 l
rpm
206 kWh
1cycle of wash...........
{200 cycles of wash......
1cycle of wash...........
200 cycles of wash.......
{
1,03 kWh
49 l
- Energy consumption
wash + 2 drying cycles
- Water consumption
wash + 2 drying cycles
1200
9.800
206
1,03
49
1000
9.800
206
1,03
49
- Models............................................................................BW 1000W BW 1200W BWD 1300W
B
U
H
I

2- INSTALLATION
2.1 - Removing transit bolts
Proceed as follows:
-Let the water run for a while before connecting the hose.
-Connect the water inlet hose applying the rubber joint provided in the fittings
equipment bag.
-Position the drainage hose inside a hose of a larger diameter, or rest it well
fastened against any kind of drain at the height indicated.
-Neither of the hoses should be twisted or kinked.
2.) Push with a screwdriver at an angle
in the screw holes until the four spacers
(H) fall.
2.2 -Plumbing connection
The "H" connection can only
be applied in those machines
fitted for this (Bithermical).
H- Hot water connection.
C- Cold water connection.
After removing the external packing
the drum must be released before the
machine is used.
This is done in the following manner:
1.) Unscrew and remove the four
screws A-B-C-D.
3.) It is very important to recover these
four spacers (H) because they could
cause damage if they remain inside the
machine and also because they will be
required to move the machine in the
case of moving house.
The user will require a tap with a 3/4" gas screwthread outlet and a drain
situated between 50 and 80 cms. above floor level. The watermain pressure
must be between 0,4 and 10 bar inclusively.
5
These must be recovered and kept.
C
H
Max.80 cm.
Min.50 cm.
C
H
THERMO
D
C
B
A
H
- Use new tubes for connecting to the water supply.

6
In order to prevent noise and vibration,
ensure that the machine is not touching any
nearby walls or furniture.
2.3 - Levelling
2.4 -Electrical connection
For the appliance to work under optimum conditions, it needs to be levelled
perfectly, i.e.horizontal and stable.
Once the levelling is done, block the
adjustable feet by tightening the nut "J".
That the power supply, is single-fhase 220-
230 V ~ (230-240 ~ for UK).
That the user's meter, limiter, fuses, power
socket and installation are of an adequate
output for the power indicated on the
characteristics plate of this washing machine.
10 A 250 V fuse (13 A 250 V for UK).
If the wall socket does not have an earth
connection, you must connect the central
earth connection of the washing machine to
good ARTIFICIAL EARTH (consult your
dealer).
THE WASHING MACHINE MUST BE WELL EARTHED.
NOTE: If the power supply cable is damaged, it should be substituted by
a specially prepared replacement cable, to be supplied by the
manufacturer, or by the official after salesTechnical Service Organisation.
Use a wall socket with an earth connection.
Make periodic checks that the machine is
levelled by repeating these operations if
necessary.
Before connecting the washing machine to the power supply, the following
points should be checked through:
The manufacturer declines all responsibility for any accidents on ocurrences
caused by a defective earth connection or lack thereof.
I
J
The wasing machine's plug guarantees the
machine's earthing.
Once the machine has been positioned in ist
place, work the adjustable feet "I" at the
front of the washing machine, until it is
horizontal and the four feet are resting
firmly on the floor.

1234
3- HANDLING
7
Once the washing programme has finished, push the programme button (or
ON/OFF push-button) and wait 2 minutes before trying to open the door.
3.2 - Detergent drawer. Distribution of the washing products.
WARNING:When the door is open, the power supply
is cut and the machine will not operate.
To open the drawer, put your and in the lower part of
the soap drawer and pull it outwards.
SECTION 1 - Pre-wash soap (50 gr.Max.).
3.1 - Loading door-Opening
CASE A: 1. Press the hidden lever with the index and
middle fingers 1
2. Pull outwards.
CASE B: Pull the door lever outwards.
SECTION 2 - Main wash soap (125 gr.Max.).
SECTION 3 - Bleach (80 ml. Not concentrated).
SECTION 4 - Softener (80 ml.Max.).
Never put more than indicated by the lever in the soap
drawer.
The ideal dose of detergent depends on the hardness of
the water, how dirty the clothes are and the load.
(Consult the soap manufacturer's instructions).
Make sure that the material can support the treatment
with bleach if it is used.
B
A
1

3.3 - Selecting the clothes load
8
Soak or treat stains before the wash, in order to reduce to need to use the
hot programme.
You save 50% energy by using the 60ºC programme.
Once the clothes have been sorted, put them into the drum of the machine,
separately according to colour and group, loose piece by piece, as per the
following proportions:
Before putting the clothes into the machine, you should:
Separate the clothes into three lots (cotton, synthetics and wool).
Within each group, separate the coloureds from the whites.
Cotton maximum 5,5 kg.
Synthetics maximum 2,75 kg.
Wool maximum 1 kg.
3.4 - Selecting the right program
Once the clothes have been sorted into fabric types and colours, you need to
select the right program and temperature. SEE PROGRAM TABLE (Section 8).
3.6 - How to get the best performance
With the machine now loaded, the door closed, the soap drawer compartments
filled and the right program chosen, to start the machine, you just need to
PULL OUT THE PROGRAMMER CONTROL BUTTON (P) OR ON THE
PUSH-BUTTON (X).
The machine automatically goes through all the operations included in the
wash cycle until it ends.
The wash is now ready to be hung out dry (or to be ironed in the case of
washer - dryers).
3.6-1 - Maximise the load (Section 8)
3.5 - Starting operation
You obtain the most efficient use of energy, water, detergent and time by
using the maximum recommended load.
You save 50% energy by washing one full load instead of two half loads.
3.6-2 - Do you need a pre-wash?
Only for deeply stained laundry !.
You save detergent, water, time and between 5 to 15% of energy through
not using the pre-wash for light and normally soiled clothes.
3.6-3 - Do you need hot water?
3.6-4 - For washer-dryers: before using the dryer
Select high (> 850 rpm) for the spin before drying, in order to save energy, water
and time during the drying period.

9
4.2 - Cleaning the inlet valve filter.
It is advisable to periodically clean this filter (every 25 wash cycles) in order
to maintain the correct operation of the drain pump and consequently, the
washing and rinsing efficiency.
4- MAINTENANCE
4.1 - Cleaning the drain-pump outlet filter.
a) Turn off the water tap.
Any impurities in the water supply are deposited
in the filter at the inlet to the inlet valve.
To clean this filter:
b) Unscrew the water inlet hose at the washing
machine end.
c) Remove the filter using pointed pliers and
clean it.
d) Reverse the procedure to re-attach the hose.
4.3 - Cleaning remains of detergent.
Overfilling the prewash and main wash
compartments with too must detergent causes the
excess to be deposited inside the collector, and
could, over time, cause water to leak through the
entrance of the detergent drawer.
To clean the deposits, remove the soap drawer by
pulling it outwards, and clean it thoroughly.
In order to clean the filter carry out the following:
-Open the access door. (A). Place a container to catch
any water.
-Unscrew the cap (B) until it is loose, but do not
remove the cap completely. Pull out the filter.
After cleaning, re-insert the filter with the cap still
loose.
-There is only one way that the filter will slide
into its housing.
DO NOT USE FORCE
Now retighten fully and check for water leaks.
B
A
AVOID
CLEAN

10
Select the clothes load correctly (section 3.3) and choose the appropriate
programme (section 8).
5- CAUTIONS AND ADVICE
In order to get maximum satisfaction and performance from this appliance, it
is important to follow the instructions indicated below:
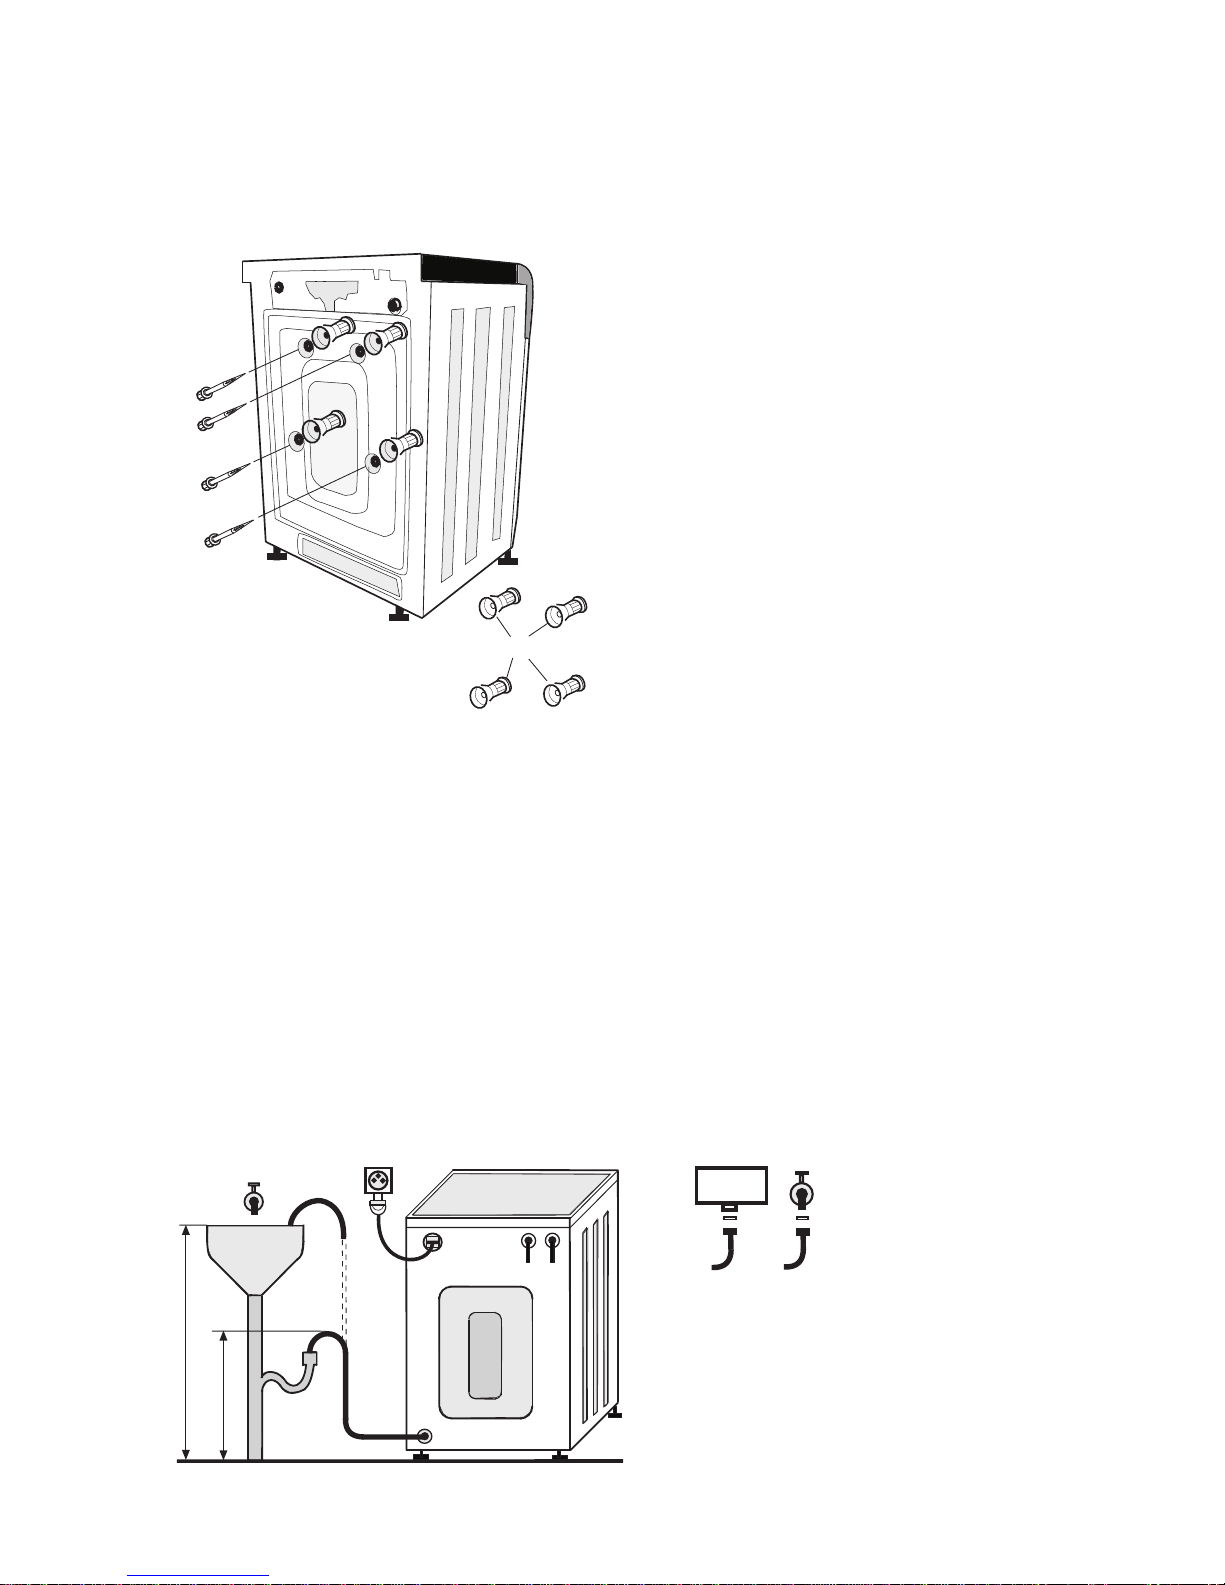
Before starting to operate the machine, it must be released from its transit
(section 2.1).
Before opening the door, check that there is no water in the machine and
the pilot light is off.
Plug the power supply plug into a socket with an EARTH CONNECTION
and at the correct voltage.
Put in the washing products in the right proportion and the right
compartment (section 3.2).
Small garments, such as socks, belts, etc. are best put inside a bag to avoid
them being lost.
Before putting clothes into the washing machine, make sure that there is
nothing in the pockets (coins, buttons, clips, etc.) and that zips are undone.
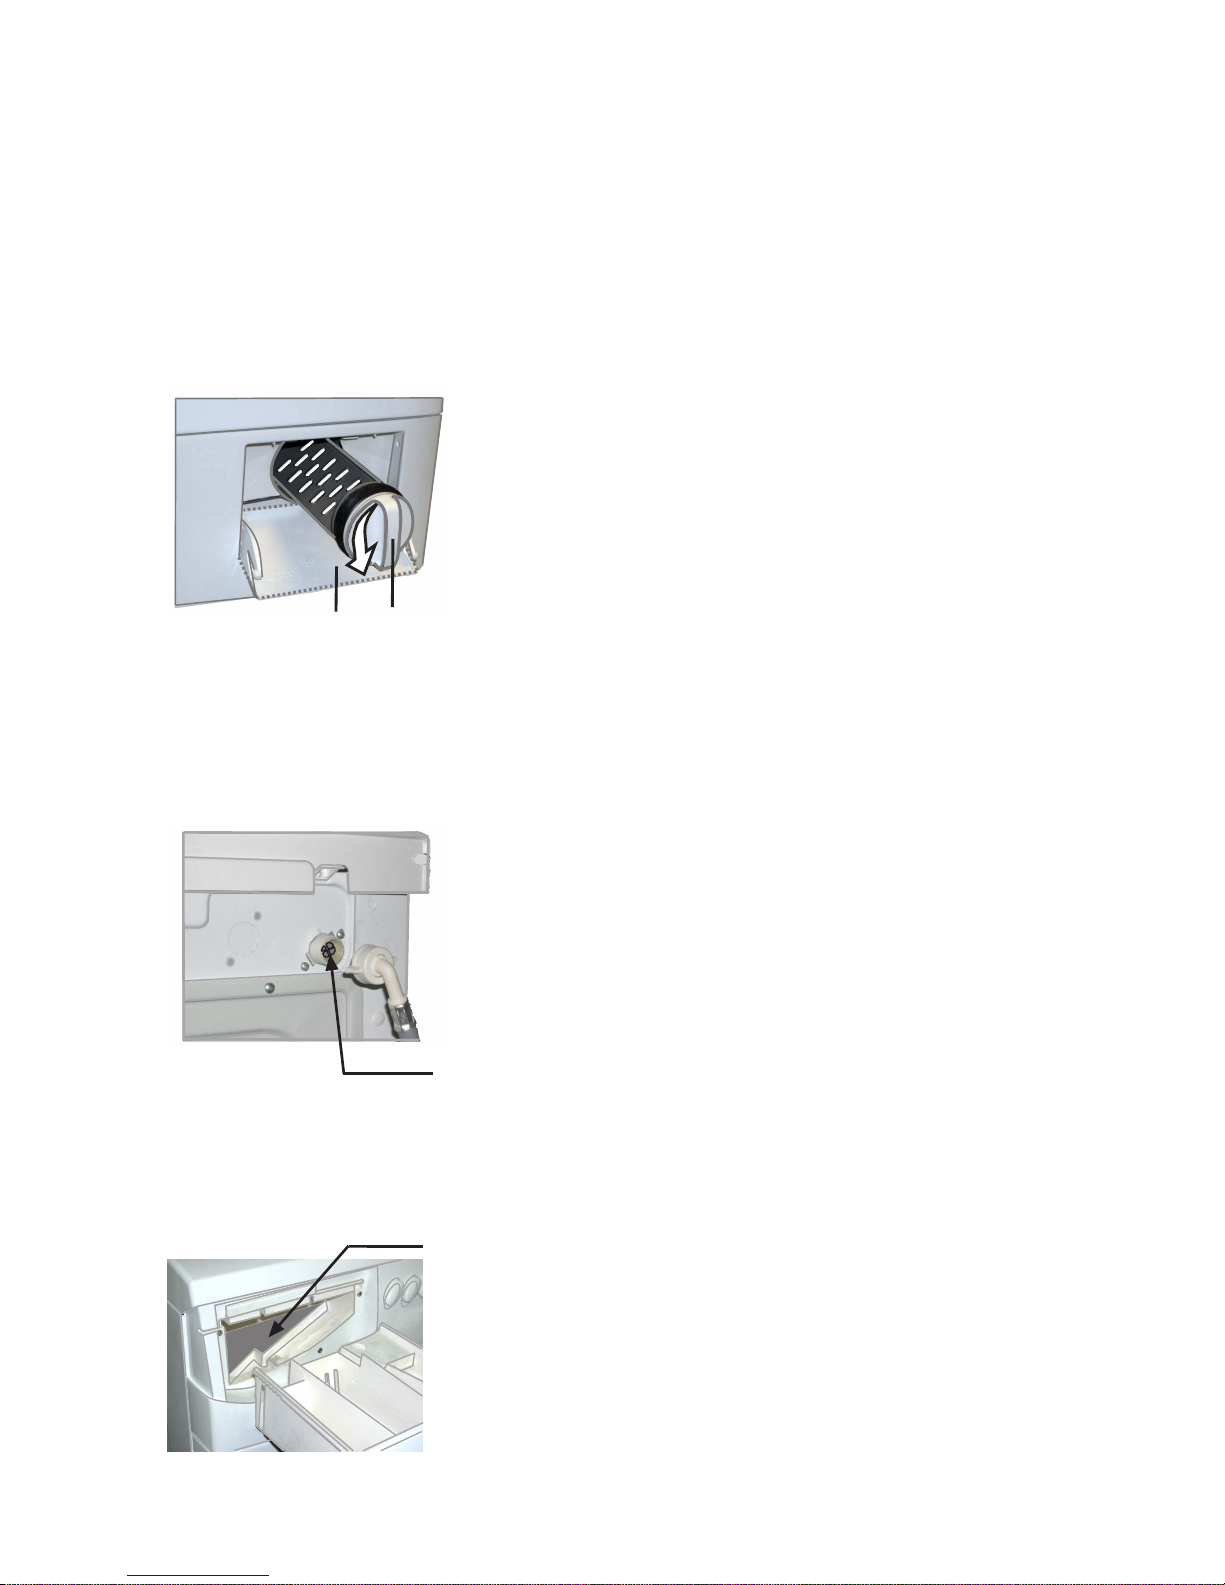
If your machine has a filter, you should periodically check it is clean (sec. 4.1).
The interior of the washing machine should be handled by specialist only.
After each wash,leave the door ajar to prevent the rubber seal from becoming
misshapen.
When the clothes to be washed are heavily soiled or splattered with mud, it
is advisable to run a program with prewash.
Always put the machine on full, to save energy.
When the machine is installed, or after a long time without it being used, it
is advisable to run a wash program with the machine empty, to eliminate
any rusty water in the tubes.
For washer-dryers, do not use the dryer function if the clothes have been
treated with any non-aqueous solution.
Also for washer-dryers,do not use the dryer function for items containing
spongey rubber or similar elastomer materials.
The dryer must be installed in a well-ventilated place, away from the
influence of gases from other appliances and from defective installations.
The lower ventilation, between the floor and the base of the machine, must
not be obstructed (by carpet, cloths, etc.).
This washing machine is exclusively for domestic use.
Dieses Handbuch passt für folgende Modelle
2
Inhaltsverzeichnis
Andere Baumatic Waschmaschine Trockner Handbücher

Baumatic
Baumatic BWD1212 Bedienungsanleitung

Baumatic
Baumatic BWD1409W Bedienungsanleitung

Baumatic
Baumatic BWD1200SS Bedienungsanleitung

Baumatic
Baumatic BWDI1206 Bedienungsanleitung

Baumatic
Baumatic BW325SL Bedienungsanleitung

Baumatic
Baumatic BWD1206SL-W Bedienungsanleitung

Baumatic
Baumatic BW325SL Bedienungsanleitung

Baumatic
Baumatic BWD12.1 Bedienungsanleitung

Baumatic
Baumatic BWD1212 Bedienungsanleitung

Baumatic
Baumatic MEGAWDSS Bedienungsanleitung


