
Brightlink BL-VWMW-H265-EXT-4K Bedienungsanleitung
1
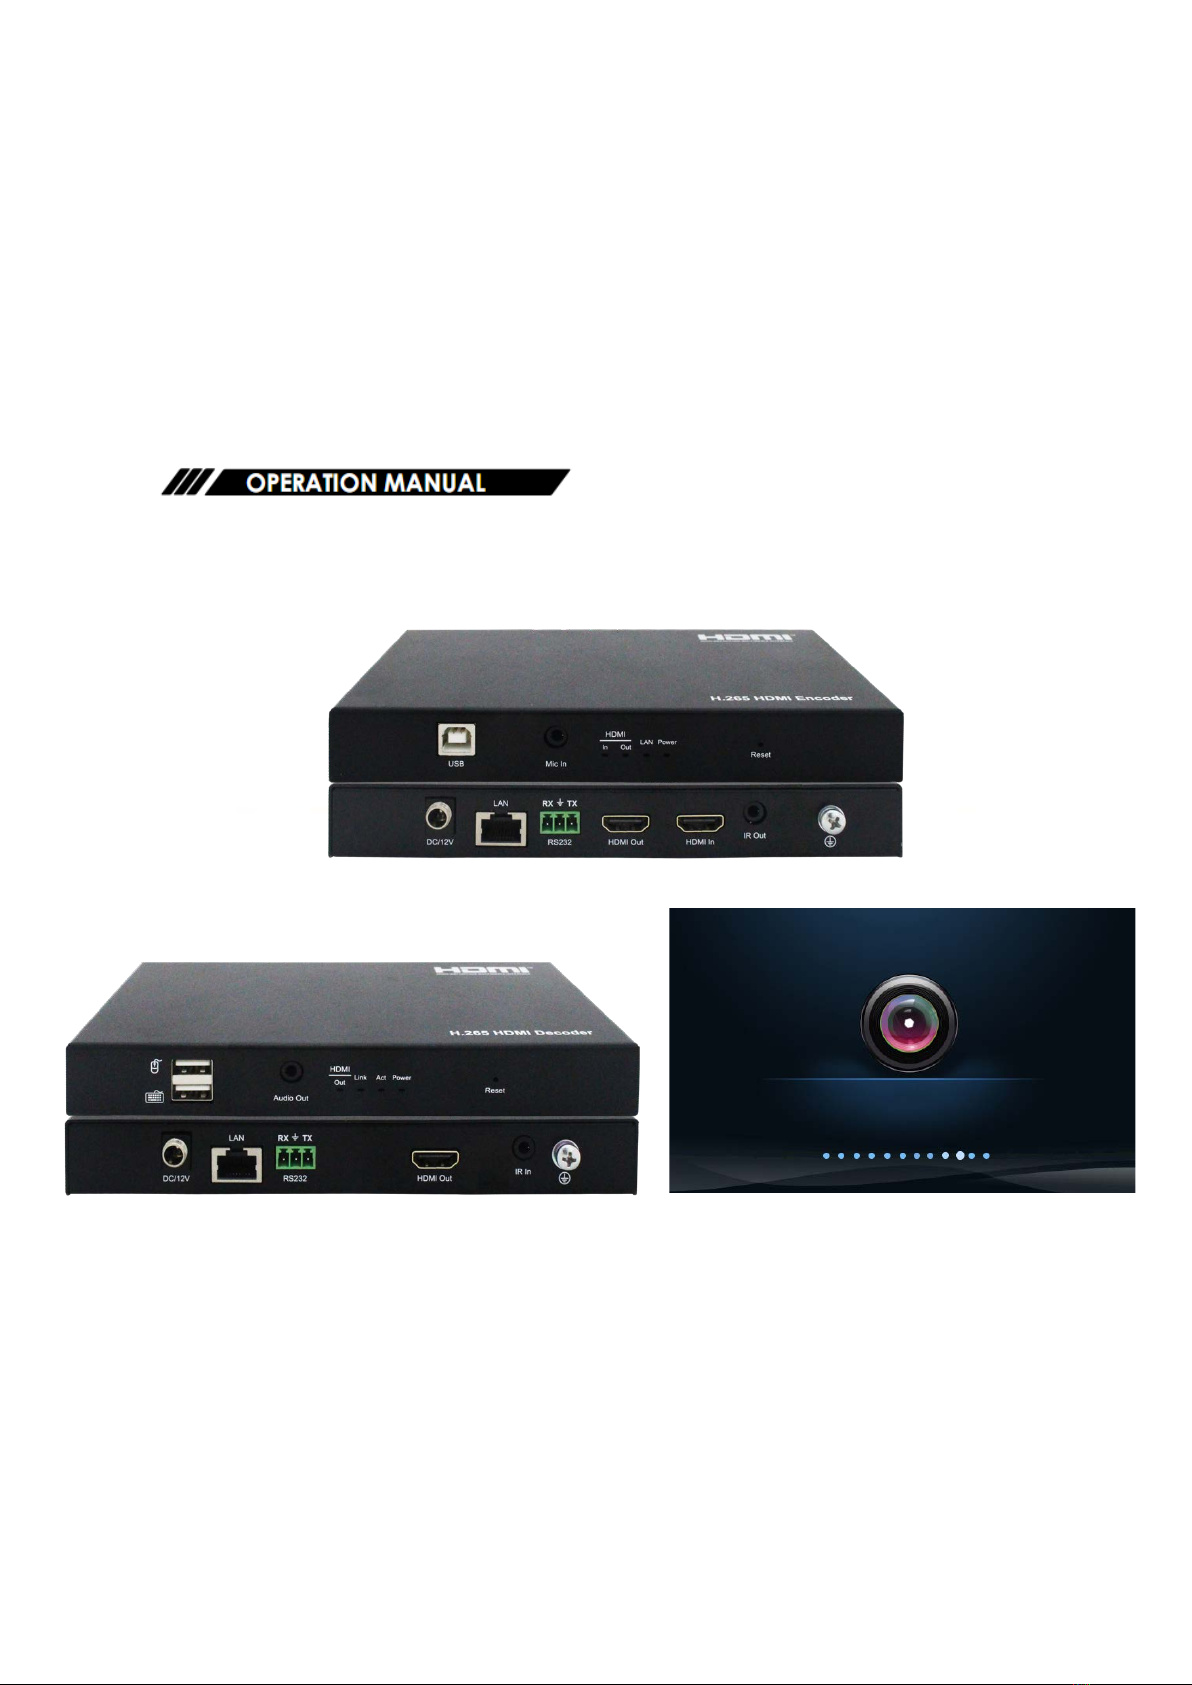
120M H.265 AV over IP Extender work
with CMP System
Max resolution 4K@30HZ,4:4:4
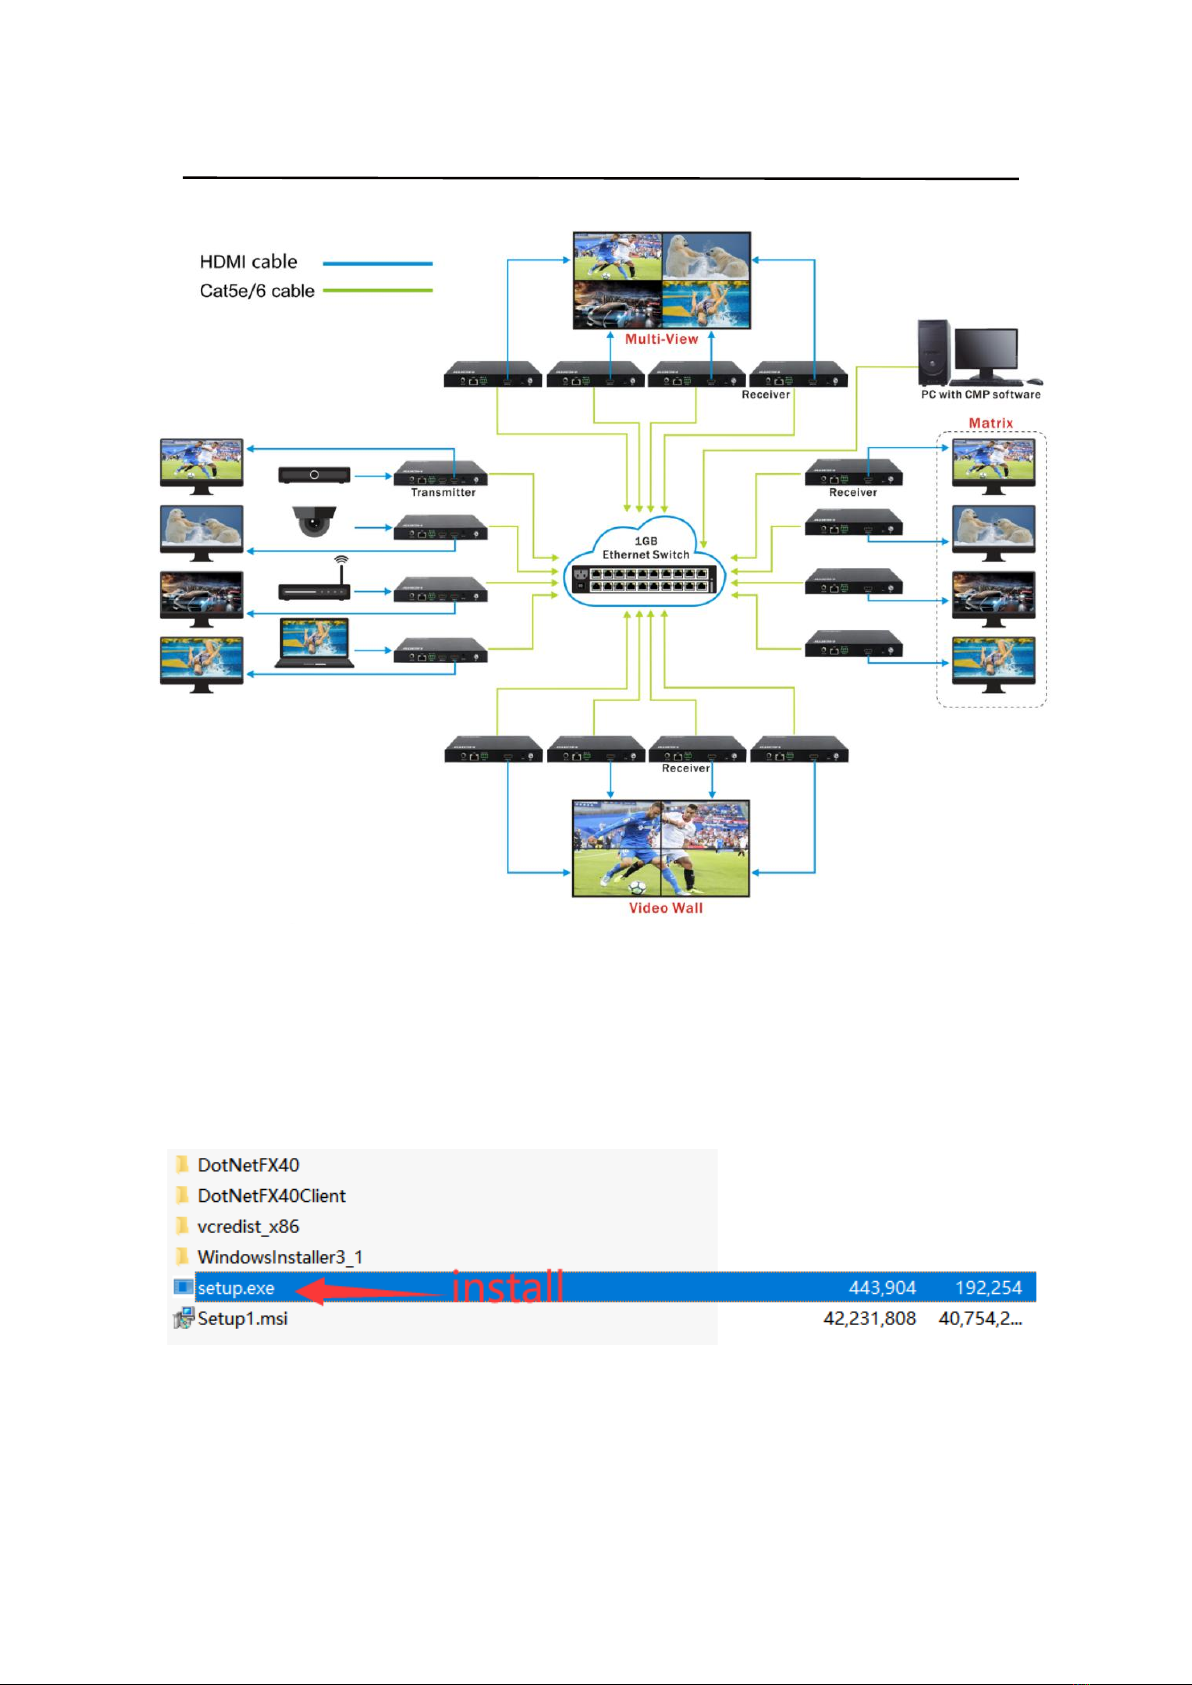
Support Video Wall, Multi Viewer, Matrix
Encoder
Decoder

2
Operating Instruction
Catalogue
Dear Customer .................................................................................................................................... 3
1. Features ........................................................................................................................................... 3
2. Specifications .................................................................................................................................. 3
3. Package Contents ............................................................................................................................ 3
4. Panel Descriptions ........................................................................................................................... 4
4.1. Encoder: ............................................................................................................................... 4
4.2. Decoder: ............................................................................................................................... 4
5. Application: ..................................................................................................................................... 5
6. CMP System: .................................................................................................................................. 5
6.1. Installation process description: ........................................................................................... 5
6.2. Registration and login platform ........................................................................................... 8
6.2.1. Registration ............................................................................................................... 8
6.2.2. Login ......................................................................................................................... 8
6.2.3. Retrieve the Password ............................................................................................... 9
6.2.4. Enter CMP System .................................................................................................... 9
6.3. Add Device Instruction ...................................................................................................... 10
6.3.1. Specific steps ........................................................................................................... 11
6.4. User Management Instruction: ........................................................................................... 21
6.4.1. Create Account: ....................................................................................................... 21
6.5. Live Preview Instruction: ................................................................................................... 23
6.6. Basic Instruction: ............................................................................................................... 25
6.6.1. Select Language: ..................................................................................................... 25
6.6.2. OSD Switch: ........................................................................................................... 25
6.7. Video Scheme Instruction: ................................................................................................. 26
6.7.1. Matrix Configuration .............................................................................................. 26
6.7.2. Screen Divide: ......................................................................................................... 27
6.7.3. Screen Splice: .......................................................................................................... 28
6.7.4. KVM/IR/RS232 configuration: ............................................................................... 31
MAINTENANCE ............................................................................................................................. 33
PRODUCT SERVICE ....................................................................................................................... 33
WARRANTY .................................................................................................................................... 33

3
Operating Instruction
Dear Customer
Thank you for purchasing this product. For optimum performance and safety, please read these
instructions carefully before connecting, operating or adjusting this product. Please keep this
manual for future reference.
1. Features
Ø Compression Technology: H.265
Ø Max resolution 4K@30HZ YUV 4:4:4
Ø Latency Time (from TX to RX) 30-80 millisecond
Ø Transmit up to 120m over single Cat5e/6 cable, with 1x looping HDMI output
Ø Request for (many to many mode) IGMP Switch
Ø Support IP/ICMP/IGMP/TCP/UDP Control (PC Tool)
Ø Support KVM RS232, IR, Local HDMI output on TX
Ø Additional Features VLC / Looping HDMI output
Ø Support RTSP/RTMP protocol
Ø Support Video Wall, Multi Viewer, Matrix work with CMP system supports real-time switch
OSD; Displaying firmware version, IP address, MAC address, etc
Ø Support Multicast(one to many, many to many), Unicast (one to one)
Ø DC12V Power supply
2. Specifications
Performance
Protocol
H.265 Encoder over TCP/IP
Video format
480P/720P/1080P/4K2K/800*600/1280*1024@60hz etc
Audio format
Analog Embedded and Analog Extractor
Streaming Bit Rate
0-100Mbps Default: 20Mbps
IR frequency
38-56Khz
RS232 Baud Rate
115200
IP SETTING
Request for Switch/Router
Support IGMP, support DHCP
Environmental & Power Requirements
Operating temperature
-5 to +35 ℃ (+23 to +95℉)
Operating Humidity Range
5 to 90%RH (No Condensation)
Power supply
12V1A
Power consumption
TX: 4.68W; RX: 3.36W
Dimension
TX&RX: 184*95*24mm
Net Weight
3. Package Contents
1). Main Unit Encoder and Decoder x1
2). Power Adapter DC12V1A x2
3). IR TX cable; IR RX cable
4). Disk (PC TOOL; User manual; Update software; CMP system) x1
4
Operating Instruction
4. Panel Descriptions
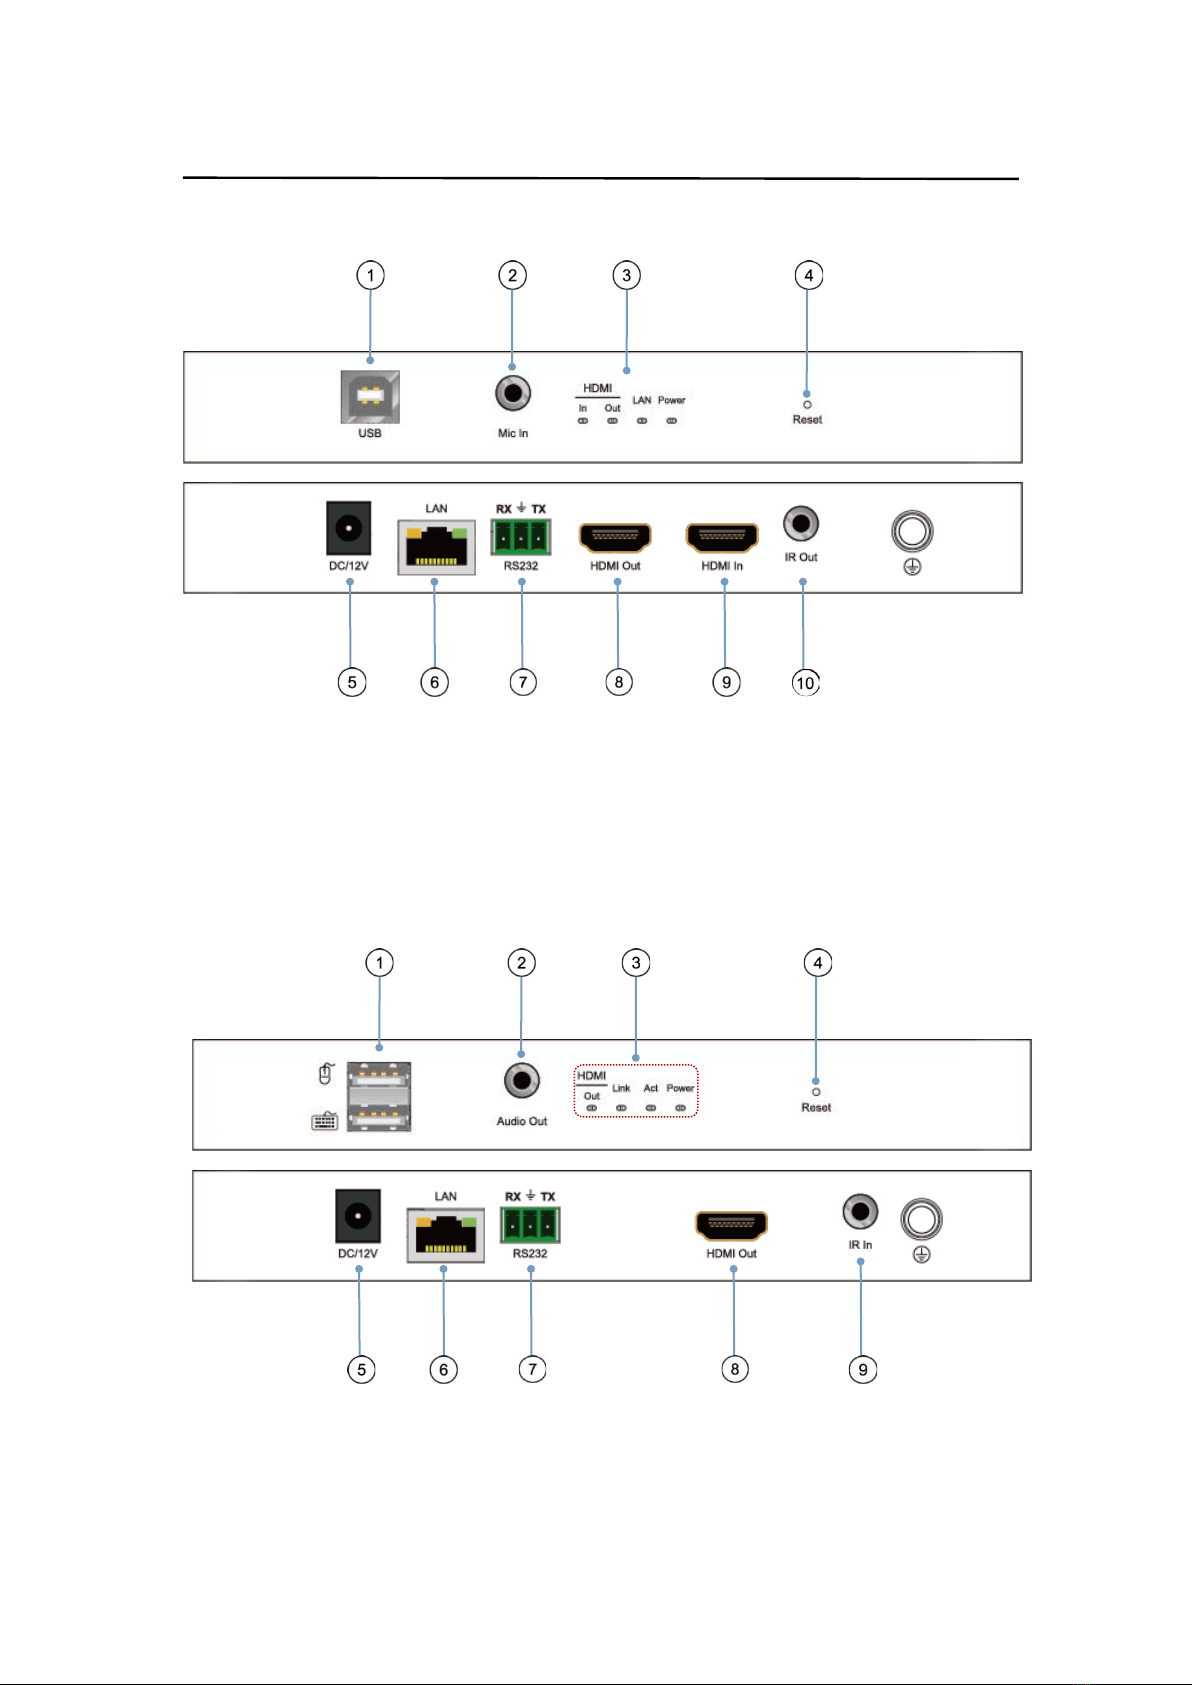
4.1. Encoder:
① USB Type B input ② Analog Input
③ Indicator of HDMI; LAN; Power ④ Reset button
⑤ DC/12V input ⑥ Cat5/6 output
⑦ RS232 pass through ⑧ HDMI Loop output
⑨ HDMI Input ⑩ IR out
4.2. Decoder:
① USB Type A output ② Analog Output
③ Indicator of HDMI; Link; Act; Power ④ Reset button
⑤ DC/12V input ⑥ Cat5e/6 input
⑦ RS232 pass through ⑧ HDMI output
⑨ IR input
5
Operating Instruction
5. Application:
6. CMP System:
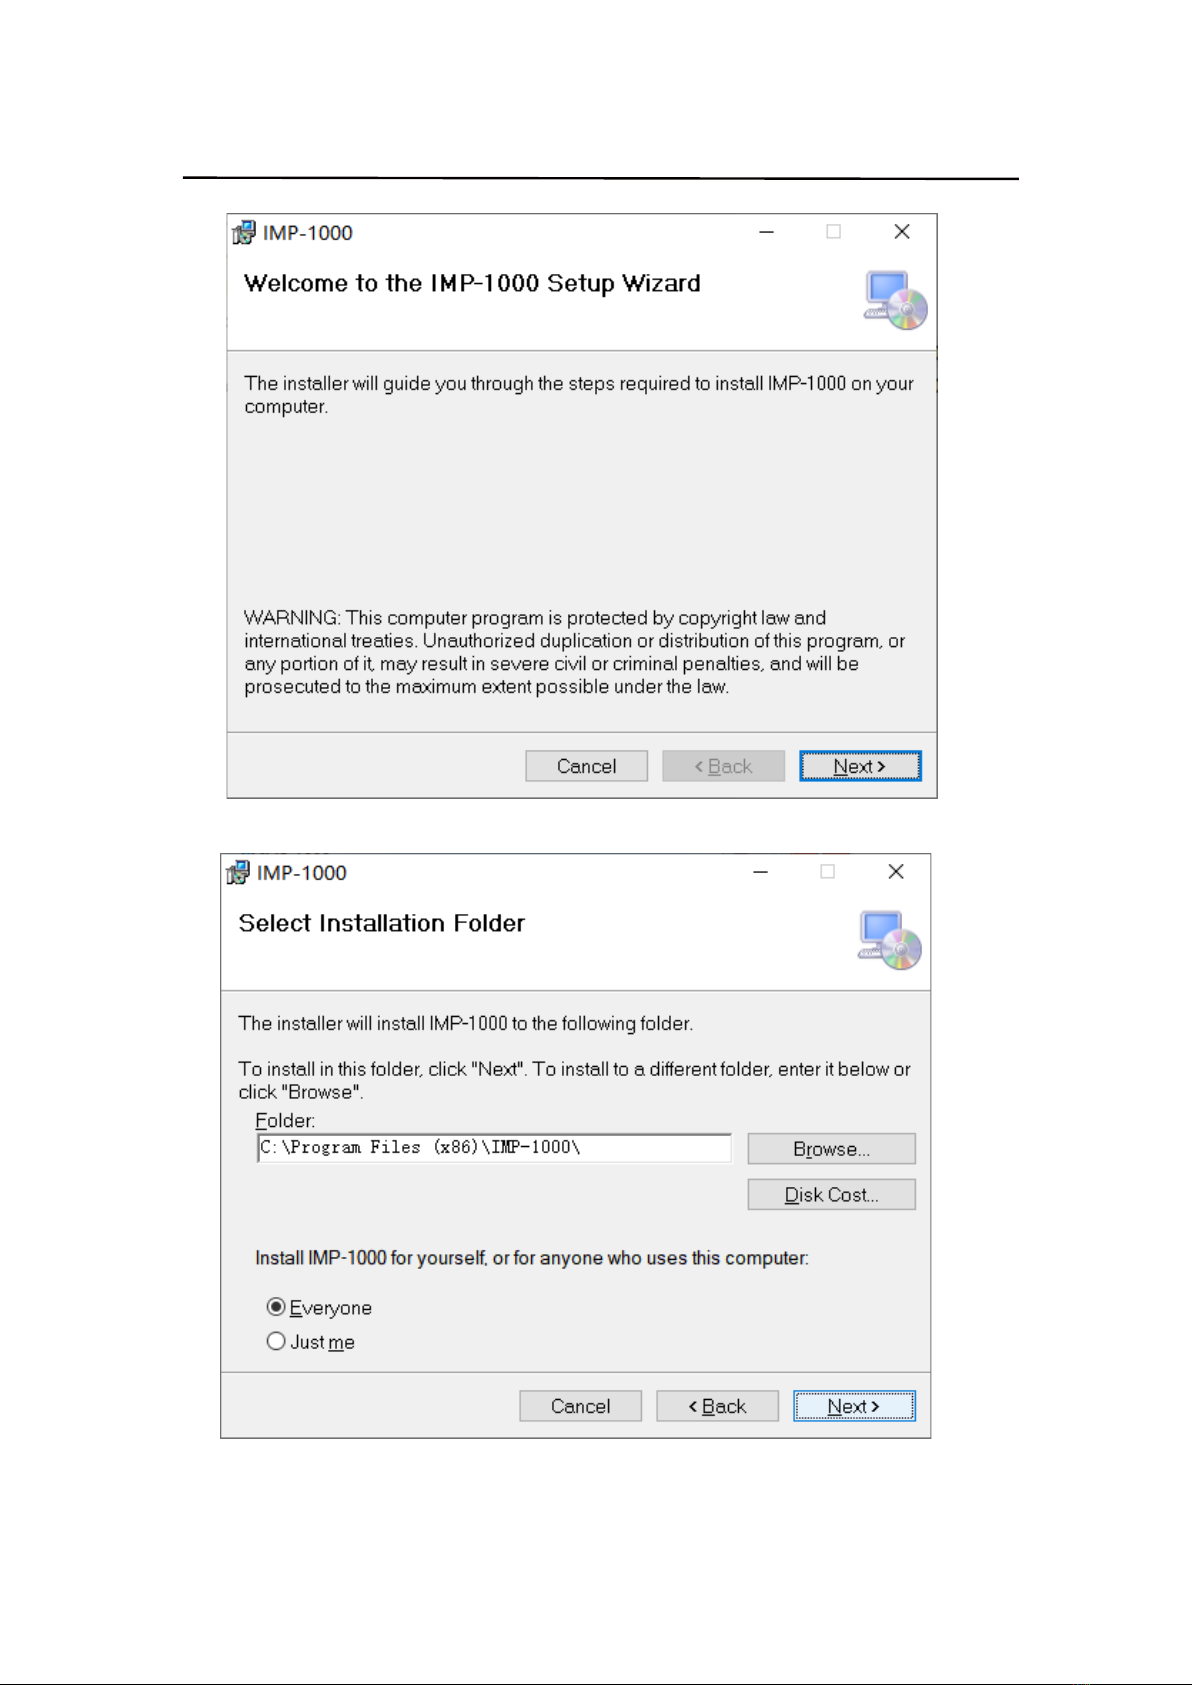
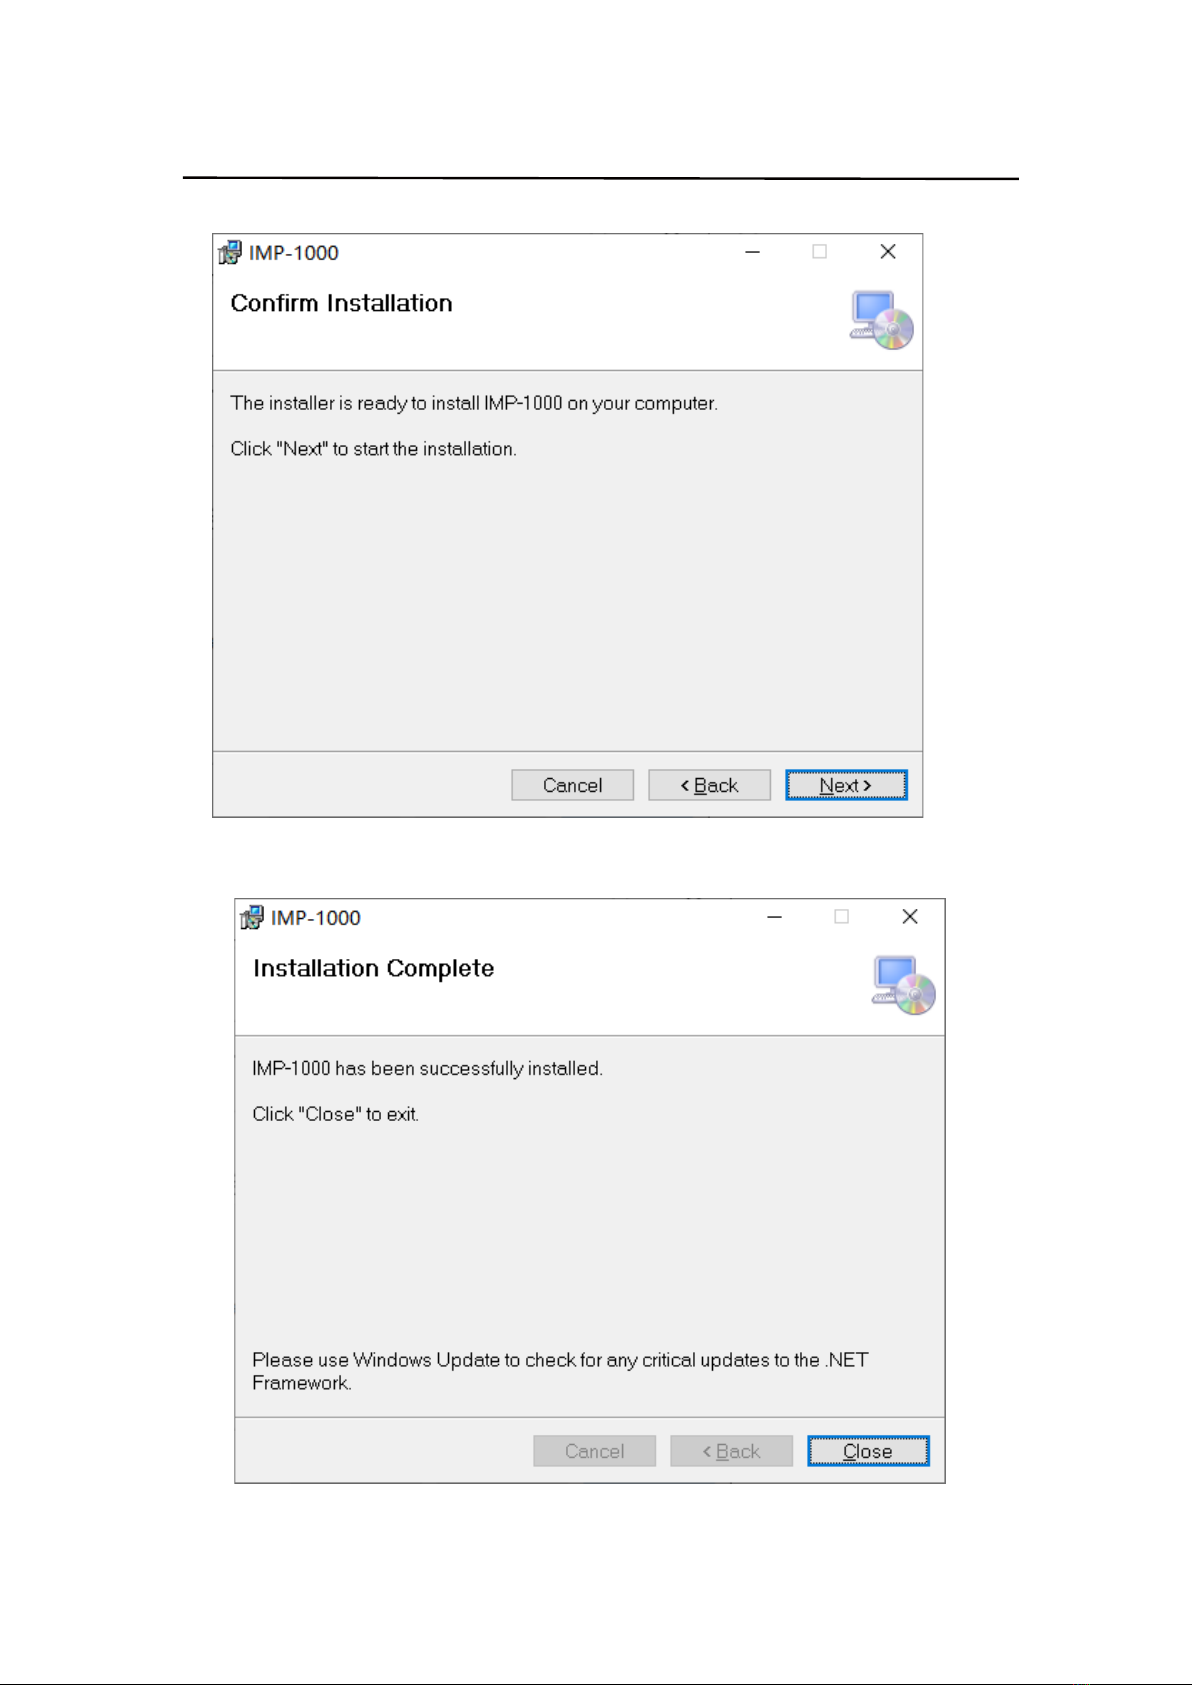
6.1. Installation process description:
Before connecting the product, copy "CMP plate-setup" from the CD, double-click the software in
the installation package to run, and install the platform on the computer.
Take Win7 operating system as an example, the installation process is as follows
CMP (P1)
6
Operating Instruction
CMP (P2)
CMP (P3)
7
Operating Instruction
CMP (P4)
CMP (P5)
8
Operating Instruction
6.2. Registration and login platform
6.2.1. Registration
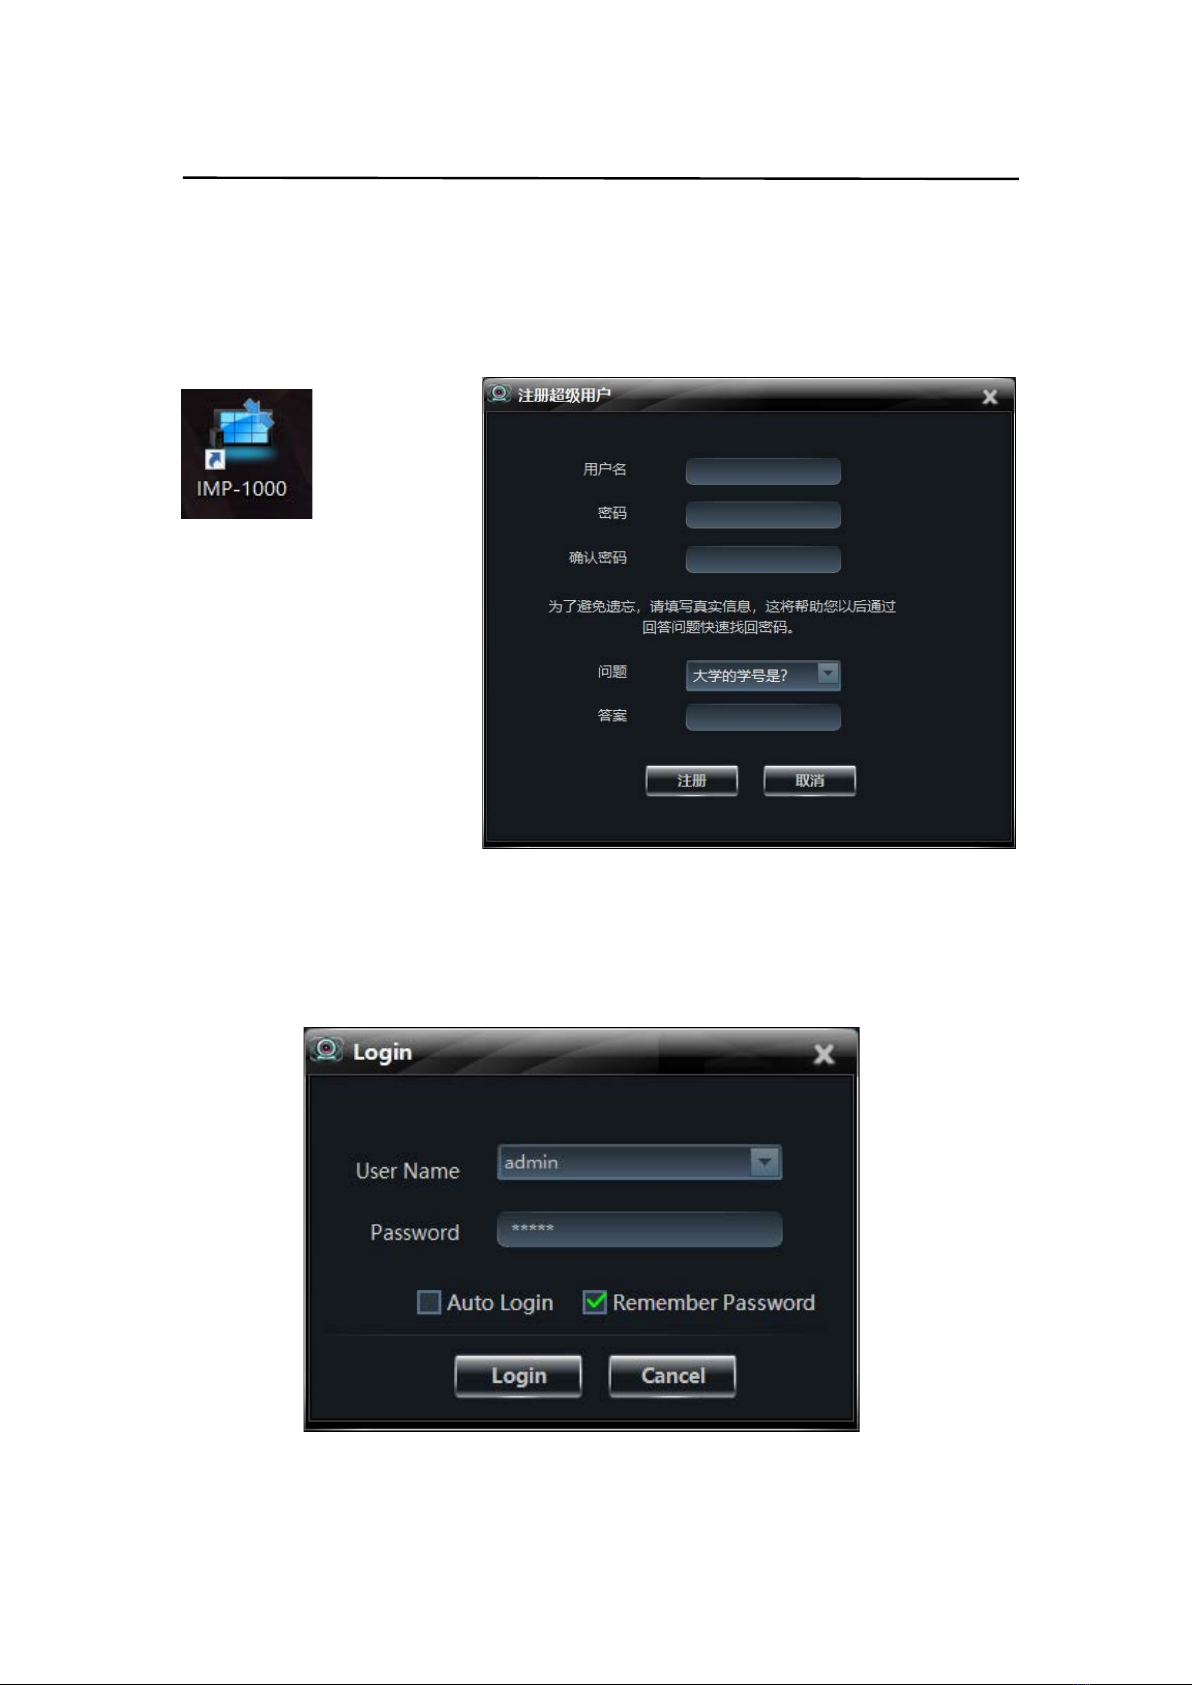
Double-click the mouse to open imp-1000 integrated management platform, and the registration
window will pop up when it is opened for the first time.Enter username, password, confirmation
password, and any questions and answers.To retrieve the password if you forget.
6.2.2. Login
After registration, the login interface will pop up, enter the registered user name and password, and
you can choose to log in automatically or remember the password.Click login to log in to the main
interface of the platform.
9
Operating Instruction
6.2.3. Retrieve the Password
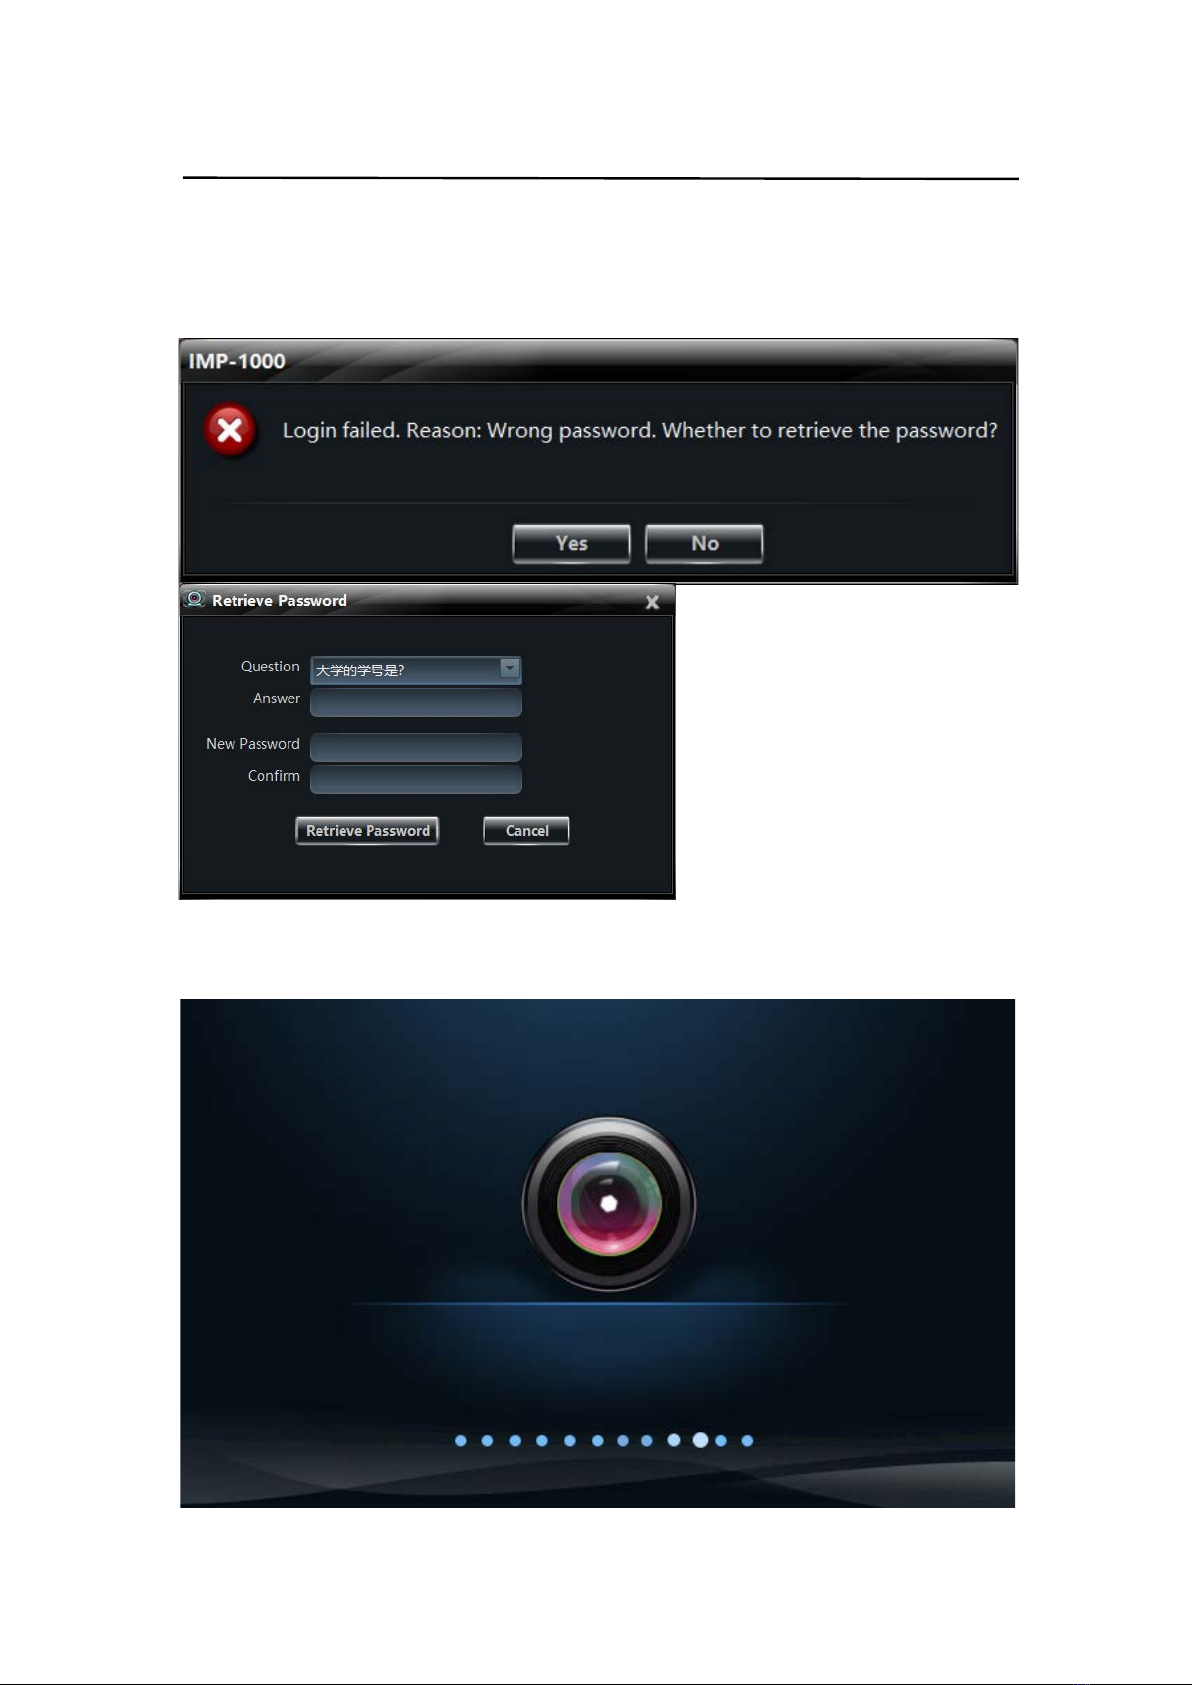
If you enter a wrong password or forget your password in the login interface, the system will
automatically pop up a prompt to retrieve your password. You can enter the password retrieval
interface, enter the answer to the question you filled in during registration, and reset your password.
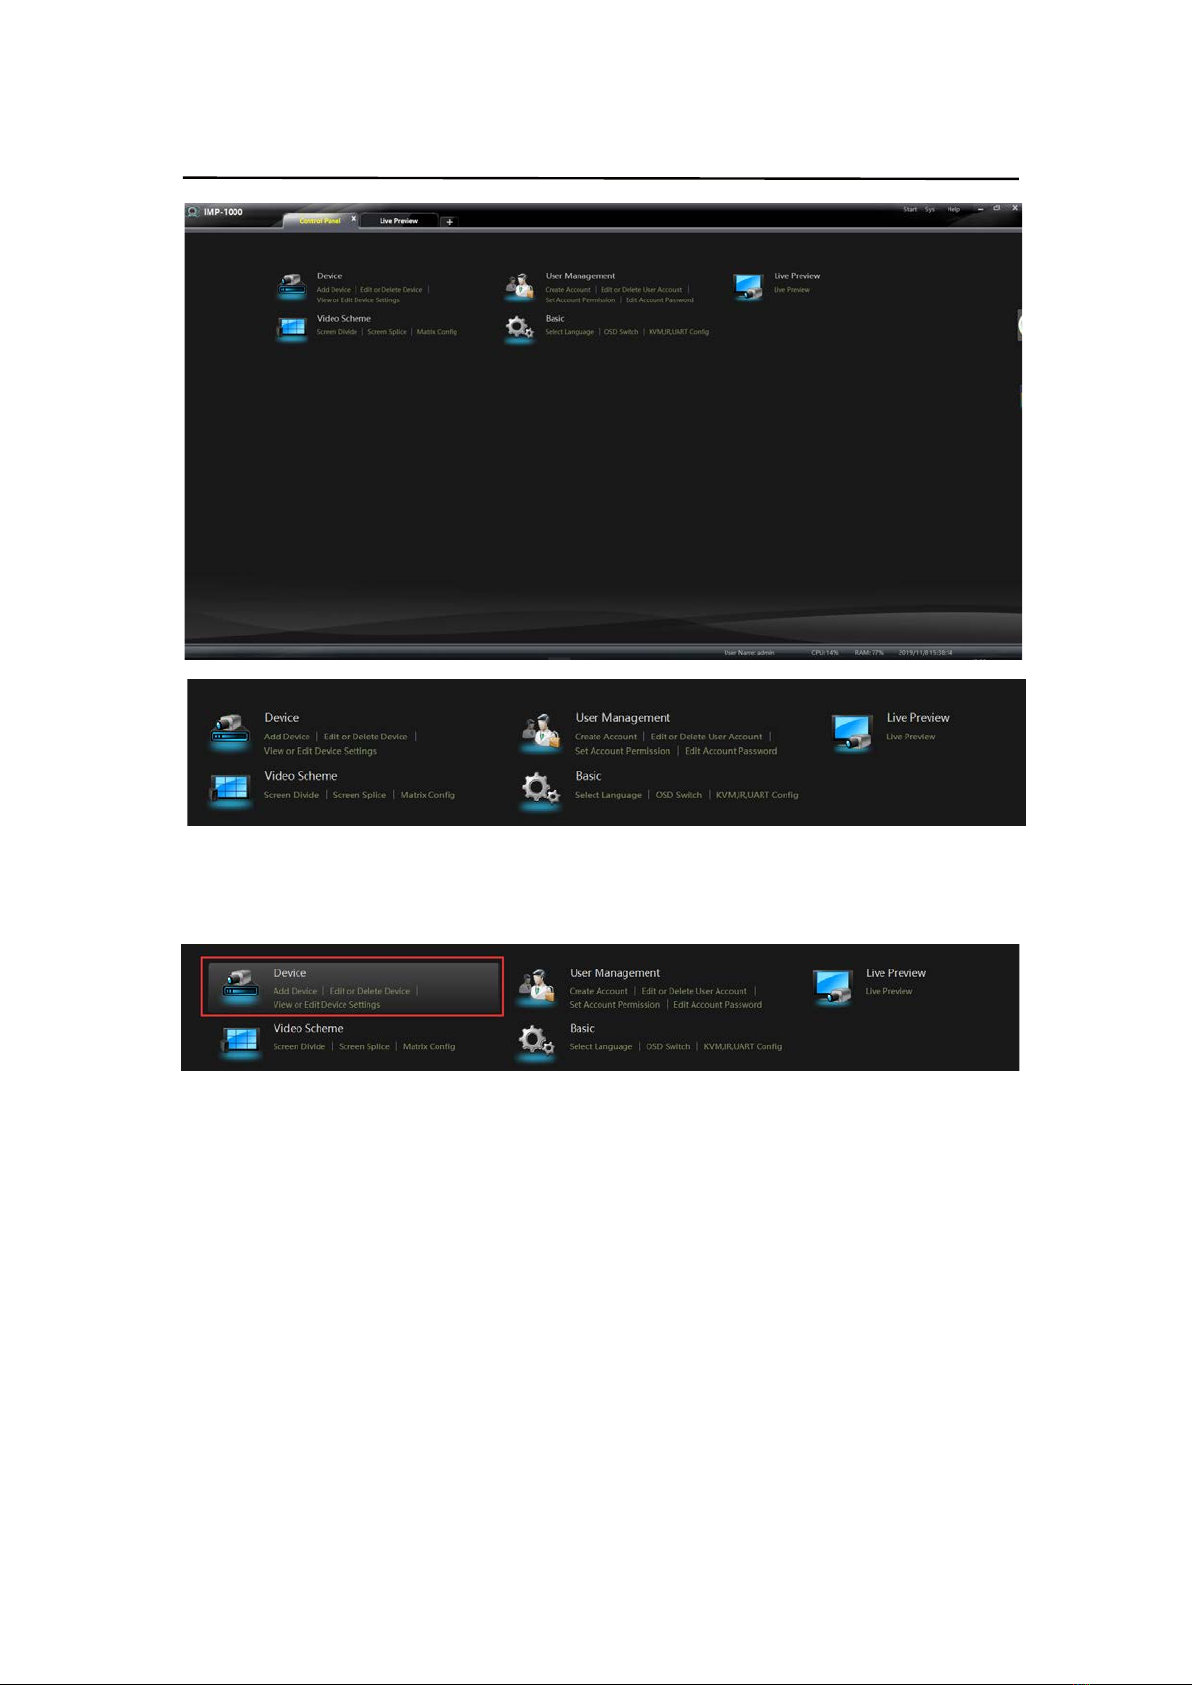
6.2.4. Enter CMP System
Enter the user name and password correctly and enter the main function interface.
10
Operating Instruction
6.3. Add Device Instruction
According to the above diagram, connect the products to the switch. And the router LAN port is
connected to the switch through the network cable. And the network property IPV4 is set as
automatic acquisition. Because the product default DHCP is ON, the router DHCP address pool can
automatically assign IP addresses to the product and computer. Then the computer can open the
software platform to manage and operate.
To login to the platform for the first time, click add device in device management, and you can
choose to add device quickly (automatically scan all devices in the regional network) or manually.
Quick add only need to check add, manually add need to input network parameters and other
settings can be successfully added.
Inhaltsverzeichnis
Andere Brightlink Extender Handbücher


