BRINKMAN Ranch Bedienungsanleitung

OWNER’S MANUAL / MANUAL DEL PROPIETARIO
ASSEMBLY AND OPERATING INSTRUCTIONS
INSTRUCCIONES DE ARMADO Y OPERACIÓN
SAVE THIS MANUAL FOR FUTURE REFERENCE
GUARDE ESTE MANUAL PARA REFERENCIA FUTURA
NOTICE TO INSTALLER:
LEAVE THESE INSTRUCTIONS WITH THE
GRILL OWNER FOR FUTURE REFERENCE.
AVISO PARA EL INSTALADOR:
ENTREGUE ESTAS INSTRUCCIONES AL
PROPIETARIO DE LA PARRILLA PARA
REFERENCIA FUTURA.
WARNING/ADVERTENCIA
HAZARDOUS EXPLOSION MAY RESULT IF THESE WARNINGS AND INSTRUCTIONS ARE
IGNORED. READ AND FOLLOW ALL WARNINGS AND INSTRUCTIONS IN THIS MANUAL
TO AVOID PERSONAL INJURY, INCLUDING DEATH OR PROPERTY DAMAGE.
SE PUEDE PRODUCIR UNA EXPLOSIÓN PELIGROSA SI SE HACE CASO OMISO A
ESTAS ADVERTENCIAS E INSTRUCCIONES. LEA Y SIGA TODAS LAS ADVERTENCIAS E
INSTRUCCIONES EN ESTE MANUAL PARA EVITAR LESIONES PERSONALES, INCLUSO
LA MUERTE, O LOS DAÑOS MATERIALES.
INS_810-3070-S_INSTR-Fire Pit _Grill 10/13/11 10:58 AM Page 1

WARNING
IMPORTANT SAFETY WARNINGS
READ ALL SAFETY WARNINGS AND INSTRUCTIONS CAREFULLY
BEFORE ASSEMBLING AND OPERATING YOUR COOKER.
1
•
Only use this grill on a hard, level, noncombustible, stable surface (concrete, ground, etc.) capable of supporting
the weight of the unit. DO NOT use on wooden or other surfaces that could burn.
•
FOR OUTDOOR USE ONLY. DO NOT operate grill indoors or in an enclosed area. In windy weather, place grill in an
outdoor area that is protected from the wind.
•
Proper clearance of 10 feet between grill and combustible materials (bushes, trees, wooden decks, fences,
buildings, etc.) or construction should be maintained at all times when grill is in use. DO NOT place grill under a
roof overhang or other enclosed area.
•
Place a metal pan or pot under grill to catch any ashes or embers that may escape the grill.
• DO NOT use gasoline, kerosene or alcohol for lighting wood. Use of any of these or similar products will cause an
explosion possibly leading to severe bodily injury.
• This is an attended product. DO NOT leave grill unattended while in use or while hot.
•
Never move grill when in use or when it contains hot coals or ashes.
•
Keep grill in an area where children and pets cannot come into contact with unit. Close supervision is necessary
when the grill is in use or hot after use.
•
Never add charcoal lighting fluid to hot or even warm coals as flashback or explosion may occur causing severe
burns.
• DO NOT store or use grill near gasoline or other flammable liquids, gases or where flammable vapors may be
present.
•
To avoid personal injury, DO NOT wear loose clothing or allow hair to hang freely while tending to grill.
•
DO NOT burn any material other than wood or charcoal in grill as your fuel source.
• Always use oven mitts/gloves to protect your hands. Surfaces will be very HOT!
•
Safety pins should be used at all times. Insert safety pins in nearest holes directly under cooking grill.
•
Never leave hot coals and ashes in grill unattended. Remaining coals and ashes must be extinguished. Use
caution to protect yourself and property. Carefully saturate coals completely with water. Allow coals and water to
remain in grill 24 hours prior to disposing.
•
With garden hose, completely wet the surface beneath and around the grill to extinguish any ashes, coals or
embers which may have fallen during use or cleaning.
•
Use caution when lifting or moving the grill to prevent strains and back injuries. Moving the grill may require the
help of an additional person.
•
We advise that a fire extinguisher be on hand. Refer to your local authority to determine proper size and type of
fire extinguisher.
• DO NOT use wood logs over 18 inches in length.
USE CAUTION AND COMMON SENSE WHEN OPERATING YOUR OUTDOOR GAS GRILL.
FAILURE TO ADHERE TO THE SAFETY WARNINGS AND GUIDELINES IN THIS MANUAL
COULD RESULT IN BODILY INJURY OR PROPERTY DAMAGE.
SAVE THIS MANUAL FOR FUTURE REFERENCE.
1

INS_810-3070-S_INSTR-Fire Pit _Grill 10/13/11 10:58 AM Page 2

FOR COVERS, ACCESSORIES AND OTHER PRODUCTS, PLEASE VISIT US ONLINE AT:
ASSEMBLY & OPERATING INSTRUCTIONS
READ ALL SAFETY WARNINGS & ASSEMBLY INSTRUCTIONS CAREFULLY
BEFORE ASSEMBLING OR OPERATING YOUR COOKER.
FOR MISSING PARTS, PLEASE CALL CUSTOMER SERVICE AT 1-800-527-0717.
2
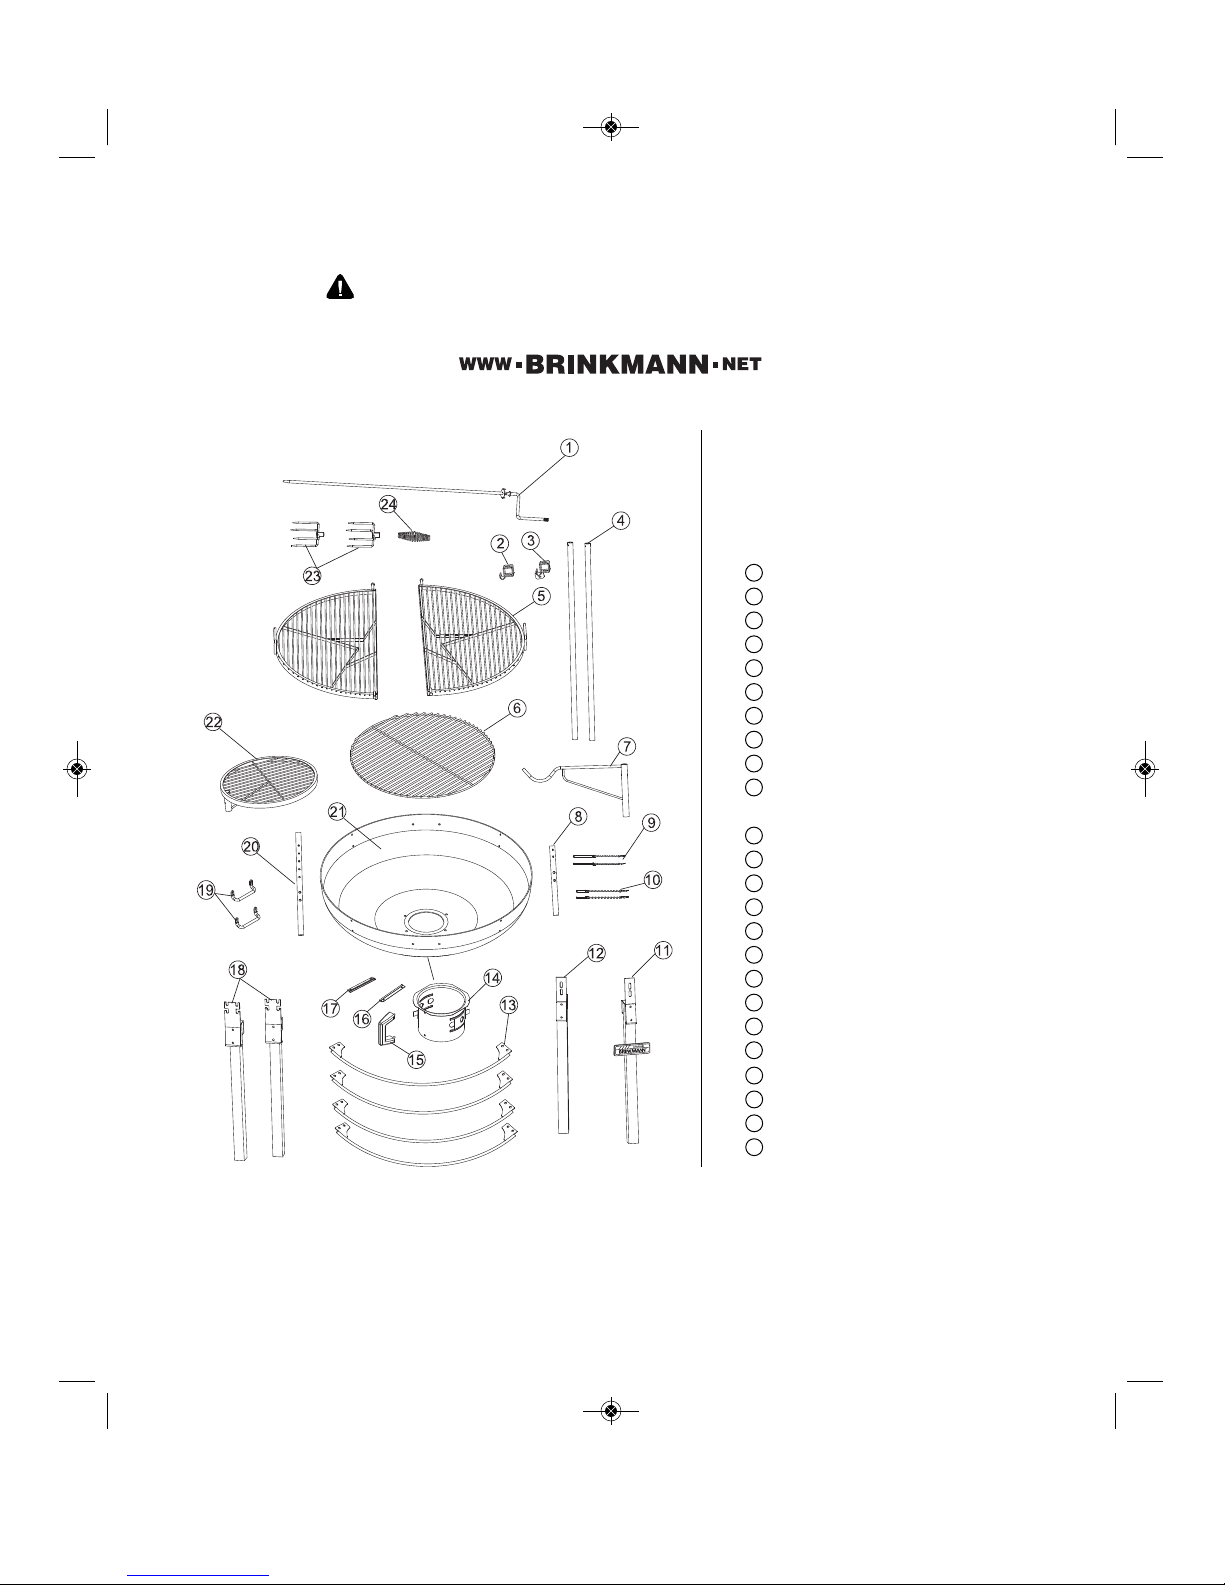
PARTS LIST:
1 Spit Rod
1 Spit Holder Bracket
1 Spit Holder Stop Bracket
2 Spit Holder Supports
2 Cooking Grates
1 Charcoal Grate
1 Swing Hook
1 Swing Hook Holder
2 Cooking Grate Set Pins
2 Swing Hook Set Pins and
Cooking Grate Set Pins
1 Front Leg
1 Rear Leg
4 Retaining Rings
1 Ash Bowl
1 Ash Bowl Handle
1 Left Ash Bowl Bracket
1 Right Ash Bowl Bracket
2 Left / Right Legs
2 Handles
1 Warming Rack Bracket
1 Fire Bowl
1 Warming Rack
2 Spit Forks
1 Spit Rod Spring Handle
1
2
3
4
5
6
7
8
9
10
The following tool is required to assemble this
Brinkmann Ranch Fire Pit & Grill:
• Phillips Head Screwdriver
11
12
13
14
15
16
17
18
19
20
21
22
23
24
CALIFORNIA PROPOSITION 65 WARNING
This product contains chemicals, including lead in the brass of certain component parts, that are known to the State of
California to cause cancer, and birth defects or other reproductive harm. Wash hands after handling. When used, this product
emits fuel combustion chemicals that are known to the State of California to cause cancer, and birth defects or other
reproductive harm. Follow all instructions in this manual and use only in well ventilated, outdoor area.
INS_810-3070-S_INSTR-Fire Pit _Grill 10/13/11 10:58 AM Page 3

Make sure you have all items listed under PARTS LIST and PARTS BAG CONTENTS before you
begin the installation process.
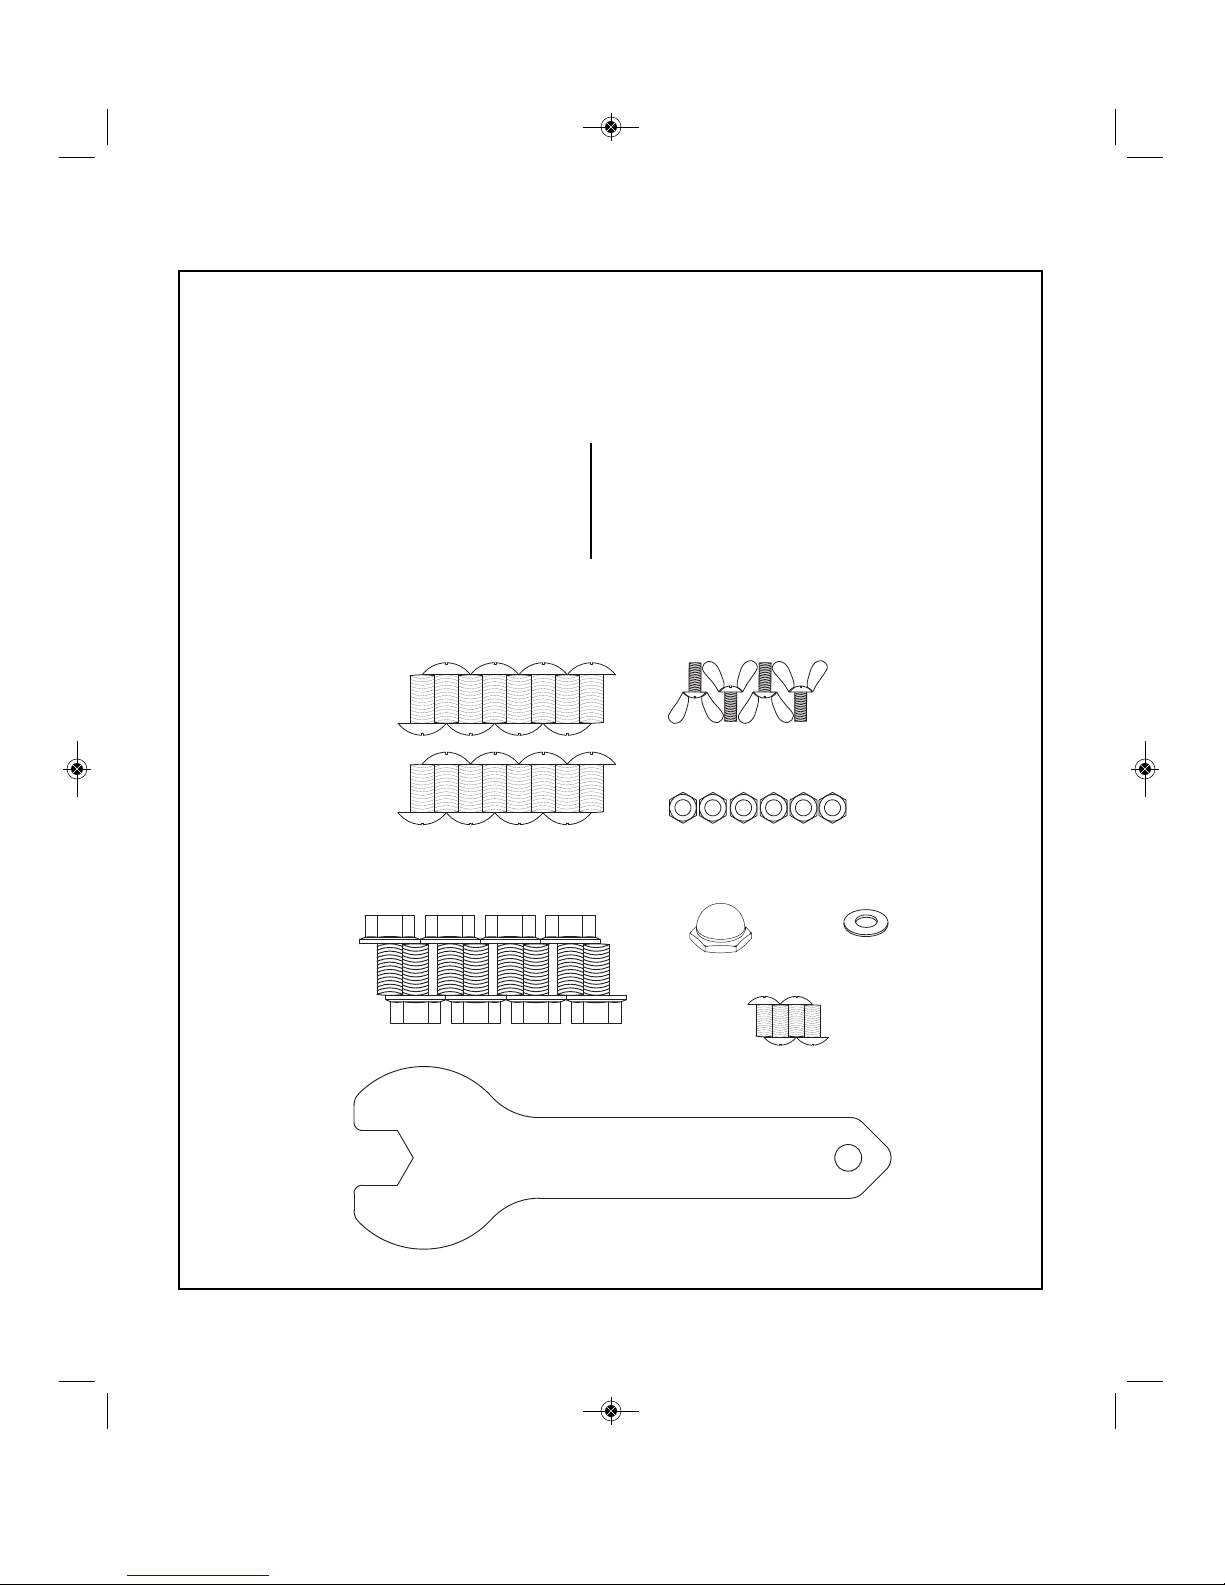
PARTS BAG CONTAINS:
Qty. Qty.
PARTS BAG CONTENTS
3
16 M6 X 12 mm Bolts
4 M6 X 12 mm Wing Bolts
6 M6 Nuts
8 M6 X 12 mm Hex Head Bolts
1 M10 Flat Washer
1 M10 Cap Nut
4 M5 X 12 mm Bolts
1 Hex Nut Wrench
M6 X 12 mm Bolts
M6 X 12 mm
Wing Bolts
M6 Nuts
M5 X 12 mm Bolts
M6 X 12 Hex Head Bolts M10 Cap Nut
Hex Nut Wrench
M10 Flat Washer
INS_810-3070-S_INSTR-Fire Pit _Grill 10/13/11 10:58 AM Page 4

4
NOTE: Choose a good, cleared assembly
area and get a friend to help you
put your grill together. Lay
cardboard down to protect grill
finish and assembly area.
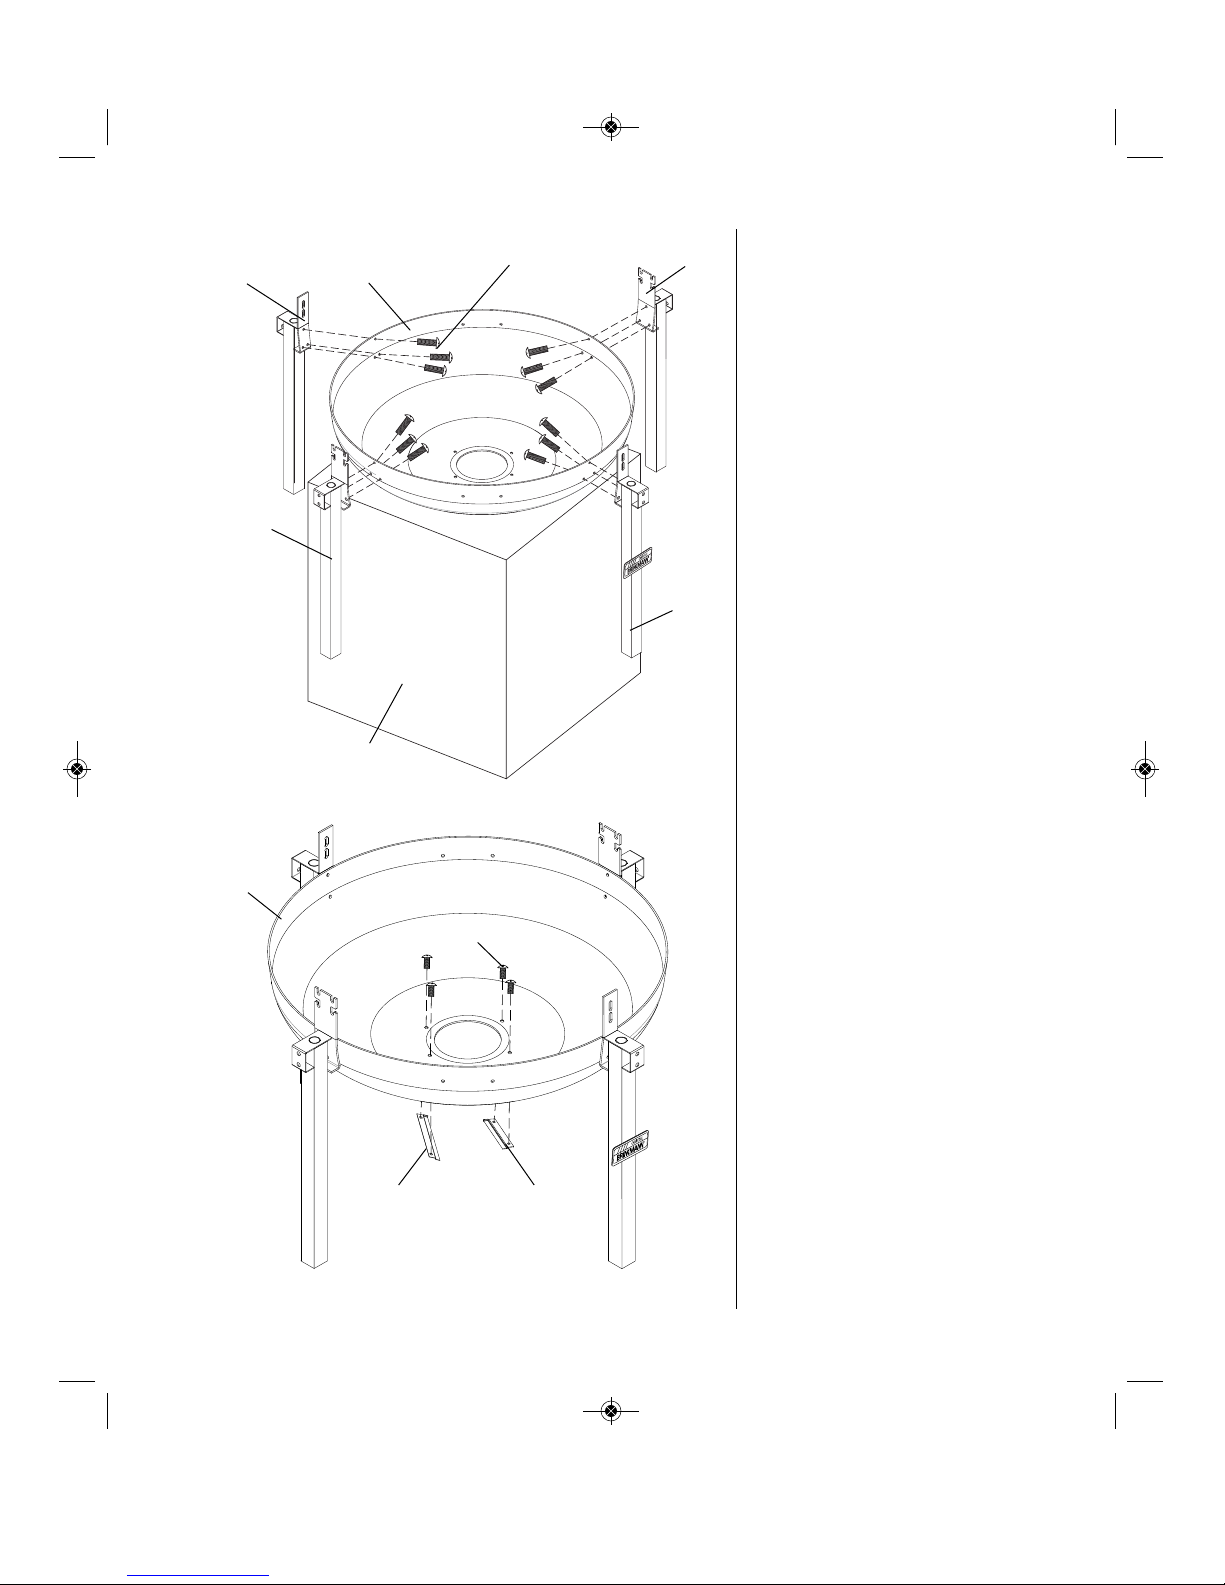
Step 1
Place the fire bowl on platform, then
attach legs to fire box using twelve
M6 X 12 mm bolts as illustrated.
Step 2
Remove the platform after assembled
legs, attach left and right ash bowl
brackets to fire bowl using four
M5 X 12 mm bolts as illustrated.
Rear Leg
Left/Right Leg
Rear Leg
Left/Right Leg
Left/Right LegLeft/Right Leg
Front Leg
Platform
Left Ash Bowl
Bracket
Right Ash Bowl
Bracket
M5 X 12 mm Bolts
Fire Bowl
Fire Bowl
M6 X 12 mm Bolts
INS_810-3070-S_INSTR-Fire Pit _Grill 10/13/11 10:58 AM Page 5

5
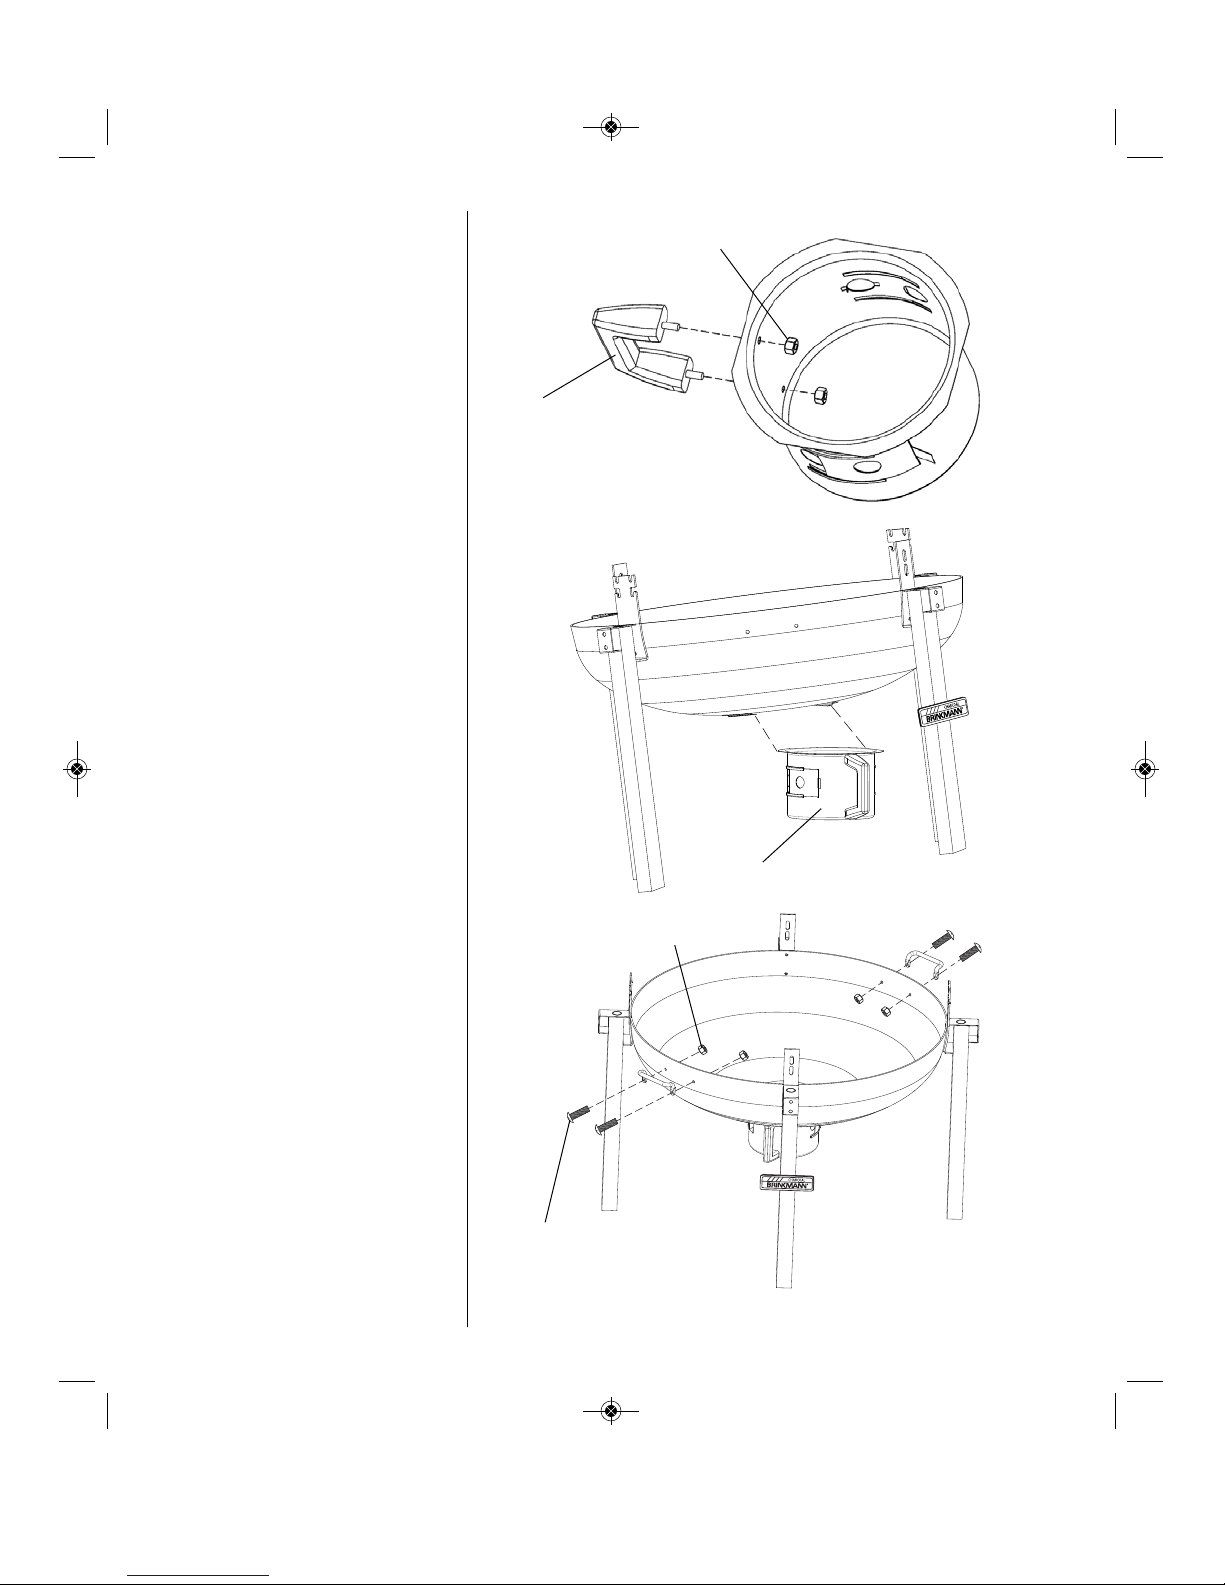
Step 3
Attach ash bowl handle into ash bowl
using two M6 nuts as illustrated.
Step 4
Insert ash bowl into ash bowl rails as
illustrated.
Step 5
Attach handle to fire box using four
M6 X 12 mm bolts and four M6 nuts as
illustrated.
Ash Bowl
M6 Nuts
M6 X 12 mm Bolts
M6 Nuts
Ash Bowl Handle
INS_810-3070-S_INSTR-Fire Pit _Grill 10/13/11 10:58 AM Page 6

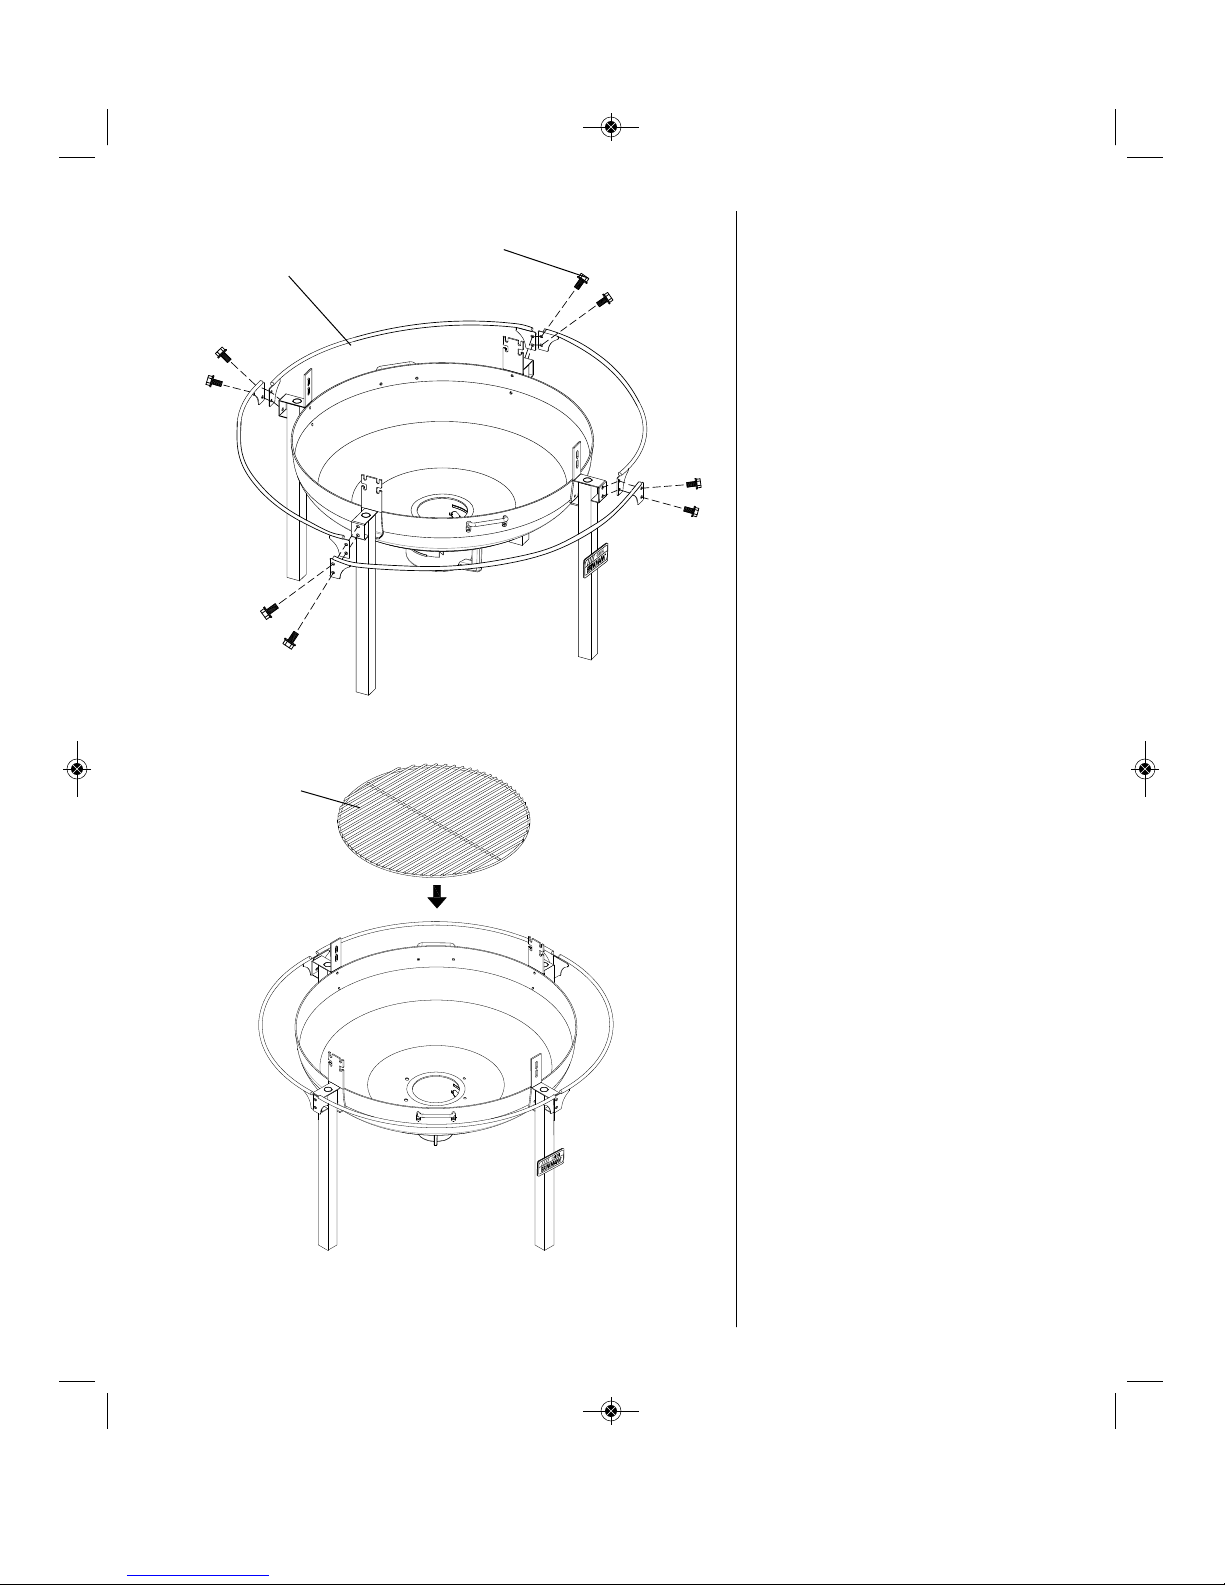
Charcoal Grate
5
Step 6
Attach retaining rings to legs using eight
M6 X 12 mm hex head bolts as illustrated.
Step 7
Insert charcoal grate as illustrated.
6
M6 X 12 mm Hex Head Bolts
Retaining Ring
INS_810-3070-S_INSTR-Fire Pit _Grill 10/13/11 10:58 AM Page 7

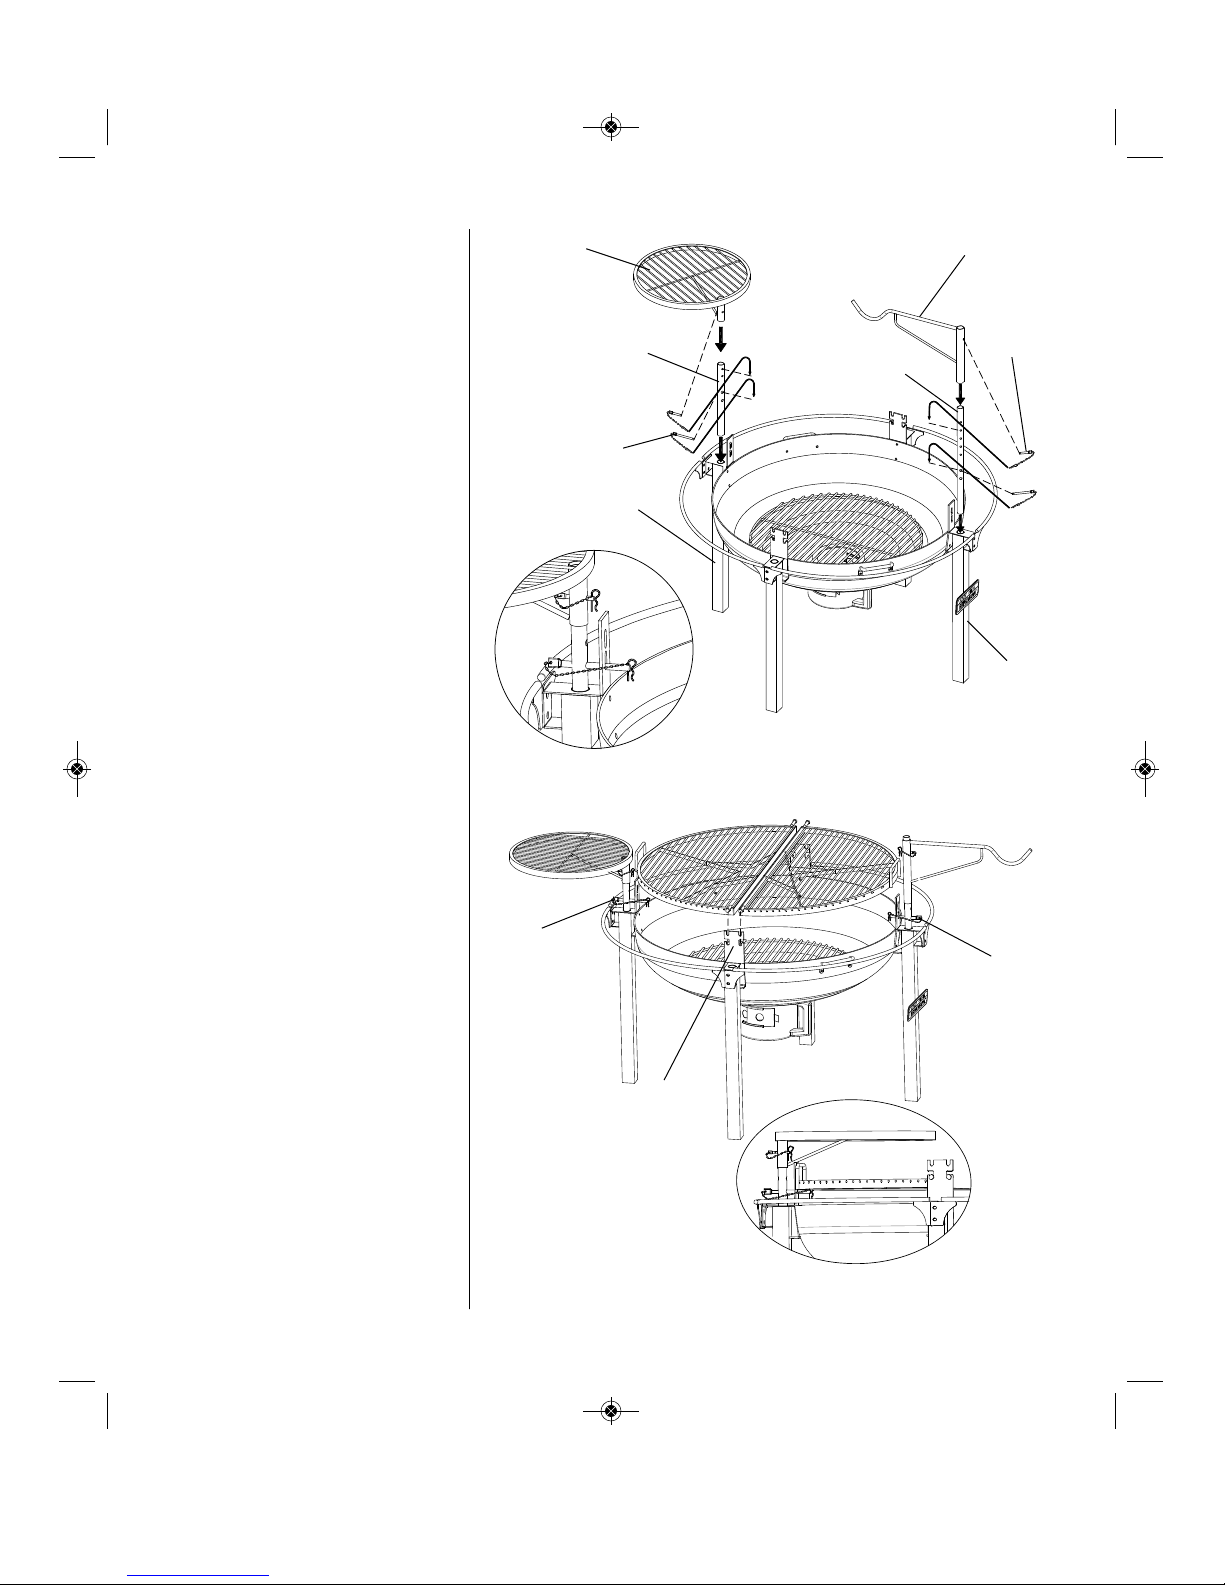
Step 8
Insert warming rack bracket and
swing hook holder into holes on front
and rear legs. Secure with swing hook
set pins and cooking grate set pins.
Set warming rack onto warming rack
bracket and secure with cooking grate
set pins.
Step 9
Place cooking grates on upper or
lower center supports. Then adjust set
pins in side posts to support the
middle of cooking grates.
77
Swing Hook
Center
Supports
Warming Rack
Warming Rack
Bracket
Cooking Grate
Set Pins
Rear Leg
Front Leg
Swing Hook
Holder
Swing Hook
Set Pins
Cooking Grate
Set Pins Cooking Grate
Set Pins
INS_810-3070-S_INSTR-Fire Pit _Grill 10/13/11 10:58 AM Page 8

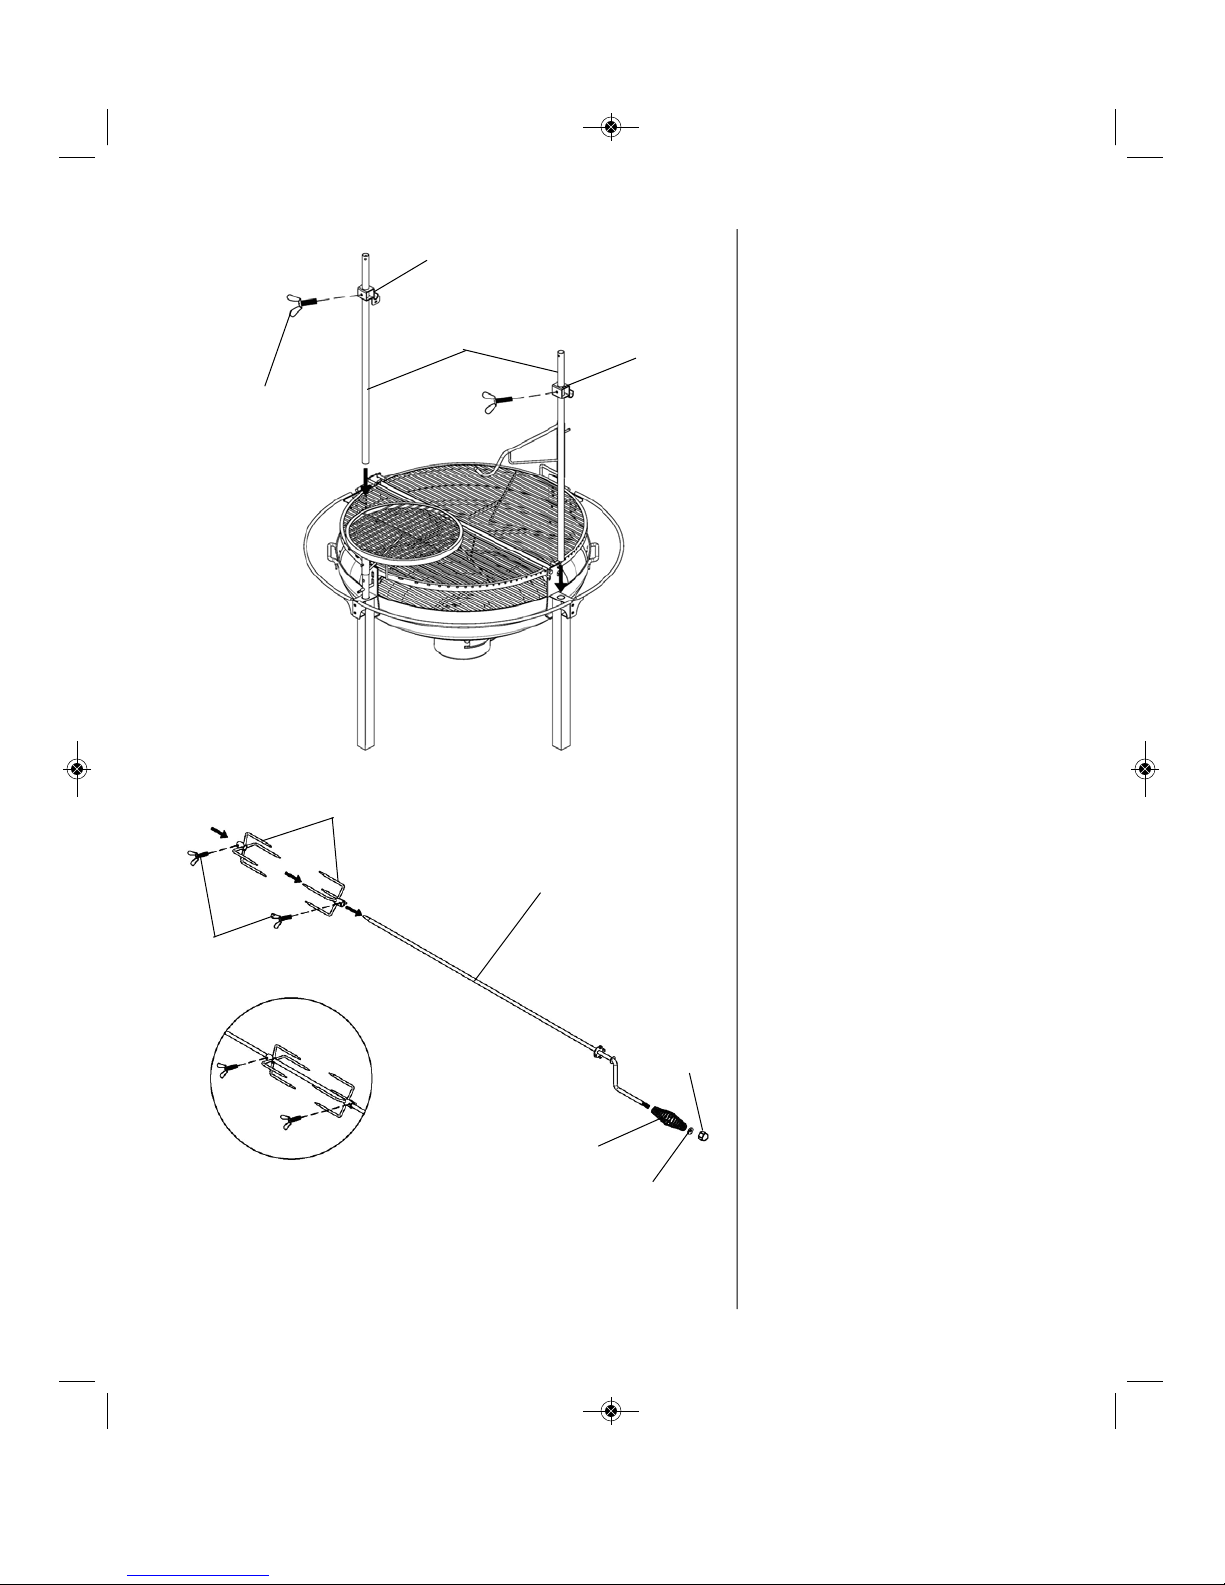
Step 10
Attach spit holder bracket and spit
holder stop bracket to spit holder
supports using two M6 X 12 mm wing
bolts. Insert spit holder supports into
holes next to cooking grate center
supports. Set height to desired level.
Step 11
Assemble spit by sliding forks onto spit
with pointed end facing the middle.
Secure using M6 X 12 mm wing bolts.
Step 12
Assemble spit spring handle by sliding
onto spit handle end and secure with
M10 flat washer and M10 cap nut.
8
Spit Rod Spring Handle
Spit Rod
M10 Cap Nut
M10 Flat Washer
M6 X 12 mm
Wing Bolts
M6 X 12 mm
Wing Bolts
Spit Forks
Spit Holder
Stop Bracket
Spit Holder
Bracket
Spit Holder
Supports
INS_810-3070-S_INSTR-Fire Pit _Grill 10/13/11 10:58 AM Page 9

CHARCOAL
9
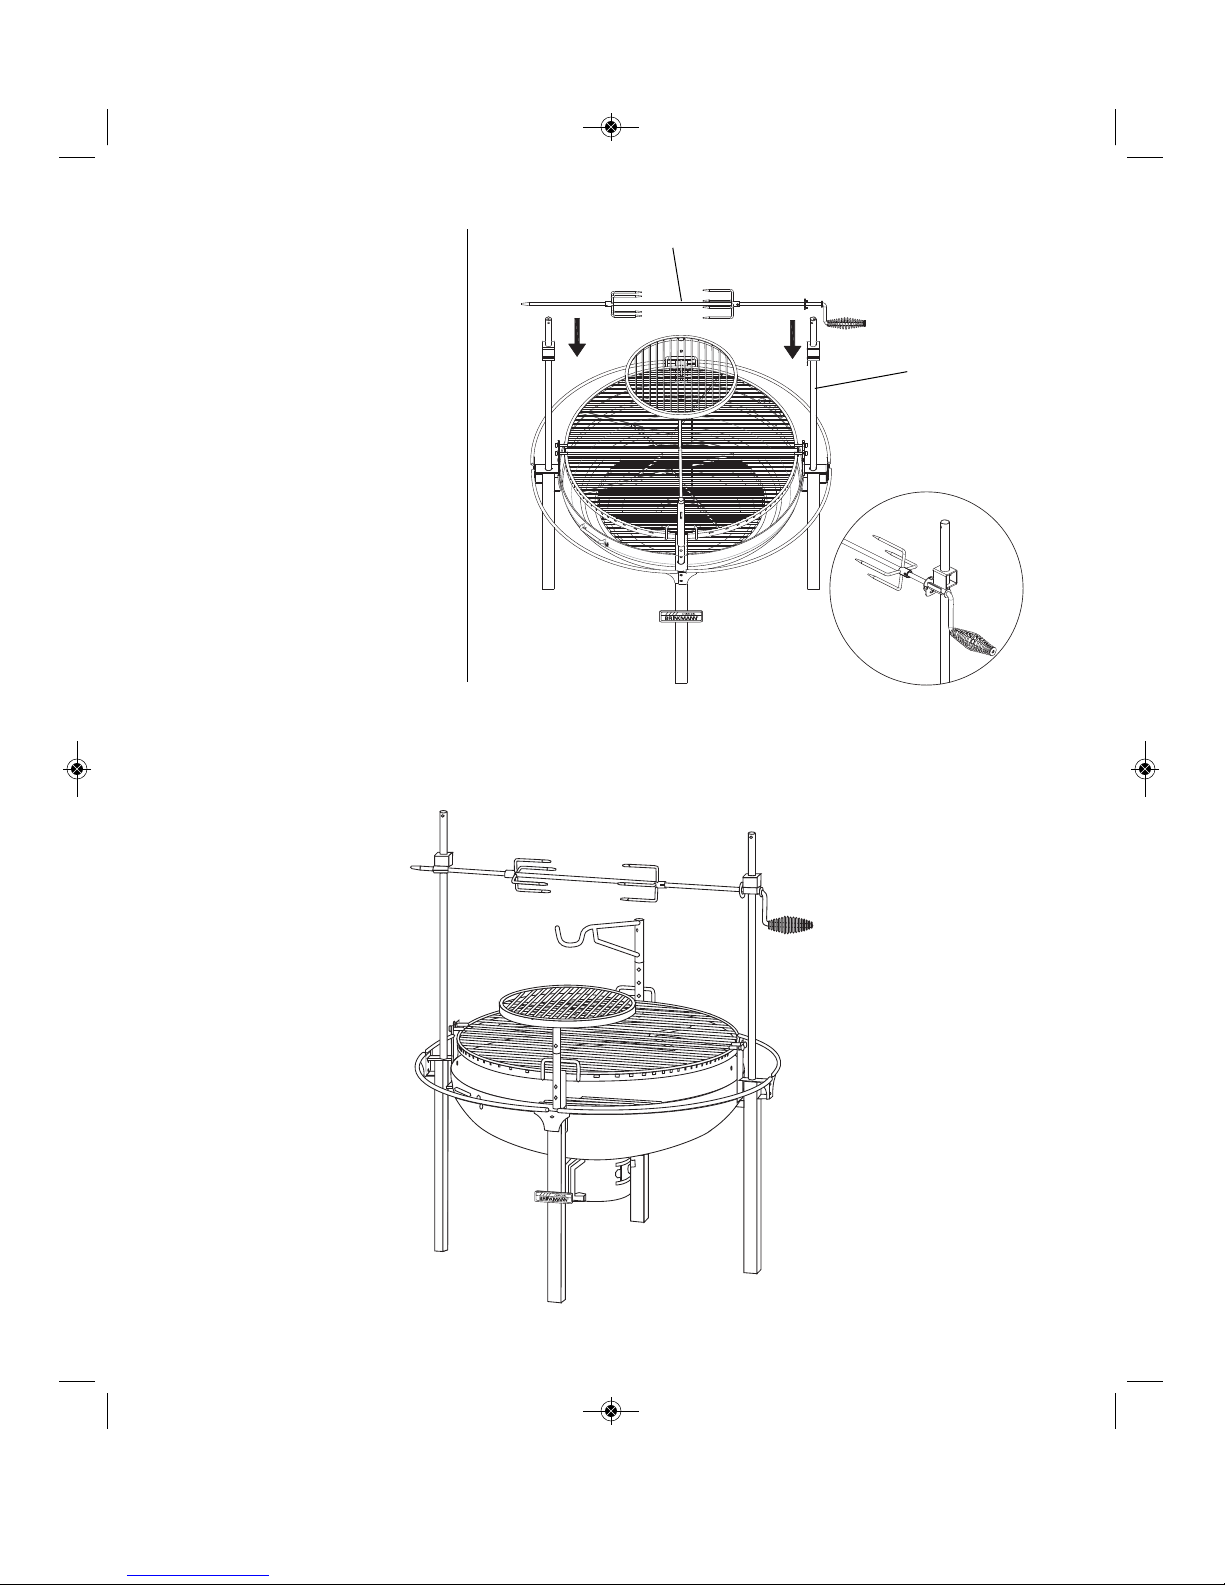
Spit Assembly
Spit Holder
Supports
Step 13
Place spit assembly onto spit holder
supports as illustrated.
YOUR BRINKMANN RANCH FIRE PIT
& GRILL IS NOW READY FOR USE.
Brinkmann®3070-S (Assembled)
INS_810-3070-S_INSTR-Fire Pit _Grill 10/13/11 10:58 AM Page 10
Inhaltsverzeichnis
Sprachen: