
CAME-TV WAERO Bedienungsanleitung

1
Summary
The CAME-TV WAERO Duplex Digital Wireless
Foldable Headset is easy to set up and provides
about 350m/1200ft of open range between the
Master and Remote headsets. There are two
versions available, US for the US while EU for EU
countries and other countries can use either
version if it does not have the regulation on
frequency use. This manual applies to model
WAERO-R (Remote) and WAERO-M (Master).
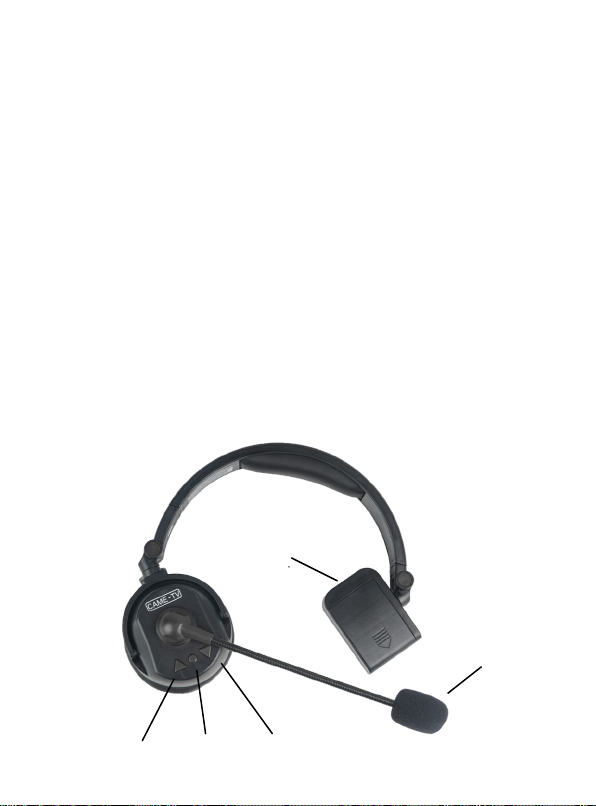
Product Structure
Volume+ On /O Volume -
Microphone
Baery Pack

2
Operating Instructions
1.Power On/Off
Power on: the headset will be powered on
automatically when battery is installed. In the
condition that battery is already in its compartment,
one quick press the power button to turn on the
headset.
Power off: Press and hold the power button for
around 5 seconds until power indicator changes off.
Note: Power off the remote headsets first otherwise
the master headset can not be powered off.
2.LED Indicators
Master: red LED on earcup indicates master headset.
Remote: blue LED on earcup indicates remote
headset.
3.Microphone Boom
MUTE OFF: When microphone boom is in down
position, you can talk and listen.
MUTE ON: Flip the boom microphone up, it mutes the

3
microphone only and you can still hear what everyone
else is saying.
4. Volume
Voice +: Raise the volume
Voice -: Lower the volume
5. Pairing
Headsets are paired at the factory and ready for use
when they are powered on. For the headsets which
already had been paired successfully, they can be
connected automatically and no need to pair again.
Note: If for some reason you need to re-pair the
headsets here is the recommended procedure.
Before pairing process, it is important to turn on all
headsets and mute off the microphone in the same
group otherwise the connection may be cut down.
( The LED indicator is flash slowly being mute on,
which may disturb our judgment in pairing procedure.)
It is recommended to start with master headset, press
and hold on both volume + & - buttons
simultaneously until the red Led indicator starts
flashing quickly.

4
Then following steps should be proceed on the
premise of that the led on the remote headset
become solid after powered on. On the remote
headset, press and hold on both volume + & -
buttons simultaneously until the Blue LED starts
flashing quickly. The slowly flash on the remote
headset indicates the process is completed. The
same procedure goes for other headsets for pairing.
Each master headset can be paired with 3 different
remote headsets. (If an hub is needed, it is regarded
as one of the remote headsets.) The master headset
will quit the pairing process and LED become solid
after three different remote headsets had been
paired with the master
Quit pairing mode by taping power button on master
if remote headset(s) is/are less than 3 pieces.

5
Pair How to Pair How to quit pairing
process
Master
or
Remote
Press and hold
on volume + & -
buttons
simultaneously
until the Red
Led indicator
starts flashing.
Short press Power
button on master
( Remote will quit
pairing automatically
and led indicator
become solid if master
headset has already
been paired with three
remote headsets.)
HUB
Long press
function Button
until LED
indicator flashes
quickly.
Long press function
Button (Remote will
quit pairing
automatically and led
indicator become solid
if master module has
already been paired
with three remote
headsets.)
Quick Start and Tips

6
1.During pair process, master will always remain in
pairing mode while remote needs to be paired one by
one.
2.The master headset is not allowed to be in pairing
mode if there are more than 2 master headsets. For
example, Module one and Module two of the hub can
not be in pairing mode at the same time.
3.If the remote has already been paired with master in
Group A and this remote need to be paired with Group
B master, in this case, the group A master needs to
be turn off in advance.
4.Please make sure the microphone is in talking mode
and do not mute on the microphone when pairing the
headsets. The reason is that the led indicators flash
slowly when mute on is activated and it will be hard to
judge the pairing procedure.
5.Quick press ON/OFF button 7 times and repeat the
pairing process if the led of remote headset stay solid
and the pairing mode can not be activated.

7
HUB Description
For our standard kits, the most connections available
is a four headset connection via a master headset
with three remotes. To expand beyond that capability,
we now offer a hub to provide connection up to 10 in
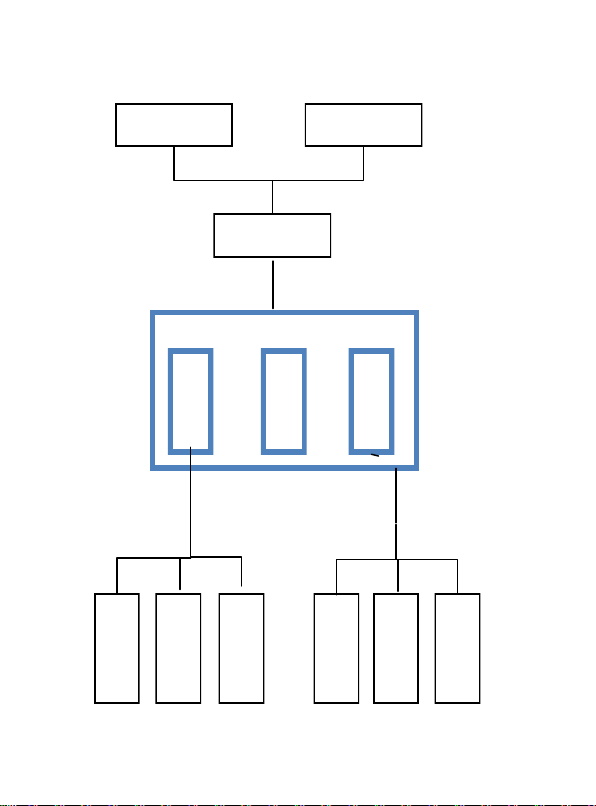
one system. Normally a master headset can connect
to three remotes, but in this configuration the hub is
utilizing on of the three channels available to the
master. The hub in turn communicates to two groups,
with each group connecting to three headsets. By
adding a microphone to the hub, it becomes an
additional headset. All together when configured as
the image shows, you can have 10 users on the same
system. Remote B&C headsets in the right diagram
can be replaced with two different HUB so the whole
system will become a 19 persons communication
system.
The hub has a micro USB port to power/charge the
unit via 5V DC with a USB power supply or power
bank. When power is connected can run directly
without batteries and also charge when batteries are
installed. The Hub can run alone on batteries and with
one installed run time is about 8-10 hours and with
two batteries installed, the run time increases to about
15-18 hours.
8
Master A
Remote B Remote C
HUB
HUB M1
HUB R
HUB M2
Remote D
Remote E
Remote F
Remote G
Remote H
Remote I

9
4 Person Team, Max Distance 2400ft
Inhaltsverzeichnis


