CNC QB2 Bedienungsanleitung

Page 1
QB2 CNC
User guide
Safety precautions
Like any power tool, operating and using a CNC machine can be dangerous. Diligence must be applied when operating
any machine. It is recommended to wear appropriate PPE such as eye protection and ear muffs for your own safety.
NEVER leave a powered machine unattended at any time!
In the event of an issue or if something doesn’t seem right, it is recommended to immediately disconnect power to
the machine and unplug it from the wall power outlet. Contact our customer support team if you have any concerns
about your machine.
Always ensure your machine is free and clear of any swarf, dust or other obstructions that may impact the motion of
your machine. We highly recommend the use of a Dust shoe and vacuum system for keeping your machine clean and
clear of swarf and dust.
Always ensure to follow the maintenance guide at the bottom of this manual after initial assembly and setup and also
periodically to ensure your machine always performs to its optimal capacity.
Page 2
Unboxing your Machine and setup
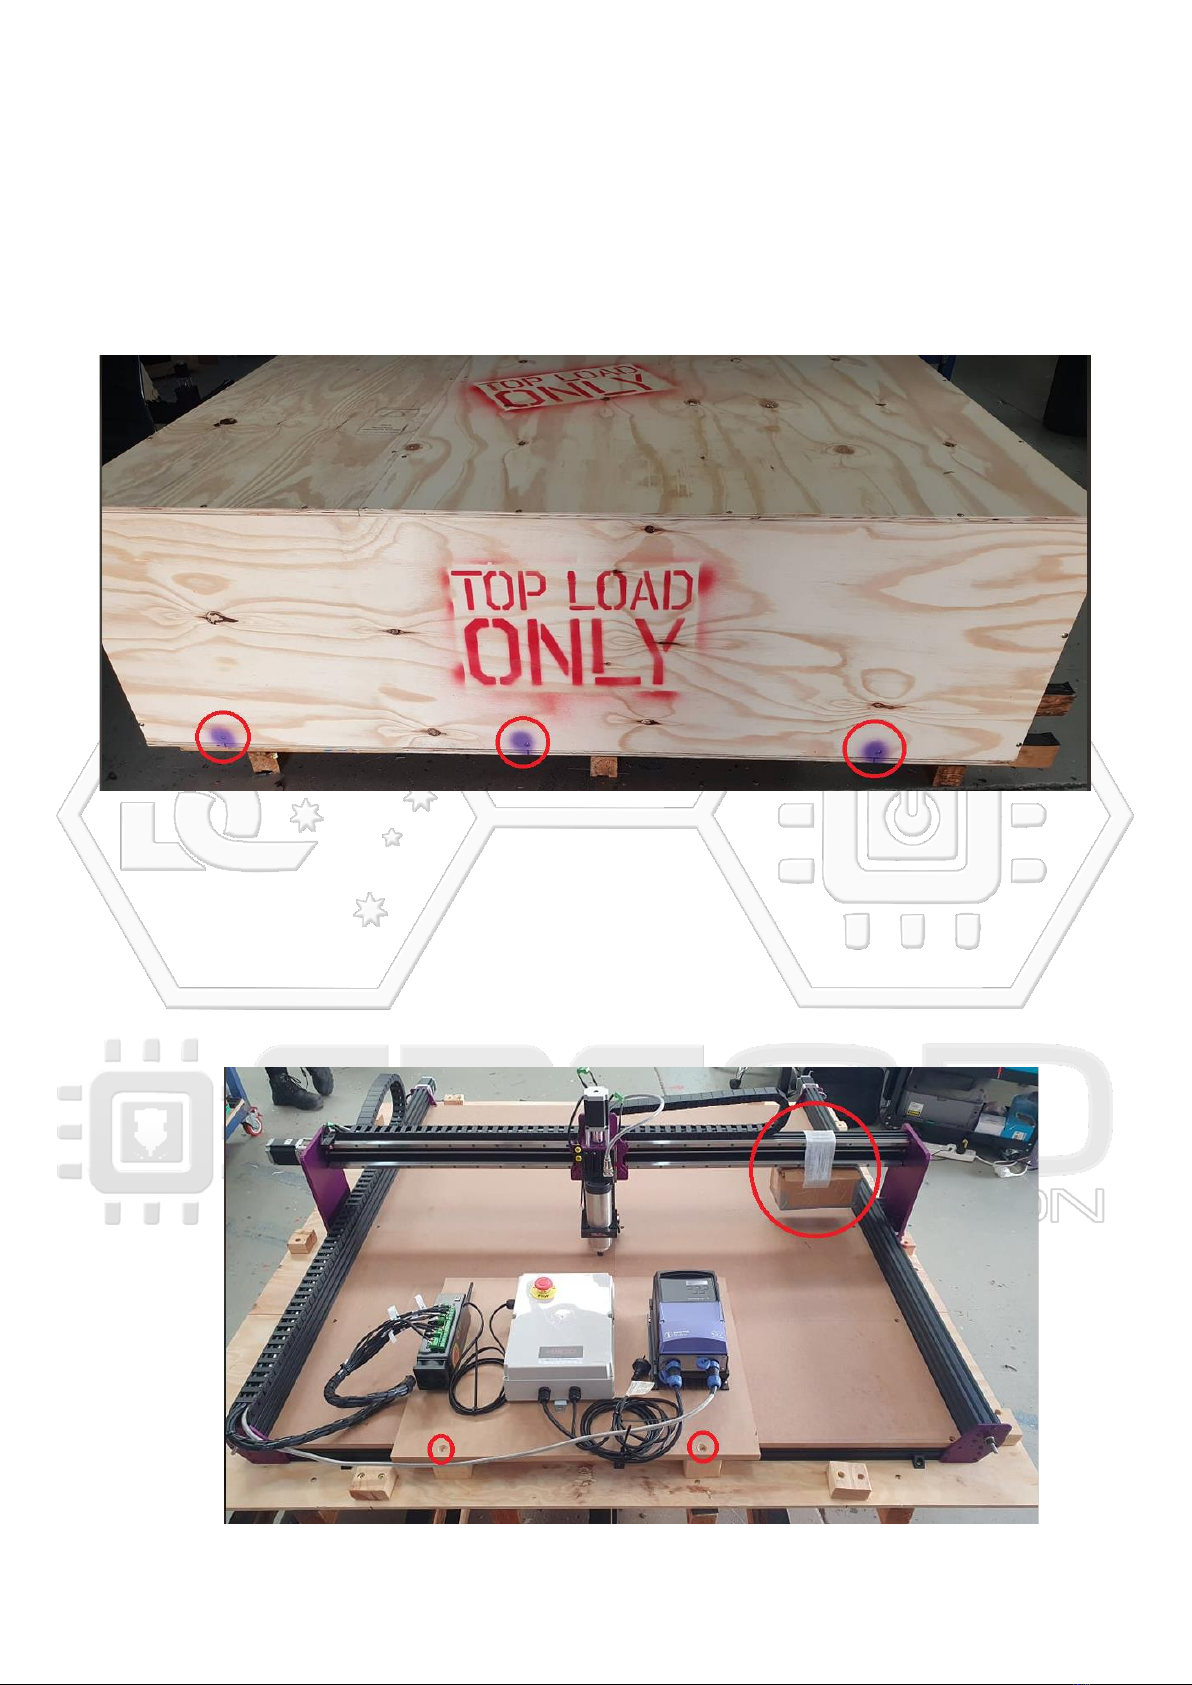
1. Look for the screws on the crate that have purple paint on them. Use a Philips head
screw driver or impact driver bit to unscrew the main crate packaging. Once
unscrewed, get a friend to help you carefully lift the crate cover off. This will expose
the machine and components underneath. If you do not have a friend to help you can
unscrew the entire top cover and dismantle the packaging from top down.
2. Once your machine is exposed you can unscrew the electronics board from the front
of the crate and slide it onto the machines spoil board for easy transport to its home
location bench or table. At this point you can also carefully remove the small parts
accessories box that is hanging onto the Gantry. This usually contains your endmills,
laser goggles, Dust shoe and other accessories you may have purchased with your
machine.

Page 3
3. Now that we have everything loose it is a good idea to get a friend or 3 to help move
your machine on to your table/bench. Be very careful to avoid skewing the machine
while transporting it and under no circumstances should you ever grab the ballscrews.
Always ensure the ballscrews are protected to avoid bending them. They control your
machines movement so keeping them nice and straight and under the right tension is
very important.
Some users may choose to move the entire pallet and bottom packaging onto the bench
and run the machine from there. This is OK to do also. If doing this, keep the machine
fastened to the pallet itself.
If you have removed the pallet and crate baseboard from the machine it is
recommended to use the 6 angle brackets; 3 on front, 3 on back (that secured your
machine to the pallet originally) to secure the machine down to the new bench. Start
with the 3 on the rear of the machine and check squareness of your machine. If the
machine is square then secure the front down.
4. Once your machine is in position it is time to find a spot for your electronics. To make
it easy, you can mount the existing MDF board that has the electronics fixed to it to
the front of your machines table. This will provide easy access to the VFD and E-stop.
You can also choose to unmount the electronics from the MDF board and position
them where you like as long as cables will reach of course. It is not recommended to
power up just yet but we will shortly!
Mounting suggestion using the existing MDF electronics mounting board:

Page 4
Things to check before powering on!
We’re almost there! It’s important to do some quick checks to ensure your machine is ready
to go. Sometimes in transport, things can wiggle loose. Here are some things to check.
❖Check all nuts and bolts on the machine.
❖Check the green connectors that connect all the wires. They should be firm and
secure. Try giving each wire a slight tug in each screw terminal to make sure
they are definitely secure!
PRO TIP: You can familiarize yourself and follow the maintenance guide at the
bottom of these instructions to check that everything is nice and secure after the
machine has been moved into its home location.
❖Download and install our CNC3D Commander software if you have a Windows
computer. It can be found here:
https://www.cnc3d.com.au/commander
Let’s plug it in!
Take the single power plug lead and plug it directly into a wall socket. It is NOT
recommended to run the machine from a power board. Once powered on, your Nighthawk
controller fan will come on and so will the display on your VFD.
You can now either choose to connect to your machine via USB on your PC or wifi via by
directly accessing the Nighthawk controllers web interface.
We highly recommend visiting the user manual for the Nighthawk controller found here:
https://www.cnc3d.com.au/nhc

Page 5
PLEASE NOTE
Some key things with the QB2
Machine settings
Our trained team preconfigure every aspect of your machine prior to it being sent to you.
You do not need to change any settings in your controller and definitely DO NOT load any
profiles onto your machine within the Profiles tab of our Commander software.
By default, we set soft limits to the maximum travel limits of your X and Y axis. Whenever
you first power on your machine you MUST home your machine. If your controller is ever in
an Alarm state, you can reset it by clicking the “Unlock” button in Commander. If this fails to
clear, hit the E-stop button in Commander then the unlock button.

Page 6
Initial setup steps once powered on
Surfacing your spoil board
It is highly recommended to surface the top of your spoil board. Surfacing the entire
working area means that your tool will always be perpendicular to your cutting tool.
To do this, follow the steps above for making a rectangle but make one the size of your
actual working area. This information is stored in the Peripherals tab of commander, do not
use a measuring tape to get these measurements as the physical size and the working size
will be different. See example below for where to find these measurements:
In this case we can see our X and Y maximum travel limits in Red and the homing pull off
value in Orange. To work out our machine’s maximum travel we need to deduct the homing
pull off from the maximum travel. In this case:
X will be [1282 - 3 = 1279mm]
Y will be [1302 –3 = 1299mm]
When using the spoil board surfacing wizard in Commander, we have preconfigured some
values that suit the QB2 CNC design. It is recommended to keep most of the settings but to
change the “Width (X)” and “Length (Y)” values to match your machine. Once you have
entered these values, you can save this job by clicking the “Generate” button. This will
prompt you to save the file. Choose a location you can easily find it.

Page 7
Once done, close out of the Surfacing wizard and the Creation tools. This should take you
back to the main Commander window.
The next step is to prepare to run the job! To do this we need to home your machine first.
Once homed, loosen off your collet nut on your spindle and insert a 6mm collet and the
22mm surfacing bit provided with your QB2 CNC. Please ensure the surfacing bit is inserted
quite high into the collet but not all the way in. Once in, tighten the collet nut up.
Note: Extreme force is not required to tighten your collet nut. Just make sure it is secure.
If you ordered one, attach your dust shoe and vacuum hose at this time as well.
Get a marker and squiggle some lines all over your spoil board. This will allow us to tell if
surface has been machined or not. See photo below of areas that were missed on our first
pass trying to surface the spoil board.

Page 8
Using the jogging buttons in Commander, put a piece of scrap paper under the surfacing bit
and lower the Z down until it is just touching the paper. Ensure to reduce your downward
travel distance as you get closer to the surface to ensure the machine does not crash into
the spoil board.
Once you feel resistance when moving the paper around you can remove the paper and
discard it.

Page 9
Back in our Commander software, Click the “Zero job” button. Then click on Load Job and
select the file you saved out of the surfacing wizard. Once loaded, hit the green run button
on your VFD and wait until the spindle is up to speed. Once at speed, turn on your vacuum
extraction (if attached) and hit the ‘Run Job’ button. See sequence here:

Page 10
This will start the process of surfacing your spoil board. It may take a long time to complete
this process. If something doesn’t seem right then immediately hit the E-stop button on your
control box or via our Commander software.
Note: Using the E-stop on your Nighthawk controller or via our Commander software will
only stop your machine moving but will not stop your spindle. If you want to stop both the
spindle and machine quickly, we recommend using the mechanical E-stop on your control
box.
Once the job is complete check to see if we removed all of the markings on the bed. If we
didn’t, repeat the process again 1mm lower than last time until the entire area is surfaced.
SOME GREAT NEWS!
The process we have just followed here is basically how every job will be run if streaming
the job. You will be running all future jobs like this. Also keep in mind you can upload jobs to
your Nighthawk controller and run them off your SD card. Saving this handy spoil board job
will make it easy next time you want to freshen up your surface OR after you replace your
spoil board.
Inhaltsverzeichnis
Andere CNC Industrieanlagen Handbücher