
Cobalt Digital Inc X12-XLE Bedienungsanleitung
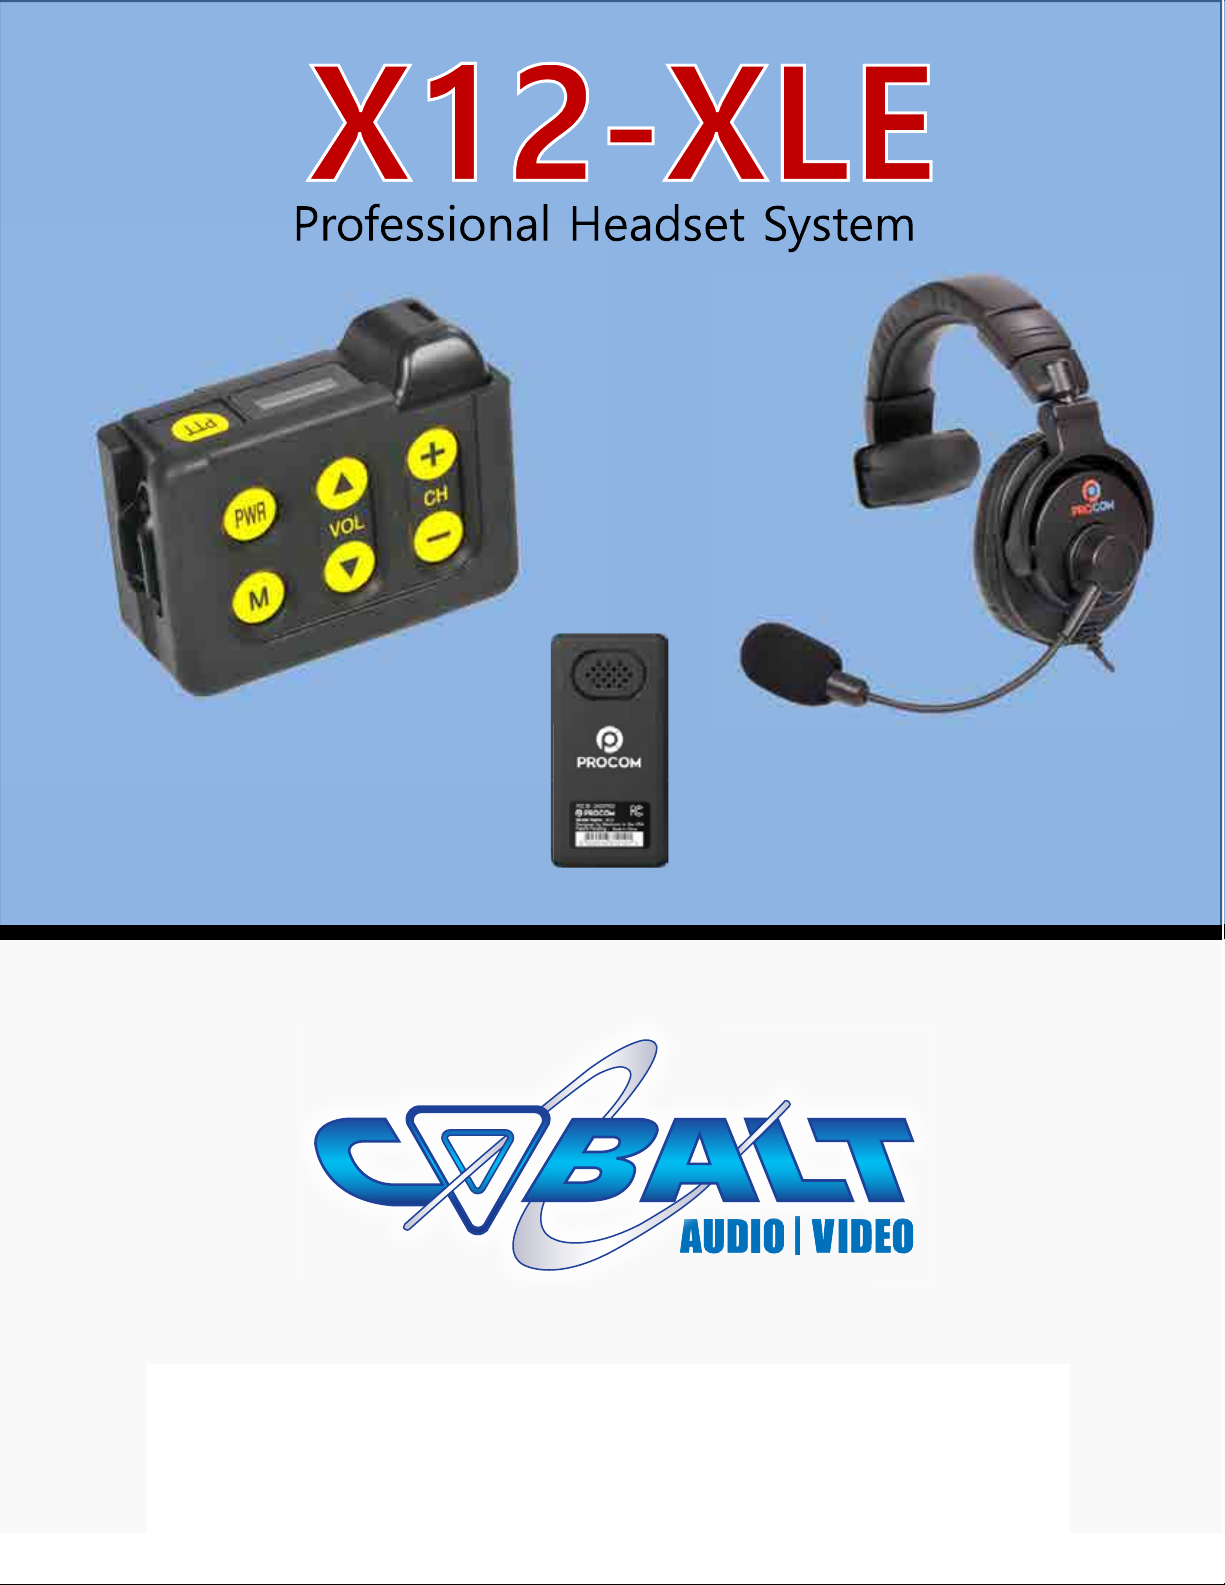
X12 – X12E - XLE Belt Pack
HS
-
35
Headset
2373 Leechburg Road - Lower Burrell, PA 15068
724-337-1400
sales@proacw.com
www.procomheadsets.com
HS
-
35
Headset
“Designed by Coaches for Coaches”
X12M Mini Helmet Receiver
®
2350 Fortune Drive | Lexington KY 40509
859.299.9494 | 800.264.6021 | 859.299.9334
david.fried@comtronicsnow.com
www.cobaltav.com

Table of Contents
I Contents I
Caution
Certificate
Introduction
Product Image
Function
1. Power
2. Current Setting Display
3. Volume Setting
4. User Number Setting
5. Channel Setting
6. Pairing(Grouping)
------------------------------------------------------------ 02
--------------------------------------------------------- 03
------------------------------------------------- 04
------------------------------------------------------- 05
------------------------------------ 05
-------------------------------------------- 06
-------------------------------------- 06
-------------------------------------------- 07
------------------------------------------
08
Table of Contents
6. Pairing(Grouping)
7. Noise Cancel
8. Beep Sound
9. Display Brightness
10. Mic Volume Level
11. Device Version Info
12. Mic Mute/Group/PA Mode (PTT button)
13. Side Tone
14. How to Charge
FAQ
Specifications and Caution
Quick Start Up Guide
Quick Reference Guide
------------------------------------------
08
---No Longer Available on Firmware 004 or greater --- 09
------------------------------------------------ 09
----------------------------------------- 10
----------------------------------------- 10
--------------------------------------- 11
------------------11
-------------------------------------------------- 11
-------------------------------------------- 12
--------------------------------------------------------------- 13
-------------------------------------- 14
-------------------------------------------- 15
------------------------------------------ 16
-01-

Caution
All X Series transceivers operate in the license-free 900MHz ISM band and are subject to the
Rules and Regulations of the FCC.
This device complies with part 15 of the FCC rules. Operation is subject to the following two
conditions: (1) This device may not cause harmful interference and (2) this device must accept
any interference received, including interference that may cause undesired operation.
NOTE 1 : The Grantee Is Not Responsible For Any Changes Or Modications Not Expressly
Approved By The Party Responsible For Compliance. Such Modications Could Void The User’s
Authority To Operate The Equipment.
NOTE 2 : This equipment has been tested and found to comply with the limits for a Class B
digital device, pursuant to part 15 of the FCC Rules. These limits are designed to provide
reasonable protection against harmful interference in a residential or commercial installation. This
equipment generates and can radiate radio frequency energy and, if not installed and used in
accordance with the instructions, may cause harmful interference to radio communications.
However, there is no guarantee that interference will not occur in a particular installation. If this
equipment does cause harmful interference to radio or television reception, which can be
determined by turning the equipment o and on, the user is encouraged to try to correct the
interference by one or more of the following measures:
- Reorient or relocate the receiving antenna.
- Increase the separation between the equipment and receiver.
-
Connect the equipment into an outlet on a circuit dierent from that to which
the receiver is
connected
.
Caution
-02-
-
Connect the equipment into an outlet on a circuit dierent from that to which
the receiver is
connected
.
- Consult the dealer or an experienced radio/TV technician for help.
NOTE 3 : This appliance and its antenna must not be co-located or operation in conjunction with
any other antenna or transmitter.
NOTE 4 : Although communication will work ne, we still encourage while in a press box, the
optimum place to put the belt pack is nearest the window and position it or elevate it where
the belt pack can see the entire eld.
NEVER keep the belt pack on your hip or below ANY OBSTRUCTION while in the press box.
Please pass this along to the coaches or individuals that are setting up the headsets prior to
kicko .

Caution
Caution
•Do not put sharp or hard materials into the speaker hole when using this product.
•Do not attempt to repair the transceiver or other components of the system yourself.
•Do not leave components in vehicle during extreme hot/cold weather for long periods of time.
•Leaving in a extreme hot area (+110 degrees Fahrenheit) for a long period of time may result in
deformation or malfunction of this product.
•Use only the provided charger and cable for charging. Using a third party charger may cause re.
•Stop using immediately if you see re or smell smoke from this.
•Stop using immediately when exposed to risk of re.
•Do not use third party’s components, such as batteries, chargers, cables or headsets.
•Keep components clean by using a damp cloth when exposed to extreme dirt or water.
•If submerged in water, cease operation and contact customer service at 859-299-9494.
Certication :
-03-
Identication Code : Shown below
Company Name: Westcom Wireless, Inc
dba / ProCom USA
Engineering Country USA
Software Development Country USA
Firmware Development Country USA
Electronic PC Board Manufacturer <1.06 Japan, 1.06 USA
Plastic Case Manufacturer Country Ver 1.00 – 1.05, Taiwan, Ver 1.06 Korea,
Final Assembly Country USA
Headset Manufacturer Country USA
Manufacturing Date: Marked Separately
Li-Ion Battery Country used in Belt Pack and Mini Receiver, Japan
Model Name: Shown Below
Output Rating: Shown Below
Date of Manufacture: Separately Shown
FCC Type Acceptance: Westcom USA
Model Name Output Rating Identication Code
ProCom X Series 500mW FSK,
250 GFSK
2AO37X12
Introduction
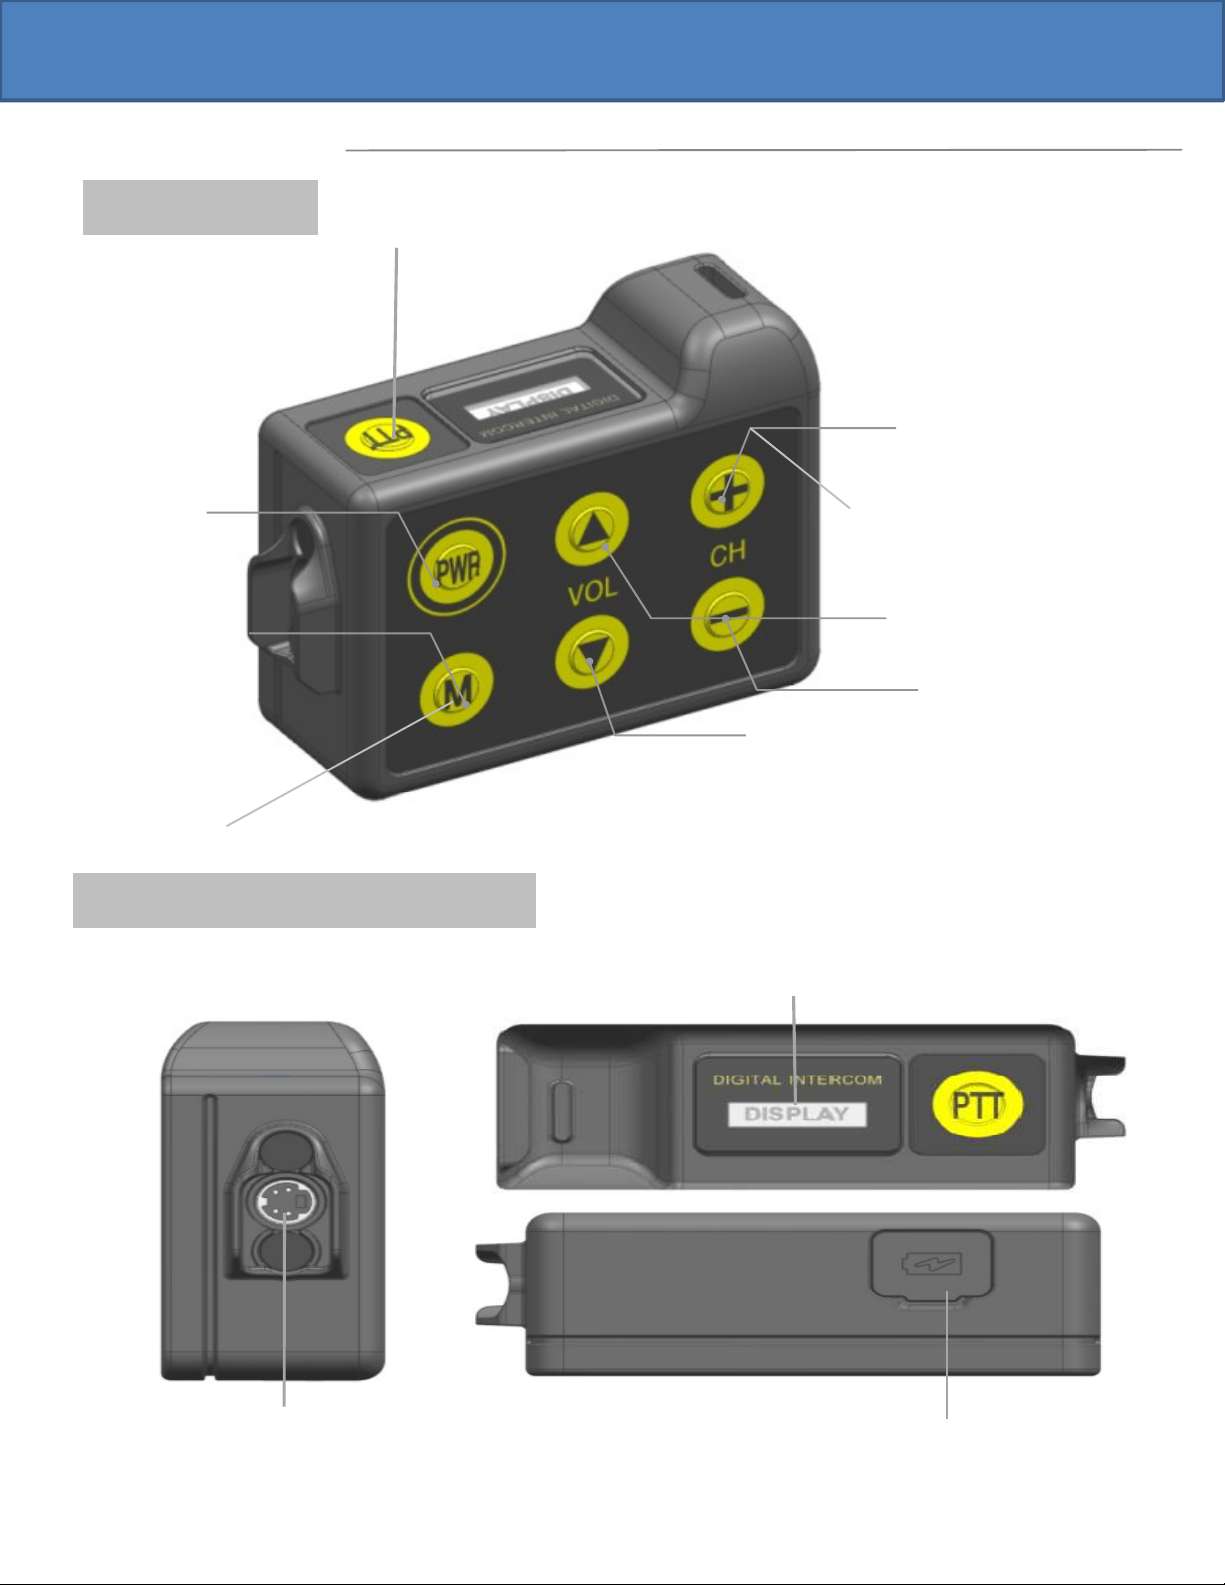
Channel Up (Short Press)
Channel Down
Power
•Mute - Quick Press
or
•Group - Quick Press
•Menu - Long Press
Volume Up (Short Press)
Volume Down (Short Press)
PTT button (Used to communicate with helmet receiver) X12 Only
Product Image
FRONT
Introduction
Group Call
(Long Press and hold)
-04-
TOP & SIDE & BOTTOM
8 Characters Display for User Name and Channel
Name, Users on Channel and Battery Charging Level
Charging Port
Headset Port
The M button is a multi function button. A Long Press will enter the Menu Mode, a short press for the X12 or
XLE will MUTE the microphone. For the X12E, a short press will switch between Group 1 and Group 2
Function
1. Power
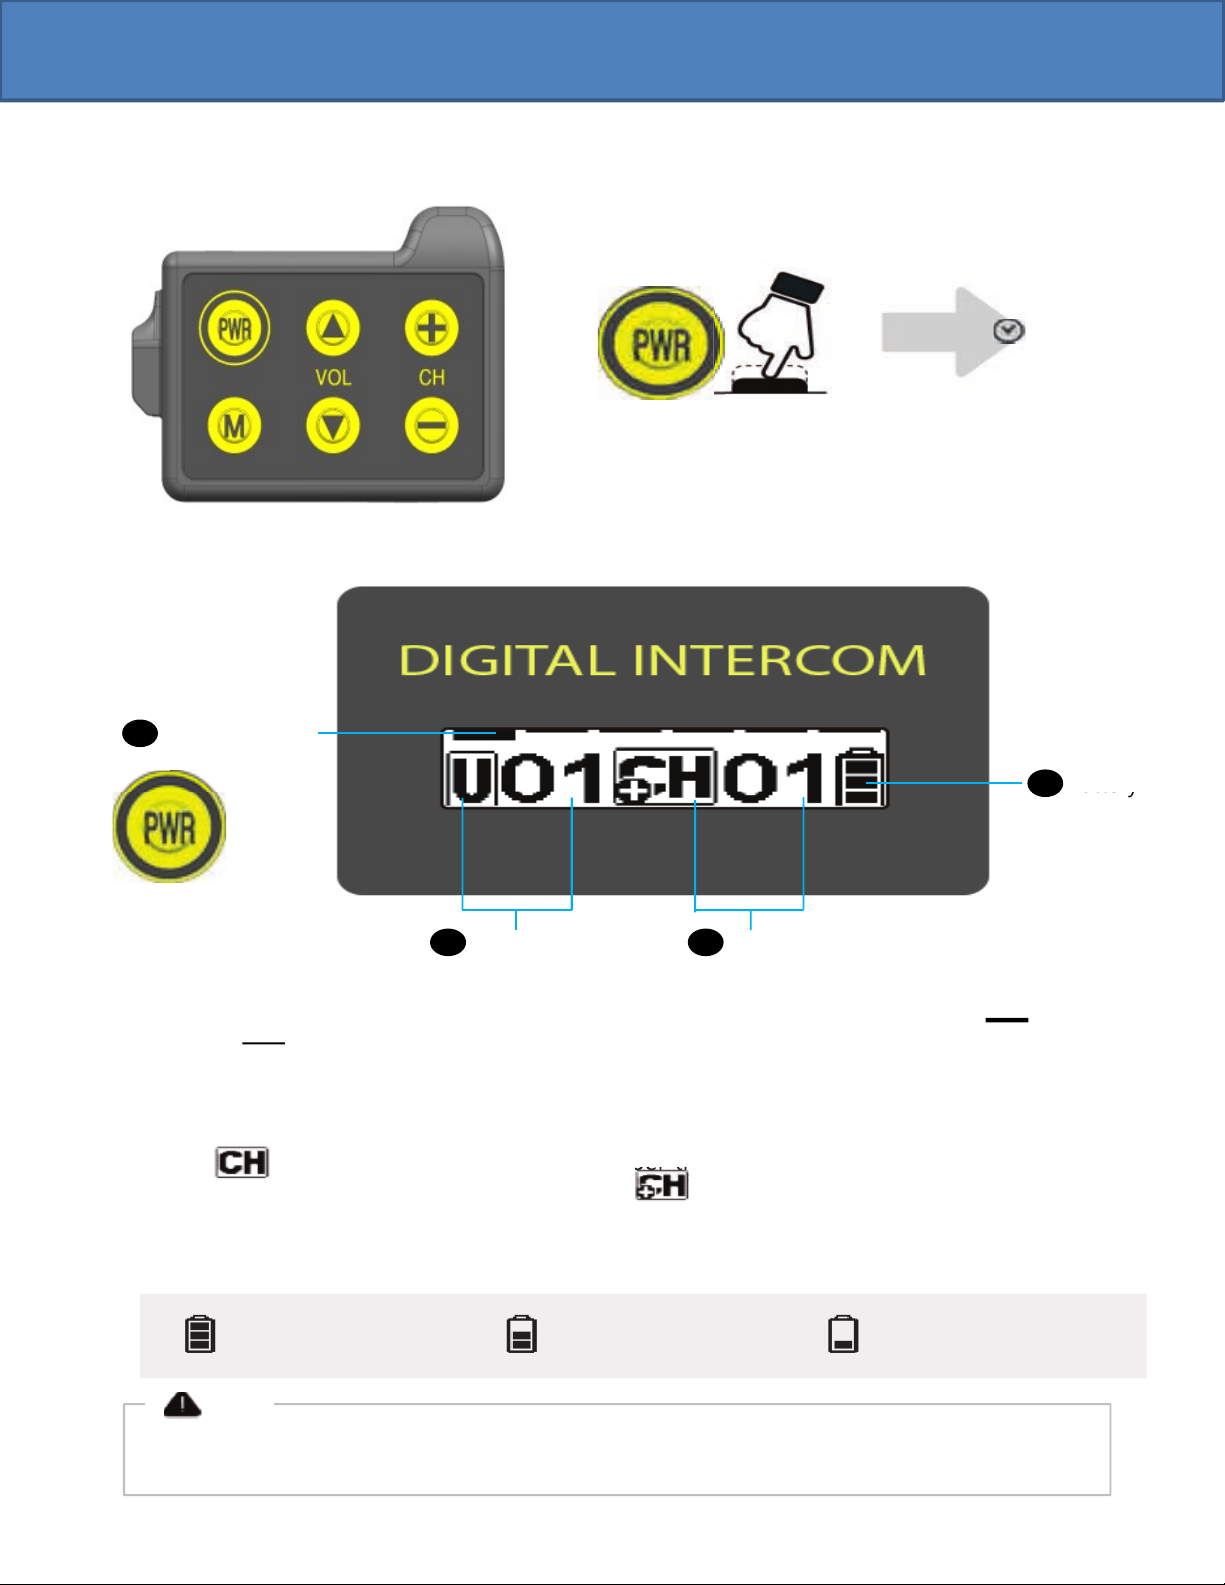
Power on, off with PWR button (Hold for two seconds).
2 sec
2. Current Setting Display
Connection/
Stand-by
1
Battery
4
Stand-by
Functions
1. Connection/Stand-By : Twelve bars on the upper display shows connection or
stand-by .
2. User Number : displays the User Number that your device is set to.
3. Channel : means the current channel number that your belt pack is set to.
If your belt pack is the Master Belt Pack set the User Number to 01 on the display.
4. Battery : Indicates current battery level.
When the battery is running low, the battery ICON will begin blinking.
User Number
2Channel Number3
Battery
4
3. Channel : means the current channel number that your belt pack is set to.
If your belt pack is the Master Belt Pack set the User Number to 01 on the display.
3. Channel : means the current channel number that your belt pack is set to.
If your belt pack is the Master Belt Pack set the User Number to 01 on the display.
More than 80% Below 50% Below 20%
Note
If device is left in standby status for half hour, it will automatically turn off for power-saving.
Standby status means a device is ready for pairing two belt packs.
-05-
Pressing Power button for one
second will toggle display.
Function
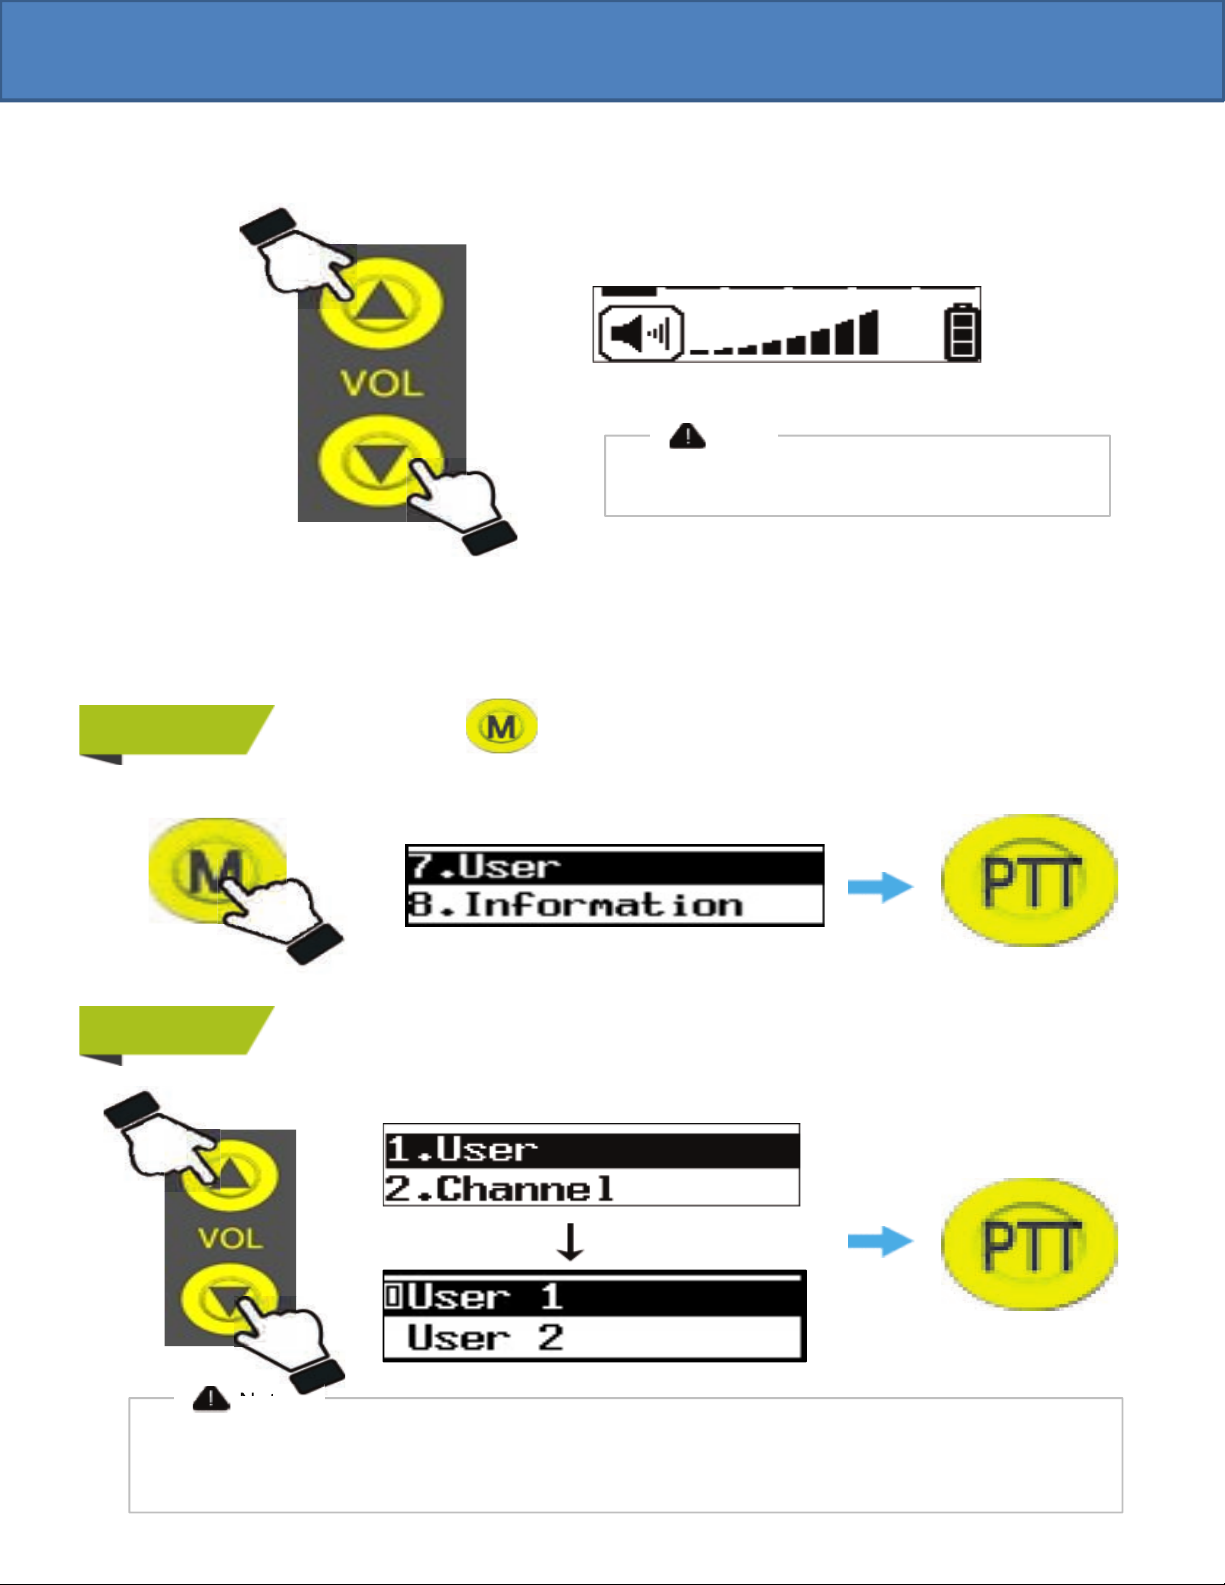
3. Volume Setting and Group Call (Long Press for Group Call for X12 or X12E).
Volume level ranges from 0 to 8. (Factory Default is 5).
Note
Volume 0 means no audio volume
4. User Number Setting
User Number ranges from User 1 to User 12. User 1 is factory set as the Master Belt Pack.
Each device occupies one user number. Having two devices with the same User Number will
cause interruption in communication.
STEP 1 Press and hold button to go to Menu and then choose “7. User”.
Press and hold button to go to Menu and then choose “7. User”.
Functions
-06-
STEP 2 Choose between “User 1” and “User 12”
(User 1 is always the Master)
Note
● There MUST be one Master Device for each communication group.
● Press and hold PTT button for transmitting to the X12M Mini Helmet Receiver
Press PTT button to select
Press PTT button to complete
Note
Function
5. Channel Setting
Belt packs should be set to the same channel number for communication.
Depending on your system’s configuration, you may have multiple channels. Belt packs on
the same channel can communicate to each other..
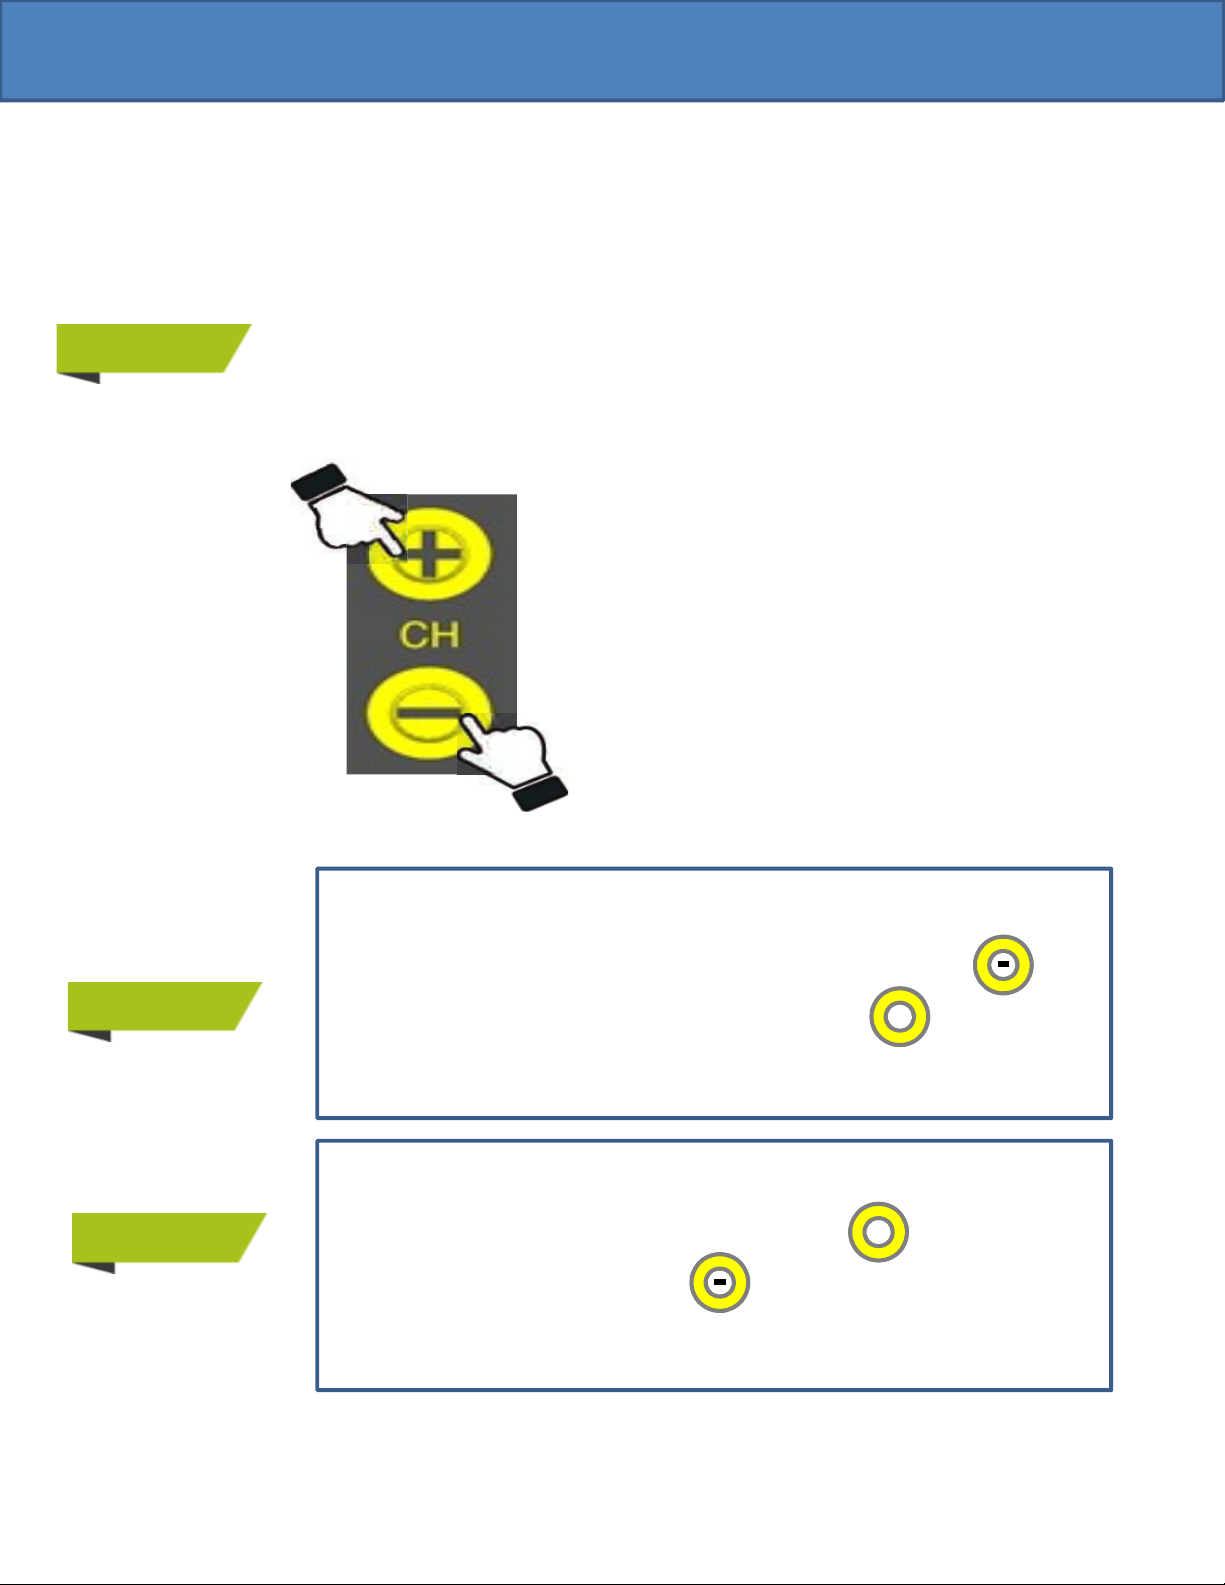
STEP 1
The X12 belt pack can have a maximum of six talk paths (channels). Your X12
belt pack is pre-programmed depending on the number of channels that has
been purchased with your order. Channels 5 and 6 are usually reserved for the
X12M Mini Helmet Receiver. The XLE has a maximum of 2 channels.
Select a channel number
by pressing Channel Up or Down button
Functions
-07-
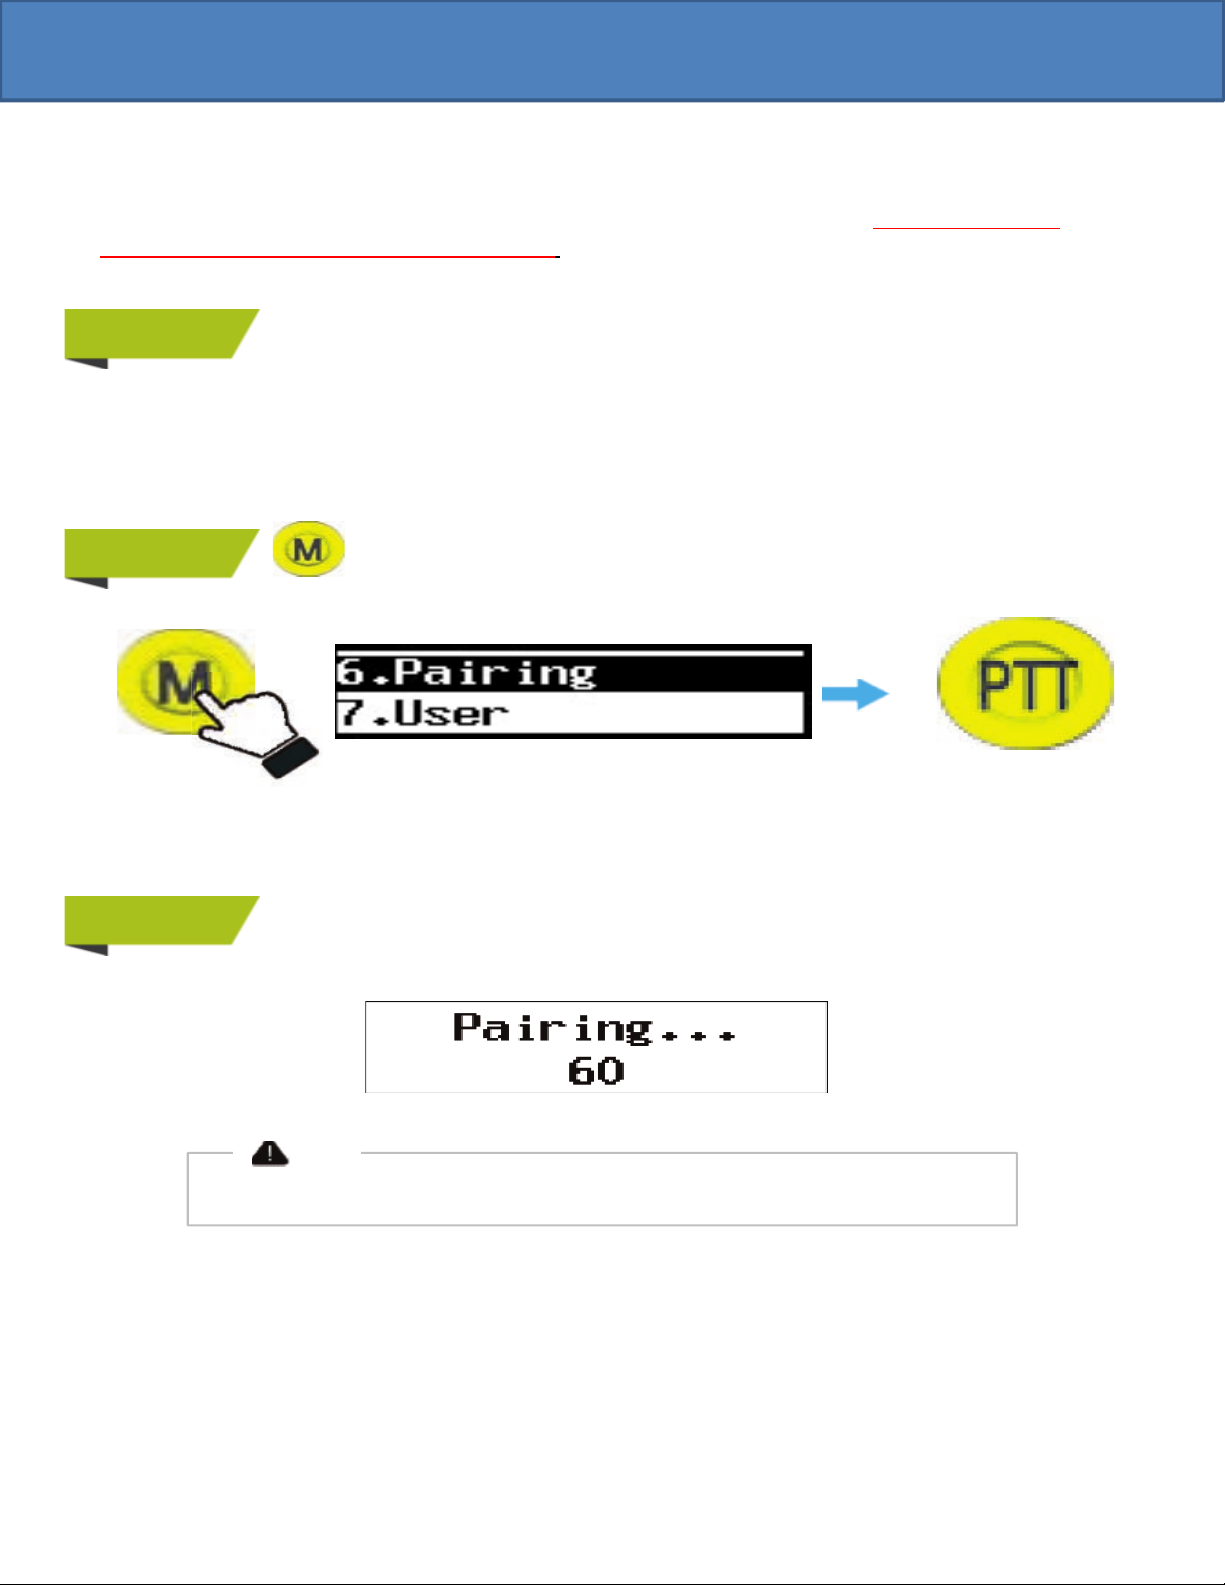
OPTION 1
OPTION 2
When Rotation is turned “OFF” the channel selection will stop at the first
or last channel programmed into your belt pack. If you press the
channel selection will stop at channel 1. If you press , the channel
selection will stop at the last channel programmed into your belt pack.
+
When Rotation is turned “ON” the channel selection will rotate. If your
belt pack is set to the last channel and you press the belt pack will
rotate to channel 1. If you press and your belt pack is on channel
1, the belt pack will go to the last channel programmed in your belt pack.
+
Function
6. Pairing (Grouping multiple belt packs to the same system)
Below pairing procedure should be done to establish communication group.
PLEASE NOTE: YOUR SYSTEM HAS ALREADY BEEN CONFIGURED. PAIRING IS NOT
NECESSARY AND NOT RECOMMENDED.
Pairing is made between the Master Belt Pack and the remaining belt packs.
Each belt pack must be set to a different user number. Belt packs can not have
the same User ID number.
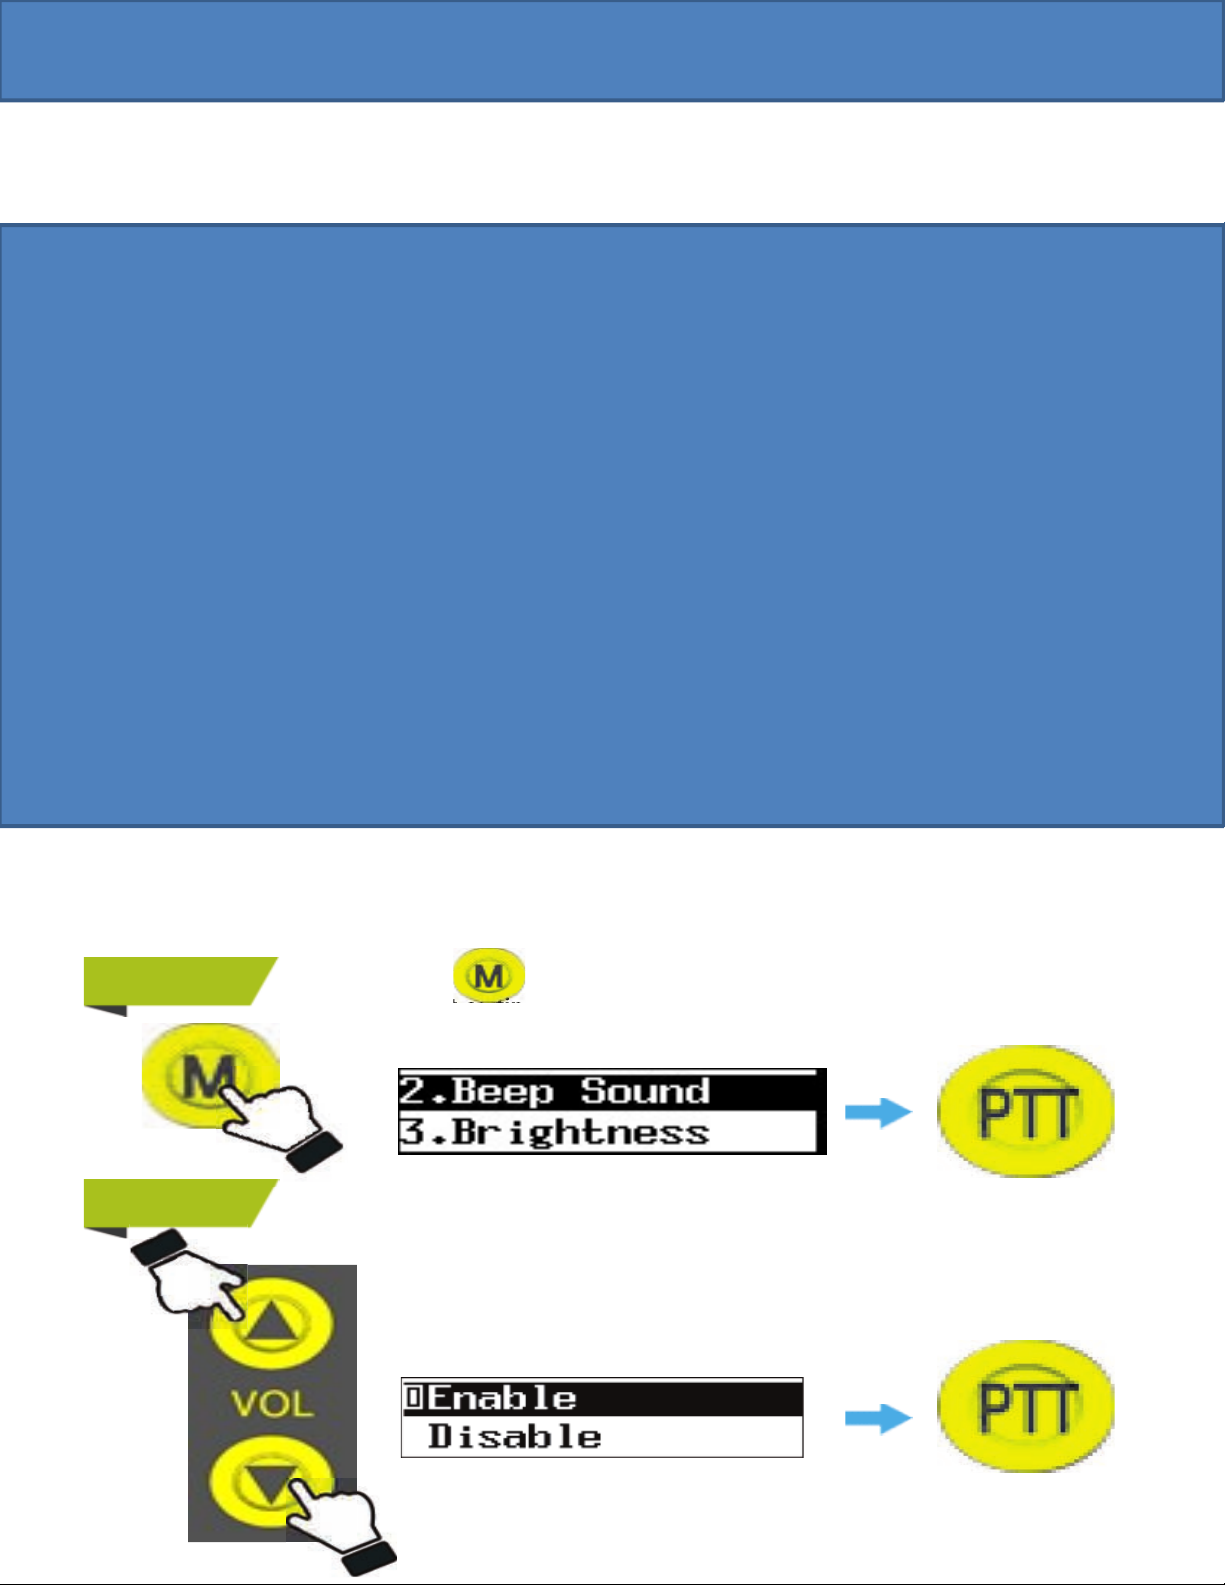
STEP 2 Press and hold ‘M’ button to go to Menu and then select “6. Pairing”.
Push PTT button to
Functions
STEP 1
-08-
STEP 3 Once pairing has completed, paired devices go to stand-by display.
If you press ‘M’ button while pairing is being processed, the pairing is canceled
and the belt packs go to stand-by mode.
Note
Pairing is automatically canceled if pairing is not completed within 60 seconds.
Push PTT button to
select
Function
7. Noise Cancel (No longer available on Version 004 or greater. Noise cancel on all firmware
versions is now automatic and changes is not recommended.
Functions
-09-
8. Beep Sound
You can turn the warning and/or button sound on or off depending on user’s preference.
STEP 1 Press and hold button to go to menu and select “5. Beep Sound”.
Factory default setting is Disabled
STEP 2 Choose between “Enable” and “Disable”
Push PTT button to select
Press and hold button to go to menu and select “5. Beep Sound”.
Factory default setting is Disabled
Push PTT button to select
Inhaltsverzeichnis
Andere Cobalt Digital Inc Headset Handbücher


