Code Reader 4100 Bedienungsanleitung

C006244_01_CR4100_QuickStart_Guide
QuickStart Guide
Code Reader 4100™
QuickStart Guide Version 01
Release Date: May 2011

C006244_01_CR4100_QuickStart_Guide
Statement of Agency Compliance
The Code Reader 4100 (CR4100) has been tested for compliance with FCC regulaons and was found to be
compliant with all applicable FCC Rules and Regulaons.
IMPORTANT NOTE: To comply with FCC RF exposure compliance requirements, this device must not be co-located
or operate in conjuncon with any other antenna or transmier.
CAUTION: Changes or modicaons not expressly approved by the party responsible for compliance could void
the user’s authority to operate the equipment.
The Code Reader 4100 has been tested for compliance to CE standards and guidelines and was found to conform
to applicable CE standards, specically the EMC requirements EN 301489-1/-7/-17/-19/-24, Radio: EN 301511,
301908 -1/-2, 300328, 301893, 300440-1/-2, Safety: EN 60950-1+A11, 50332-1/-2, Health EN50360, 62209-1.
Code voids product warranty if the hard case has been opened or tampered with in any way.
i

C006244_01_CR4100_QuickStart_Guide
Code Reader 4100 QuickStart Guide
Copyright © 2011 Code Corporaon.
All Rights Reserved.
The soware described in this QuickStart Guide may only be used in accordance with the terms of its license agreement.
No part of this publicaon may be reproduced in any form or by any means without wrien permission from Code Corporaon. This
includes electronic or mechanical means such as photocopying or recording in informaon storage and retrieval systems.
NO WARRANTY. This technical documentaon is provided AS-IS. Further, the documentaon does not represent a commitment on
the part of Code Corporaon. Code Corporaon does not warrant that it is accurate, complete or error free. Any use of the technical
documentaon is at the risk of the user. Code Corporaon reserves the right to make changes in specicaons and other informaon
contained in this document without prior noce, and the reader should in all cases consult Code Corporaon to determine whether
any such changes have been made. Code Corporaon shall not be liable for technical or editorial errors or omissions contained
herein; nor for incidental or consequenal damages resulng from the furnishing, performance, or use of this material. Code
Corporaon does not assume any product liability arising out of or in connecon with the applicaon or use of any product or
applicaon described herein.
NO LICENSE. No license is granted, either by implicaon, estoppel, or otherwise under any intellectual property rights of Code
Corporaon. Any use of hardware, soware and/or technology of Code Corporaon is governed by its own agreement.
The following are trademarks or registered trademarks of Code Corporaon:
CodeXML® , Maker, QuickMaker, CodeXML® Maker, CodeXML® Maker Pro, CodeXML® Router, CodeXML® Client SDK, CodeXML®
Filter, HyperPage, CodeTrack, GoCard, GoWeb, ShortCode, GoCode®, Code Router, QuickConnect Codes, Rule Runner®, Cortex®
All other product names menoned in this QuickStart Guide may be trademarks of their respecve companies and are hereby
acknowledged.
The soware and/or products of Code Corporaon include invenons that are patented or that are the subject of patents pending.
U.S. Patents: 6997387, 6957769, 7428981, 6619547, 6736320, 7392933, 7014113, 7240831, 7353999, 7519239, 7204417, 6942152,
7070091, 7097099, 7621453
The Code Reader soware uses the Mozilla SpiderMonkey JavaScript engine, which is distributed under the terms of the Mozilla
Public License Version 1.1.
The Code Reader soware is based in part on the work of the Independent JPEG Group.
Code Corporaon, 14870 South Pony Express Road, Suite 200, Bludale, UT 84065
www.codecorp.com
ii

C006244_01_CR4100_QuickStart_Guide
Table of Contents
1.0 - What is Included ................................................................................................................................................................. 1
2.0 - Inserng the Baery ........................................................................................................................................................... 2
2.1 - Removing the Baery ......................................................................................................................................................... 2
2.2 - Inserng the Hand Strap .................................................................................................................................................... 2
2.3 - LED Indicators on the Reader ............................................................................................................................................. 3
2.4 - LED Indicators on Cradle ..................................................................................................................................................... 3
2.5 - Charging the CR4100 .......................................................................................................................................................... 4
2.6 - Charging the Spare Baery ................................................................................................................................................. 4
2.7 - Charging Cradle Connectors ............................................................................................................................................... 5
2.8 - Using the Charging Cup ...................................................................................................................................................... 5
2.9 - Connecng the Communicaon Cable to the Charging Cup .............................................................................................. 5
2.10 - Baery Status Indicator .................................................................................................................................................... 5
2.11 - Inserng an SD Card ......................................................................................................................................................... 5
2.12 - Inserng a SIM Card ......................................................................................................................................................... 6
3.0 - Conguring the CR4100 Bar Code Reader using Cortex™ Mobile ...................................................................................... 6
3.1 - Opon Sengs .................................................................................................................................................................. 7
3.2 - Symbologies ....................................................................................................................................................................... 7
3.3 - Prexes/Suxes ................................................................................................................................................................. 8
3.4 - Buon Sengs ................................................................................................................................................................... 9
3.5 - File Install ........................................................................................................................................................................... 9
3.6 - About .................................................................................................................................................................................. 9
4.0 - Conguring the CR4100 Bar Code Reader - Advanced ....................................................................................................... 10
4.1 - Tesng the CR4100 Bar Code Reader ................................................................................................................................. 10
4.2 - Reseng the CR4100 ......................................................................................................................................................... 10
iii

C006244_01_CR4100_QuickStart_Guide
1.0 - What is Included
Refer to your Code Part Number with the following tables to determine what is included in your CR4100 order. For example, the part
number on your order will be silimilar to: CR4100 - Rabc - de - F1.
R is for Radio Opons
a: B is for Bluetooth
b: W for WiFi
c: H for HSDPA (3.5G card)
CR4100
represents the reader -F1
represents Firmware
(soware pre-installed on
the reader)
Next secon is for User Opons
d: Keyboard (Q: Qwerty, N: Numeric)
e: Color (W: White, G: Gray)
--
A standard package includes one (1) CR4100, one (1) Cradle, two (2) standard baeries, one (1) USB cable, and one (1) power supply.
For units that include the HSDPA card, your package will also include, one (1) microphone/earphone and two (2) extra stylus pens.
Note: For wireless opons, if an opon is not included, it is not necessary to insert a leer. For example, CR4100-RBW-QG-F1 is a
CR4100 with Bluetooth and Wi Opons, QWERTY Keypad and the color is Dark Gray.
1
CR4100 Cradle 2 Baeries 5.2V DC
Power Adapter
USB Cable 2 Stylus Pens Earphones
(HSDPA units only)
C006244_01_CR4100_QuickStart_Guide
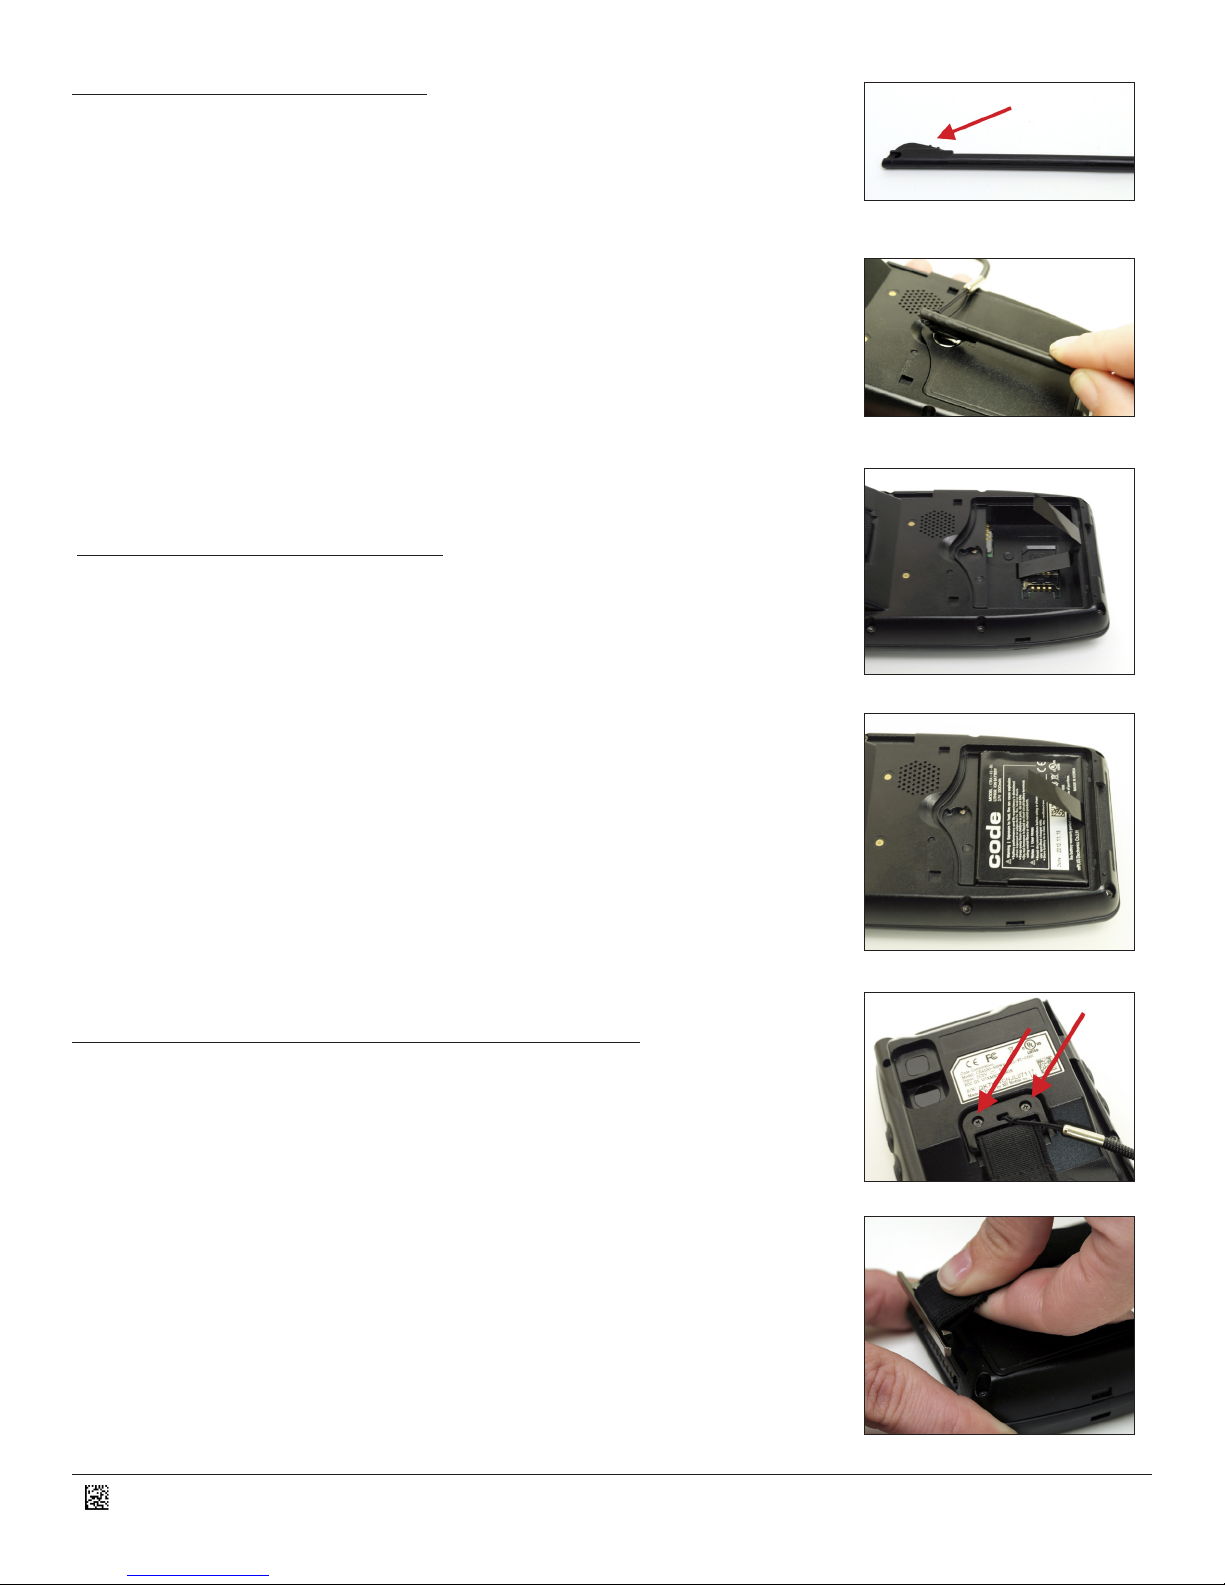
2.0 - Inserng the Baery
1. Using the at poron of the stylus (Figure 1), insert the tool into the slot on the baery
cover located on the back of the unit (Figure 2). Rotate the slot clockwise from LOCK to
UNLOCK.
2. Making sure a poron of the strap is exposed (Figure 3), insert the baery such that
the contacts of the baery are aligned with the pins inside the CR4100 (Figure 4).
3. Place the cover back on the CR4100.
4. Using the at poron of the stylus, rotate the slot counterclockwise from UNLOCK to
LOCK (see Figures 1 & 2).
2.1 - Removing the Baery
1. Using the at poron of the stylus (Figure 1), insert the tool into the slot on the baery
cover located on the back of the unit (Figure 2). Rotate the slot clockwise from LOCK to
UNLOCK.
2. Pull on the strap, and the baery will pop out.
3. Insert a new baery, or leave empty (see Secon 2.0 - Inserng the Baery).
4. Place the cover back on the CR4100.
5. Using the at poron of the stylus, rotate the slot counterclockwise from UNLOCK to
LOCK (see Figures 1 & 2).
2.2 - Aaching/Removing the Hand Strap
1. To aach the hand strap, using a Philips head screwdriver and supplied screws, aach
the top poron of the hand strap to the back of the CR4100 (Figure 5).
2. Slide the plasc key on one end of the hand strap into the slot on the boom of the
CR4100 (Figure 6).
3. To remove the hand strap, slide the plasc key on the end of the handstrap out of
the slot at the boom of the CR4100 (Figure 6) and use a Philips head screw driver to
remove the screws in the top poron of the hand strap (Figure 5).
Figure 1
Figure 2
Figure 3
Figure 4
Figure 5
Figure 6
2

C006244_01_CR4100_QuickStart_Guide
2.3 - LED Indicators on the Reader
LED Posion Descripon of LED LED Status LED Meaning
1st LED Good Read Indicator Flashes Green Good Read
2nd LED Wireless Indicator Flashes Red Weak Wireless Signal
Flashes Blue Strong Wireless Signal
3rd LED Charging Indicator for Baery
in the CR4100
Solid Red Charging
Solid Green Charging Complete
2.4 - LED Indicators on Cradle
Depending on the revision of Cradle you have received,
there is one of two possible descripons next to the LED
light. These could be PWR or a icon.
Regardless of which Cradle you have received, the LED
indicates the charging status of the spare baery being
charged in the back slot of the Cradle.
RED = Spare baery charging.
GREEN = Spare baery charging complete.
3

C006244_01_CR4100_QuickStart_Guide
2.5 - Charging the CR4100
1. Make sure a baery is installed in the CR4100 (see Secon 2.0 Installing the Baery).
2. Insert the CR4100 into the front charging slot of the Cradle with the screen and keypad
facing forward (Figure 7).
3. The LED on the CR4100 - not the cradle - will illuminate. Refer to the LED Indictor
secon (Secon 2.3) of this QuickStart Guide for LED charging status/light descripons.
2.6 - Charging the Spare Baery
1. Align the metal contacts on the baery, such that they make contact with the charging
pins in the cradle.
2. Place the baery into the rear slot on the charging Cradle (Figure 8).
3. The LED on the front of the Cradle will illuminate. Refer to the LED Indictator Secon
(Secon 2.3) of this QuickStart Guide for the LED charging status/light descripon on
the Cradle.
2.7 - Charging Cradle Connectors
Connectors are located on the back of the Cradle (Figure 9).
1. 5.2V DC: Insert the barrel jack of the power supply into this connector.
2. USB Client: Connect the communicaon cable (supplied) to the Cradle and
the host device (PC).
3. USB Host: Can be used to connect peripheral devides, such as keyboards,
to the CR4100.
4. COM: Can be used to connect to peripheral deivces or used to AcveSync
with host PC.
Figure 7
4
Figure 8
Figure 9

C006244_01_CR4100_QuickStart_Guide
2.10 - Baery Status Indicator
Baery is empty.
Baery is charging.
Baery has a full charge.
1. At the top of the CR4100, peel back the rubber grommet to expose the SD Slot
(Figure 12).
2. Insert the SD Card in the proper orientaon.
3. Push the rubber grommet back into the slot.
4. Make certain that the rubber grommet is seated properly, to maintain a seal
and ensure the CR4100’s IP65 rang.
5
2.9 - Connecng the Communicaon Cable to the Charging Cup
2.8 - Using the Charging Cup
1. Slide the Charging Cup (Figure 10) onto the boom of the CR4100.
2. Connect the Power Supply into the back on the Charging Cup. This will charge the CR4100.
3. Please refer to the LED Indicator Secon (Secons 2.3 and 2.4) of this QuickStart Guide for
charging LED status descripons.
Figure 10
Figure 12
2.11 - Inserng an SD Card
1. To use the CR4100/Charging Cup as a USB Client, slide the white switch located on the back
of the Charging Cup to the (C) posion (See Figure 11).
2. Connect the communicaon cable (USB cable supplied) to the Cradle and the
host device (PC).
Figure 11
The baery status indicator is located in the top right corner of the CR4100 window screen.

C006244_01_CR4100_QuickStart_Guide 6
1. Click the Windows START icon on the upper le poron of the screen on the
CR4100 (Figre 14).
2. Click on Cortex Mobile (Figure 15), you may need to scroll down through the
icons to nd Cortex Mobile. Cortex Mobile is the bar code reader conguraon
tool.
3. You will see a pop-up which states “Inializing Scanner” (Figure 16).
4. Aer the pop-up disappears, you will see a Data Matrix icon in the lower right
hand corner of the screen (Figure 17).
3.0 - Conguring the CR4100 Bar Code Reader using Cortex™ Mobile
2.12 - Inserng a SIM Card
1. Follow the instrucons for Removing the Baery in Secon 2.1 of this QuickStart
Guide.
2. The SIM card socket is located in the baery compartment (Figure 13).
3. Insert the SIM card into the socket as shown in the diagram on the right of the
socket.
4. Follow the instrucons for Inserng the Baery in Secon 2.0 of this QuickStart
Guide.
Figure 13
Figure 14
Figure 15
Figure 16
Figure 17
Inhaltsverzeichnis


