Colordyne 2600 series Bedienungsanleitung

Colordyne 2600 Series
Mini Press User Guide Version 3.6

Colordyne 2600 Series Mini Press User Guide v3.6
Page | 1
Copyright statement
© 2015 Colordyne Technologies, This document, attachments and information contained herein are the
confidential and proprietary property of Colordyne Technologies and their suppliers. As such, this
document, attached files and information contained herein are subject to all nondisclosure and
proprietary information agreements currently in effect with your organization. Copies of this document,
any portion of this document or attachments may not be transmitted or disclosed to any third party
without the prior written permission of Colordyne Technologies.
© 2015 Colordyne Technologies All content is the confidential property of, or licensed to, Colordyne
Technologies (“Colordyne Technologies,” “we,” or “us”) and is protected under United States copyright,
trademark and other intellectual property laws.
Colordynetech.com
3275 Intertech Drive, Suite 100
Brookfield, WI 53045
USA
Phone (262) 784-1932

Colordyne 2600 Series Mini Press User Guide v3.6
Page | 2
Contents
1 Overview...........................................................................................................................................................4
1.1 Introduction..............................................................................................................................................4
1.2 Certificate of compliance..........................................................................................................................4
1.3 General information .................................................................................................................................4
1.4 Technical Specifications............................................................................................................................5
2 Setting up the 2600 Series Mini Press ..............................................................................................................7
2.1 Moving and physical setup .......................................................................................................................7
2.2 Cabling (network and power)...................................................................................................................7
3 Power on...........................................................................................................................................................8
3.1 Visible safety check...................................................................................................................................8
3.2 Power on process .....................................................................................................................................8
3.3 Installing ink tanks ....................................................................................................................................8
3.4 Installing the printhead ......................................................................................................................... 10
4 Threading the press....................................................................................................................................... 14
4.1 Unwinder and rewinder roll direction................................................................................................... 14
4.1.1 Rolling direction unwinder - Ink jet coating on the inside or outside ........................................... 14
4.1.2 Rolling direction rewinder ............................................................................................................. 15
4.2 Threading from scratch ......................................................................................................................... 15
4.3 Threading using the currently threaded material ................................................................................. 18
4.4 Adjusting Label Edge Sensor.................................................................................................................. 21
5 Calibrate the web path (paper) ..................................................................................................................... 25
6 Select and queue print/start job ................................................................................................................... 26
7 Pause, resume or stop print job .................................................................................................................... 28
8 Moving the web............................................................................................................................................. 30
9 Changing label material................................................................................................................................. 32
10 Printing modes........................................................................................................................................... 32
10.1 Continuous printing mode..................................................................................................................... 32
10.2 Diecut printing mode............................................................................................................................. 33
10.3 Blackmark printing mode ...................................................................................................................... 35
10.4 Gap size and speeds .............................................................................................................................. 38
11 Shutting down the 2600 Series Mini Press Press ...................................................................................... 38
12 Driver installation/features ....................................................................................................................... 39

12.1 Driver installation .................................................................................................................................. 39

Colordyne 2600 Series Mini Press User Guide v3.6
Page | 3
12.2 Driver features and functions................................................................................................................ 42
13 Software features ...................................................................................................................................... 46
13.1 Right status bar...................................................................................................................................... 46
13.2 General settings (HOME menu)............................................................................................................. 47
13.2.1 Overview........................................................................................................................................ 47
13.2.2 Settings .......................................................................................................................................... 48
13.2.3 Statistics......................................................................................................................................... 53
13.2.4 Shutdown....................................................................................................................................... 55
13.2.5 Exporting statistics data to a CSV file ............................................................................................ 56
13.3 2600 Series Mini Press handling (2600 Series Mini Press tab).............................................................. 58
13.3.1 Overview........................................................................................................................................ 58
13.3.2 Handling......................................................................................................................................... 59
13.3.3 Maintenance.................................................................................................................................. 60
13.3.4 Job Library...................................................................................................................................... 62
13.3.5 Print Queue.................................................................................................................................... 64
13.3.6 Diagnostics..................................................................................................................................... 65
13.3.7 Media Settings............................................................................................................................... 66
14 Updating software and firmware on 2600 Series Mini Press.................................................................... 68
14.1 Updating via online updater.................................................................................................................. 68
14.2 Updating via offline updater ................................................................................................................. 69
15 Maintenance.............................................................................................................................................. 71
15.1 Regular cleaning/checking tasks............................................................................................................ 71
15.1.1 Wipe down surfaces ...................................................................................................................... 71
15.1.2 Emptying waste ink bottle............................................................................................................. 74
15.2 Replacing the wiper roller ..................................................................................................................... 75
15.3 Manual printhead wiping ...................................................................................................................... 80
16 Trouble shooting........................................................................................................................................ 83
16.1 Error States............................................................................................................................................ 83
16.2 Error messages on screen...................................................................................................................... 84
16.3 Firmware update failure........................................................................................................................ 85

Colordyne 2600 Series Mini Press User Guide v3.6
Page | 4
1Overview
1.1 Introduction
Purpose
The purpose of these instructions is to ensure correct installation, use, handling and
maintenance of the press.
Accessibility
The instructions are to be kept in a location known to the staff and must be easily accessible
for the operators and maintenance personnel.
Knowledge
It is the duty of the employer (the owner of the press) to ensure that anyone who is to
operate, service, maintain, or repair the press have read the instructions. As a minimum, they
should have read the part(s) relevant for their work. In addition, anyone who is to operate,
service, maintain, or repair the press is under obligation to look for information in the
instructions themselves.
1.2 Certificate of compliance
1.3 General information
Press designation
The complete press designation is Colordyne 2600 Series Mini Press.

Colordyne 2600 Series Mini Press User Guide v3.6
Page | 5
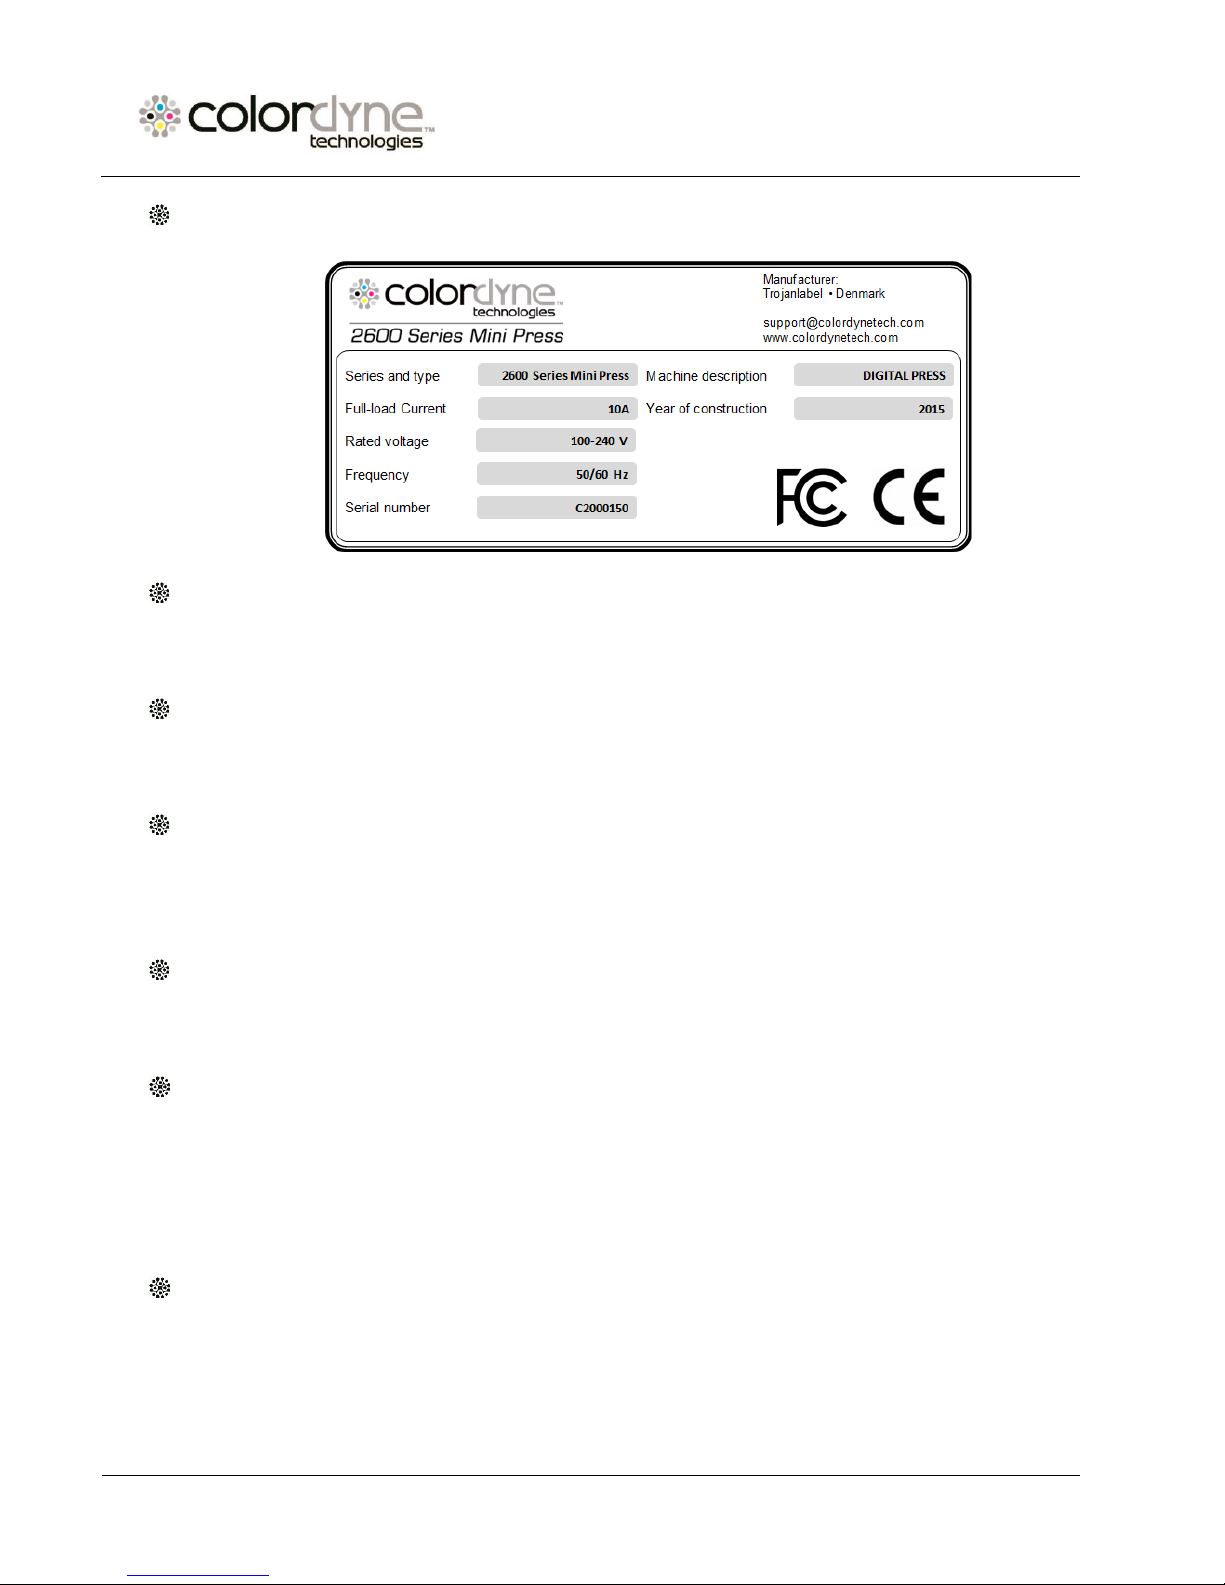
Machine plate
The machine plate (picture) is situated on the back side of the press at the lower left corner:
General description
The press consists of an unwinder/rewinder, double dancer arm system, winder tensioner,
label sensor, nip roller, automatic web clamps, splice table, service door, and 4 ink tanks.
Purpose and intended use
The press is only to be used to print labels. The press must not be used for any other purpose
than the purpose mentioned above.
Warning about foreseeable misuse
The 2600 Series Mini Press may not be used with inks not endorsed by Colordyne. All inks
purchased from Colordyne or from official Colordyne distributors worldwide are endorsed by
Colordyne.
Operating positions, location and arrangement
The press is intended to be used in a light industrial / office environment. The operator
operates the press in a standing or sitting position.
Environment
It is important that the press is placed in a clean environment, with sufficient air
conditioning/cleaning. Avoid placing it in an environment with dust and paper debris, as the
print head nozzles are sensitive to this.
1.4 Technical Specifications
General
•Maximum print speed 60 ft/min (18 m/min)
•1600 x 1600 dpi full color
•Self-cleaning station ensures high print quality over long runs.
•Four 2-liter ink tanks (CMYK)

Colordyne 2600 Series Mini Press User Guide v3.6
Page | 6
Media Handling
•Media width: 2 inch to 9.5 inch (50.8 mm to 241.3 mm)
•Maximum printable width: 8.71 inch (221.5 mm)
•Media thickness: 0.004 to 0.012 inch (0.1 to 0.3 mm)
Web Handling System
•Maximum roll size: 24 inch (600 mm)
•Core size: 3 inch (76 mm)
•Tension: 25 to 100 Nm, taper tension (maximum depending on roll size)
•Direct servo drive for precision web control.
Web Guide
•Auto roll alignment system
•Optical web edge sensor, adjustable position
Temperature and Relative Humidity
If transferring the 2600 Mini Press from different temperature conditions, ensure that the
press has had sufficient time to acclimatize.
•Storage Range: 23° to 122° F (-5° to 50° C) at RH up to 85%, non-condensing at 149° F (65°
C)
•Operating Range: 41° to 95° F (5° to 35° C) at RH 22-80% (non-condensing)
•Recommended Operational: 68° to 86° F (20° to 30° C) at RH 22-80% (non-condensing)
Dimensions and weight
•Height excluding screen: 53 inch (1340 mm)
•Height including screen: 64 inch (1616 mm)
•Width: 59 inch (1500 mm)
•Depth: 36 inch (918 mm)
•Weight: approx. 794 lbs (360 kg) including inks
Dimensions and weight including shipping crate
•Height: 62 inch (1570 mm)
•Width: 64 inch (1630 mm)
•Depth: 42 inch (1060 mm)
•Weight: approx. 1036 lbs (470 kg) including one set of inks
Electrical
•Voltage Range: 100 - 240 VAC
•Frequency Range: 50 - 60 Hz
•Estimated typical consumption: 400 Watts

Colordyne 2600 Series Mini Press User Guide v3.6
Page | 7
2Setting up the 2600 Series Mini Press
2.1 Moving and physical setup
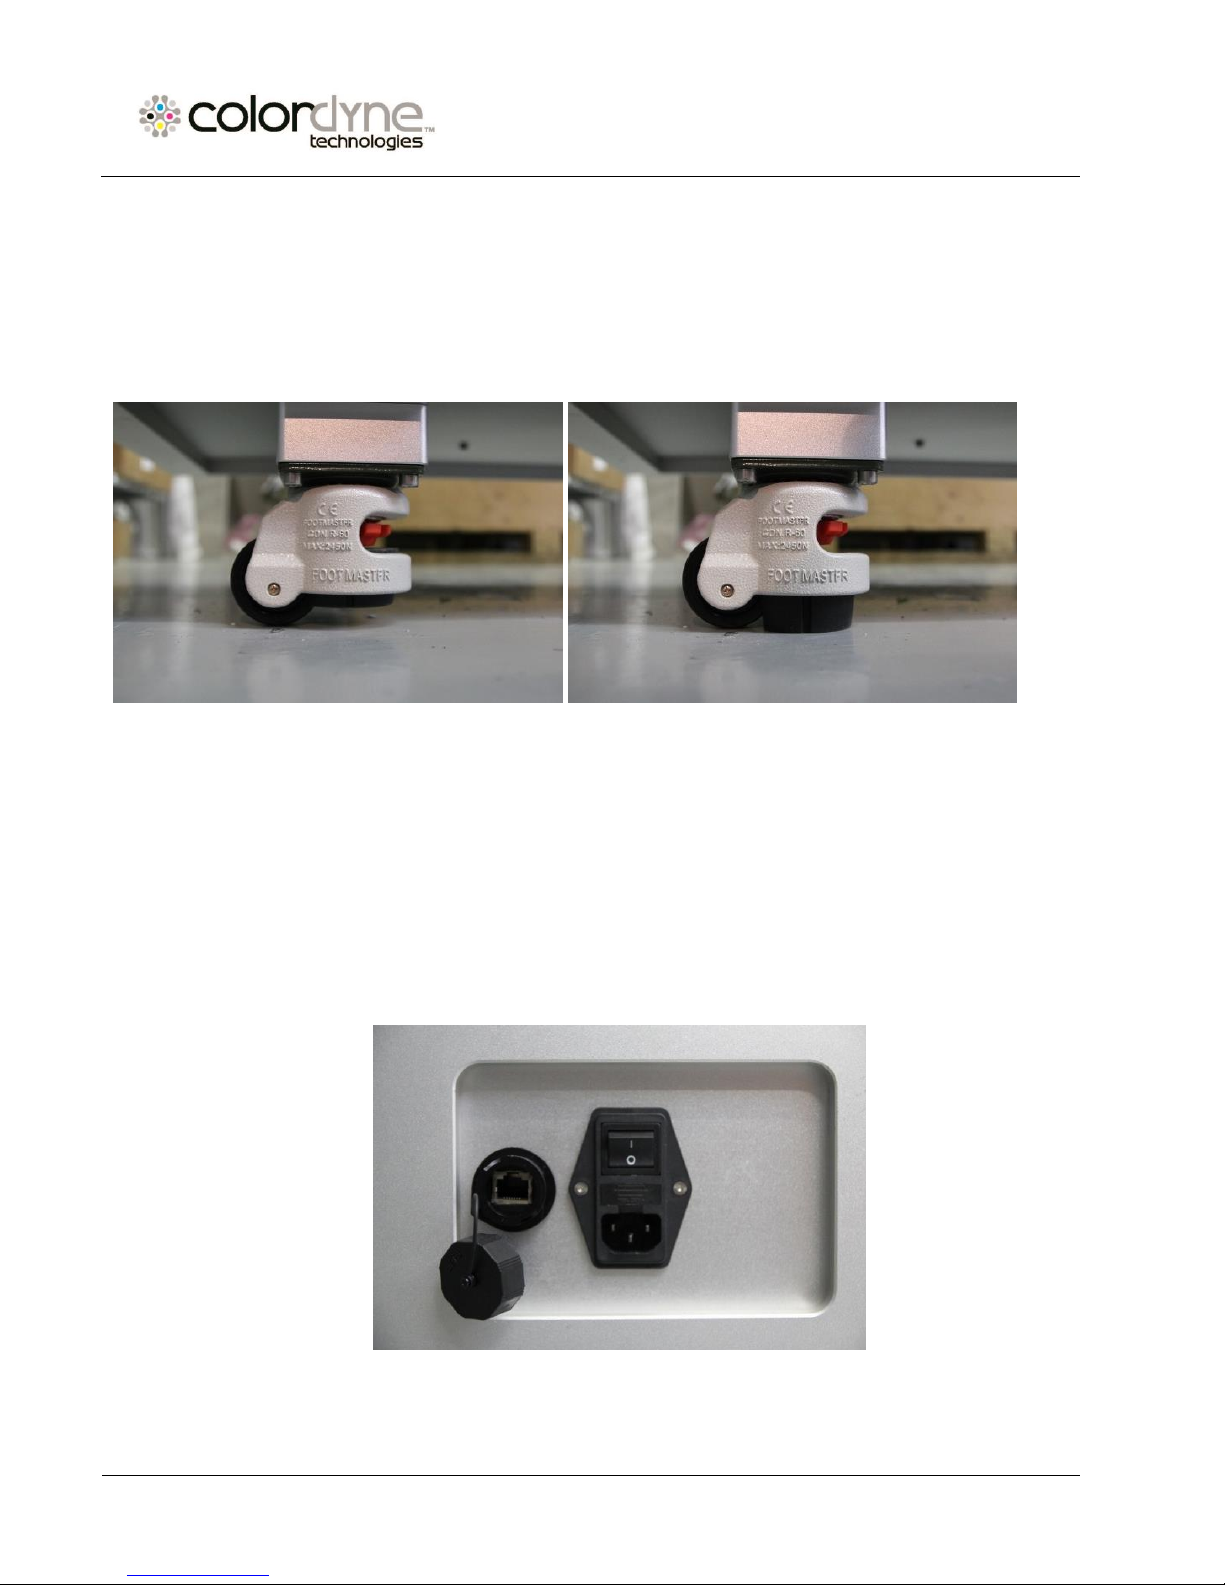
The press is equipped with four (4) wheels for light movement. Do not attempt to push the press over
doorsteps or other obstacles regardless of size. Due to the very low clearance, please take care if there are
even small height variations of the surface.
Place the press on a stable level surface and secured by lowering the built-in the stands, using the red tooth-
wheel, until the wheels move freely without touching the ground.
Confirm the press is level, using a spirit leveler.
2.2 Cabling (network and power)
The press has two cable inlets.
1. Power Supply
2. Ethernet
Only the power cable is necessary for powering up the press. The network cable is necessary for sending new
print jobs to the 2600 Series Mini Press and remote support/software updates.

Colordyne 2600 Series Mini Press User Guide v3.6
Page | 8
3Power on
3.1 Visible safety check
Before powering on the 2600 Series Mini Press, visibly ensure that no foreign objects are interfering with the
print engine or web-path.
3.2 Power on process
1. Press the physical power switch on the backside of the 2600 Series Mini Press, switching it from 0 to 1.
a. Turning the main power switch on starts up Colordyne Control touch screen and print engine. For
safety reasons the web-path is not powered up yet to prevent any unexpected movement of the
label material.
b. Web state will display ‘Emergency stop’.
2. Press the physical green start button which can be found on the top of the press (near the screen) to
initialize (power up) the web path system.
a. Web state will display ‘Initializing’during this process.
b. The initializing process works with or without threaded label material.
3. The press is fully functional when the 2600 Series Mini Press tab is visible on the Colordyne Control
software and the ‘Web state’ field at status bar is ‘Not calibrated’.
3.3 Installing ink tanks
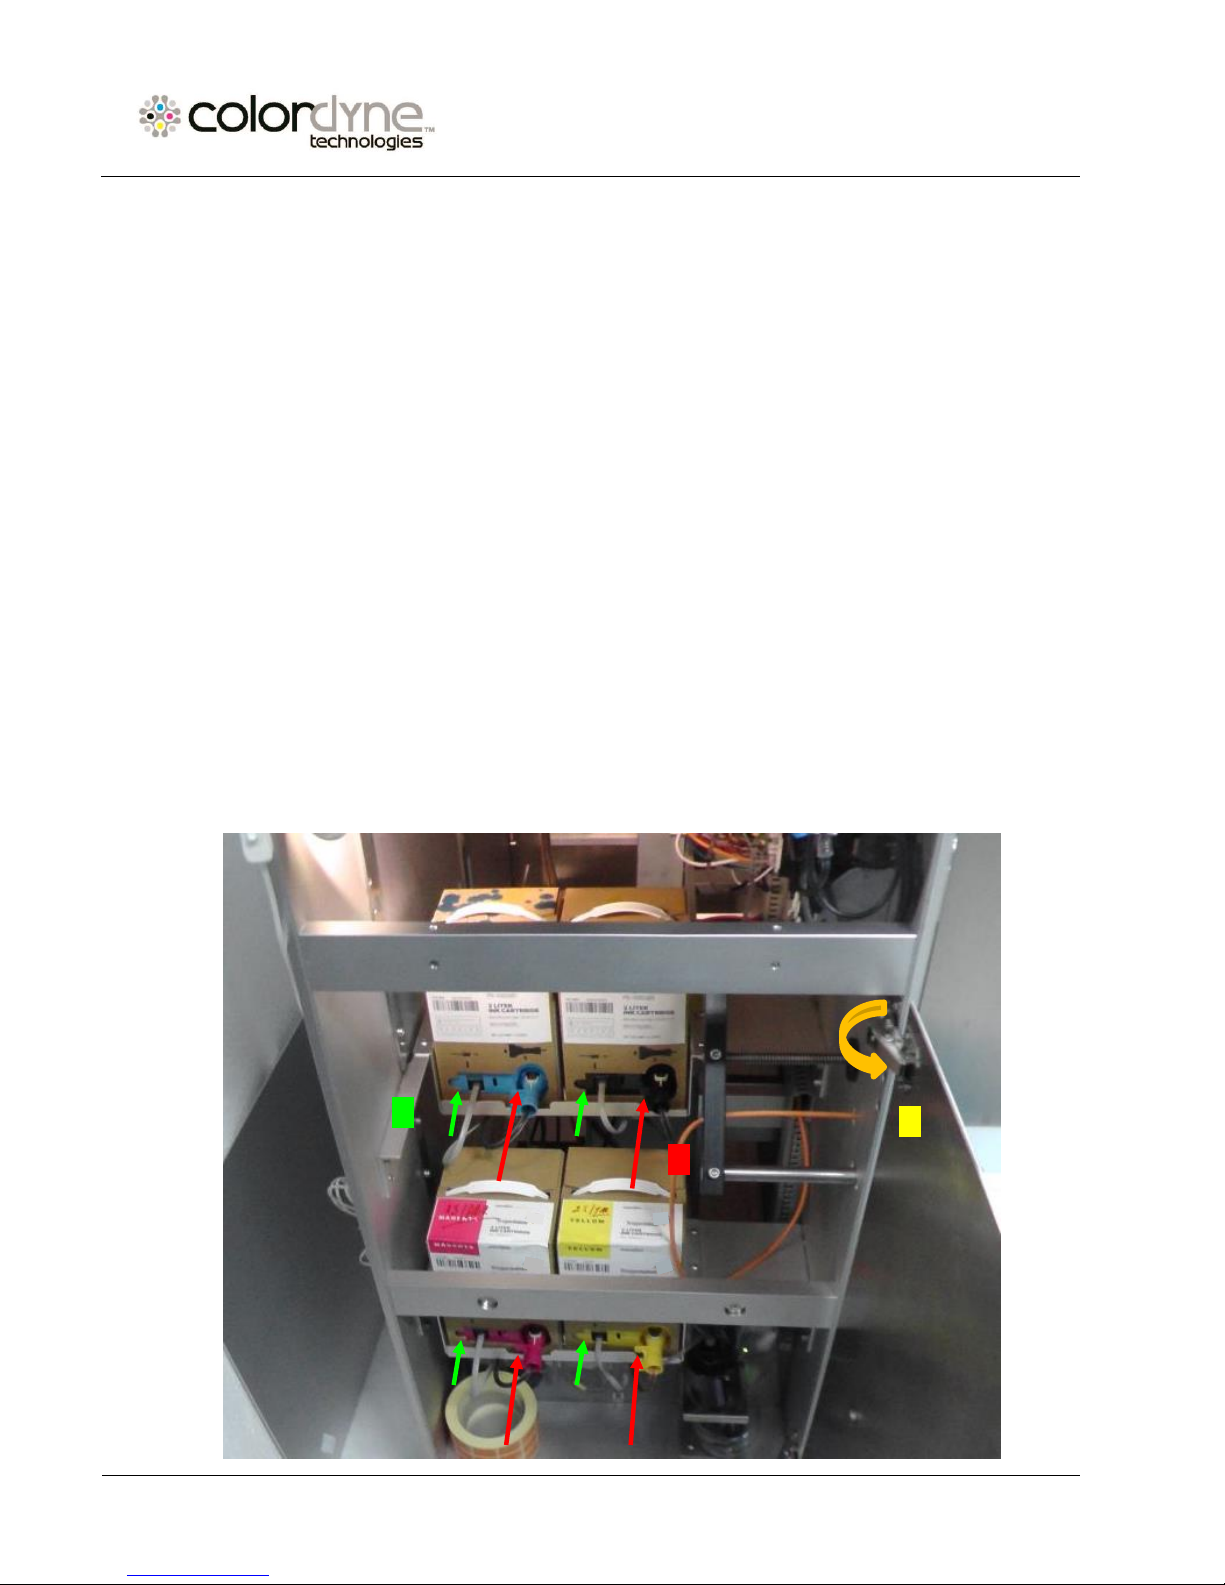
The 2600 Series Mini Press uses YMCK ink tanks, each contain 2 liters of ink when opened. Every 2600 Series
Mini Press ink tank is QA chip protected ensuring that only genuine Colordyne ink tanks can be used.
1.
2.
3.

Colordyne 2600 Series Mini Press User Guide v3.6
Page | 9
1. Open door on left side to gain access to ink tanks (orange arrow on picture above).
2. Connect QA chip reader cable (green arrow on picture above).
3. Connect tube with connector (red arrow on picture above).
When ink tank is connected the proper ink level and percentage is displayed at status bar on the touch screen:
NOTE: 2600 Series Mini Press ink tanks are not refillable and shall be treated as hazardous waste when empty.
Ink tank levels
Reservoir ink tank levels
Inhaltsverzeichnis