
Crystal View MES-1/5901 Bedienungsanleitung
PLEASE READ ALL INSTRUCTIONS CAREFULLY AND RETAIN FOR FUTURE USE
Bluetooth Digital Audio Multimedia Center
Instruction Manual
MODEL:MES-1/5901

Safety Information
Disc handling
2
& Overview of controls(Main Unit)
Function / Mode
General operation
FM/AM operation
USB operation
Care and Maintenance
Troubleshooting
Technical Specications
Contents
Time setting
Alarm setting
Snooze
Sleep timer
Dimmer
Bluetooth operation
Paring and connecting
During playing
Disc Operation
During playing
During playing
2
Functions and Controls
Operating Instructions
1
4
3
5
Assembling the unit --Floor Standing Style
FCC statement
Limited Warranty
14
15
Assembling the unit--on wall
6
7
16
17
12
8
9
14
13
13
13
13
13
13
13
12
12
12
12
12
12
12
10
11
Program procedure
Assembling the unit --Floor Standing Style
Overview of controls(Remote Controller)
14
14
Assembling the unit--on wall
Assembling the unit--on wall
Assembling the unit--on wall
(Continued)
(Continued)
(Continued)
(Continued)
(Continued)
Aux/Audio
12
Package Cotents
Assembling the unit --Floor Standing Style
18
Important – Please read these instructions fully before installation
Safety Information
This symbol means that this unit is double
insulated. An earth connection is not required.
CAUTION : CLASS 1 LASER PRODUCT
Use of contents or adjustments of performance of
procedures other than those specied Herein may result
in hazardous radiation exposure.
LASER SAFETY
This unit employs a laser, only qualied service
personnel should attempt repair.
DANGER: Invisible laser radiation when open and
interlock failed or defeated avoid direct exposure to beam.
CAUTION: hazardous laser radiation when open and
intelock defeated.
CAUTION: TO REDUCE THE RISK OF ELECTRIC
SHOCK, DO NOT REMOVE ANY COVER. NO
USER-SERVICEABLE PARTS INSIDE, REFER
ANY SERVICING TO QUALIFIED SERVICE
PERSONNEL.
• Please read this owner’s guide
• Please take the time to follow the instructions in this
owner’s guide carefully. It will help you set up and
operate your system properly and enjoy all of its
advanced features.
• Please save this owner’s guide for future reference.
• The product label is located on the back of the
product.
• This product must be used indoors. It is neither
designed nor tested for use outdoors, in recreation
vehicles, or on boats.
• Heed all warnings - on the product and in the
owner’s guide.
• Do not use this apparatus near water or moisture.
Do not use this product near a bathtub, washbowl,
kitchen sink, and laundry tub, in a wet basement,
near a swimming pool, or anywhere else that water
or moisture is present.
• Only use attachments/accessories specied by the
manufacturer.
• Unplug this apparatus during lightning storms or
when unused for long periods of time - to prevent
damage to this product.
• Refer all servicing to qualied service personnel
• Servicing is required when the apparatus has
been damaged in any way: such as liquid has been
spilled or objects have fallen into the apparatus; the
apparatus has been exposed to rain or moisture,
does not operate normally, or has been dropped -
Do not attempt to service this product yourself.
Opening or removing covers may expose you to
dangerous voltages or other hazards.
• To prevent risk of re or electric shock, avoid
overloading wall outlets, extension cords, or integral
convenience receptacles.
• Use proper power sources - Plug the product into a
proper power source, as described in the operating
instructions or as marked on the product.
• The mains plug is used as the disconnect device, the
disconnect device shall remain readily accessible
CAUTION
RISK OF ELECTRIC SHOCK!
DO NOT OPEN!
• Do not touch the playback side of the disc.
• Do not attach paper or tape to disc.
• Fingerprints and dust on the disc cause picture and
sound deterioration. Wipe the disc from the centre
outwards with a soft cloth. Always keep the disc
clean.
• If you cannot wipe off the dust with a soft cloth, wipe
the disc lightly with a slightly moistened soft cloth
and nish with a dry cloth.
• Do not use any type of solvent such as thinner,
benzene, commercially available cleaners or
antistatic spray for vinyl. It may damage the disc.
• Do not store discs in a place subject to direct sunlight
or near heat source.
• Do not store discs in a place subject to moisture and
dust such as a bathroom or near a humidier.
• Store discs vertically in a case, stacking or placing
object on discs outside or their case may cause
warping.
Disc handling
2
3
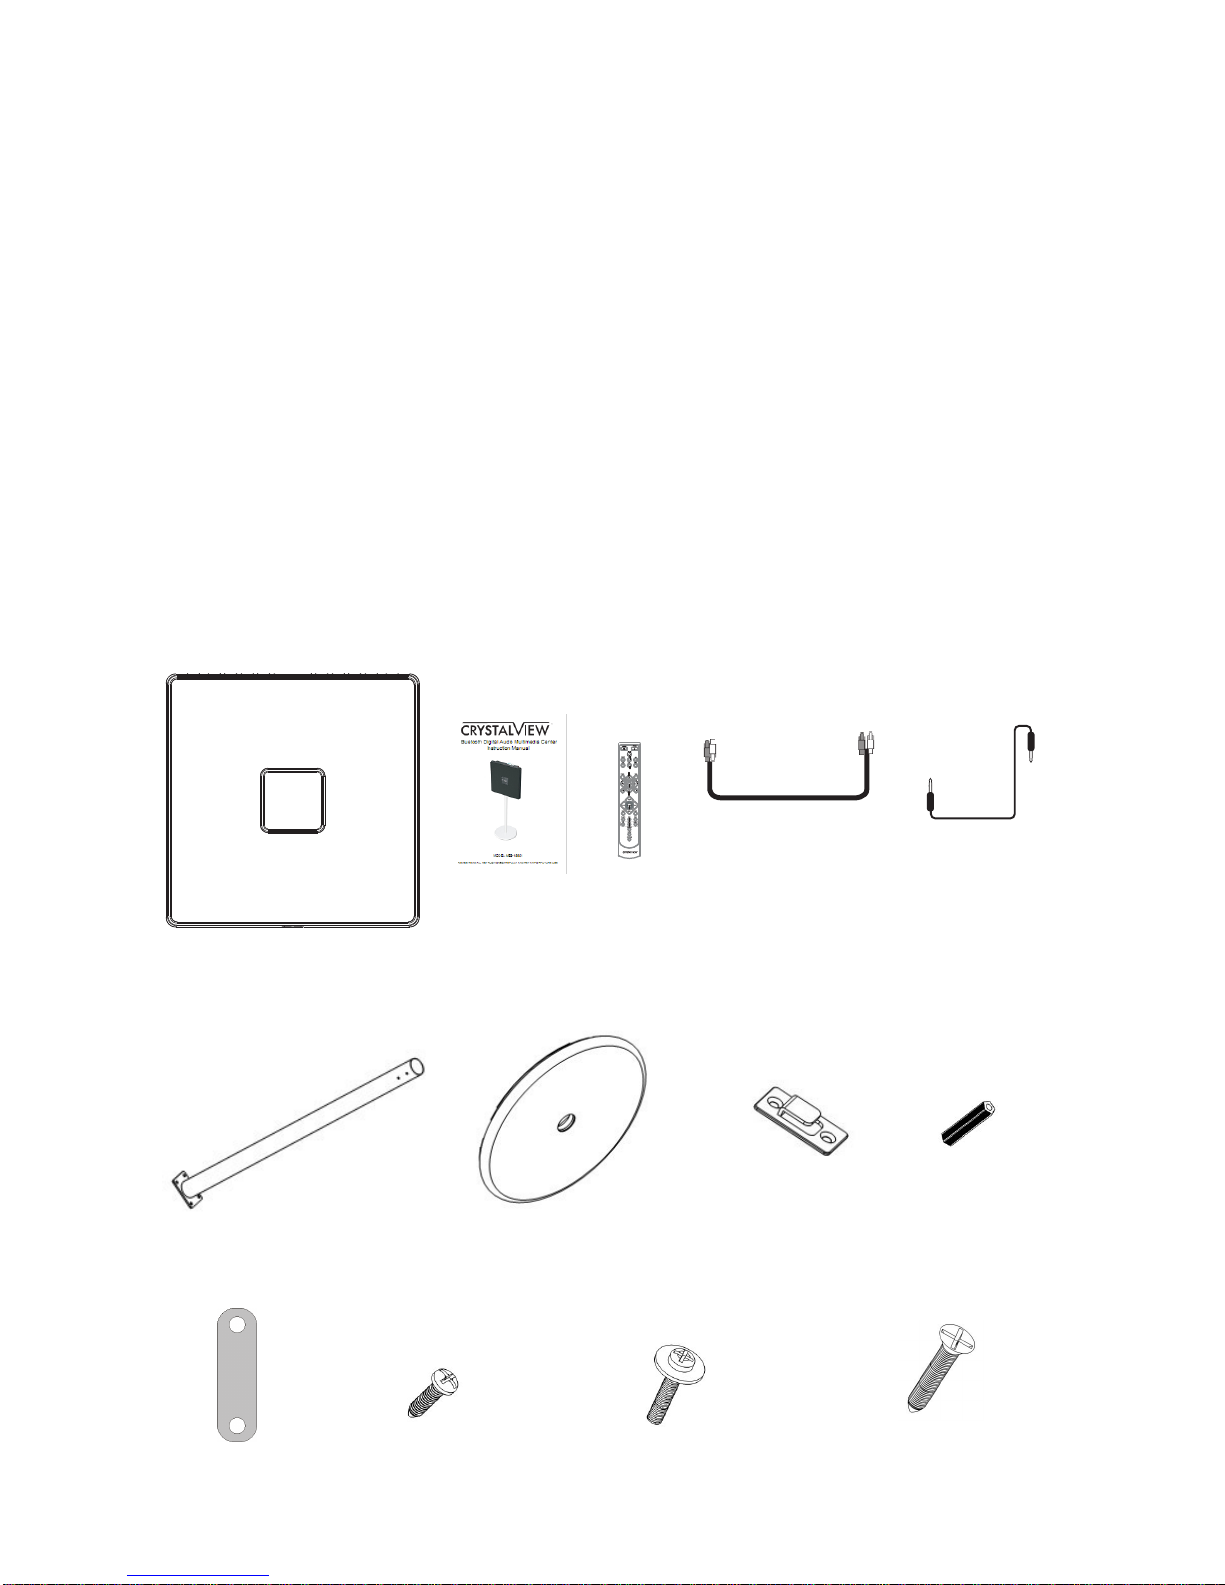
Package Contents
Bluetooth Digital Entertainment Speaker System
Remote Control
RCA Cable
Auxiliary Cable
Assembly and Mounting Apparatus
Steel Pipe 1pcs
Base 1pcs
Metal Brackets 2pcs
Wall Plugs 4pcs
Three Types of Screws
Rubber Gaskets 2pcs
Instruction Manual
PWM4*17 4pcs
KA3.5*25*8mm 4pcs
PA3*10 6pcs
( 4 pcs for fixing cable under the base, 2 pcs for connecting steel pipe. )
( For fixing the base and the metal plate. )
( For fixing the metal brackets on wall. )
PWM4*17 KA3.5*25*8mm
PA3*10
ASSEMBLING THE UNIT
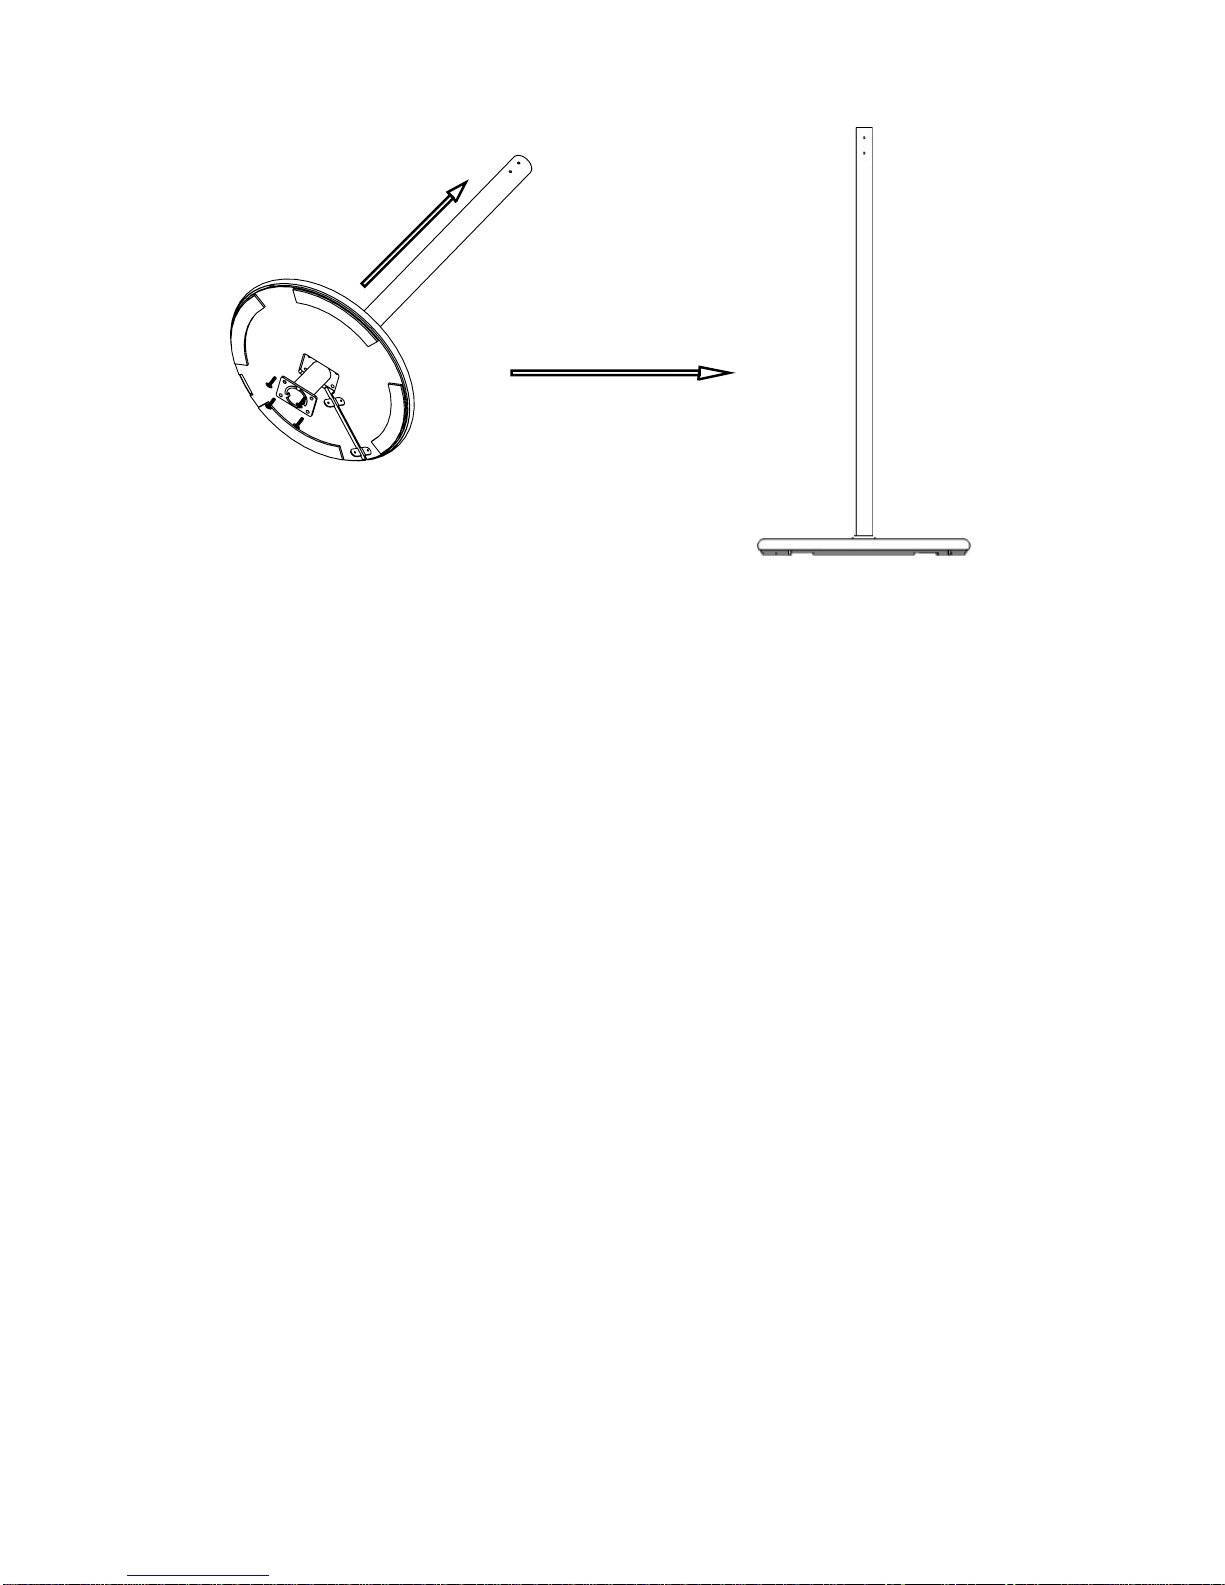
Step 1:
Insert the pipe from the bottom of the stand and fix it with screws supplied.
Step 1
Assembling the Unit---Floor Standing Style
4
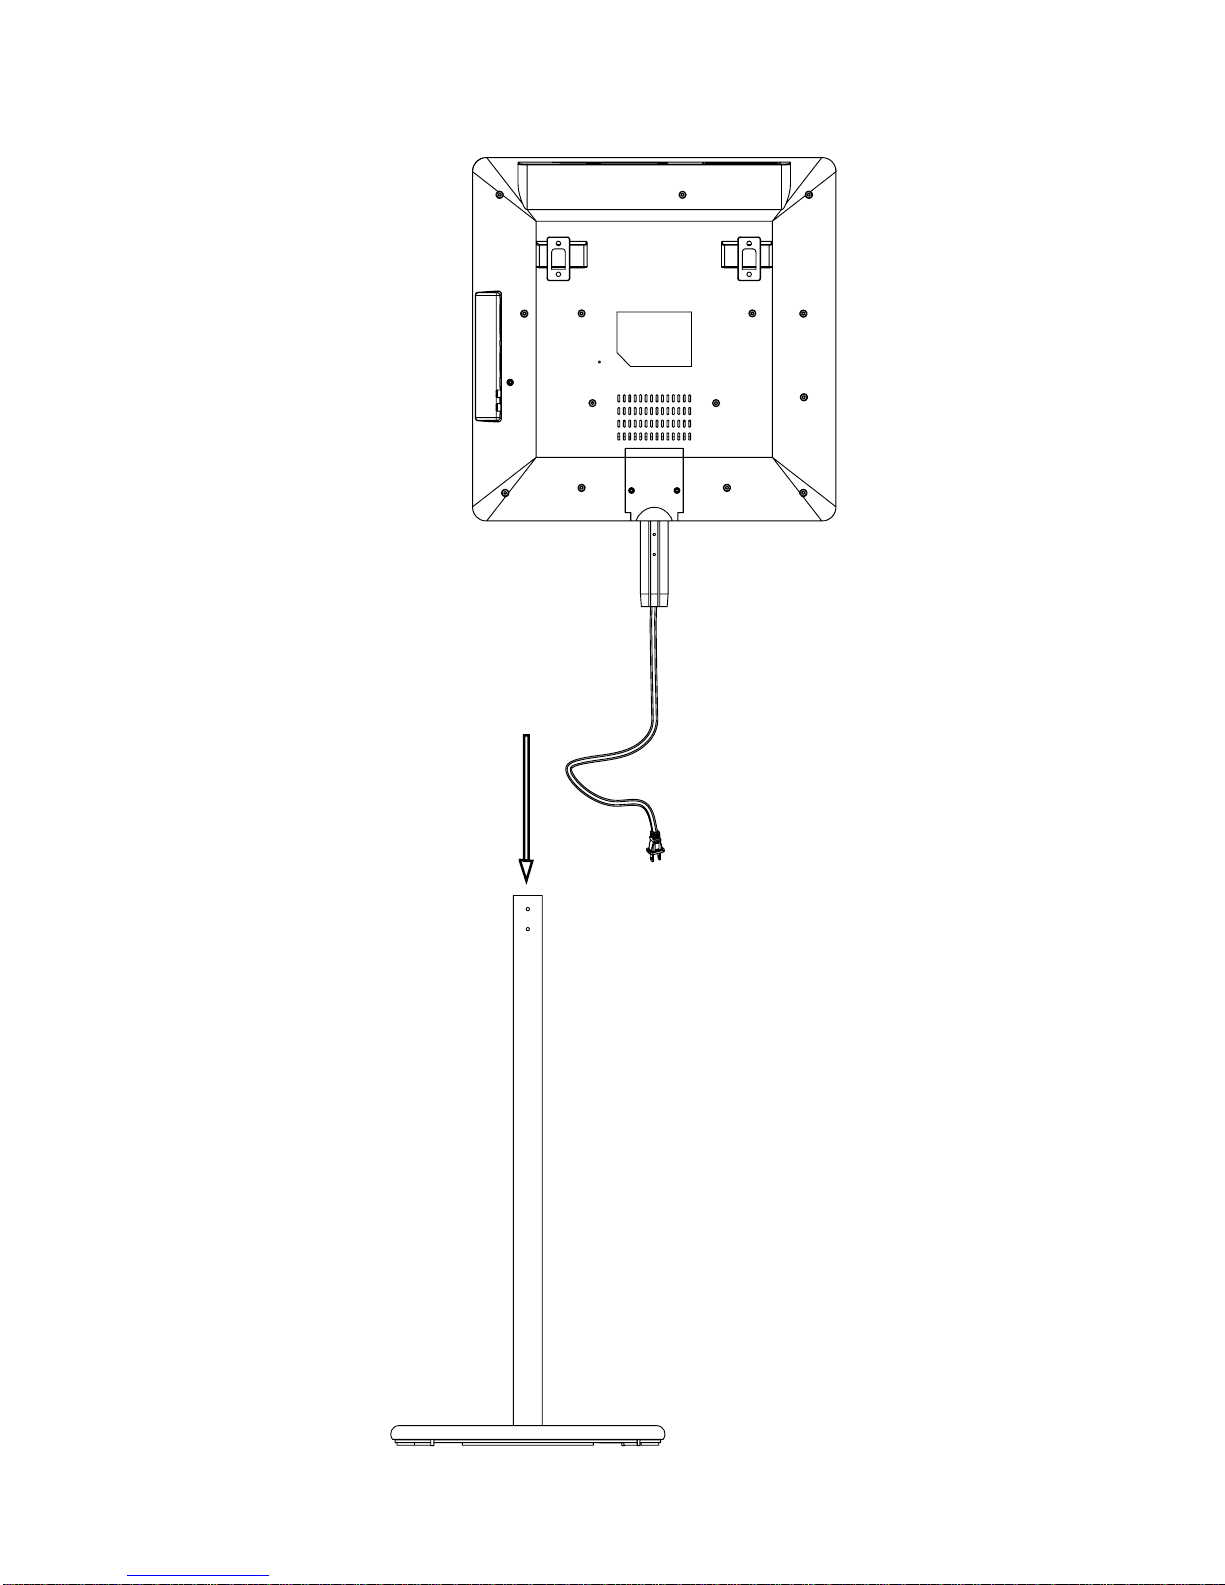
ASSEMBLING THE UNIT
Step 2: Insert the connection cord in the
Step 2
top of steel pipe, and run it through the
other end of the steel pipe.
Assembling the Unit---Floor Standing Style(Continued)
5
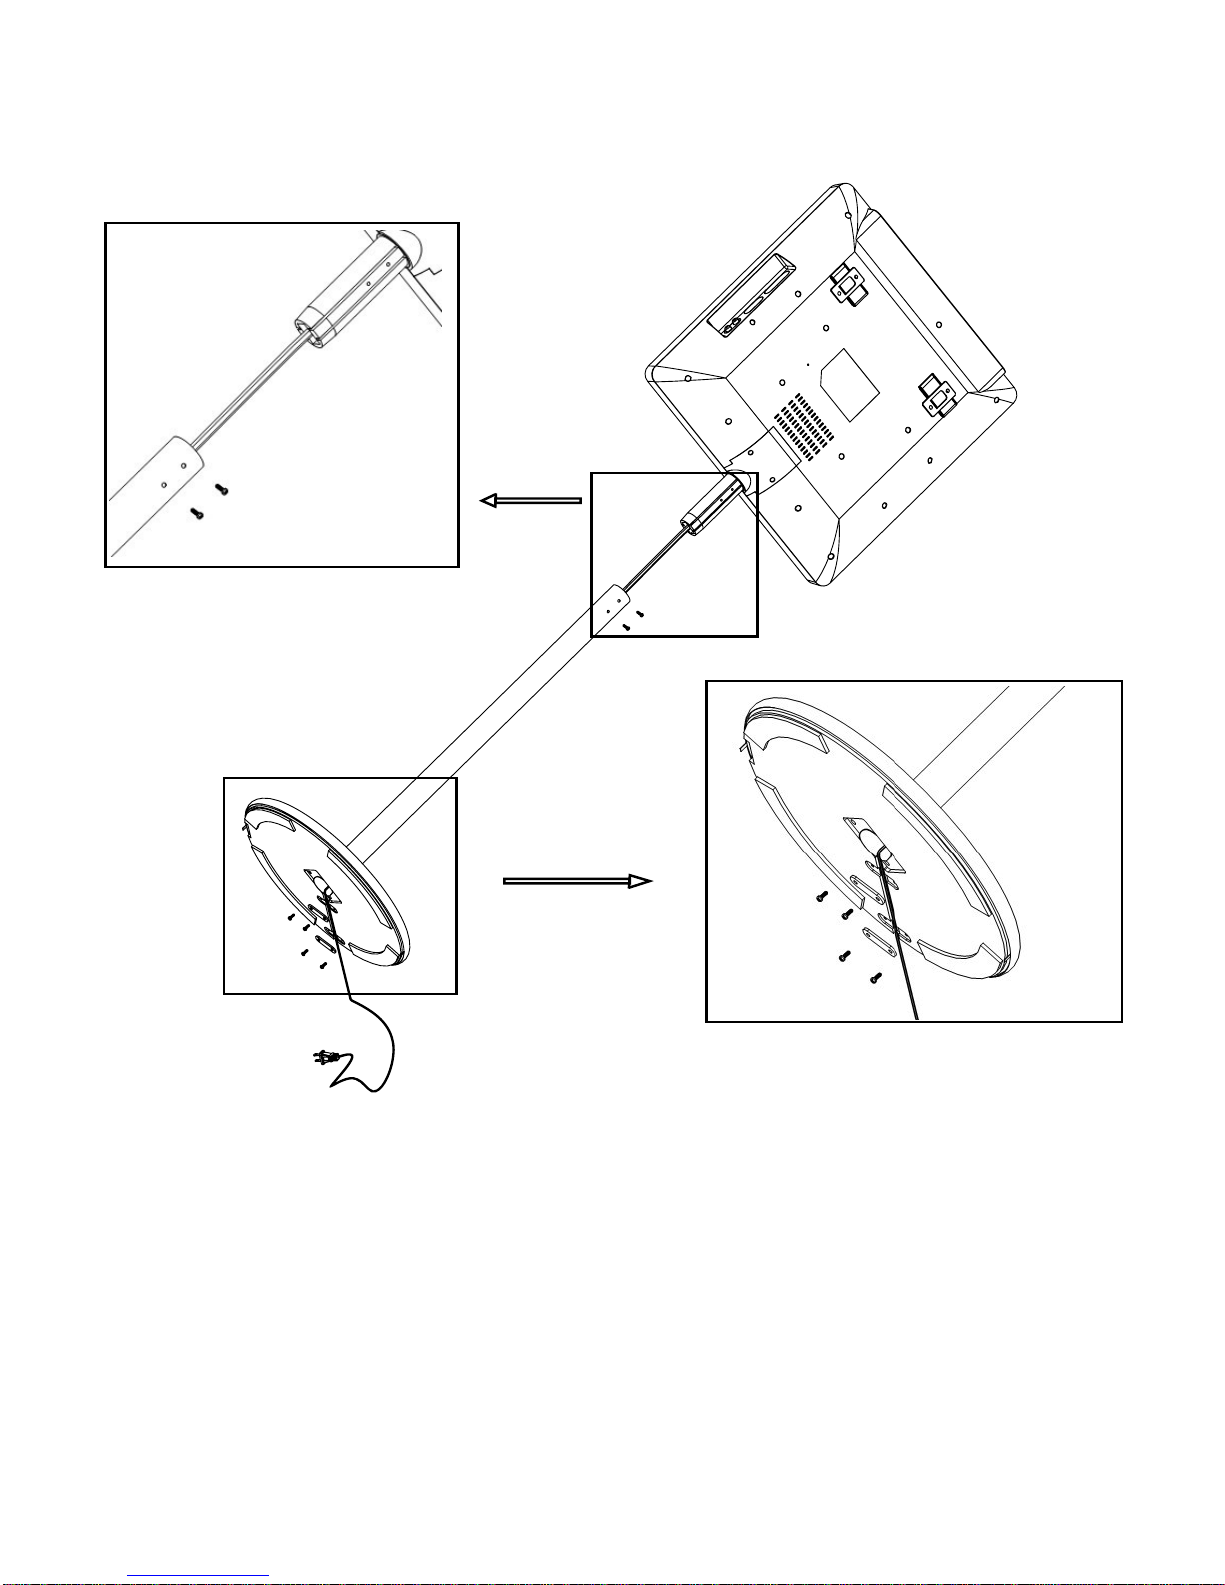
ASSEMBLING THE UNIT
Step 4: Pull wire towards the base, and fix it to the bottom of the stand using the
Step 4
Step 3:
Step 3
Insert the upper part of the unit into the steel pipe then use screw to
Assembling the Unit---Floor Standing Style(Continued)
fix two parts.
rubber brackets and screws provided. This concludes your assemble process.
6
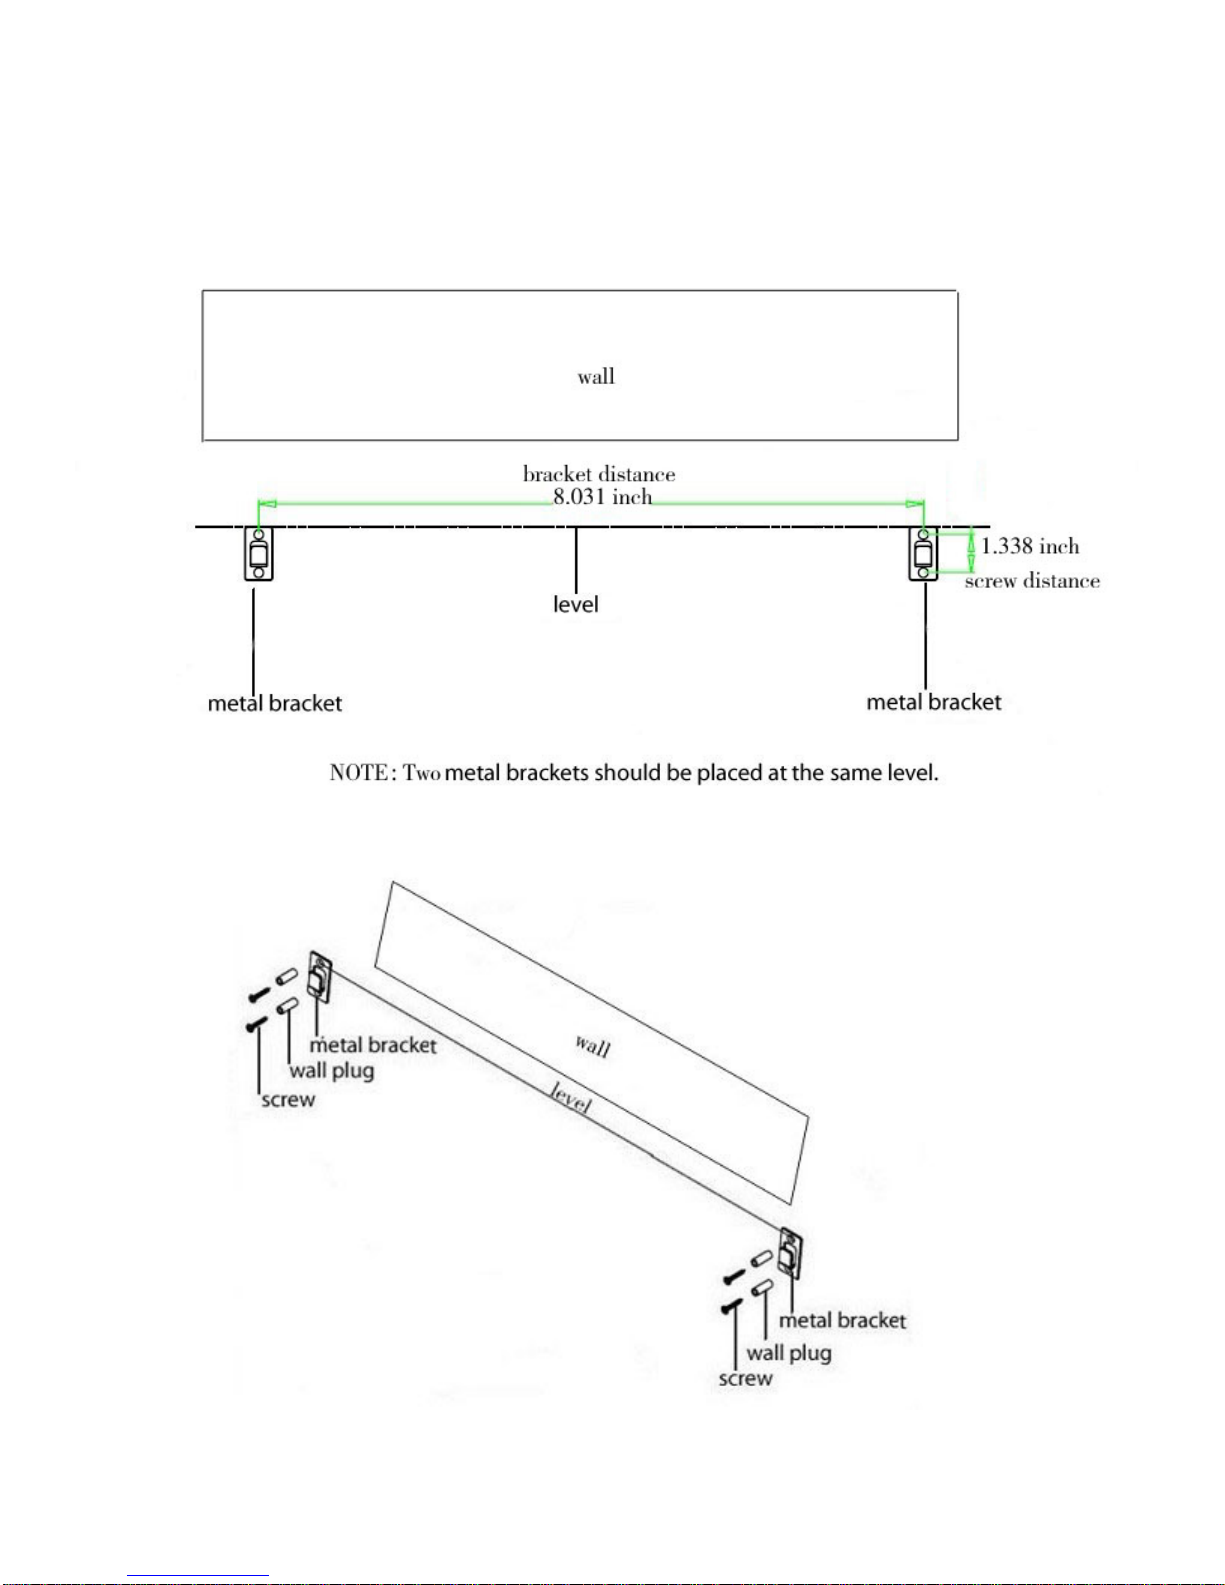
ASSEMBLING THE UNIT--- ON WALL
Step 1: Drilling holes according to the size in Fig below.
Step 2:Insert the wall plug and fix metal brackets on wall with screws provided.
7
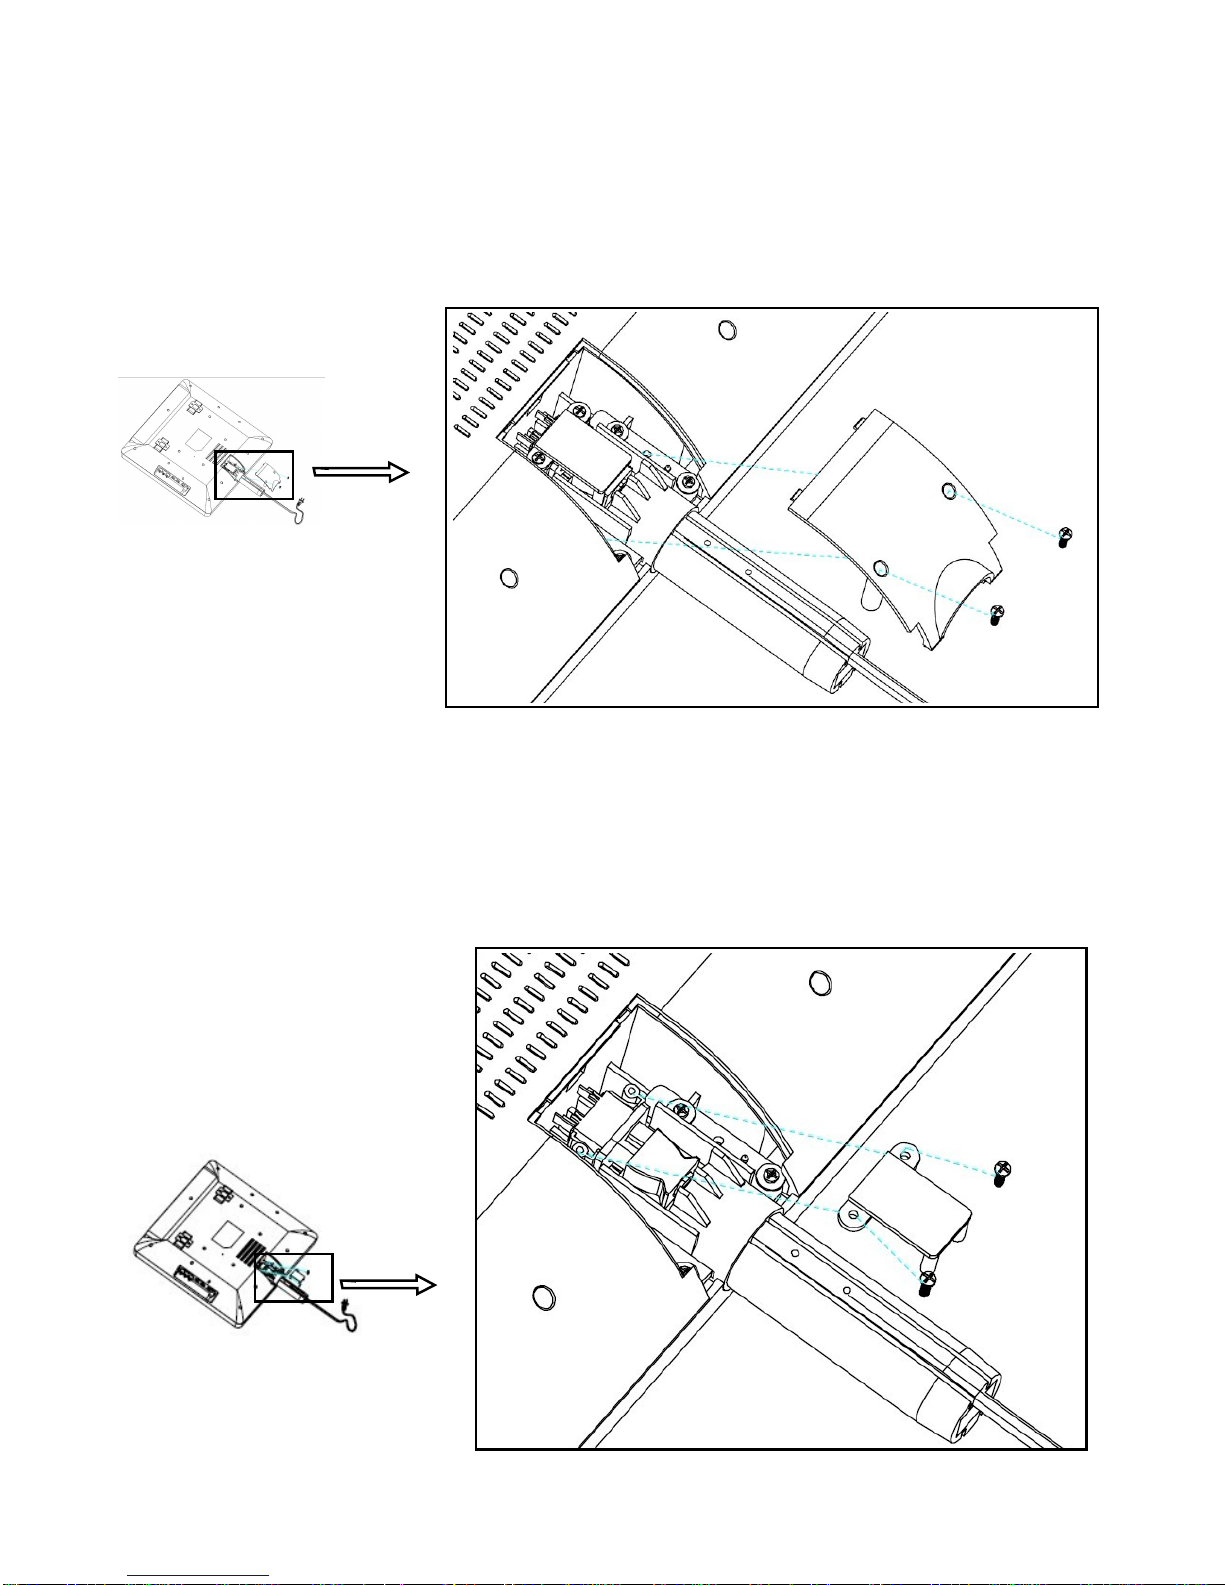
Step 3:Uncover the power plug plastic cover at the back of the unit.
Screw out and take off the cover.
Step 4:Screw out and disassemble the bracket fixing the power plug.
ASSEMBLING THE UNIT---ON WALL(Continued)
8
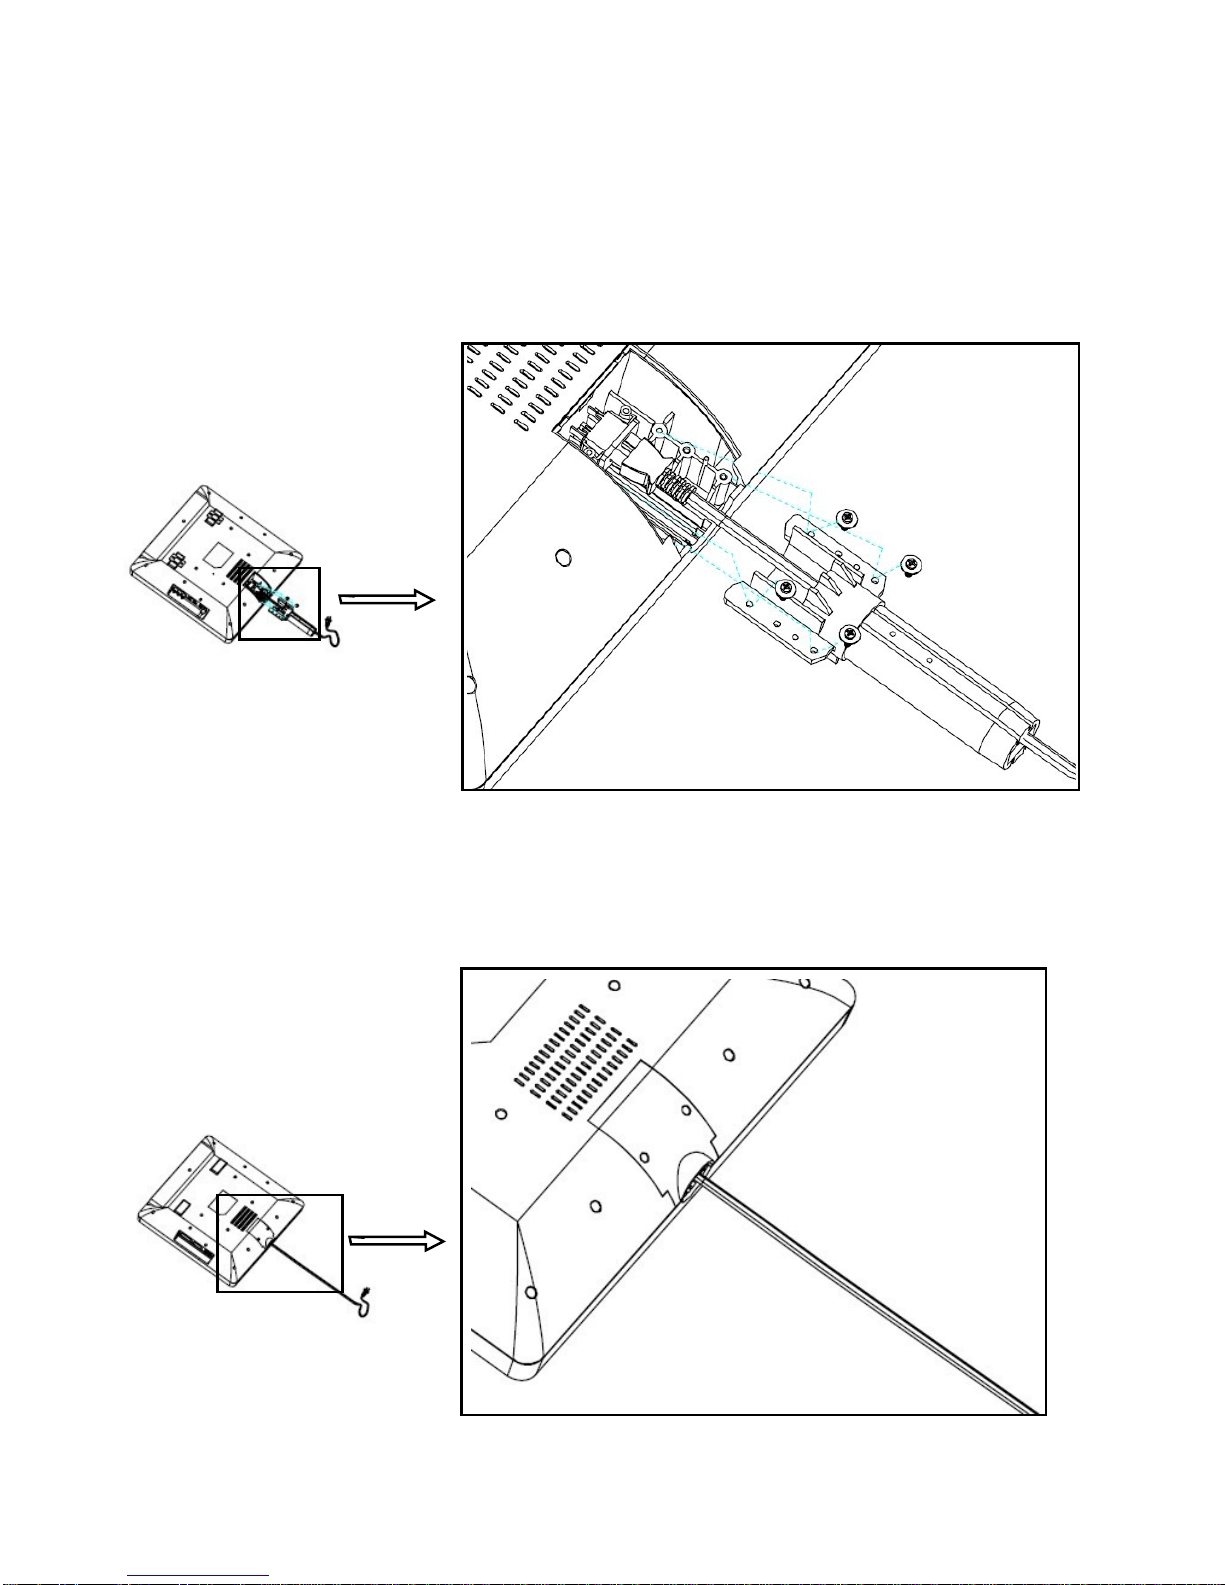
Step 5:Screw out and disassemble the short connecting and fixing pipe.
Step 6: Insert the power source plug and screw the brackets and the cover back.
9
ASSEMBLING THE UNIT---ON WALL(Continued)
Inhaltsverzeichnis
Beliebte Lautsprechersystem Handbücher anderer Marken


Sondpex
Sondpex Active Speaker System and Digital Music... Bedienungsanleitung

JVC
JVC NX-PN7 Bedienungsanleitung

Marshall Amplification
Marshall Amplification AR-DM61-BT Bedienungsanleitung

Yamaha
Yamaha NX-A01 - Speaker Sys Bedienungsanleitung

SE Audiotechnik
SE Audiotechnik I-LINE Bedienungsanleitung

Gemini
Gemini WRX-843 Series Bedienungsanleitung