Datamars TracKing-I Bedienungsanleitung

TracKing-1
QUICK START GUIDE
GUIDE DE DÉMARRAGE RAPIDE
GUÍA DE INICIO RÁPIDO
GUIDA RAPIDA
V. 4
LIVESTOCK ID

© 2012-2022 Datamars Limited.
All product names and brand names in this document are trademarks or registered trademarks of their respective
holders.
No part of this publication may be photocopied, reproduced, stored in a retrieval system, or transmitted in any form or
by any means, electronic, mechanical, photocopying, recording or otherwise without the prior written permission of
Datamars Limited. Product specifications may change without prior notice.
For more information on other quality Datamars brands and products, visit datamars.com
Datamars SA (Global Headquarters)
Via Industria 16
6814 Lamone
Switzerland
Phone: +41 91 935 73 80
Fax: +41 91 945 03 30
Email: [email protected]
The
Bluetooth
®
word mark and logos are registered trademarks owned by Bluetooth SIG, Inc. and any use of such
marks by Datamars SA and its subsidiaries is under license. All trademarks with an * are neither owned by nor licensed
to Datamars SA and belong to their respective owners.

1
2
Before you start
Home menu
This guide provides you the basic information to start using your TracKing-1 to read electronic identication
codes (EIDs). For additional information on the reader functionalities, please refer to Datamars website
www.datamars.com
We recommend to fully charge the battery before the rst usage of the reader. To charge the battery, plug
the USB cable into the corresponding connector on the bottom of the reader and connect it to a PC or a wall
mount adapter with USB plug. Be sure to safely eject the reader from your PC before disconnect the USB
cable.
Active screen when the reader is switched on.
Battery level
Bluetooth icon (optional)
Supported USB interface
Continuous reading icon
Date and time
Session le EIDs counter
Settings menuReadingSessions menu
Antenna
(on the back of the reader)
Softkeys
Press these two buttons to
select the commands above
them in the action toolbar
“ON”/Reading button
Press this button to turn the
reader ON and start reading
With the reader on, press
this button to select the
commands above it in the
action toolbar
Press and hold this button
to turn the reader o
Mini USB communication port
Display
3

4
3
Sessions menu
Reading
EID counter: shows how many EIDs are stored in the last session selected.
Session le: it’s a memory le where the EIDs read are stored. The le is named with date and time at the
creation of the session. The home menu shows the name of the last session le selected.
• Press the “ON”/Reading button to start reading.
•When a tag is successful read, the display will show the EID detected (see gure above).
• In continuous reading mode the reading icon will be shown on the display until you stop reading.
• The reader can check duplicates on the last 10, 100 or 1000 EIDs recorded. If duplicates are not
allowed, an EID already stored in the session le won’t be recorded twice and the duplicate icon will be
shown on the reader’s screen.
•Select the sessions menu icon to have all the sessions les recorded shown on the display.
•Select the arrow icon to move from a session le to the following. A longer press will reverse the arrow
direction.
• Select the icon
to enter the desired session le and review all the EIDs recorded in that
session (see next gure).
• Select the home icon to return to the home menu.
Transponder type + eld bit info
Position of the session le in the
sessions menu
EID country code
Number of EIDs stored in the
selected session le
National identication code
Reading in process
Duplicate icon
Total number of EIDs registered in
the reader (up to 4000)
4

•For each session le, the display shows all the EIDs read. Select the arrow icon to move from an EID to
the following. A longer press will reverse the arrow direction.
• For each EID selected, the blue bar on the display shows:
- the position of the EID in the session le (from the rst EID read to the last one presented at the
top of the list)
- date and time of the reading.
• Select the icon
to print or delete data (see gure below).
• Select the sessions menu icon to return to the session menu.
• Select the icon
to perform the selected action.
• Select the arrow icon to move from an action to the following.
• Select the icon to return to the selected session le.
Print over the connected device
(USB or Bluetooth [optional]) the
EIDs stored in the selected session
Delete the selected EID
Delete duplicate EIDs
Delete the session
5

5Settings menu
Select the arrow icon to navigate in the menu
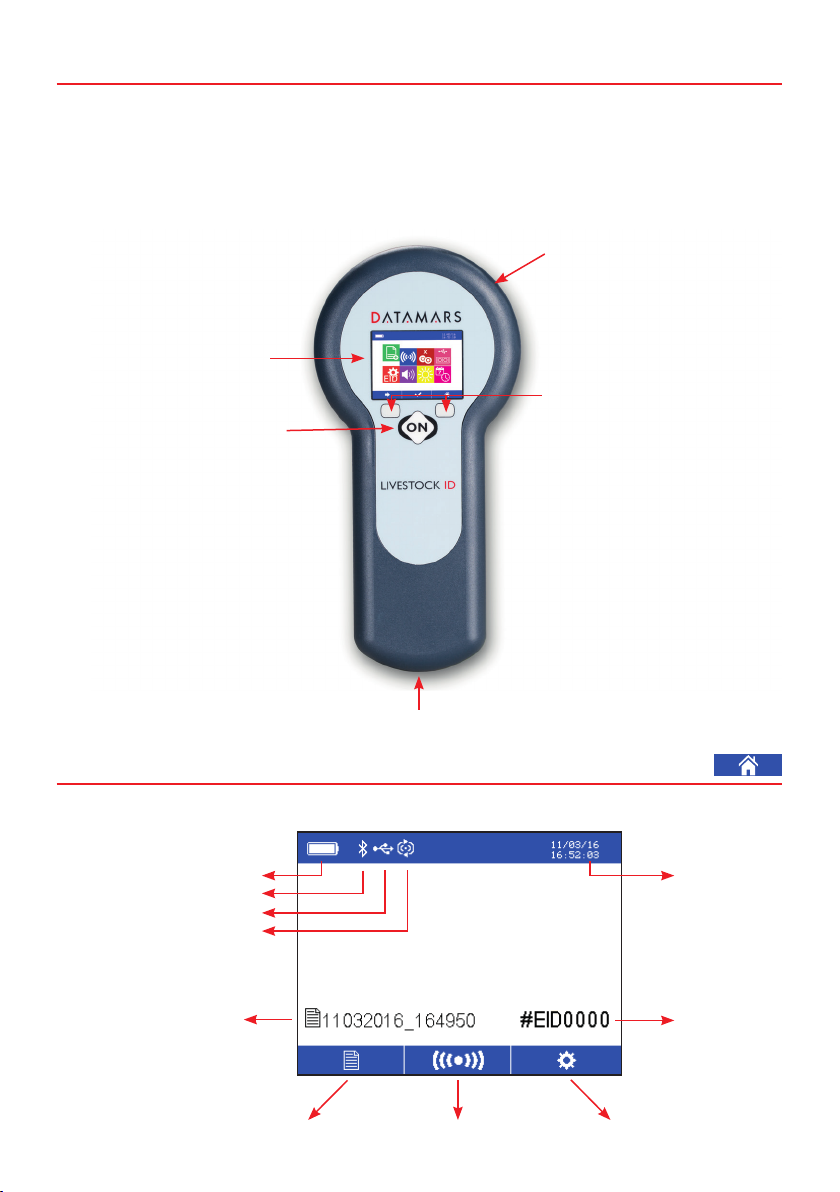
Press the ON button to select the desired setting
Select the home icon to return to the home
menu
New session le: create a new session le.
EID format: 8 formats are available to store and transmit the EID.
Audio ON/OFF: Acoustic signals can be enabled or disabled.
Reading modes
Single reading mode (left): Pressing the ON/reading button, only one EID is read (to read
another one, click the reading button again).
Continuous reading mode (right): pressing the reading button the scanner continues
reading tags until the reading button is pressed again (or time-out occurs).
Supported USB Interfaces
Turn o the reader to connect it to the PC in mass storage and open session les.
If the reader is turned ON while connected to a PC, the reader will behave as a PC
peripheral and EIDs will be sent to the PC via the USB cable at each reading. Two
interfaces are supported:
Keyboard wedge (KWG)- left: the reader is seen by the PC as a keyboard. The codes
will be displayed on the PC screen in any window where a mouse cursor is active. No
conguration on the PC is needed.
Virtual Com Port (COM) - right: the reader is connected to one of the Virtual Com Ports
of the PC and sends the codes using RS232 protocol. Codes are received on a hyper-
terminal or using Datamars S-ID software (requires a specic PC driver that can be
downloaded from www.datamars.com).
Duplicate EIDs check
No duplicates check: (icon 1). Duplicates allowed. A single EID can be recorded in the
same session le more than once.
Duplicates check: Duplicates not allowed. The reader remembers the last 10 (icon 2), 100
(icon 3) and 1000 (icon 4) recorded in the session le. If the reader detects an EID already
stored in the session le, the EID won’t be recorded twice and the duplicate icon will be
displayed on the screen.
X
EID
X 10
100 1000
EID
1
3
2
4
6

Display Brightness
Firmware version (optional)
Bluetototh (optional): bluetooth settings (optional) allow you to establish a connection
and communicate via Bluetooth with other devices such as scales, printers, computers and
mobile devices. For full instructions on how to use the Bluetooth functionality, please refer
to the Application Note available on Datamars website www.datamars.com.
Date and Time
6Troubleshooting
• If the reader doesn’t switch on, charge the battery for at least 30 minutes and then try to switch on the
reader again (recommended time for full battery recharge = 2 hours).
• If the reader doesn’t work properly or the reading distance is too short, you may be close to a source of
electromagnetic disturbances (monitors, PC…) or you may be close to metallic surfaces which reduce
the performance of the antenna.
• In case of technical issues with the reader, an error message can be displayed on the screen. For more
7

1
2
Avant propos
Menu accueil
Ce manuel fournit les instructions basilaires pour utiliser le lecteur TracKing-1 pour lire les codes
d’identication électronique (electronic identication codes, EIDs). Pour des informations supplémentaires
relatives aux fonctionnalités du lecteur veuillez consulter le site internet de Datamars www.datamars.com.
Nous recommandons une pleine charge de batterie avant la première utilisation. Pour recharger la
batterie,insérez simplement le câble USB dans le connecteur approprié (mini USB) au bas de l’appareil, et
reliez le câble à un ordinateur ou à un adaptateur mural. Assurez-vous d’éjecter le lecteur de votre ordinateur
avant de déconnecter le cable.
Ecran aché avec le lecteur allumé.
Niveau de charge
Icône Bluetooth (optionnel)
Interface USB
Icône de lecture en continu
Date et heure
Fichier de session Compteur
EIDs
ParamètresLectureMenu des sessions
Antenne
(à l’arrière de l’appareil)
Touches de fonction
Ces deux touches permettent
de saisir les commandes qui
s’achent à l’écran
“ON”/Touche de lecture
Appuyez sur cette touche
pour allumer le lecteur et
commencer à lire
Avec le lecteur allumé,
appuyer sur cette touche
pour saisir les commandes
qui s’achent au-dessus de
l’écran
Maintenez cette touche
enfoncée pour éteindre
l’appareil
Mini USB Port de communication
Écran
8

4
3
Menu des sessions
Lecture
Compteur EID : montre le nombre des données stockées dans le dernier chier de session sélectionné.
Fichiers de session : c’est un chier de mémoire où les données enregistrées sont stockées. Il est nommé
selon la date et l’heure au début de la session. Le menu accueil ache le dernier chier sélectionné.
•Appuyez sur la touche de lecture pour commencer à lire.
•Quand une puce est identiée, l’écran ache l’EID lu (voyez l’illustration au-dessous).
•Avec la modalité de lecture en continu, l’icône de lecture est aché sur l’écran jusqu’à la n de la
lecture.
•Vous pouvez choisir de ne pas enregistrer un EID qui a déjà été enregistré dans les derniers 10, 100
ou 1000 EIDs enregistrés dans la session en cours. Dans ce cas, si le lecteur détecte un EID qui a déjà
été enregistré dans les derniers 10, 100 ou 1000 EIDs dans la memoire, cela ne sera pas enregistré à
nouveau dans le chier de la session en cours et l’icône des doublons sera achée à l’écran.
•Sélectionnez l’icône du menu des sessions pour acher toutes les sessions enregistrées.
•Sélectionnez l’icône en forme de èche pour se déplacer d’une session à l’autre. Maintenez appuyé
plus longtemps pour inverser la direction de la èche.
•Sélectionnez
pour entrer dans la session choisie et acher les EIDs enregistrées dans
cettesession (voyez l’illustration suivante).
•Sélectionnez l’icône accueil pour revenir au menu accueil.
Type de transpondeur +
champs pour info bits
Position du chier de session dans
le menu de sessions
Code pays
Nombre de EIDs enregistrés
dans le chier de session
sélectionné
Numéro national d’Identication
Lecture en cours
Icône des doublons
Nombre d’EIDs mémorisés dans le
lecteur (jusqu’à 4000 codes)
9

•Les codes lus sont achés dans chaque chier de session. Sélectionnez l’icône en forme de èche
pour se déplacer d’un EID à l’autre. Maintenez appuyé plus longtemps pour inverser la direction de la
èche.
•Pour cheque EID sélectionné, la ligne en bleu indique :
- la position dans le chier de session (depuis le premier EID lu jusqu’au dernier présenté en haut
de la liste)
- date et heure de la lecture de l’EID
•Sélectionnez l’icône
pour accéder aux options d’imprimerie et d’eacement (voyez
l’illustration suivante).
•Sélectionnez l’icône accueil pour revenir au menu accueil.
•Sélectionnez l’icône
pour accomplir l’action souhaitée.
•Sélectionnez l’icône en forme de èche pour se déplacer d’une action à l’autre.
•Sélectionnez l’icône pour revenir au chier de session sélectionné.
Imprimer sur le dispositif relié (via
USB ou Bluetooth [optionnel]) les
EIDs mémorisés dans la session
sélectionnée
Eacer l’EID sélectionné
Eacer les codes dupliqués
Eacer la session sélectionnée
10
Inhaltsverzeichnis
Sprachen:
Andere Datamars Kartenleser Handbücher
Beliebte Kartenleser Handbücher anderer Marken

Rosslare
Rosslare DR-6255 Bedienungsanleitung

Lindy
Lindy 51541 Bedienungsanleitung

Diapro T?bbi Ürünler
Diapro T?bbi Ürünler Across System Bedienungsanleitung

Johnson Controls
Johnson Controls Kantech tyco ioSmart Bedienungsanleitung

ACS
ACS ACR122L Bedienungsanleitung

Secukey
Secukey S2-MF Bedienungsanleitung


