
DreamCast AURA36-CFB60 Bedienungsanleitung
1
DreamCast
design and production
Match Lit Firepit with Standing Pilot
60k - 250k BTU with Safety Shut-off
Installation & Operation Manual
OUTDOOR DECORATIVE
GAS APPLIANCES
CERTIFIED FOR USA & CANADA
We recommend that our fire pits
be installed and serviced by
professionals that are certified in the
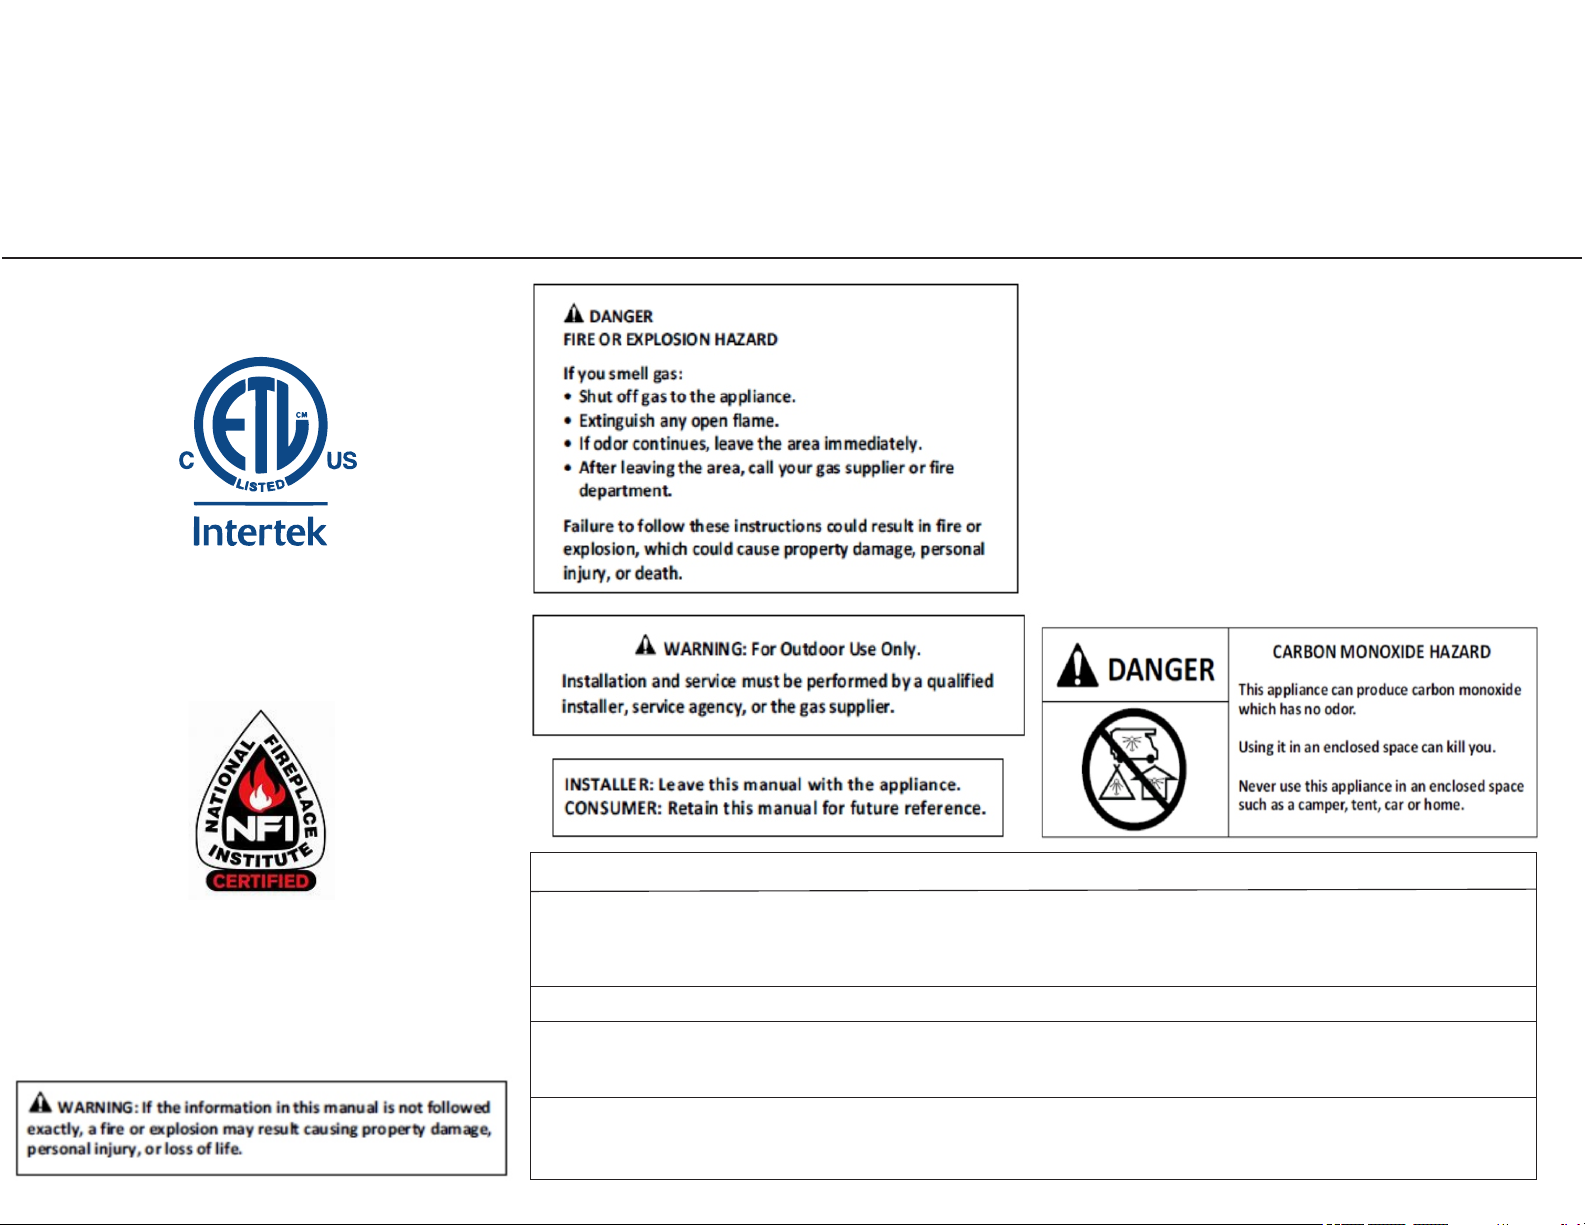
U.S. by NFI
(National Fireplace Institute)
The installer is responsible for using the correct fuel line sizing and/or regulation to provide
gas within the specified minimum and maximum gas inlet pressures of the fire feature.
⚠ WARNING
Do not store or use other flammable vapors and liquids in the vicinity of this or any other appliance.
An LP-cylinder not connected for use shall not be stored in the vicinity of this or any other appliance.
⚠ WARNING
Improper installation, adjustment, alteration, service or maintenance can cause injury or
property damage. Read the installation, operating and maintenance instructions thoroughly
before installing or servicing equipment.
Certified to
ANSI STD Z21.97 - 2017
CSA STD 2.41 - 2017
4011077

2
This Owner’s Guide and Instruction Manual
contains critical information for the safe installation
and operation of your DreamCast fire feature. You
must read this manual in its entirety prior to
installation and/or operation.
Failure to follow these instructions may result
in property damage, personal injury, or death.
IMPORTANT: This appliance should
be inspected before use and at least once annually
by a qualified service person. More frequent
cleaning may be required as necessary. It is
imperative that the control compartment, burners
and circulating air passageways of the appliance be
kept clean. If it is evident that the burner is
damaged it must be replaced prior to the appliance
resuming operation. Contact DreamCast for a
replacement.
DANGER: Carbon monoxide poisoning can lead to
death!
CARBON MONOXIDE POISONING:
Early signs of carbon monoxide poisoning resemble
the flu, with symptoms including headache, dizzi
ness, or nausea. If you experience these signs, the
Fire Pit may not be working properly. Get fresh air
at once! Have the Fire Pit serviced. Some people
are more affected by carbon monoxide than others,
including pregnant women, people with heart or
lung disease or anemia,those under the Influence
of alcohol, and those at high altitudes.
NATURAL GAS AND PROPANE:
To assist in detecting leaks, an odorant has been
added to natural gas and propane. However, this
odorant can fade, and gas may be present even
though no odor exists.
WARRANTY REQUIREMENT:
When not in use, appliance must be covered at
all times. Failure to cover the fire feature
will void the warranty.
WARNING: Any modification to this appliance or its
controls can be dangerous.
1. This appliance, as supplied, is only for use with the
type of gas indicated on the rating plate.
2. When this appliance is connected to a fixed piping
system, the installation must conform with local codes
or, in the absence of local codes, with the National Fuel
Gas Code, ANSI Z223.1/NFPA 54; National Fuel Gas
Code, National Gas and Propane Installation Code,
CSA B149.1; or Propane Storage and Handling Code,
CSA B149.2 as applicable.
3. Keep the appliance area clear and free from
combustible materials, gasoline and other flammable
vapors and liquids
4. Do not burn solid fuel in this appliance. Do not use
this appliance to cook food or to burn paper or other
objects.
5. Children and adults should be alerted to the
hazards of high surface temperatures and should stay
away to avoid burns or clothing ignition.
6. Clothing or other flammable materials should not be
hung from the appliance, or placed on or near the
appliance.
7. Young children should be carefully supervised when
they are in the area of the appliance.
8. Do not use the appliance if any part has been under
water. Immediately call a qualified service technician to
inspect the appliance and to replace any part of the
control system and any gas control which has been
under water.
9. Inspect the appliance before each use. If your firepit
uses a hose inspect the hose before each use. If there
is evidence of excessive abrasion or wear, or if the
hose is damaged it must be replaced. Contact
Dreamcast for a replacement.
WARNING: DO NOT USE OXYGEN MIXERS WITH
YOUR DREAMCAST APPLIANCE. Mixers may create
leakage in the cavity of the pit and could cause fire or
explosion which could cause property damage,
personal injury, or death.
Turn the appliance off and let cool before servicing,
installing, repairing or covering. Any guard or other
protective device removed for servicing the appliance
must be replaced prior to operating the appliance. Only
a qualified service person should install, service,
or repair the appliance.
HIGH ALTITUDE INSTALLATION
Gas fireplaces are tested and approved
for elevations from 0 to 4,500 feet in Canada and
U.S.A. When installing this fireplace at an elevation
above 4,500 feet (in Canada), check with local
authorities. Consult your local gas utility for assistance
in determining the proper orifice for your location.
LOCAL CODES
Install and use your Outdoor Fire Pit with care. Follow
local codes. In the absence of local codes, use the
latest edition of The National Fuel Gas Code ANSI
Z223.1/NFPA 54 available from:
American National Standards Institute Inc.
1430 Broadway New York NY 10018
National Fire Protection Association,Inc.
Batterymarch Park Quincy MA 02269.
DreamCast is not responsible for damage due to
improperly installed or operated units. Instructions are
updated as needed, and it is the installer or owners’
responsibility to periodically review DreamCast's
website for applicable updates
(www.dreamcastdesign.com.)
Please keep this manual with your important
papers.
General Information

3
UNBOXING
Upon receiving your DreamCast Firepit, take care to check all parts
have been received according to the included packing slip.
ATTENTION: Fragile! Concrete may chip or scratch if collided
with other hard materials such as stone, metal, or other concrete.
HANDLE WITH CARE!
Remove the concrete parts from the crate, unwrap and place them on
a soft surface. Take care when handling concrete parts as concrete is
brittle and can chip or flake if struck. Inspect all parts for shipping
damage. Any shipping damage must be reported immediately. We
allow for 48 hours after receipt for any shipping damage to be claimed
under warranty. Please contact DreamCast Design if you are missing
any parts.
SET-UP
Before placing your DreamCast Firepit, check that the desired location
meets all clearances to combustibles listed in the Fire Pit Clearances
Diagram. Ensure that the final location for the fire pit is as flat and level
as possible. Make sure to provide adequate drainage beneath the
opening in the base of the fire pit body.
Carefully lift the fire pit or fire pit base and place it in its final position. If
there is a gas riser, fire pit should be placed so that the stub is
enclosed within the fire pit.
If the fire pit does not sit level, shim appropriately so that
it is level and evenly supported. If the fire pit has a top section,
carefully lift and place it on top of its base. Ensure that the provided
rubber shims are installed between the top and base. Check that the
top section is level and stable. If it does not sit level or is unstable,
shim as required with additional rubber shims.
Follow the assembly instructions in this manual to connect the burner
assembly, test for gas leaks, and place decorative burner media.
CONCRETE CARE
Your new DreamCast fire pit is factory sealed to resist staining and
discoloration. However, care should be taken to maintain the
premium concrete finish.
Concrete is a very porous material and may stain from certain
substances left on the surface. Things that may stain if not removed
include red wine, acidic juices, oils and waxes, tree sap and other
organic material. Additionally, water trapped under an object for an
extended period can leave a watermark.
We strongly recommend covering your firepit with a breathable,
weather resistant cover when not in use.
MAINTENANCE
Your concrete fire pit can be cleaned with a soft cloth and mild soap
to remove dirt and scuffs.
The surface can be periodically cleaned and refreshed
with our DreamCast Refresh Sealer. Please contact us for more
information and to order Refresh Sealer.
Scratches and chips can be repaired with our patch kit, though any
repairs made to concrete will be visible.
Your DreamCast Concrete Firepit
This Owner’s Guide and Instruction Manual contains critical information for the safe installation operation and
maintenance of your DreamCast fire feature. You must read this manual in its entirety prior to installation
and/or operation.
CAUTION - HEAVY
Use care when lifting and placing to avoid injury and damage to
property and the fire pit itself.
Fire pits will require 2 or more people to lift.

4
Applicable Models
This Owner’s Guide and Instruction Manual is applicable to the following fire pit models. Specified hourly BTU inputs for each model.
MODEL:
BTU INPUT (NG):
BTU INPUT (LP):
AURA36-CFB60
85,000 BTU
62,000 BTU
AURA48-CFB60
85,000 BTU
62,000 BTU
AURA48-CFB120
130,000 BTU
110,000 BTU
AURA48-CFB180
165,000 BTU
160,000 BTU
BLOQ-CFB60
85,000 BTU
62,000 BTU
CUBO-CFB60
85,000 BTU
62,000 BTU
ELEMENT36-CFB60
85,000 BTU
62,000 BTU
ELEMENT48-CFB60
85,000 BTU
62,000 BTU
ELEMENT48-CFB120
130,000 BTU
110,000 BTU
ELEMENT48-CFB180
165,000 BTU
160,000 BTU
LIBRA48-CFB60
85,000 BTU
62,000 BTU
LIBRA60-CFB60
85,000 BTU
62,000 BTU
LIBRA60-CFB120
130,000 BTU
110,000 BTU
LIBRA60-CFB180
165,000 BTU
160,000 BTU
LIBRA72-CFB60
85,000 BTU
62,000 BTU
LIBRA72-CFB120
130,000 BTU
110,000 BTU
LIBRA72-CFB180
165,000 BTU
160,000 BTU
LINEA48-CFBL110
155,000 BTU
135,000 BTU
LINEA60-CFBL190
180,000 BTU
190,000 BTU
LINEA72-CFBL250
275,000 BTU
245,000 BTU
MODEL:
BTU INPUT (NG):
BTU INPUT (LP):
LOTUS32-CFB60
85,000 BTU
62,000 BTU
LOTUS45-CFB60
85,000 BTU
62,000 BTU
LOTUS45-CFB120
130,000 BTU
110,000 BTU
LOTUS45-CFB180
165,000 BTU
160,000 BTU
PHANTOM48-CFBL150
160,000 BTU
160,000 BTU
PHANTOM60-CFBL210
215,000 BTU
215,000 BTU
PHANTOM72-CFBL250
275,000 BTU
245,000 BTU
QUADRA48-CFBL110
155,000 BTU
135,000 BTU
QUADRA60-CFBL150
160,000 BTU
160,000 BTU
QUADRA72-CFBL210
215,000 BTU
215,000 BTU
QUADRA84-CFBL250
275,000 BTU
245,000 BTU
ZEN34-CFB60
85,000 BTU
62,000 BTU
ZEN34-CFB120
130,000 BTU
110,000 BTU
ZEN34-CFB180
165,000 BTU
160,000 BTU
ZEN36-CFB60
85,000 BTU
62,000 BTU
ZEN36-CFB120
130,000 BTU
110,000 BTU
ZEN36-CFB180
165,000 BTU
160,000 BTU
ZEN48-CFB60
85,000 BTU
62,000 BTU
ZEN48-CFB120
130,000 BTU
110,000 BTU
ZEN48-CFB180
165,000 BTU
160,000 BTU

5
GENERAL INSTALLATION INSTRUCTIONS
Use only joint compound, thread sealant, or tape specific to gas
use that is resistant to all gases. Apply joint compound, thread
sealant or tape to all male pipe fittings only and DO NOT USE ON
FLARED END OF FLARED FITTINGS. Be sure to tighten every
joint securely. If you are lighting manually be sure to maintain a
minimum safe distance to avoid property damage, personal injury,
or death. Please refer to match lit instructions:
1.Verify gas supply matches burner & pilot type.
2. Verify gas inlet pressure is within the specified minimum and
maximum pressures. Consult Gas Inlet Pressures on previous
page.
3. Purge gas lines of air, water and debris.
4. Perform all leak tests with leak detector or leak reactant
on main gas supply and repair leaks as necessary. Turn off gas
supply.
5. For models that include electronic ignitions, be sure to have a
qualified electrician install proper power supply following all local
codes.
6. Inspect flex line(s) for punctures or breaks in line(s).
7. Make sure the control knob turns the control valve before
installing. Use only your hand to turn the control knob. Never use
tools. If the control knob will not turn by hand, don’t try to repair it.
Force or attempted repair may cause a fire or explosion.
8. Refer to Connection Diagrams for applicable gas connections.
9. Position burner safely with access to all gas connections for
testing. Position burner to allow sufficient clearance from the fire
pit to avoid damage.
10.Turn on gas supply to perform repeat leak tests on main gas
supply and all connections to appliance and repair as needed.
11. Do not use appliance if there is evidence of leaking gas. If leak
is suspected, turn off main gas supply immediately. For appliances
for use with a fixed fuel piping system and equipped with an
appliance gas pressure regulator, the appliance and its individual
shutoff valve must be disconnected from the gas supply piping
system during any pressure testing of that system at test pressure
in excess of ½ psi (3.5kPa). The appliance must be isolated from
the gas supply piping system by closing its individual manual
shutoff valve during any pressure testing of the gas supply piping
system at test pressures equal to or less than ½ psi (3.5 kPa).
12. Ignite burner. See applicable ignition instructions within
Operating Instructions, page 15.
13. Once appliance is lit, perform leak test on all gas connections
and repair as needed.
14. Turn off appliance and allow to cool.
Minimum and Maximum
Gas Inlet Pressures
The installer is responsible for using the correct fuel lines
and/or regulation to provide gas to the fire feature within the
specified minimum and maximum gas inlet pressures below:
CODE REQUIREMENTS
It is the responsibility of the installer to consult with the
local municipality and to FOLLOW ALL LOCAL CODES
concerning the installation and operation of the fire feature.
Minimum
Maximum
Natural Gas
7.0" W.C.
(1.7436 Kpa)
10.0" W.C.
(2.4884 Kpa)
Liquid Propane
11.0" W.C.
(2.7399 Kpa)
13.0" W.C.
(3.2381 Kpa)
6
15. DreamCast Fire Pit must be installed on a stable surface. Fire
pit must be properly assembled, level, and stable. The weight of
the burner and media must be supported by the aluminum support
plate and not by any control box or gas valve. Control boxes and
gas valves must be above grade with adequate drainage to
prevent water damage. Installer is responsible for making sure
there is enough space in the cavity for any electronics and piping.
The lower cavity of the enclosure cannot be filled with any
material (i.e. gravel, crushed rock, concrete, etc).The fire pit
burner assembly should be recessed from the top of the enclosure
to protect flame from excessive wind and to allow coverage of
burner. See Clearances Diagram on page 6. To allow for regular
maintenance, nothing should be attached to the firepit that would
prevent removal of the support pan and burner assembly.
16. Venting is required to avoid heat damage to internal
components and to allow airflow in case of gas pooling. Do not
block the integral vents in your DreamCast Firepit with any
material.
17. Only use fire rated media approved for use with high
temperatures that have been manufactured for specific use in fire
features. Never use any material for media that is nonporous and
holds moisture such as gravel, pebbles, river rock, etc. Such
material, when heated, may cause the trapped moisture to boil,
fracture unexpectedly and/or explode and which could cause
personal injury, damage or death.
18.To avoid dust and clogs getting into the system, do not dump
the media over the burner. Place the media onto the plate or pan.
Burner should be covered by approved media up to 1/2”
above the jets. Media may be positioned so that jet tips or
barrels are visible. Excessive media coverage may cause
back pressure and dangerous pooling of gas which can
result in explosion which could cause property damage,
personal injury, or death.
19. Do not cover the ignition pilot assembly or wind cage more
than halfway with any form of media.
20. Complete final verification of correct operation and lighting.
21. Review instruction manual with end user and instruct end
user not to change/modify fire pit or media in any way that may
affect pilot assembly or wind cage.
GENERAL INSTALLATION INSTRUCTIONS Cont.
7
LOCATION CONSIDERATIONS
All appliances are designed and intended for outdoor use only.
All appliances must have a gas shutoff located outside of the
appliance to allow for emergency shutoff and maintenance. Select
a location where the appliance can be attended during operation.
Never leave an operating appliance unattended or by someone not
familiar with its operation or emergency shutoff locations.
Appliances may create very high temperatures - combustibles
must be located far enough away that there is no risk of ignition.
IMPORTANT: It is recommended that material such as granite,
marble or other dense stone be kept an appropriate distance away
from flame due to risk of cracking. Manufacturer is not responsible
for damage to any nearby material for any reason.
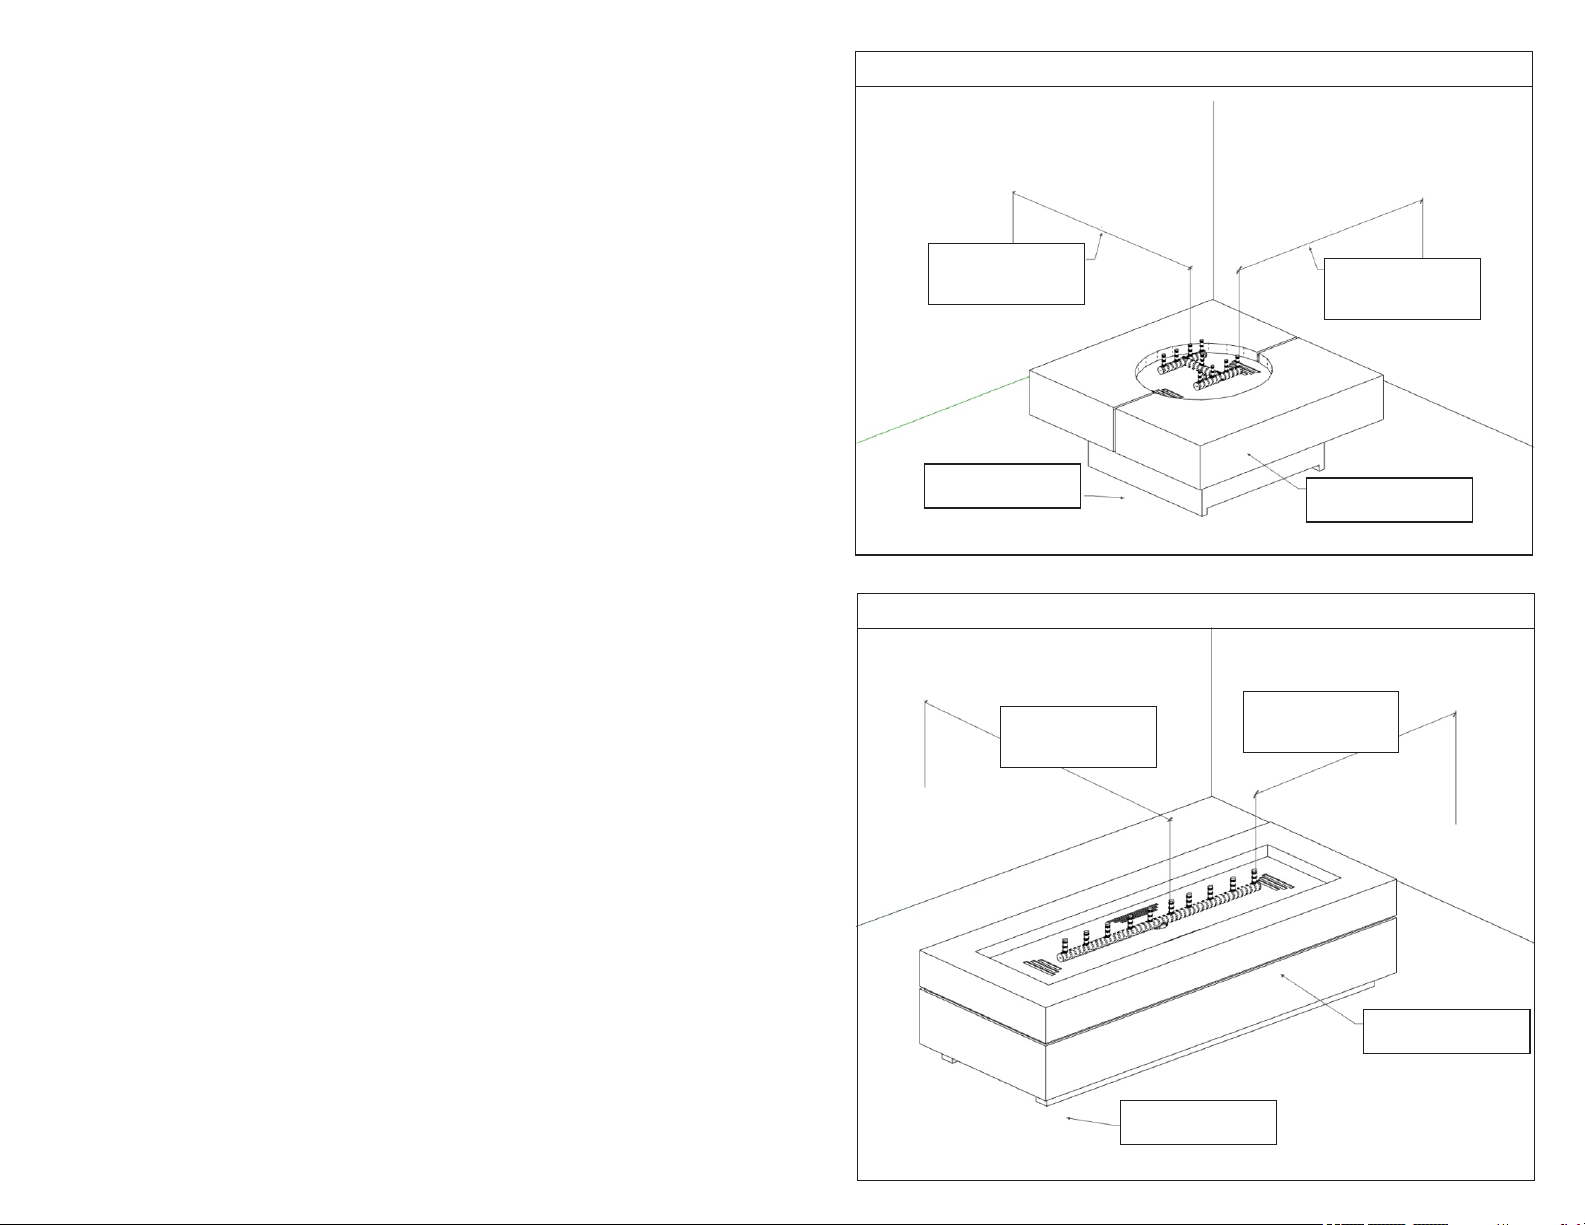
FIRE PIT CLEARANCE TO COMBUSTIBLES see fig. 1 & fig. 2
• Square/Round Fire Pits / Linear Fire Pits Short Side Clearance:
36" from any combustible structure or materials.
• Linear Fire Pits Long Side Clearance:
48" from any combustible structure or materials.
• All Fire Pits - Overhead Clearance:
There must be NO combustible materials above the firepit.
• Choose a location that allows easy access for installation and
maintenance of the fire pit.
• Pick a location that allows sufficient horizontal room to enjoy the
appliance while allowing a safe distance from the heat and flame.
• Always consult with local municipality regarding any
local code requirements.
The fire pit must be placed on a stable surface and must
be level.
Firepit Clearance Diagram (Square & Round Firepits)
Firepit Clearance Diagram (Linear Firepits)
fig. 1
fig. 2
36" Clearance
from Burner to
Combustible Surface
36" Clearance
from Burner to
Combustible Surface
Zero Clearance
to Combustible Floor DreamCast Concrete
(Non-Combustible)
DreamCast Concrete
(Non-Combustible)
Zero Clearance
to Combustible Floor
48" Clearance
from Burner to
Combustible Surface
36" Clearance
from Burner to
Combustible Surface
8
POSITIONING GAS SUPPLY
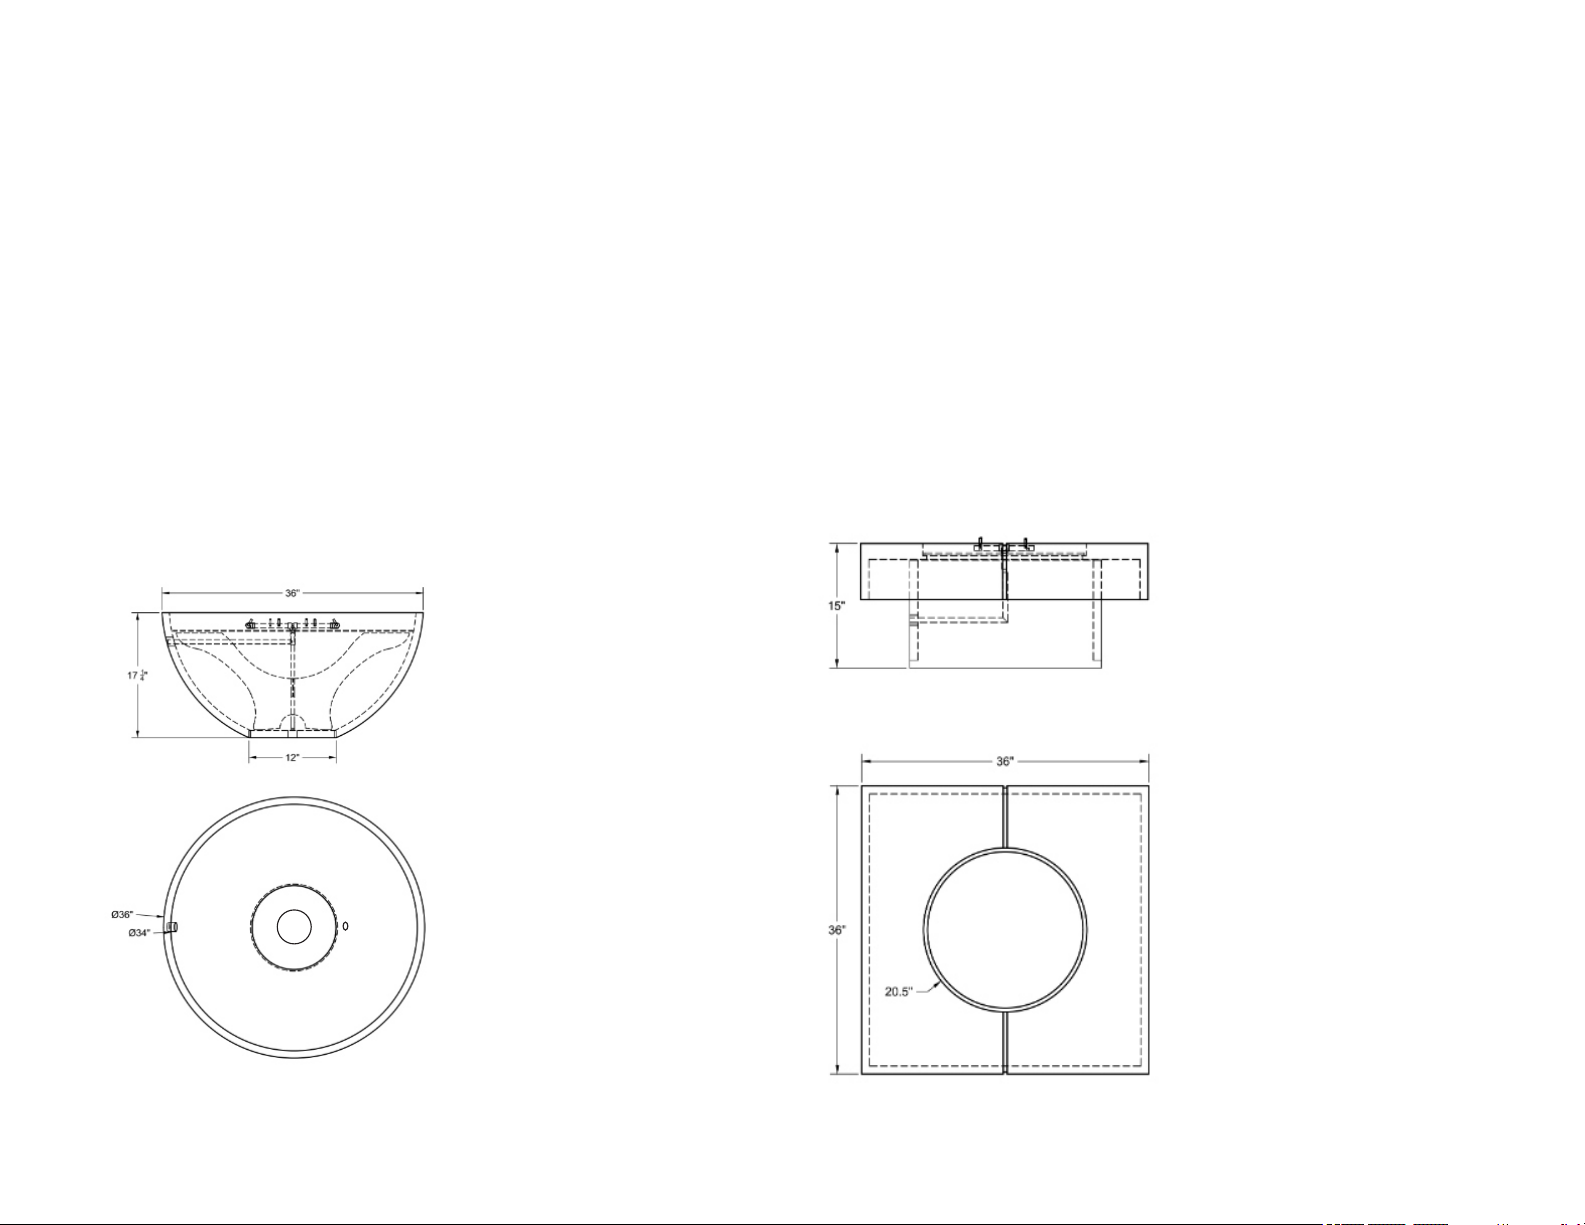
All DreamCast round Fire Bowls have a minimum 5"
diameter opening in the base through which you can bring a
gas or propane line. Side openings are also present at 1.5"
diameter to allow for above-grade gas line access.
Please make sure that the gas line is located only within this
area. This will ensure that the final position of the unit will not
be compromised.
Refer to the assembly diagram for your specific model for
more details.
We recommend that gas risers be kept as low to grade as
possible and no higher than 6” at their highest points so as
not to interfere with the internal components of the firepit.
All DreamCast square/rectangular Fire Pits have a hollow
base.
Gas supply can come up within the footprint of this hollow
base. Side slots are inherent on two sides to allow for above-
grade gas line access & ventilation.
Please make sure that the gas line is located only within this
area. This will ensure that the final position of the unit will not
be compromised.
ATTENTION:
Gas line must be installed by a licensed contractor in
compliance with local codes.
Example:
Zen 36
Fire Bowl
Example:
Element 36
Fire Table

9
Assembly Instructions - Overview
1. Position Fire Pit
Position concrete fire pit according to the Clearance
Requirements and Gas Supply location on pages 7 & 8.
2. Identify Parts & Assembly
Identify all parts on the Parts List on page 10 and
familiarize yourself with the assembly diagram for your
fire pit.
3. Assemble Fire Pit
Follow the assembly instructions on the following
pages.
4. Leak Test
Carefully leak test all connections.
5. Lighting Test
Test lighting of the firepit, following the operating
instructions on page 15-16 and observe the flame
pattern of the pilot and burner.
6. Install Fire Pit Media
Follow the instructions on Page 14.
7. Final Test
Test once more to ensure that the media installation
has not affected the burner operation.
⚠ WARNING
Failure to position parts in accordance
with these diagrams and instructions
and/or failure to use parts specifically
approved for use with this appliance
may result in property damage or
personal injury.
⚠ CAUTION
Do not remove the data plate attached
to the Concrete Fire Pit. This plate
contains important information.
NOTICE
Installation and repair should be done
by a qualified service person. The
appliance should be inspected before
use and at least once annually by a
qualified service person. More frequent
cleaning may be required as necessary.
It is imperative that controls, burner and
circulating air passageways of the
appliance be kept clean.
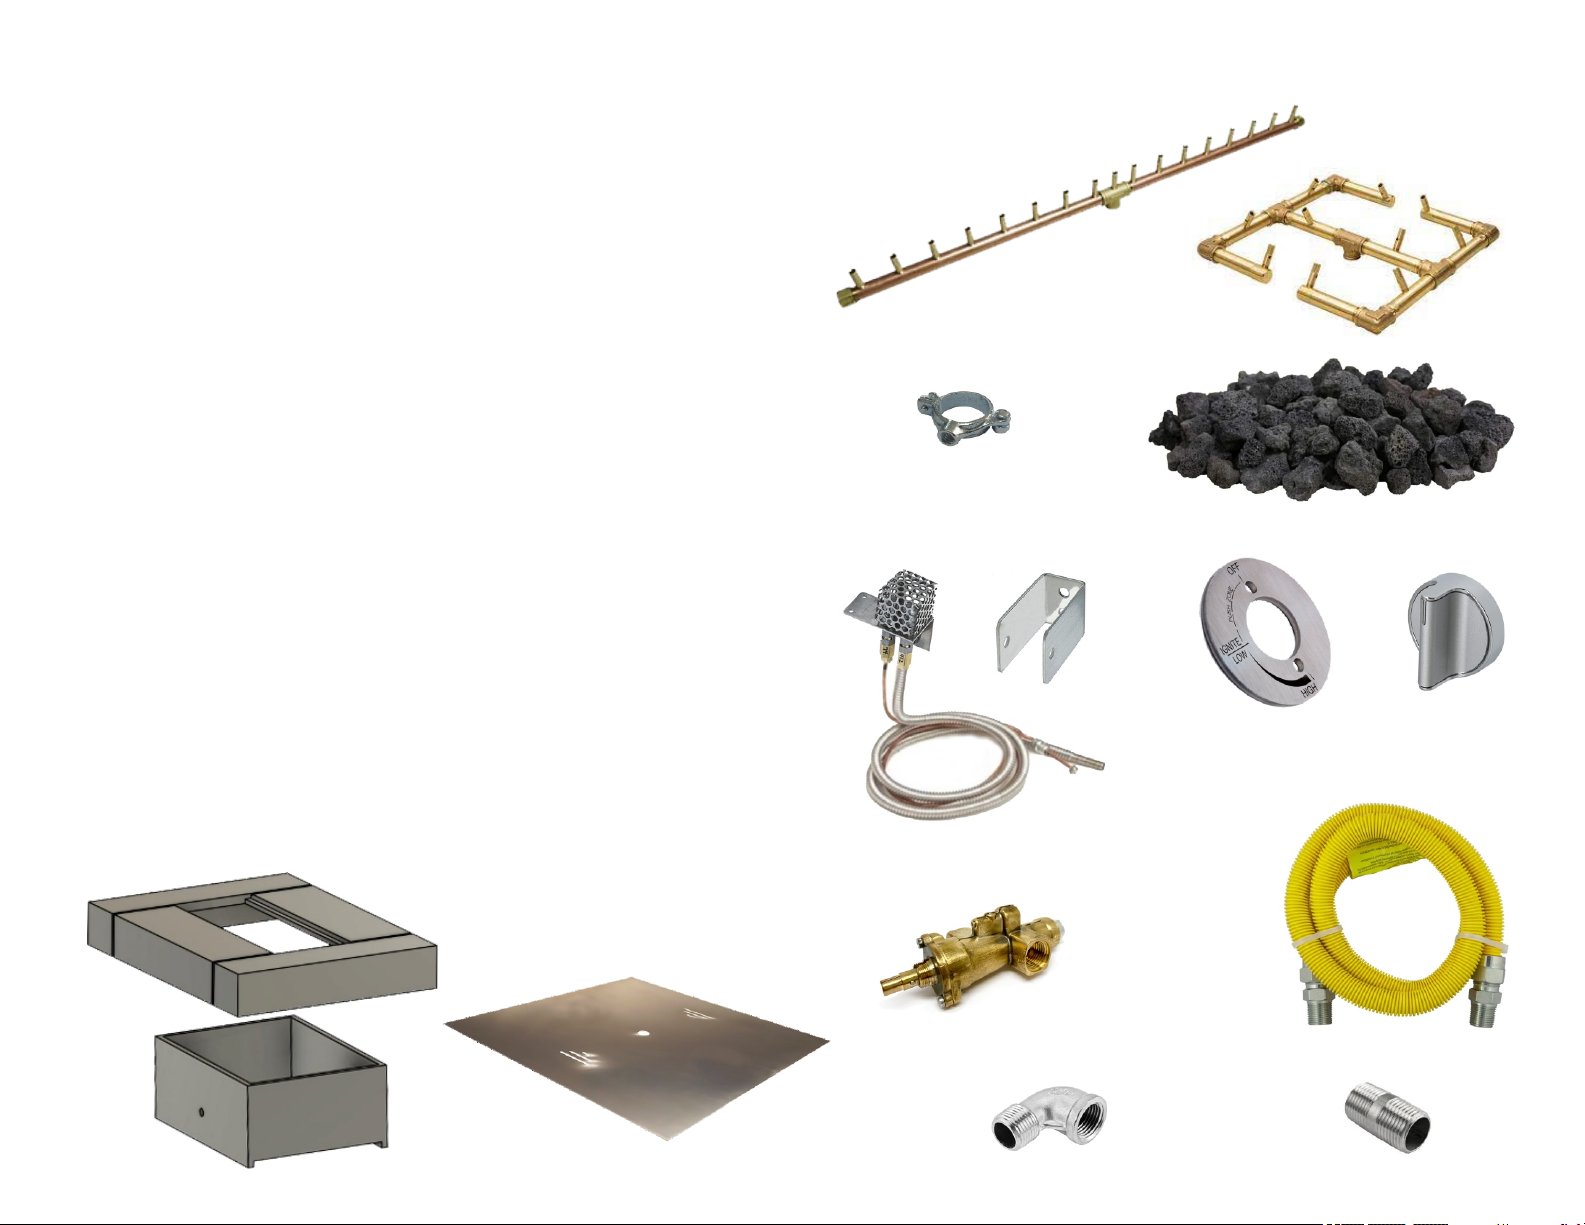
10
1. Concrete Firepit (Varies by model)
2. Aluminum Support Plate (Varies by model)
+ Aluminum Stand (Zen 36 Only)
3. Gas Burner (NG or LP) (Varies by model)
4. Split-Ring Pipe Clamp (qty. 2)
5. Fire Pit Media (Lava Rock)
6. Pilot Assembly (NG or LP)
7. Pilot Mounting Bracket
8. Control Valve Mounting Plate
9. Control Knob
10. Control Valve
11. Street Elbow 1/2" (qty. 2)
50k-199k BTU SYSTEMS:
12. Flex Hose 1/2" (qty. 2)
(inc. 1/2"x1/2" Flare x MIP fittings)
200k-250k BTU SYSTEMS:
13. Flex Hose 3/4" (qty. 2)
(inc. 3/4"x3/4" Flare x MIP fittings)
14. Nipple 1/2" (qty. 3)
1.
4.
3.
2.
7.
6. 8. 9.
10.
11.
12/13.
14.
Assembly Instructions - Parts List
5.
Dieses Handbuch passt für folgende Modelle
39
Inhaltsverzeichnis
Andere DreamCast Außenkamin Handbücher


