DSE DM-C2 Bedienungsanleitung


INSTALLATION MANUAL
DM-C2 videophones
Page:2
What did you buy
These wifi video entryphones are called Smart-Home because they are intended for home automation. You
can connect these devices to your WiFi network and then control them as you wish with the Smart Life
home automation app, even over the Internet. With the Smart Life app you also control our remote controls
and cameras of this DM series which allows you to make your own smart home
This manual explains how to install and configure the intercoms.
LENS–Wide angle lens
IR LEDs–IR LEDs for night lighting
It turns on automatically when it gets dark
MICROPHONE–Microphone
INDICATOR–Status LEDs
Flashing blue = Device is awaiting configuration Steady red =
Connection to the wifi network failed
Solid Blue = Connection to wifi network established
Solid Blue and Red = No wifi network connected
DSE SRL – ITALY – WWW.DSE.EU
INSTALLATION MANUAL
DM-C2 videophones
Page:3
LEDs off = Device in stand-by, awaiting human detection PIR–Infrared human
presence detector
If it detects a person in front of the intercom, it starts recording and sends a notification
INFRARED LIGHT–Ambient light sensor
Decides the switching on of the infrared illuminator for night shots CALL
BUTTON–Intercom button SPEAKER-Speaker
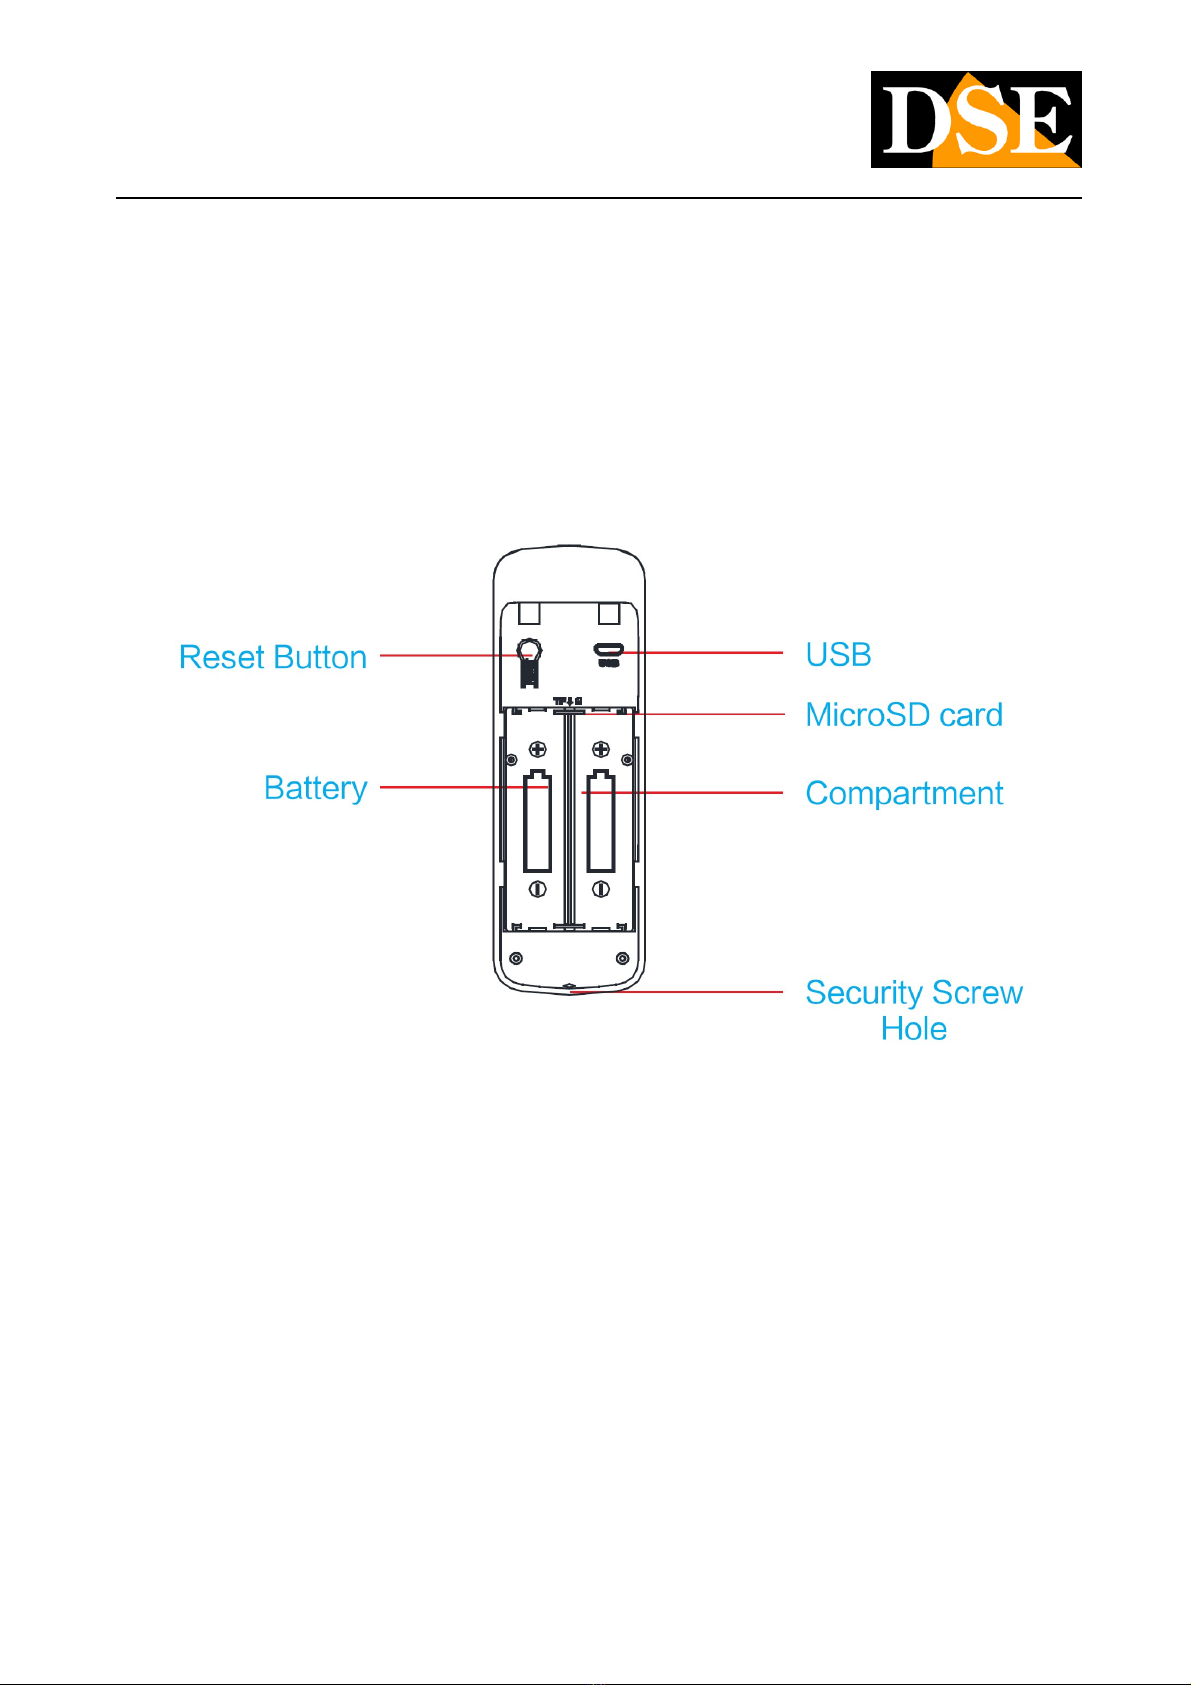
RESET BUTTON–Reset button
Press for 5 seconds to restore the factory parameters USB–Micro
USB port for battery charging
Connect a USB power supply with the included cable to recharge the batteries
MICROSD–Compartment for micro SD card
Insert a microSD card, max 32GB to record (not included). The direction of insertion is indicated with a
small drawing.
BATTERIES–2 3.7V 1800mAh rechargeable batteries
SECURITY SCREW–Fixing screw
Insert the included locking screw here to lock the doorphone into its base
DSE SRL – ITALY – WWW.DSE.EU

INSTALLATION MANUAL
DM-C2 videophones
Page:4
Assembly and operation
These battery videophones can work without any electrical connection, thanks to their internal battery.
They work normally in stand-by condition consuming very little battery. If the call button is pressed, they
are activated to record video and send notifications. They are also activated when a human presence is
detected in front of the intercom or when a remote connection with the app is requested.
Thanks to this system, these videophones can work for several weeks before needing a battery charge.
When the battery runs out, it is possible to receive an alert notification to proceed with recharging the
battery. The battery is recharged by connecting a USB power supply or a computer to the internal microUSB
socket.
The video door phone is equipped with a fixing base which is screwed to the wall with plugs. The intercom
clips into the base and is secured with a small security screw. This way you can easily remove the intercom
to recharge it.
DSE SRL – ITALY – WWW.DSE.EU

INSTALLATION MANUAL
DM-C2 videophones
Page:5
Remove the battery protectors
To prevent the batteries from being excessively discharged during storage, they are delivered with an
adhesive insulating protection on the negative. When you are ready to use the product you must remove
these protections, by extracting the batteries and removing the green cover which is located on the
negative pole of each battery. Then reinsert the batteries into the housing respecting the positive pole
upwards.
Check WIFI coverage
Before placing the product in its final location, remember that this device must connect to your wifi
network in order to function. You should therefore check with your mobile phone that in the point where
you want to put it there is good coverage of your wifi network. If you see that the signal is poor, you
should intervene on your wifi network, perhaps boosting it with a repeater.
Do not install the product in an area with poor wifi signal because it would then be unreliable in its
operation.
SD card
The Smart-Home video door phones can record the video on a micro SD card (not included) which you
can insert inside. The SD card slot is located under the rear door, above the battery compartment. You
can insert any Class 10 SD card with capacities up to 32GB. The direction of card insertion is shown by
the icon shown near the slot.
Power on
These videophones do not have a power switch. To make them work you have to open the rear door and
remove the plastic protection which in some models serves to insulate the batteries.
Inside the door you will also find the slot for inserting the microSD card, the USB socket for recharging
and the RESET button.
DSE SRL – ITALY – WWW.DSE.EU

INSTALLATION MANUAL
DM-C2 videophones
Page:6
Reset
Smart-Home devices are always equipped with a reset button which you can find behind the protective
flap. Press and hold this button for a few seconds if you want to restore the factory conditions to pair the
video door phone to a new wifi network. A voice message informs you of the reset in progress.
You must perform this reset if you want to connect your camera to a new access point, even within your
own LAN network.
DSE SRL – ITALY – WWW.DSE.EU

INSTALLATION MANUAL
DM-C2 videophones
Page:7
Download the Smart Life app
In order to use the camera with your mobile phone, you must first connect the device to your wifi
network. To do this you need the APPsmartlifewhich you can download for free from Google Play or the
Apple Store. It is a very popular app in home automation, which uses the Tuya platform.
On first launch you need to create an account by entering a valid email address. Press CREATE A NEW
ACCOUNT and then wait for the code via email to confirm your subscription.
If you don't have an email address you can also use your phone number by pressing Use Phone Number
and get the verification code via sms
Once the account has been created, you have your own space in the cloud where you can upload all your
cameras and also many different devices, such as our WiFi remote controls or our WiFi cameras of this
DM Series.
DSE SRL – ITALY – WWW.DSE.EU

INSTALLATION MANUAL
DM-C2 videophones
Page:8
Configure the video intercom
In order to use the video door phone with your mobile phone, you must first connect the device to your
wifi network. It's a very easy operation to perform, thanks to the APP you just downloaded. Activate the
video intercom by standing near the WiFi hot spot you want to connect to in order to be sure that the
WiFi signal is excellent. Also connect the mobile phone to the 2.4GHz wifi network you want to connect
the device to. The device does not support 5GHz network
Check that the front LED of the device flashes. The device can also emit a configuration-waiting audible
message. If the front button does not flash, the device is not ready for configuration and it is advisable to
check the power supply or carry out a reset. Do not connect the USB power supply, which is only for
charging, otherwise the device will not work.
1 – Press the + button and then ADD DEVICE
2 – Choose the type of SECURITY CAMERA device that you find in the CAMERA or VIDEO SURVEILLANCE
section
DSE SRL – ITALY – WWW.DSE.EU

INSTALLATION MANUAL
DM-C2 videophones
Page:9
3 – Now check that the front blue LED flashes, insert the confirmation tick and press NEXT
DSE SRL – ITALY – WWW.DSE.EU

INSTALLATION MANUAL
DM-C2 videophones
Page:10
4 – Now you have to choose your wifi hot spot to connect to and enter the access password. If you have
networks with different frequencies, remember that the device only supports 2.4 GHz WiFi networks. Select
the network and enter the password to access your WiFi network. Warning: your mobile phone must be
connected to the wifi network you want to connect the device to.
DSE SRL – ITALY – WWW.DSE.EU
Inhaltsverzeichnis
Andere DSE Gegensprechanlage Handbücher


