Dual AMB500W Betriebsanleitung
INSTALLATION/OWNER'S MANUAL
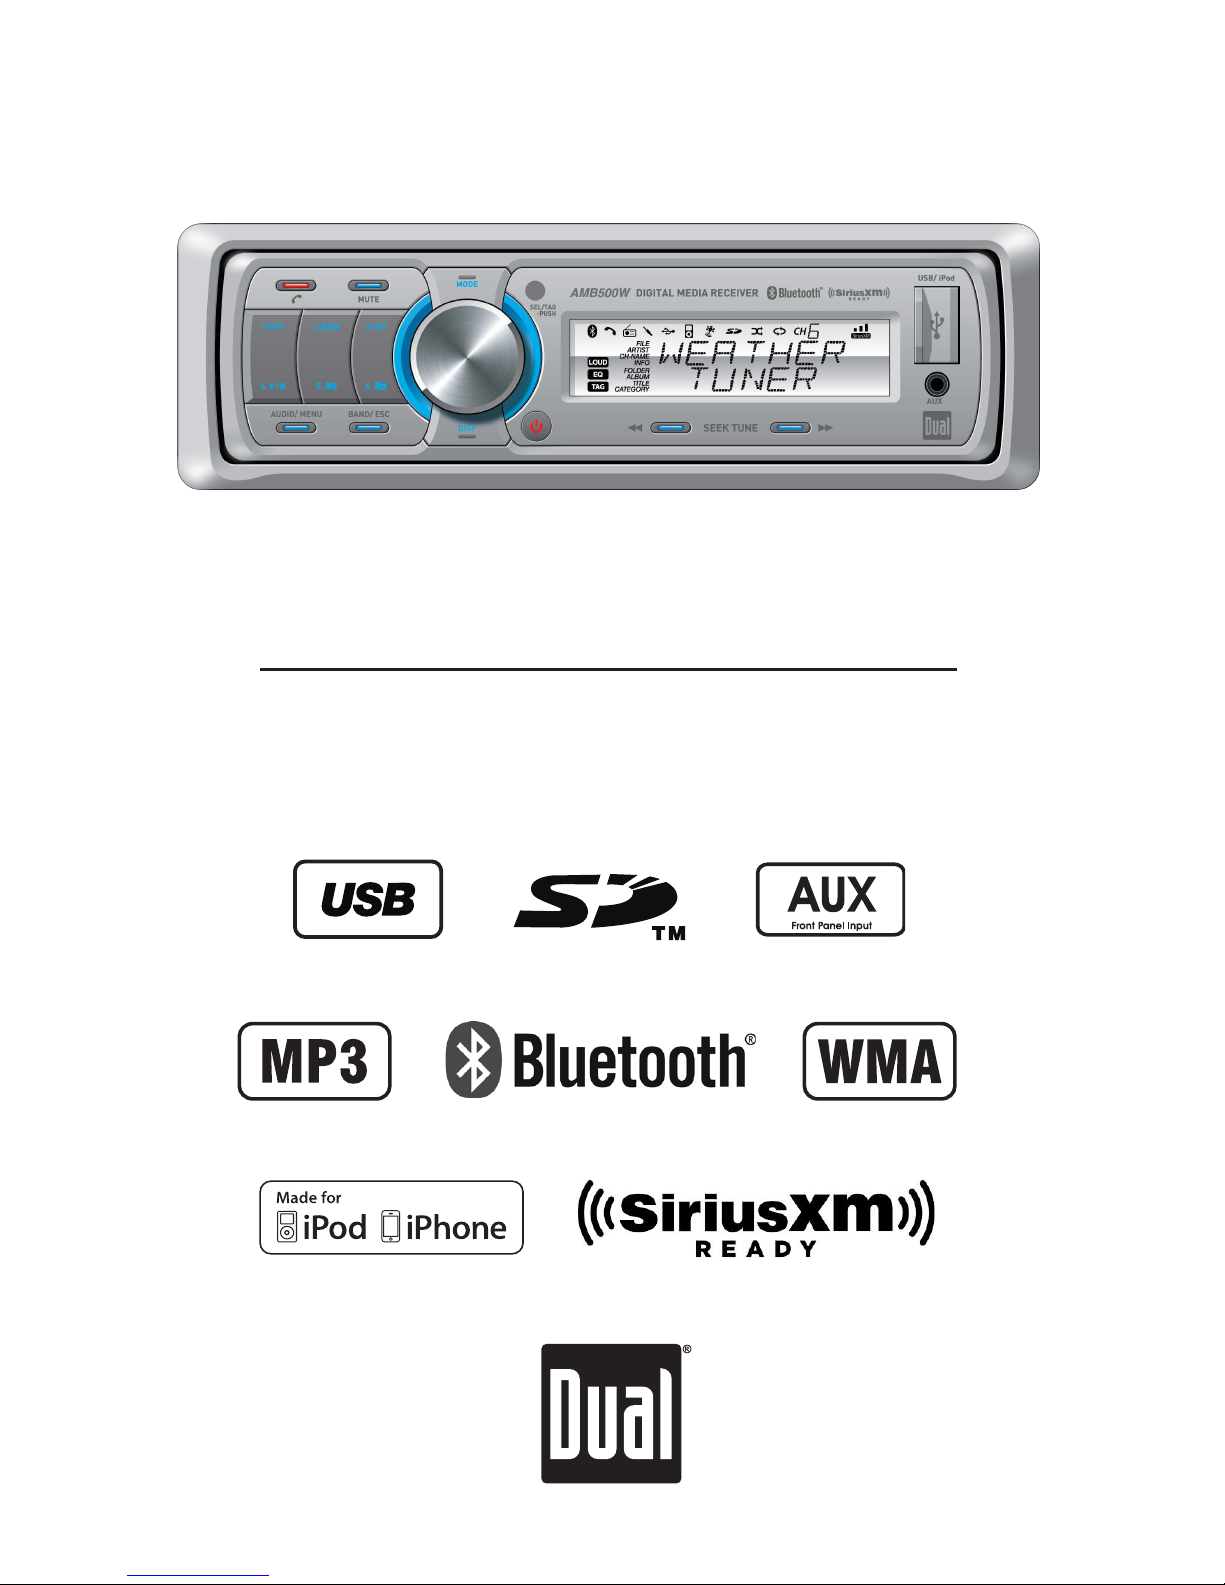
Marine Receiver with Detachable Face
AMB500W
2
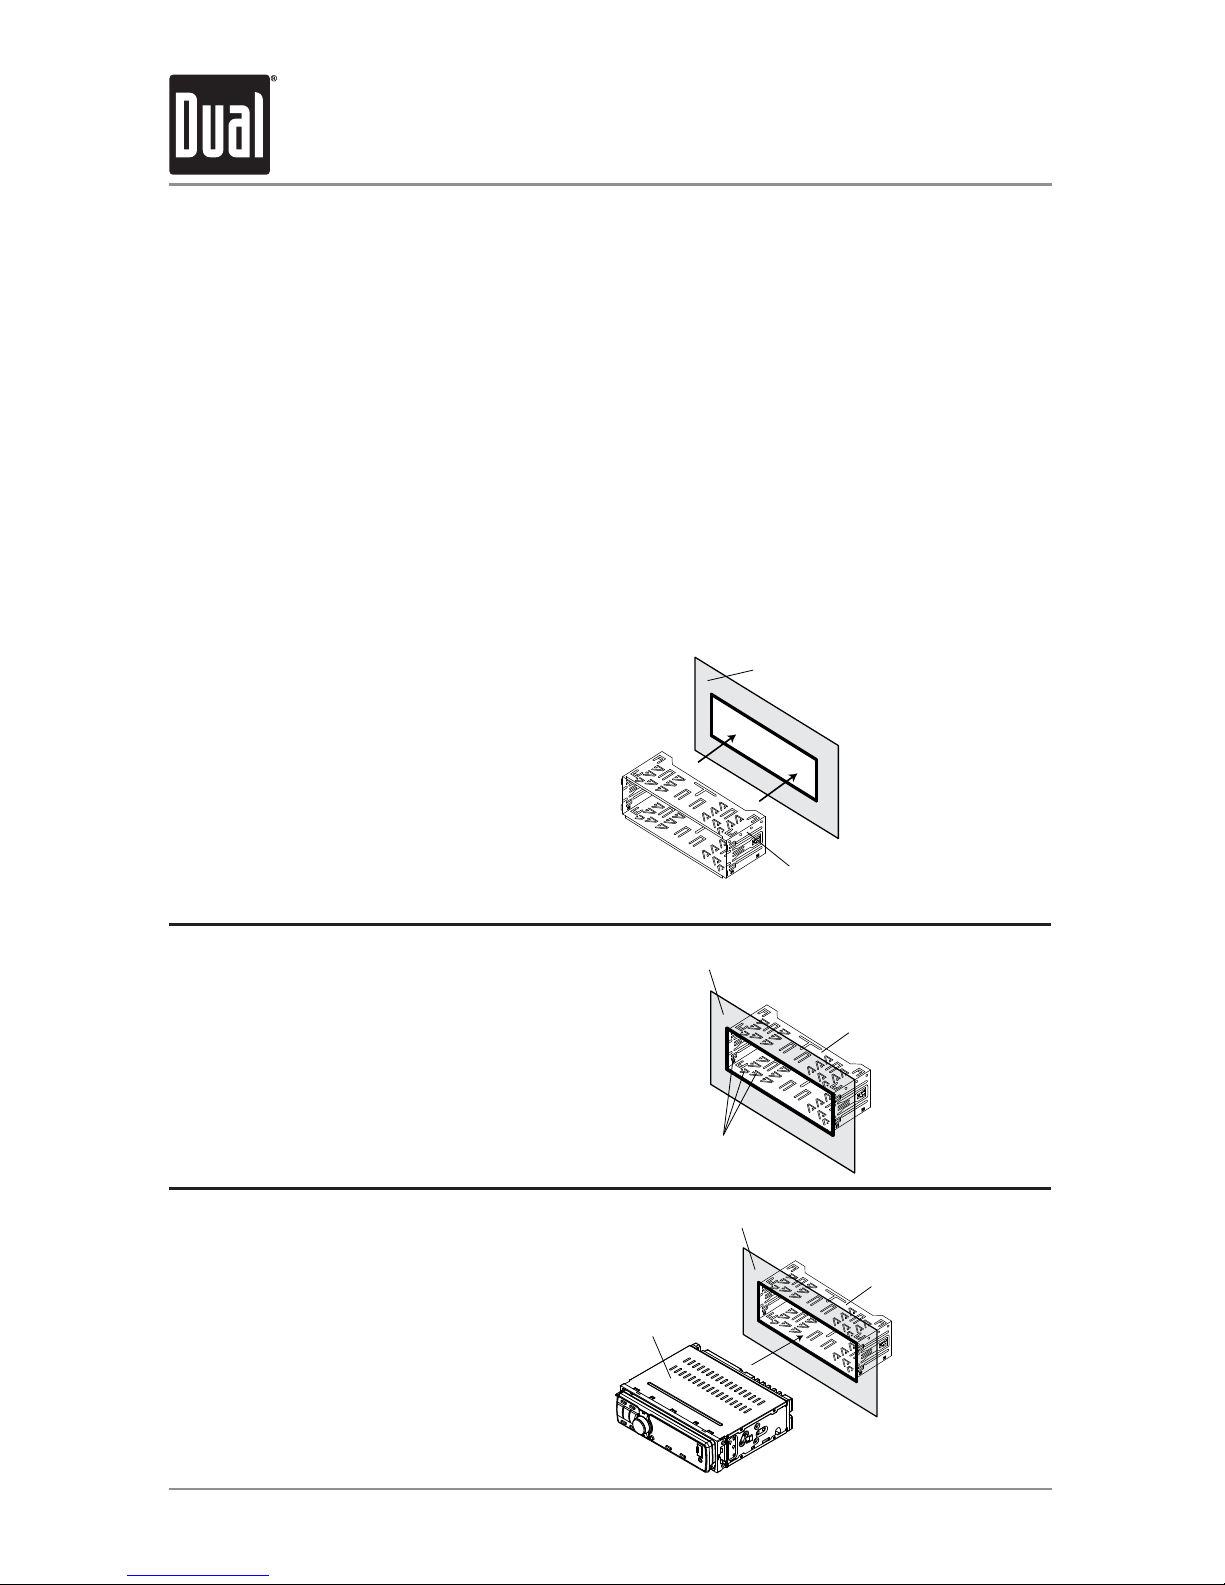
Preparation
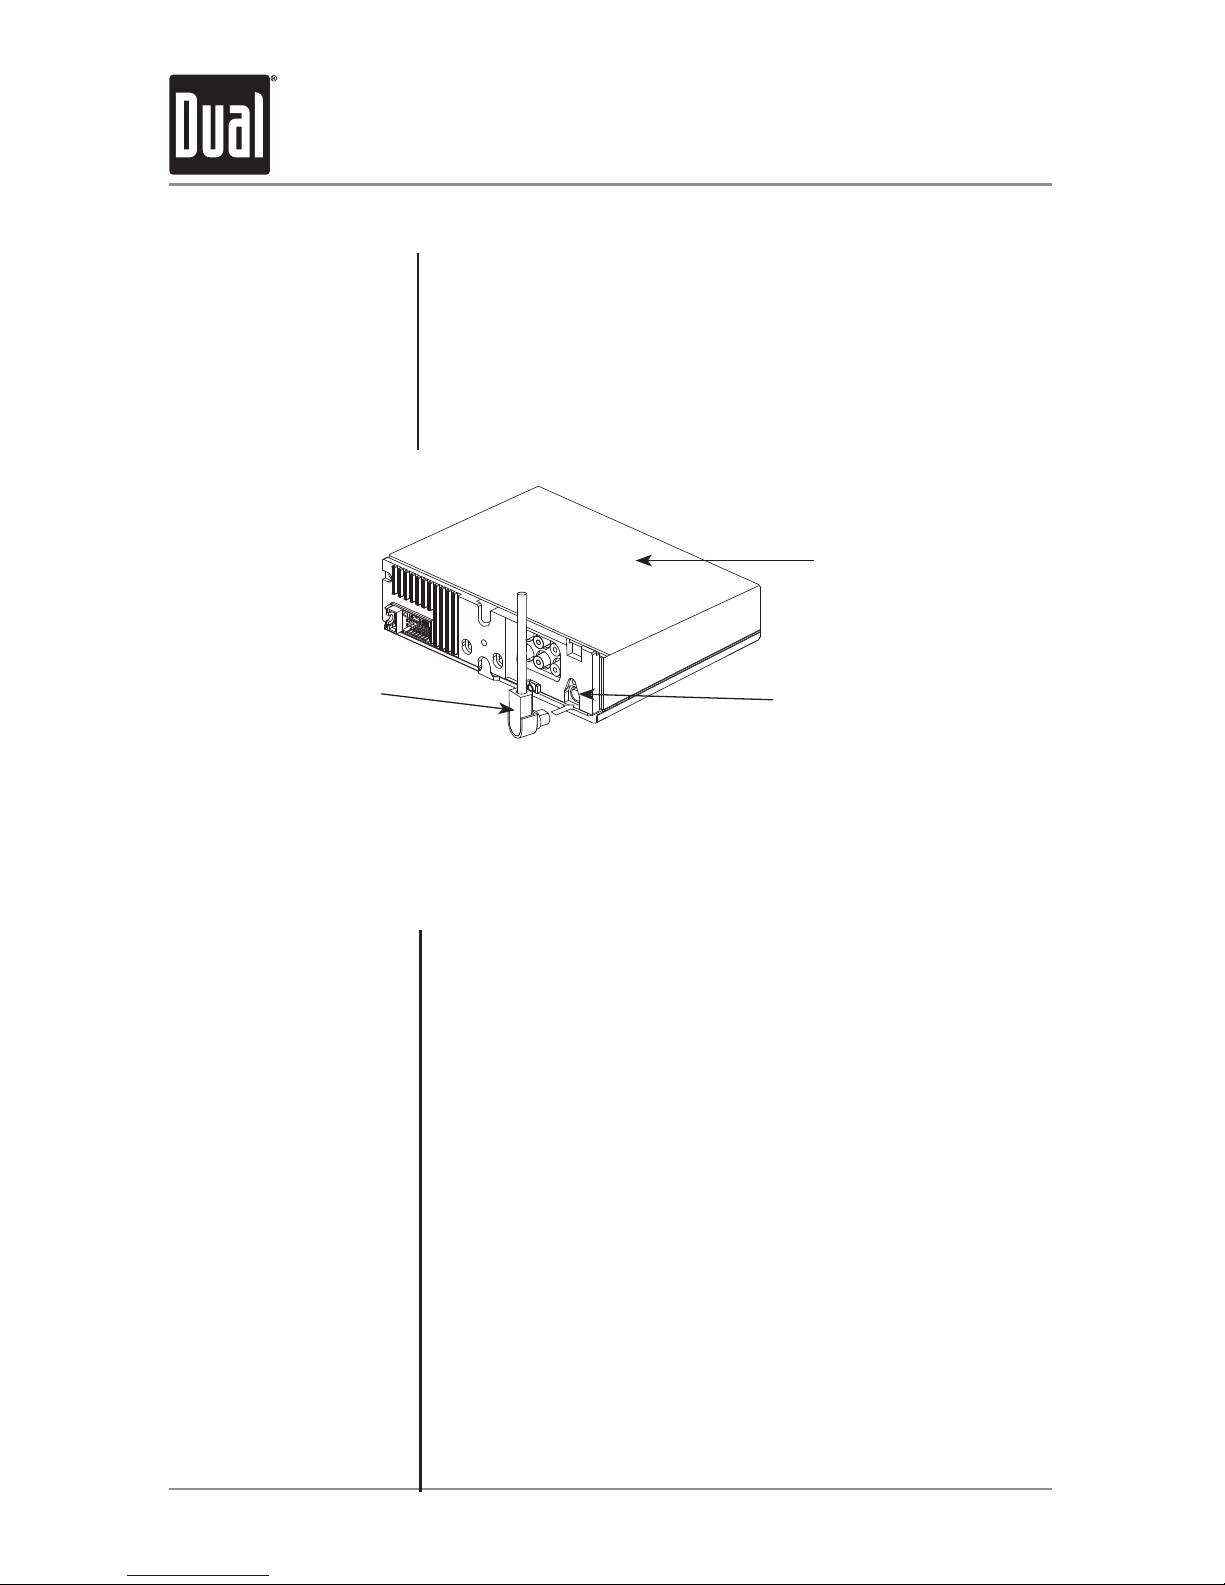
AMB500W INSTALLATION
Mounting Sleeve
Vessel Dash Panel or Splashguard
Please read entire manual before installation.
Before You Start
•Disconnectnegativebatteryterminal.Consultaqualifiedtechnicianforinstructions.
•Avoidinstallingtheunitwhereitwouldbesubjecttohightemperatures,suchasfrom
directsunlight,orwhereitwouldbesubjecttodust,dirtorexcessivevibration.
Getting Started
•Removetrimringandmountingsleevefromtheunit.
•Installmountingsleeveintoopening,bendingtabstosecure.
•Connectwiringharnessandantenna.Consultaqualifiedtechnicianifyouareunsure.
•Certainvesselsmayrequireaninstallationkitand/orwiringharnessadapter(sold
separately).
•Testforcorrectoperationandslideintomountingsleevetosecure.
•Snaptrimringintoplace.
Mounting Sleeve
Mounting Tabs
Vessel Dash Panel or Splashguard
Mounting Sleeve
WM4000 Head Unit
Vessel Dash Panel or Splashguard
Step1:
Insertthemountingsleeveintothe
vessel'sdashpanelorinstalled
Step2:
Bendmultiplemountingtabsaround
themountingsleeveuntilthe
mountingsleeveissecure
Step3:
Connectallwiringharnessesand
slidetheheadunitintothemounting
sleeveuntilitclicksintoplace
3
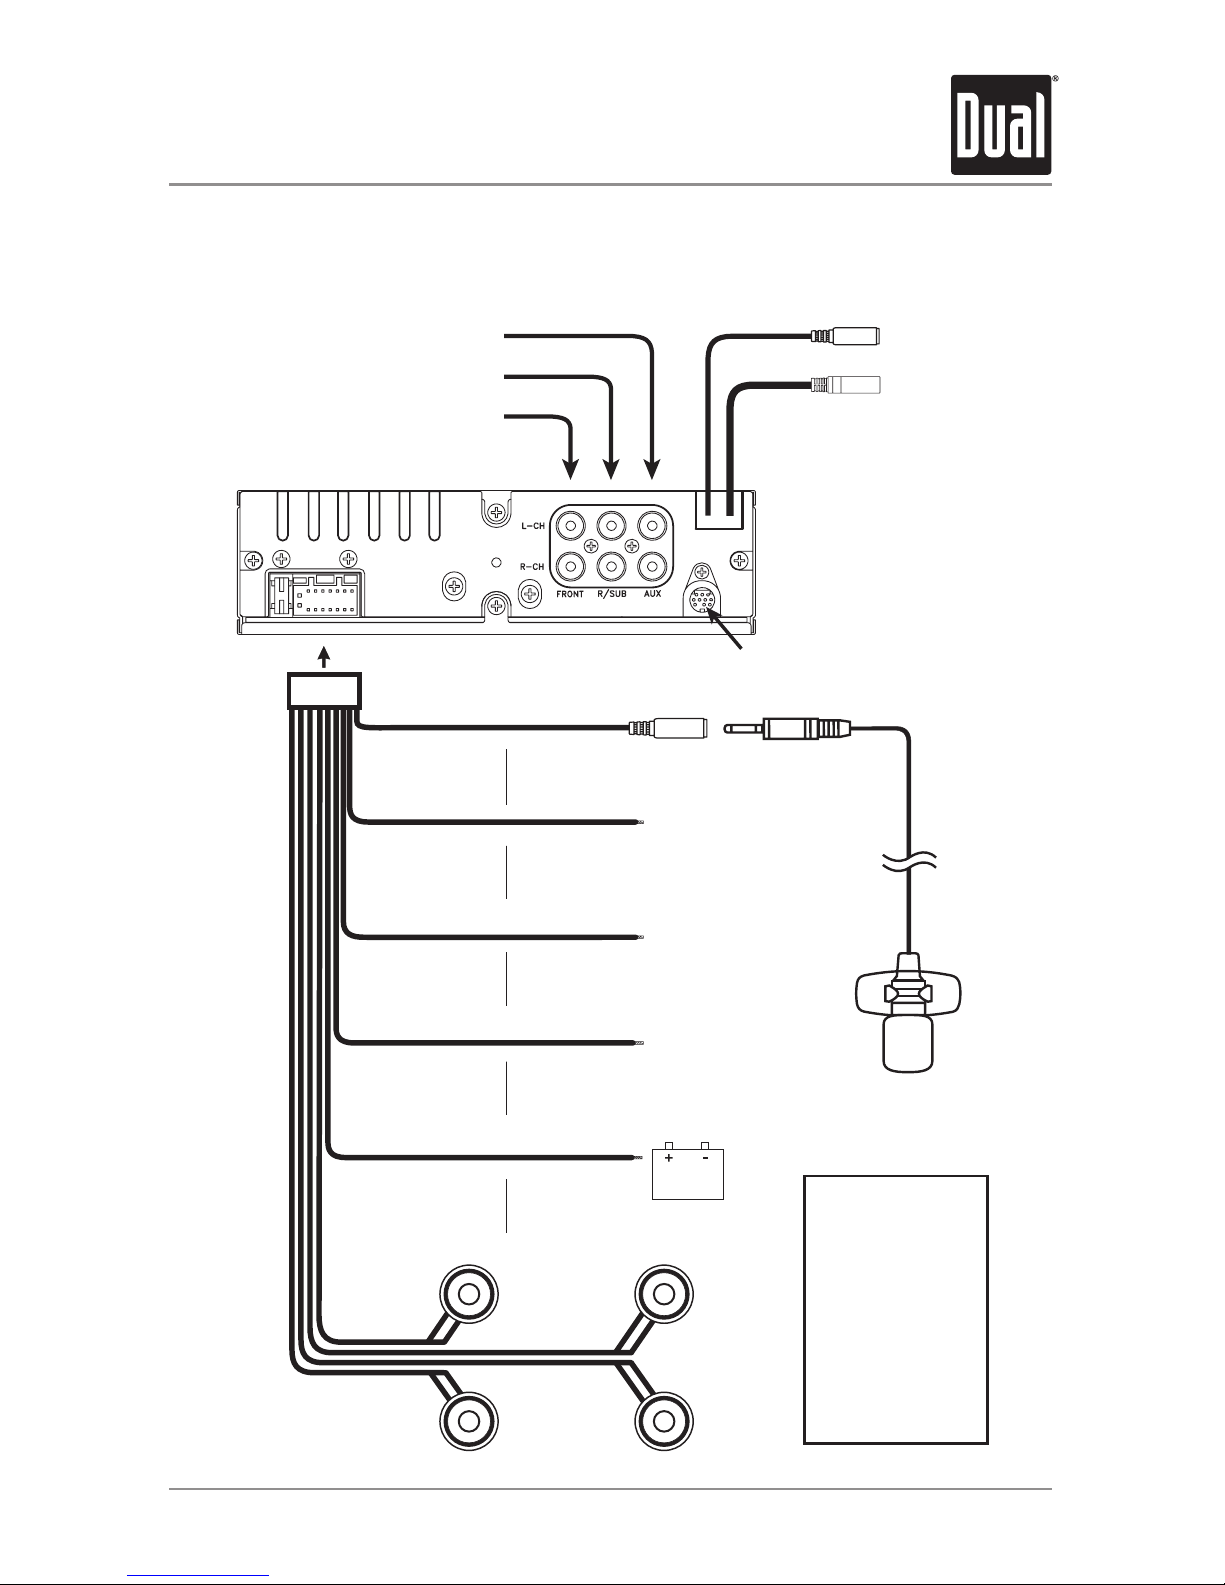
Wiring Diagram
AMB500W INSTALLATION
SiriusXM Tuner Input
(SiriusXM Connect Vehicle Tuner sold separately)
MRF40 RF Remote Input
Connect the MRF40 receiver
(sold separately)
Rear RCA Auxiliary Input
Rear/Sub RCA Output
Front RCA Output
Bluetooth Microphone
(must be connected for Bluetooth funct
ional
i
Bluetooth Microphone Input
Connect the included
Bluetooth microphone.
Remote Amplier Turn-On
Connect to an amplier or powered
antenna. Insulate wire if not used.
Ground
Connect to the vessel or
battery ground terminal.
Accessory
Connect to a switched
12 volt power source.
Battery
Connect to a constant
12 volt power source or the
positive battery terminal.
Right Front
Gray/Black (-)
Gray (+)
Left Front
White/Black (-)
White (+)
Right Rear
Violet/Black (-)
Violet (+)
Left Rear
Green/Black (-)
Green (+)
AM/FM Antenna Input
Connect the vessel antenna
BLACK
(3.5mm)
BLACK
RED
YELLOW
BLUE
FUSE
Whenreplacingthe
fuse,makesurenew
fuseisthecorrecttype
andamperage.Using
anincorrectfusecould
damagetheradio.
TheAMB500Wuses
one10ampATMfuse
locatedbesidethewiring
connector.

4
Control Locations - Receiver
FrontPanelRelease
Preset1/Repeat
BluetoothTalk/End
Preset2/Random
Mute
Preset3/Intro
Mode(Source)
Volume(turn)/Select/Tag(push)
USBPort
AuxiliaryInput
1
2
3
4
5
6
7
8
Tune/TrackUp
Tune/TrackDown
Power
Display
Preset6/FolderUp
Band/Escape
Preset5/FolderDown
Audio/Menu
Preset4/Play/Pause
9
10
11
12
13
14
AMB500W OPERATION
15
16
17
10
11
1314
1 92 43
15
16
18
19
567 8
12
17
18
19
5
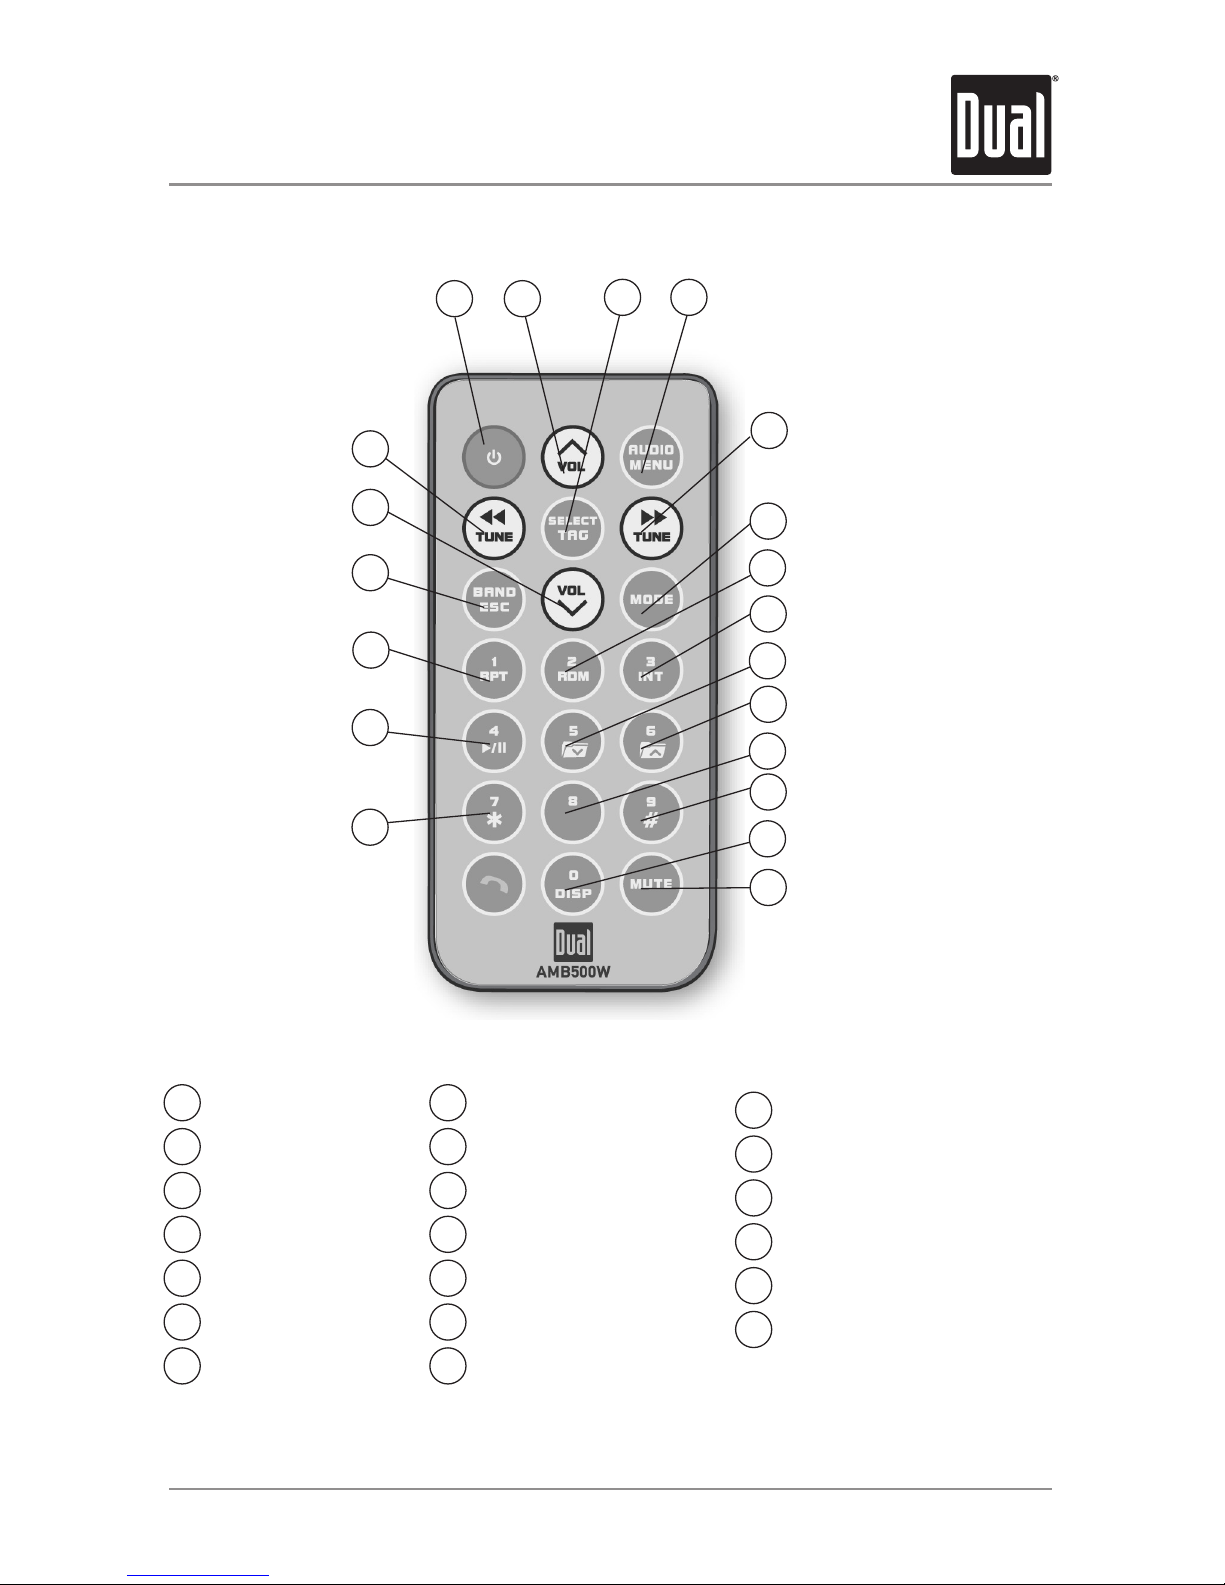
AMB500W OPERATION
Control Locations - Remote
Power
VolumeUp
Select/Tag
Audio/Menu
Tune/TrackUp
Mode(Source)
Preset2/Random
1
2
3
4
5
6
7
1 2 3
5
6
7
19
18
17
16
15
Preset3/Intro
Preset5/FolderDown
Preset6/FolderUp
Kay8
Key9/Key#
Display/Key0
Mute
8
9
10
11
12
13
14
Key7/Key*
Preset4/Play/Pause
Preset1/Repeat
Band/Escape
VolumeDown
Tune/TrackDown
15
16
17
18
19
20
4
8
9
10
11
12
13
14
20
6
AMB500W OPERATION
General Operation
Press oranyotherbutton(exceptEJECT)toturnthe
unit on. Press toturntheunitoff.
Press MODE tocycleupthroughtheoperatingmodes:
AM/FM,FrontAux,RearAux,USB,operationofiPod®,
BluetoothandSiriusXM(optional).
SiriusXMmodewillnotappearunlesstheSiriusXM
ConnectVehicleTuner(soldseparately)isconnected.
OperationofiPodmodewillnotappearunlessaniPod
device(soldseparately)hasbeenconnected.
USBandSDmodeswillnotappearunlessaUSBdevice
orSDcard(soldseparately)havebeenconnected.
TheAMB500Wofferstwoauxiliaryinputports,a3.5mm
portonthefrontpanelandanRCAconnectionontheback
oftheunit.Useeitherconnectiontoconnectaudiodevice,
MP3player,etc.PressMODE toselectAUXFRONTorAUX
REARmodes.
Adjustvolumeusingvolumeknob(00-46).
Press DISPtoselectbetweenclockanddifferenttypesof
information,suchasradiofrequency,CDtrack/elapsed
timeorMP3/WMAsonginformation.
Press RESETuponinitialinstallationorifabnormal
operationoccurs.Resetbuttonislocatedbehindthefront
panel.
Withtheuniton,pressandholdDISPuntiltheclock
beginstoflash,thenrelease.PressTUNE
nn
toadjust
thehoursandTUNE
ll
toadjusttheminutes.Press
DISPmomentarilytosavetheselectedtime.
Power On/Off
Changing Modes
Available Modes
Auxiliary Inputs
Volume
Display
Reset
Set the Clock
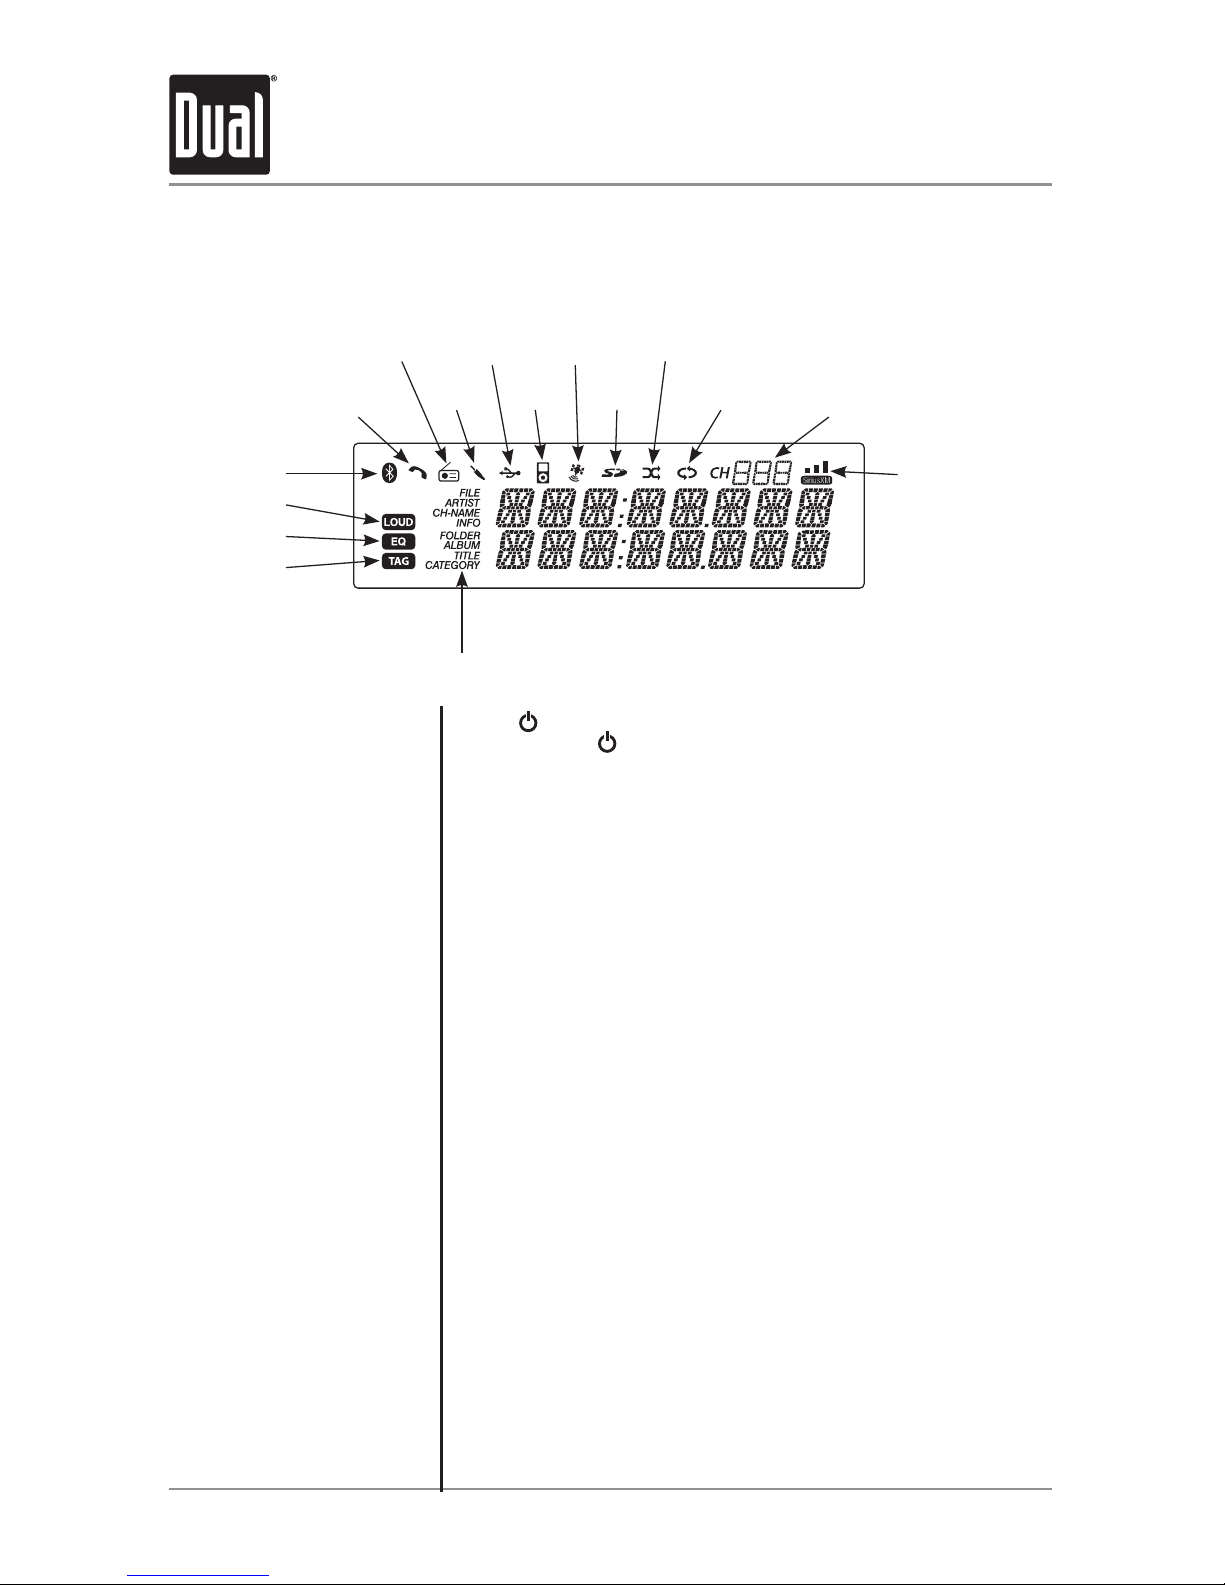
Bluetooth Icon
LOUD Indicator
EQ Indicator
iTunes Tagging
Indicator
ID3 Tag Display Type
Phone Call Icon
AM/FM
Tuner
Aux
Input
USB
Input
SD Card
Mode
SiriusXM
Mode
Preset or SiriusXM Channel
Random
Icon
Repeat
Icon
SiriusXM Signal
iPod
Mode
DisplayLayout

7
Setup Menu
AMB500W OPERATION
MenuFunction Options Action
AutoStation
Store
AUTOPGM
STATIONS
Press SELECTtoseekandsave6strongstationsinthecurrent
band.(Tuner mode only)
Local/Distance
Tuning
LOCALOFF Activatesdistancetuning(Tuner mode only).
LOCALON Activateslocaltuningforstrongstationreceptiononly(Tuner mode
only).
Tuner
Frequency
Spacing
FREQ'NCYUSA ProgramstheunittoUSAtunerspacing.
(200kHzforFMand10kHzforAM).(Tuner mode only)
FREQ'NCYEUR ProgramstheunittoEuropeantunerspacing.
(50kHzforFMand9kHzforMW).(Tuner mode only)
SelectableiPod
Control
IPODCNT
FULL
ProgramstheheadunittoadvancedcontroloftheiPod/iPhone
device.
IPODCNT
MANUAL
ProgramstheheadunittomanualcontroloftheiPod/iPhone
deviceandallowsmusictobecontrolledfromtheiPod/iPhone
device.
Loudness LOUDON Enablestheloudnessfeature,whichenhancesthebassandtreble
frequenciesatlowvolumes.
LOUDOFF Disablestheloudnesfeature.
Clock
Display
CLOCKOFF Programsunittonotdisplaytheclockwhenthepowerisoff.
CLOCKON Programsunittodisplaytheclockwhenthepowerisoff.
FrontAuxiliary
Input
AUX-FRNTON Enablesthefrontpanel3.5mmauxiliaryinput.
AUX-FRNTOFF Disablesthefrontpanel3.5mmauxiliaryinput.
RearAuxiliary
Input
AUX-REARON EnablestherearRCAauxiliaryinput.
AUX-REAROFF DisablestherearRCAauxiliaryinput.
Rear/Sub
RCAoutput
SUBWFRSUB Programstherear/subRCApreampoutputtosubwoofer.
SUBWFRREAR Programstherear/subRCApreampoutputtorear.
BeepConfirmation BEEPOFF Disablestheconfirmationbeep.
BEEPON Enablestheconfirmationbeep.
Programmable
TurnOnVolume PROG-VOL# Programsunittoalwaysturnonataspecificvolume
(defaultisOFF).Anyvolumelevel1-46canbeselected.
PoweronMessage MESSAGEOFF Disablespoweronmessage.(example:GOODMORNING)
MESSAGEON Enablespoweronmessagetobedisplayed.
Scrolling
Option
SCROLL15SEC Programsunittoscrollinformationonceevery15seconds
(default).
SCROLLONCE Programsunittoscrollonce,thenshowthefirst8characterson
display.
SCROLLON Programsunittoscrollcontinuously.
SCROLLOFF Programsunittoshowthefirst8charactersonthedisplay.
Illumination
Dimmer
DIMMERHIGH Programsunittothebrightestilluminationlevel.
DIMMERMEDIUM Programsunittothemiddleilluminationlevel.
DIMMERLOW Programsunittothedimmestilluminationlevel.
Demonstration
Mode
DEMOOFF Disablesthedemonstrationmode.
DEMOON Enablesthedemonstrationmessage.
BluetoothOptions Seepage24formenuoptions.
SiriusXMSetup (PressSELECT) Seepage12formenuoptions.

8
AMB500W OPERATION
General Operation
Theclockwilldisplay12-hourAM/PMtimeinUSA
frequencyspacingmode(PM10:00).InEuropean
frequencyspacingmode,theclockwilldisplay24-hour
time(22:00).
Press AUDIOmomentarilytoselectbetweenBass,Treble,
Balance,Fader,Equalizer,SubwooferandSourceVolume
Level.
Press AUDIO until BASSappears,thenrotatevolume
knob left/righttoadjust(-6minimum/+6maximum).
Press AUDIO until TREBLEappears,thenrotatevolume
knobleft/righttoadjust(-6minimum/+6maximum).
Press AUDIO until BALANCEappears,thenrotatevolume
knobleft/righttoadjust(BALANCELEFT12-BALANCE
RIGHT12).BALANCEEVENrepresentsequalbalance.
Press AUDIO until FADERappears,thenrotatevolume
knob left/righttoadjust(FADERFRONT12-FADERREAR
12).FADEREVENrepresentsequalfader.
Press AUDIO until EQappears,thenrotatevolume knob
toselectfromthefollowingequalizationcurves:FLAT
(default),POP,JAZZ,CLASSIC,BEAT,ROCKandUSER.
Anymanualadjustmentstothebassandtreblesettings
areautomaticallysavedasUSER.
Press AUDIO until SUBWFR appears,thenrotatevolume
knobleft/righttoadjust(0minimum/+12maximum).
Note: SubwooferoptionwillnotappeariftheREAR/SUB
optioninthesetupmenuissettoREAR.Refertopage7
for details.
Thesourcevolumelevelcontrolallowsagainadjustment
foreachaudiosource:AM,FM,WB,AUXFRONT/REAR,
operationofiPod,USB,SDcard,BluetoothandSiriusXM.
Setthesourcevolumelevelforeachmode,dependingon
therelativevolumeofeachaudiosource.
Tosetthesourcevolumelevel,pressAUDIO until
SOURCELEVELappears.Afteronesecond,thecurrent
modewillappearonthedisplay.Turnthevolume
knobtoadjusttheaudiolevelofthecurrentsource(-6
minimum/+6maximum).
Note: Onlythecurrentmodewillbeavailablefor
adjustment.Toadjustanothermodeofoperation,press
MODE untilthedesiredmodeisselected,thensetthe
sourcevolumelevelforthatmode.
12/24-hour Clock
Audio
Bass
Treble
Balance
Fader
EQ
Subwoofer
Source Volume Level
BASS TREBLE BALANCE FADER EQ SUBWOOFER SOURCE LEVEL

9
AMB500W OPERATION
Tuner Operation
Seek Tuning
Manual Tuning
Band
Storing and Recalling
Station Presets
Press TUNE
nn
or TUNE
ll
formorethanonesecond
toseektothenextstrongstation.Pressandholdtoadvance
quickly.
Press TUNE
nn
or TUNE
ll
momentarilytochange
radiofrequencyupordownonestepatatime.
Press BANDtoselectbetweenFM1,FM2,FM3,AM1,AM2
and WB bands.
Upto18FMstationsand12AMstationscanbestored.To
storeastation,selectthedesiredbandandstation.Press
andholdthedesiredpresetbutton(1-6)formorethan
2seconds.
Whenstored,thepresetnumberwillappearinthedisplay.
Thestationcanberecalledanytimebypressingthe
correspondingpresetbutton.
Band
Manual Tuning
Storing and Recalling
Presets
Press BANDtoselectweatherband(WB).
Press TUNE
nn
or TUNE
ll
momentarilytoseekthe
nextweatherbandstation.
Upto6weatherbandstationscanbestored.Tostorea
station,selecttheweatherbandandthedesiredstation.
Pressandholdthedesiredpresetbutton(1-6)formorethan
2seconds.
Whenstored,thepresetnumberwillappearinthedisplay.
Thestationcanberecalledanytimebypressingthe
correspondingpresetbutton.
Weather Band Tuner Operation
10
AMB500W OPERATION
SiriusXM Vehicle Tuner Connections
Connecting the
SiriusXM Vehicle Tuner
(sold separately)
SiriusXM Satellite Radio
Overview
Tuner Activation
SiriusXMSatelliteRadiooperationrequirestheconnectionofthe
SiriusXM Connect Vehicle Tuner(soldseparately).
Note:TheSiriusXMConnectVehicleTunermusthavetheSiriusXMlogo
tobecompatiblewiththeAMB500W.
ToconnecttheSiriusXMVehicleTuner,followtheinstructionsprovided
withthetuner.WhenconnectingthetunertotheAMB500W,thecable
orientationshouldbeconnectedasshownbelow.
EverythingworthlisteningtoisonSiriusXM,gettingover130channels,
includingthemostcommercial-freemusic,plusthebestsports,news,
talkandentertainment.ASiriusXMVehicleTuner(soldseparately)and
Subscriptionarerequired.Formoreinformation,visitwww.siriusxm.
com.
Sirius,XMandallrelatedmarksandlogosaretrademarksofSirius
XMRadioInc.anditssubsidiaries.Allothermarksandlogosarethe
propertyoftheirrespectiveowners.Allrightsreserved.
TolistentoSiriusXMSatelliteRadio,asubscriptionisrequired.
ActivatetheSiriusXMVehicleTunerusingoneofthetwomethods
below:
• Online:Goto"www.siriusxm.com/activatenow"andchoose
ACTIVATERADIO.
• Phone:Call1-800-XM-RADIO(1-800-967-2346).
Activationtypicallytakes10-15minutes,butmaytakeuptoanhour.
Itisrecommendedtoleaveyourvehicleonuntilthe"Subscription
Updated"messageappears.
SiriusXM Vehicle
Tuner Cable
Lineuptheconnectorwiththepinsonthecable.Itcanonlybeinsertedasshownabove.Pushthe
cableintotheheadunit'sconnectoruntilitclicks.Attemptingtoinsertthecabledifferentlyfromshown
abovemaycausedamagetothecableorheadunit.
AMB500W Head
Unit
SiriusXM-Ready
Input
SiriusXM Vehicle Tuner Operation
Inhaltsverzeichnis
Andere Dual Marine-Audio Handbücher


Beliebte Marine-Audio Handbücher anderer Marken


Nady Audio
Nady Audio M-Cab MC-15 Gebrauchsanweisung

Fusion
Fusion MS-RA70 Bedienungsanleitung

Garmin
Garmin Fusion APOLLO RV-RA770 Bedienungsanleitung

Boss Audio Systems
Boss Audio Systems ATV25B Bedienungsanleitung

Polk Mono
Polk Mono UM1 Bedienungsanleitung

Garmin
Garmin Fusion Apollo MS-RA670 Bedienungsanleitung