Elaflex Oasis FV100 Series Bedienungsanleitung

FOR VIDEO INSTRUCTIONS, USE QR CODE LINK ON THE RIGHT
OR GO TO WWW.OASISNGV.COM/DEMONSTRATION_VIDEOS
TO VIEW THE OPERATION VIDEO
Oasis Engineering Ltd
129 Birch Avenue, Tauranga, New Zealand.
T: +64 7 928 3808
W: www.OasisNGV.com
Servicing Video Instruction Manual
Failure to follow these instructions or to properly install and maintain this equipment could result in gas leak-
age, fire or explosion causing property damage and personal injury or death.
Oasis products must be installed, operated and maintained by trained and competent personnel in
accordance with all applicable local codes, rules and regulations in addition to the Oasis Instructions.
Oasis Engineering Ltd. will not be held liable in such circumstances where installation, operation and
maintenance procedures were performed by incompetent personnel resulting in improper assembly, unsafe
operation, equipment damage or personal injury.
Oasis recommends that all service technicians should watch the Product Servicing Video before attempting to
service this part.
FV100 Series
Fill Valve
Instrucon Manual

2
We reserve the right to modify product specifications without prior notice. FV103-INS-01 2822 © Oasis Engineering Limited
Safety
Tools Required
Ensure the system is clean of debris,
vented and isolated before any
installation or servicing work is carried
out.
Warning!
High pressure gas and gas equipment can cause serious harm to
both infrastructure and personnel if safety precautions are not
followed.
Oasis recommends considering the use of the following PPE when
working with high pressure along with any other site specific health
and safety requirements:
Thread Tape
(if using NPT
or BSPT
fittings)
Spanner
(Wrenches)
Anti Seize Grease
- Swagelok Silver Goop
- Omega 99
- or similar
Spray bottle
(Snoop or soapy water)
Thread locker
243 Loctite or
similar
3
We reserve the right to modify product specifications without prior notice. FV103-INS-01 2822 © Oasis Engineering Limited
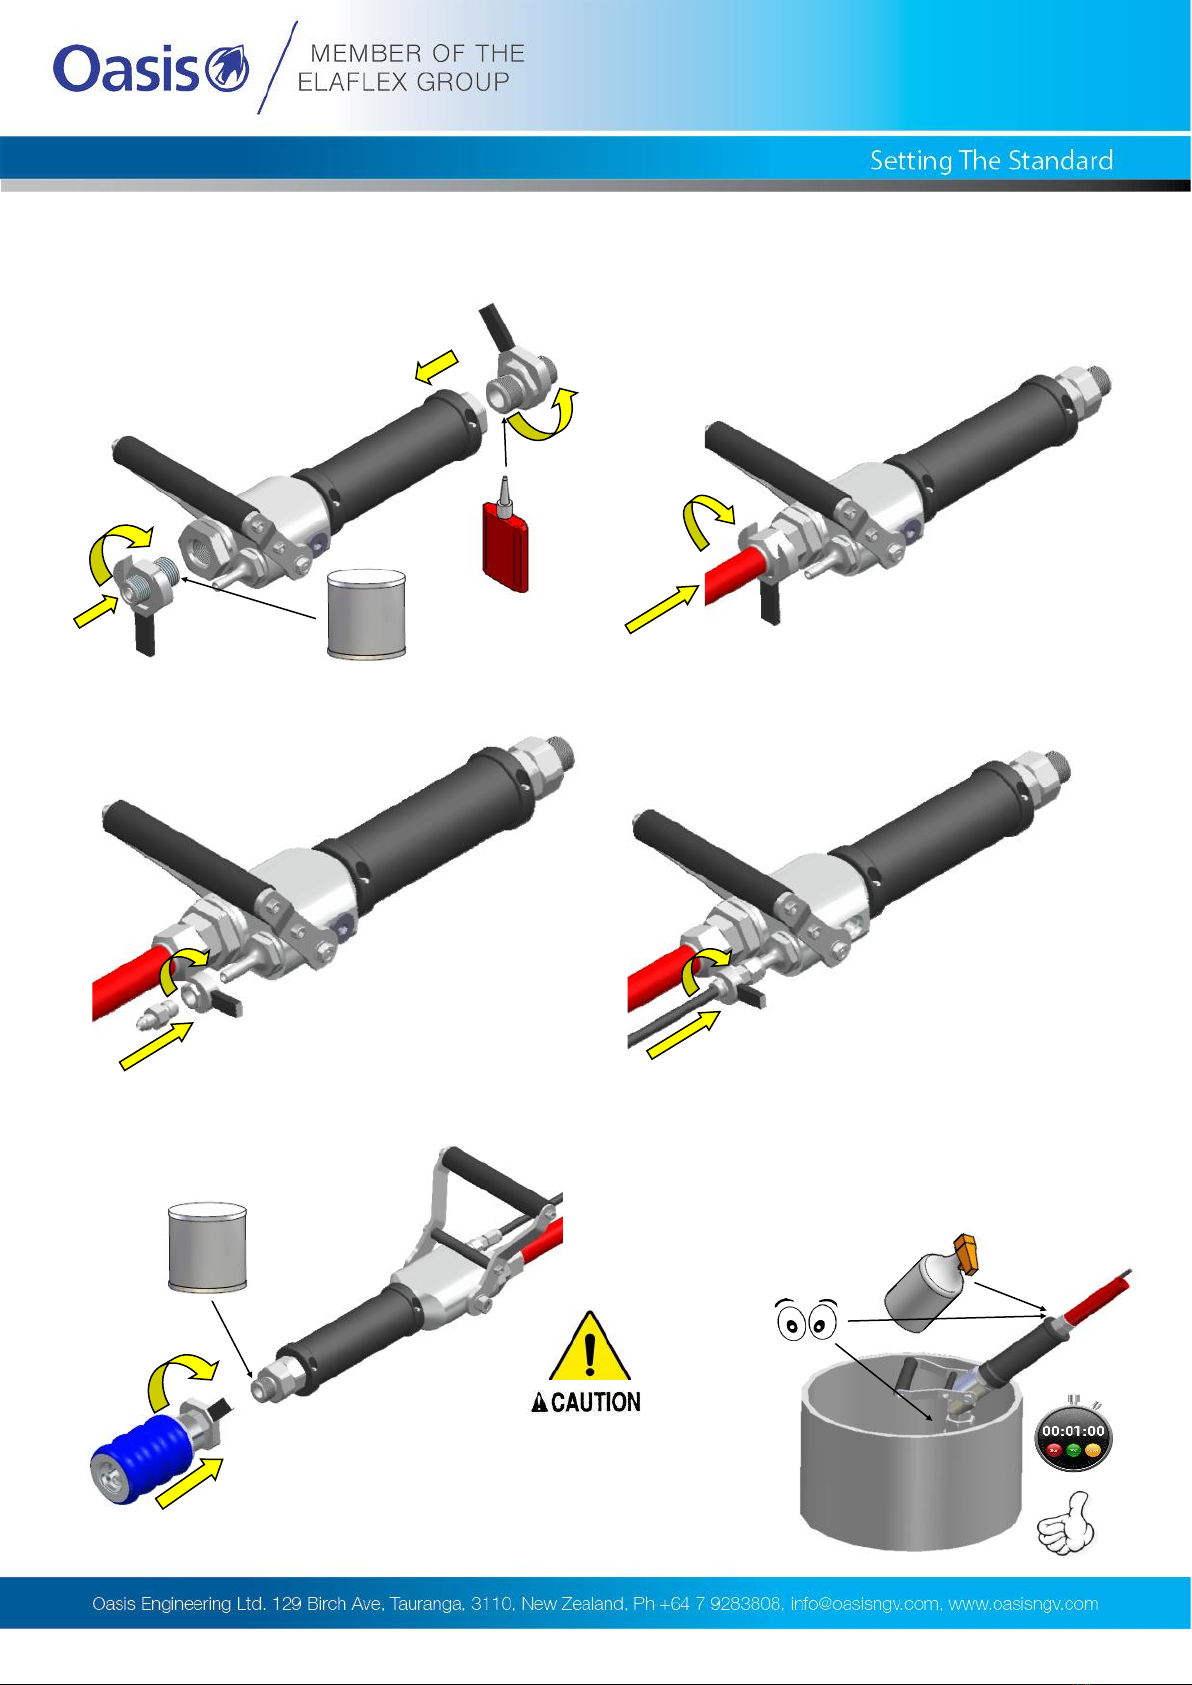
3. Attach vent fitting and tighten to
manufacturers instructions.
4. Tighten vent hose to the hose
manufacturers instructions.
1. Apply anti seize to hose fittings and
torque to 70 Nm.
2. Attach main hose, tighten the connection
to the hose manufacturers instructions.
Test for 1 minute
6. Test for leaks before use, place fill valve
and nozzle in bucket of water with valve
open and look for bubbles. Use snoop or
soapy water for unsubmerged connections.
When testing the valve, ensure the
valve is held securely and opened
slowly for the first time after servicing.
If any leakage occurs then stop test
and do not use nozzle. Contact Oasis
for help.
5. Attach nozzle as per manufacturers
instructions.
Recommend
Torque: 70 Nm
We reserve the right to modify product specifications without prior notice. FV103-INS-01 2822 © Oasis Engineering Limited
Installation
Straight Valve
4
We reserve the right to modify product specifications without prior notice. FV103-INS-01 2822 © Oasis Engineering Limited
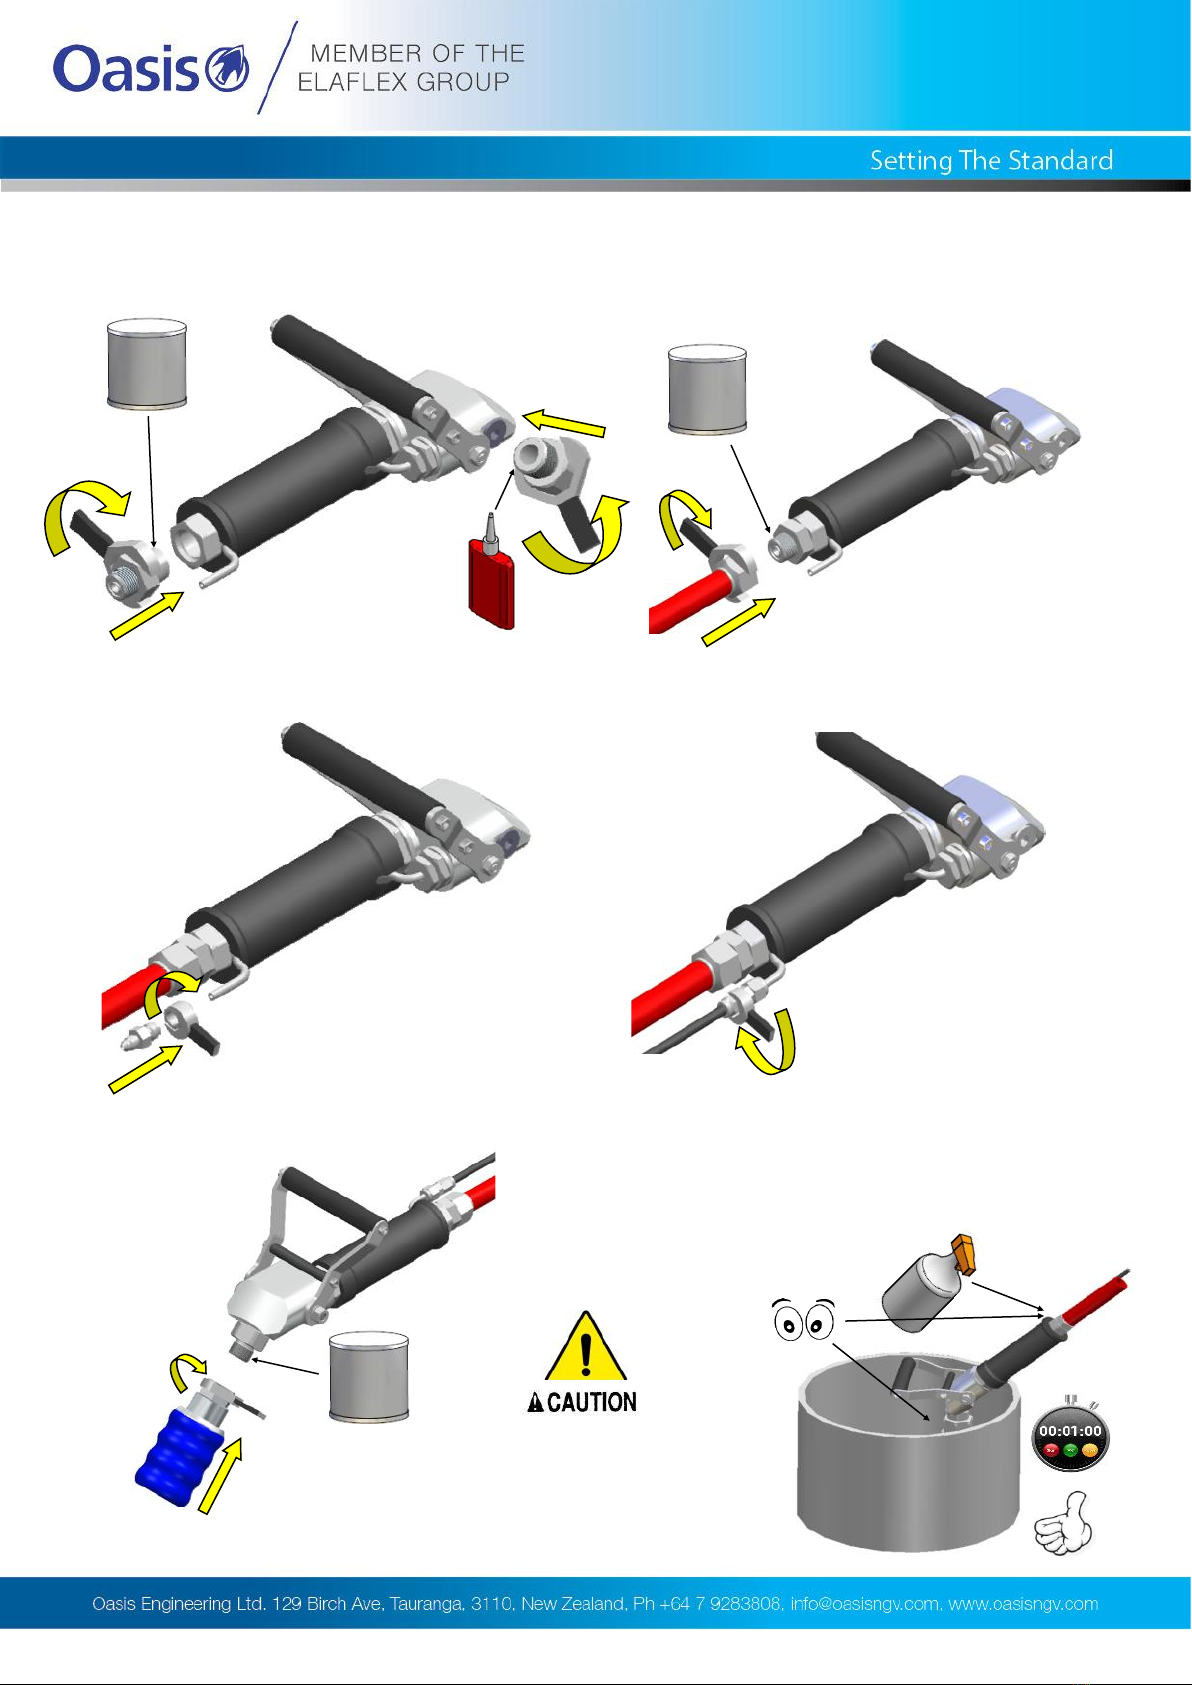
1. Apply anti seize to hose fittings and
torque to 70 Nm.
4. Tighten vent fitting and hose to the
manufacturers instructions.
2. Apply anti-seize and attach main hose,
tighten the connection to the hose
manufacturers instructions.
6. Test for leaks before use, place fill valve
and nozzle in bucket of water with valve
open and look for bubbles. Use snoop or
soapy water for unsubmerged connections.
3. Attach vent fitting and tighten to
manufacturers instructions.
5. Attach nozzle as per manufacturers
instructions.
Test for 1 minute
When testing the valve, ensure the
valve is held securely and opened
slowly for the first time after servicing.
If any leakage occurs then stop test
and do not use nozzle. Contact Oasis
for help.
Recommend
Torque: 70 Nm
Installation
45o& 90o Valve

5
We reserve the right to modify product specifications without prior notice. FV103-INS-01 2822 © Oasis Engineering Limited
1. Pick up fill valve. 2. Push onto receptacle.
4. Lift up lever.
CLICK
6. Pull nozzle sleeve back to
disengage.
5. When filling is complete,
shut off the lever.
P30
or
P36
ON OFF
Move handle in
one swift motion
3. The green indication sleeve is
visible.
We reserve the right to modify product specifications without prior notice. FV103-INS-01 2822 © Oasis Engineering Limited
Operating
Instructions
6
We reserve the right to modify product specifications without prior notice. FV103-INS-01 2822 © Oasis Engineering Limited
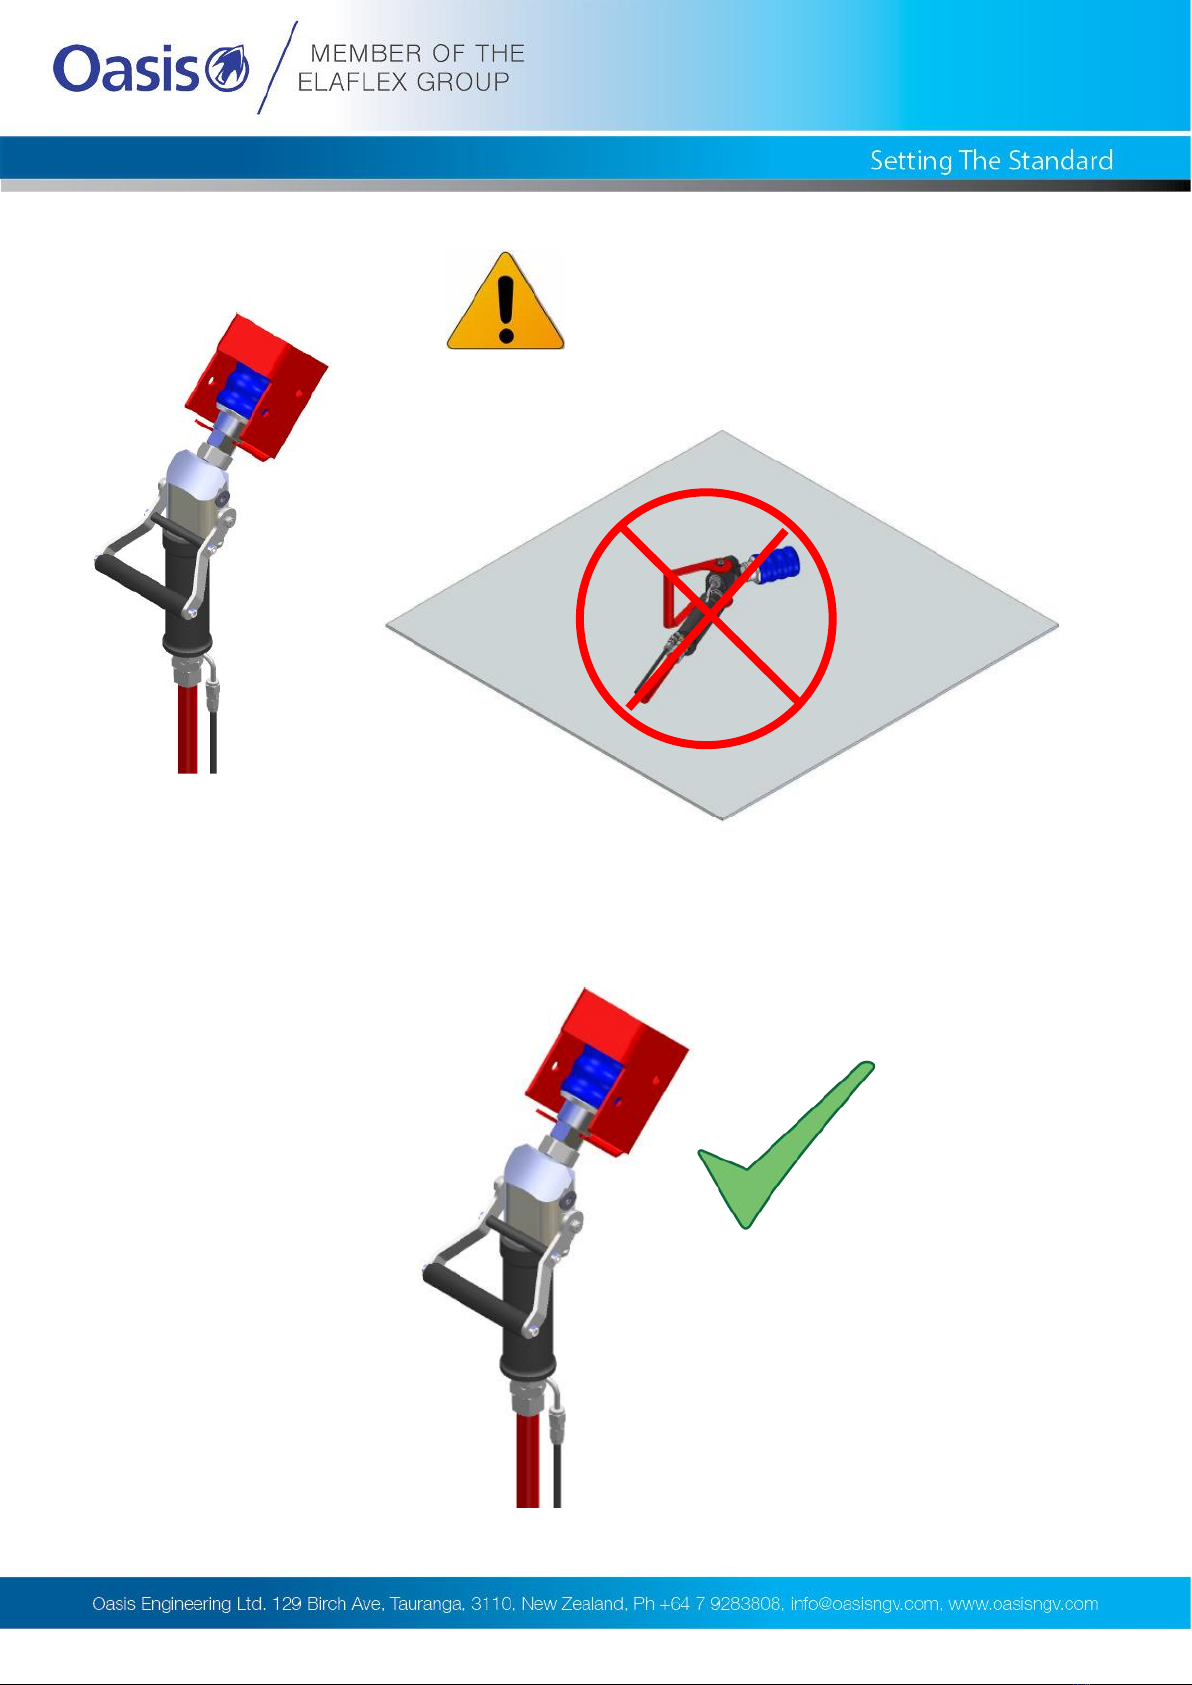
7. Hang up fill valve.
IMPORTANT
DO NOT DROP
NO GOLPEAR
DO NOT LEAVE ON FLOOR
NO DEJAR EN EL SUELO
ALWAYS PUT BACK IN HOLDER
COLGAR SIEMPRE DESPUES DE UTILIZAR
Operating
Instructions
7
We reserve the right to modify product specifications without prior notice. FV103-INS-01 2822 © Oasis Engineering Limited
Servicing
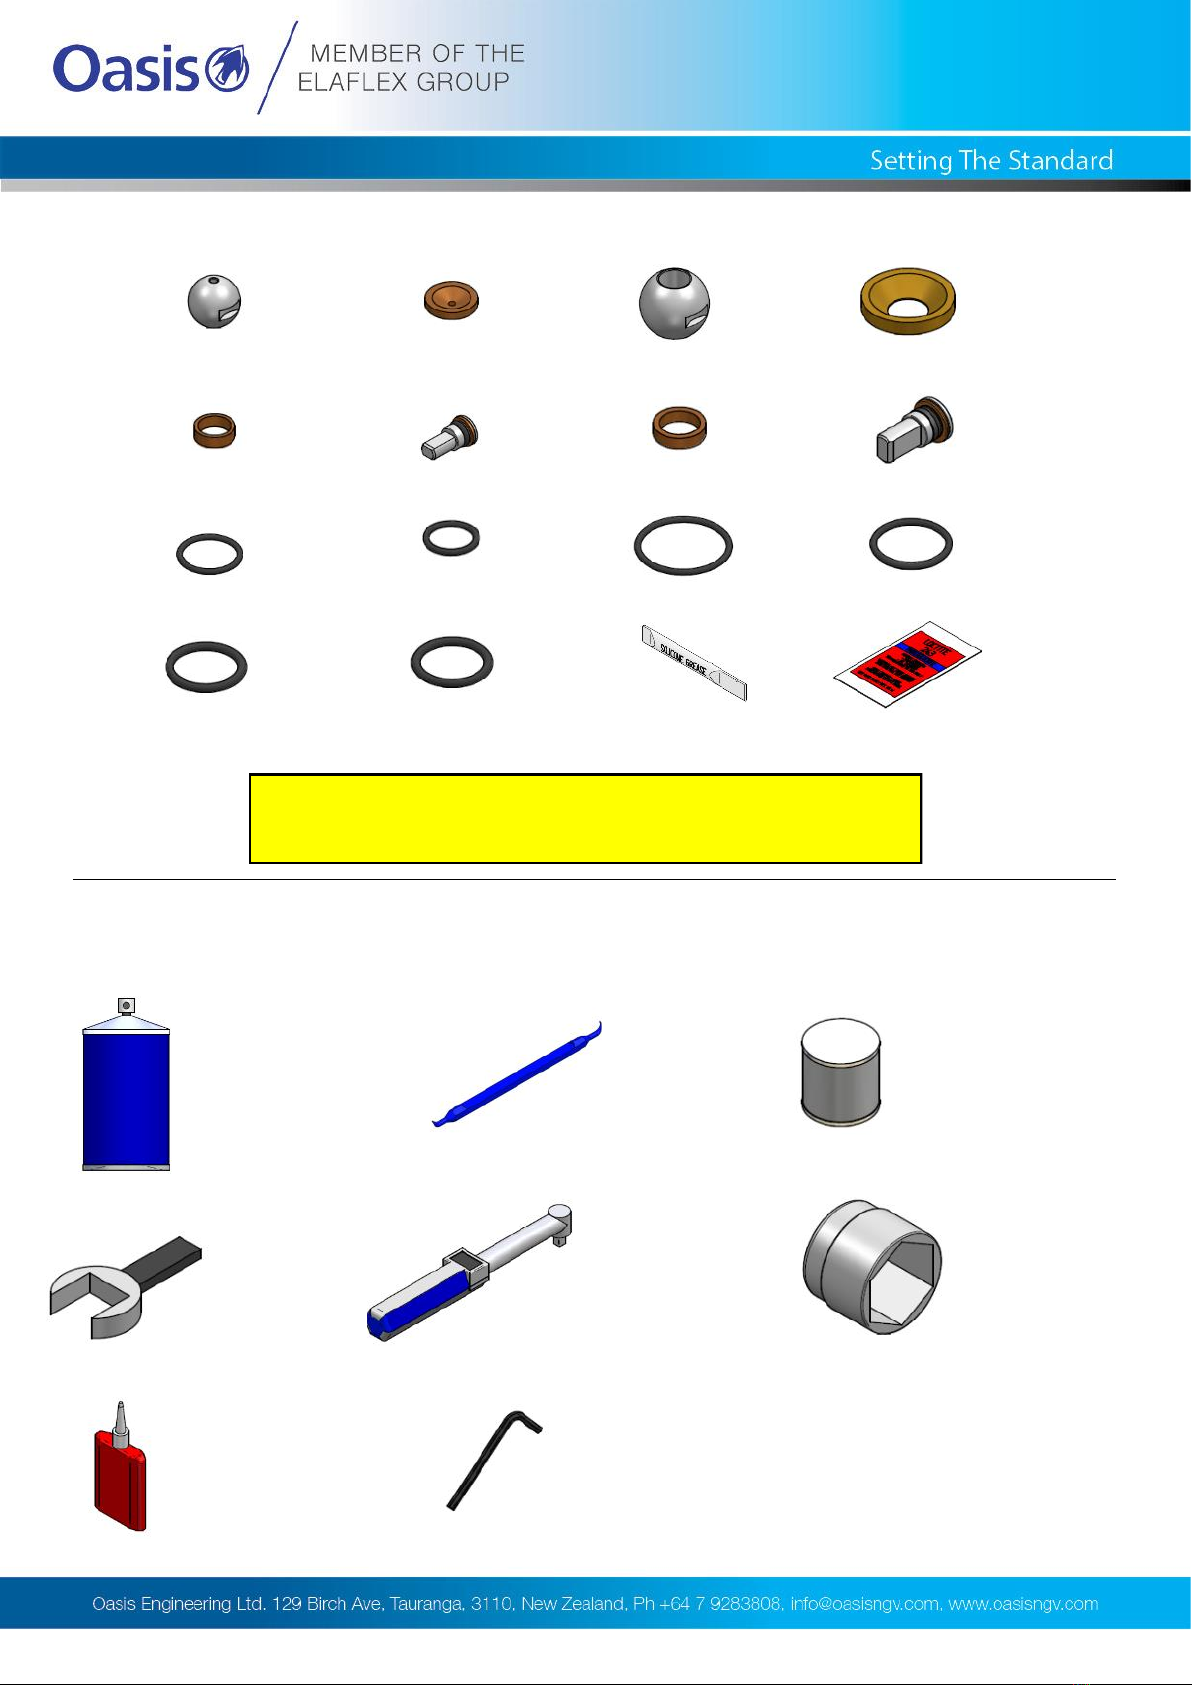
Tools Required
Cleaner (Warm Soapy
Water or Similar)
Pick Tool
TOOL-PICK
(Sold separately)
Spanner
(Wrenches)
10, 13, 19,
21, 27,
1 5/16”
Anti Seize Grease
(Loctite 771 or Similar)
For All Threads
Sockets
10, 13, 21, 27
1 5/16”
Torque Wrench
Service Kit Parts
2 x Vent Seat O-rings
1 x End Cap O-ring
1 x Vent Stem
1 x Gland
2 x Vent Seats
1 x Vent Ball
2 x Seat O-rings1 x End Cap O-ring
1 x Stem1 x Gland
2 x Seats1 x Ball
1 x Handle O-ring
The Complete Oasis Seal Kit must be used
2 x Inlet & Outlet O-ring
Threadlocker
Loctite 243 or
Similar
Allen Key
3mm
4mm
1 x Silicone Grease 1 x Thread locker
Loctite 243 or Similar
We reserve the right to modify product specifications without prior notice. FV103-INS-01 2822 © Oasis Engineering Limited
8
We reserve the right to modify product specifications without prior notice. FV103-INS-01 2822 © Oasis Engineering Limited
4mm
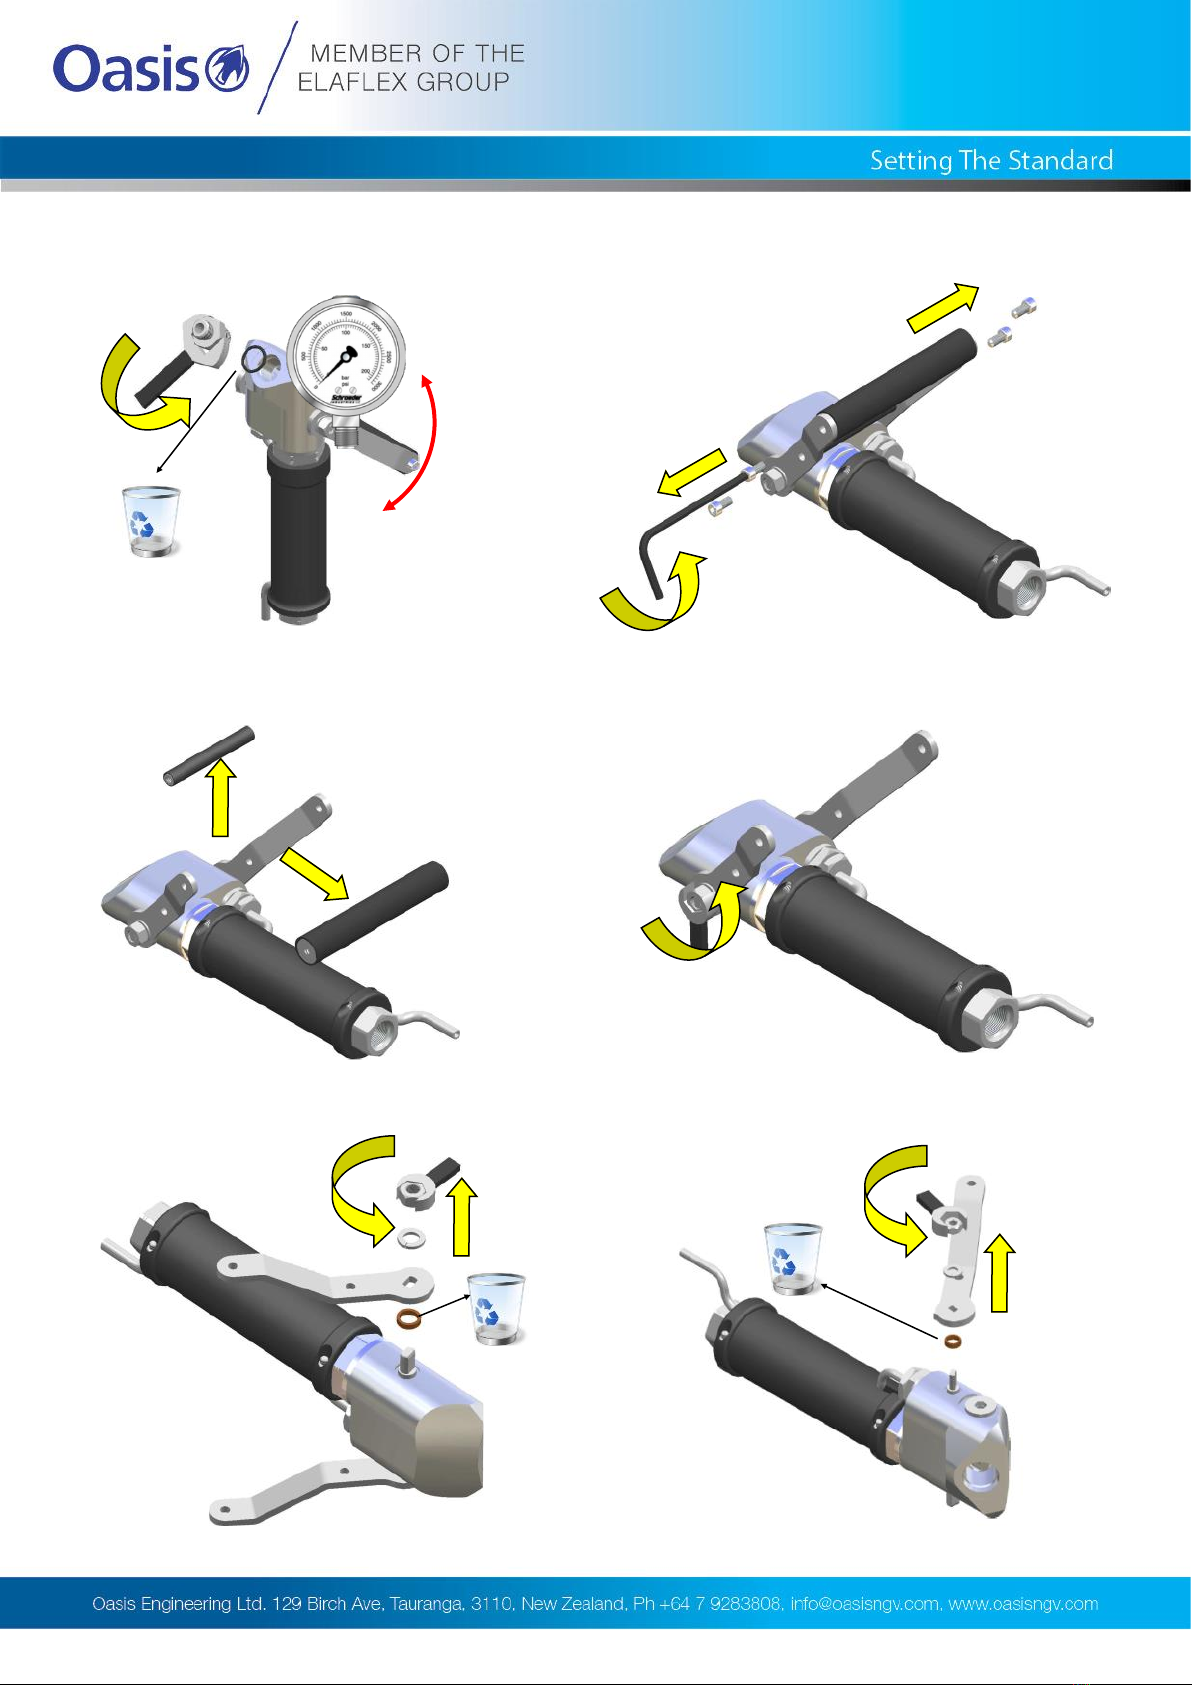
5. Remove first side.
4. Remove stem nuts.
2. Remove handle screws.
3. Remove handle
1. Remove inlet connection
6. Remove second side.
13mm
10mm
Open and close
valve to ensure
all trapped gas
is released
Servicing
Disassembly

9
We reserve the right to modify product specifications without prior notice. FV103-INS-01 2822 © Oasis Engineering Limited
8. Remove sleeve. 7. Remove sleeve screws.
9. Unscrew vent tube.
3mm
19mm
11. Remove handle. 12. Discard O-rings.
10. Remove vent tube
27mm
We reserve the right to modify product specifications without prior notice. FV103-INS-01 2822 © Oasis Engineering Limited
Servicing
Disassembly
10
We reserve the right to modify product specifications without prior notice. FV103-INS-01 2822 © Oasis Engineering Limited
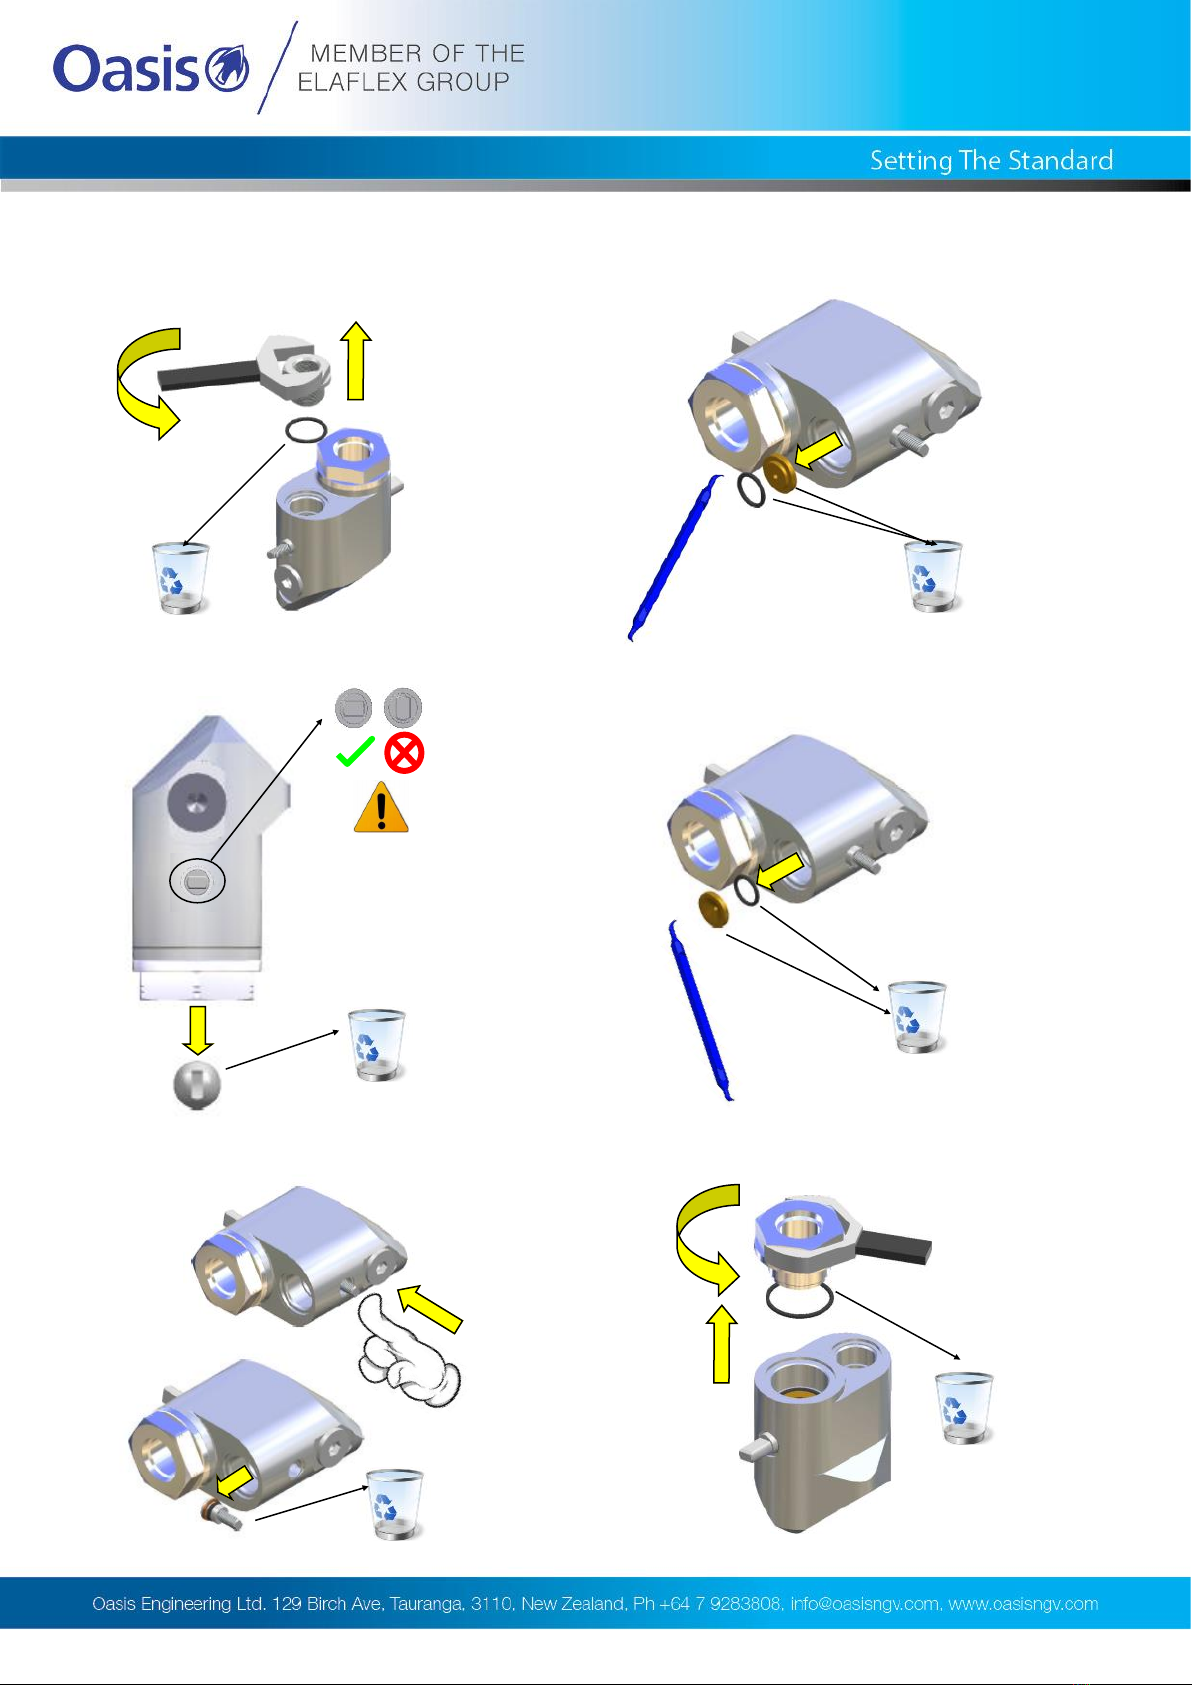
18. Discard O-ring.
13. Discard O-ring.
16. Discard seat.
14. Discard seat.
15. Discard ball.
17. Discard stem.
21mm
1 5/16”
Servicing
Disassembly
Inhaltsverzeichnis
Andere Elaflex Steuereinheit Handbücher

Beliebte Steuereinheit Handbücher anderer Marken

Festo
Festo Compact Performance CP-FB6-E Stücklistenhandbuch

Elo TouchSystems
Elo TouchSystems DMS-SA19P-EXTME Bedienungsanleitung

JS Automation
JS Automation MPC3034A Bedienungsanleitung

JAUDT
JAUDT SW GII 6406 Series Kurzanleitung

Spektrum
Spektrum Air Module System Bedienungsanleitung

BOC Edwards
BOC Edwards Q Series Bedienungsanleitung


