Etec 32A66 Bedienungsanleitung

32A66
USER’S MANUAL
For technical assistance or troubleshooting, please call 1-800-936-1168 or email
[email protected]. The Technical Support Center is available 24-hours a day,
32” LCD TELEVISION
32A66-1
7-days a week.

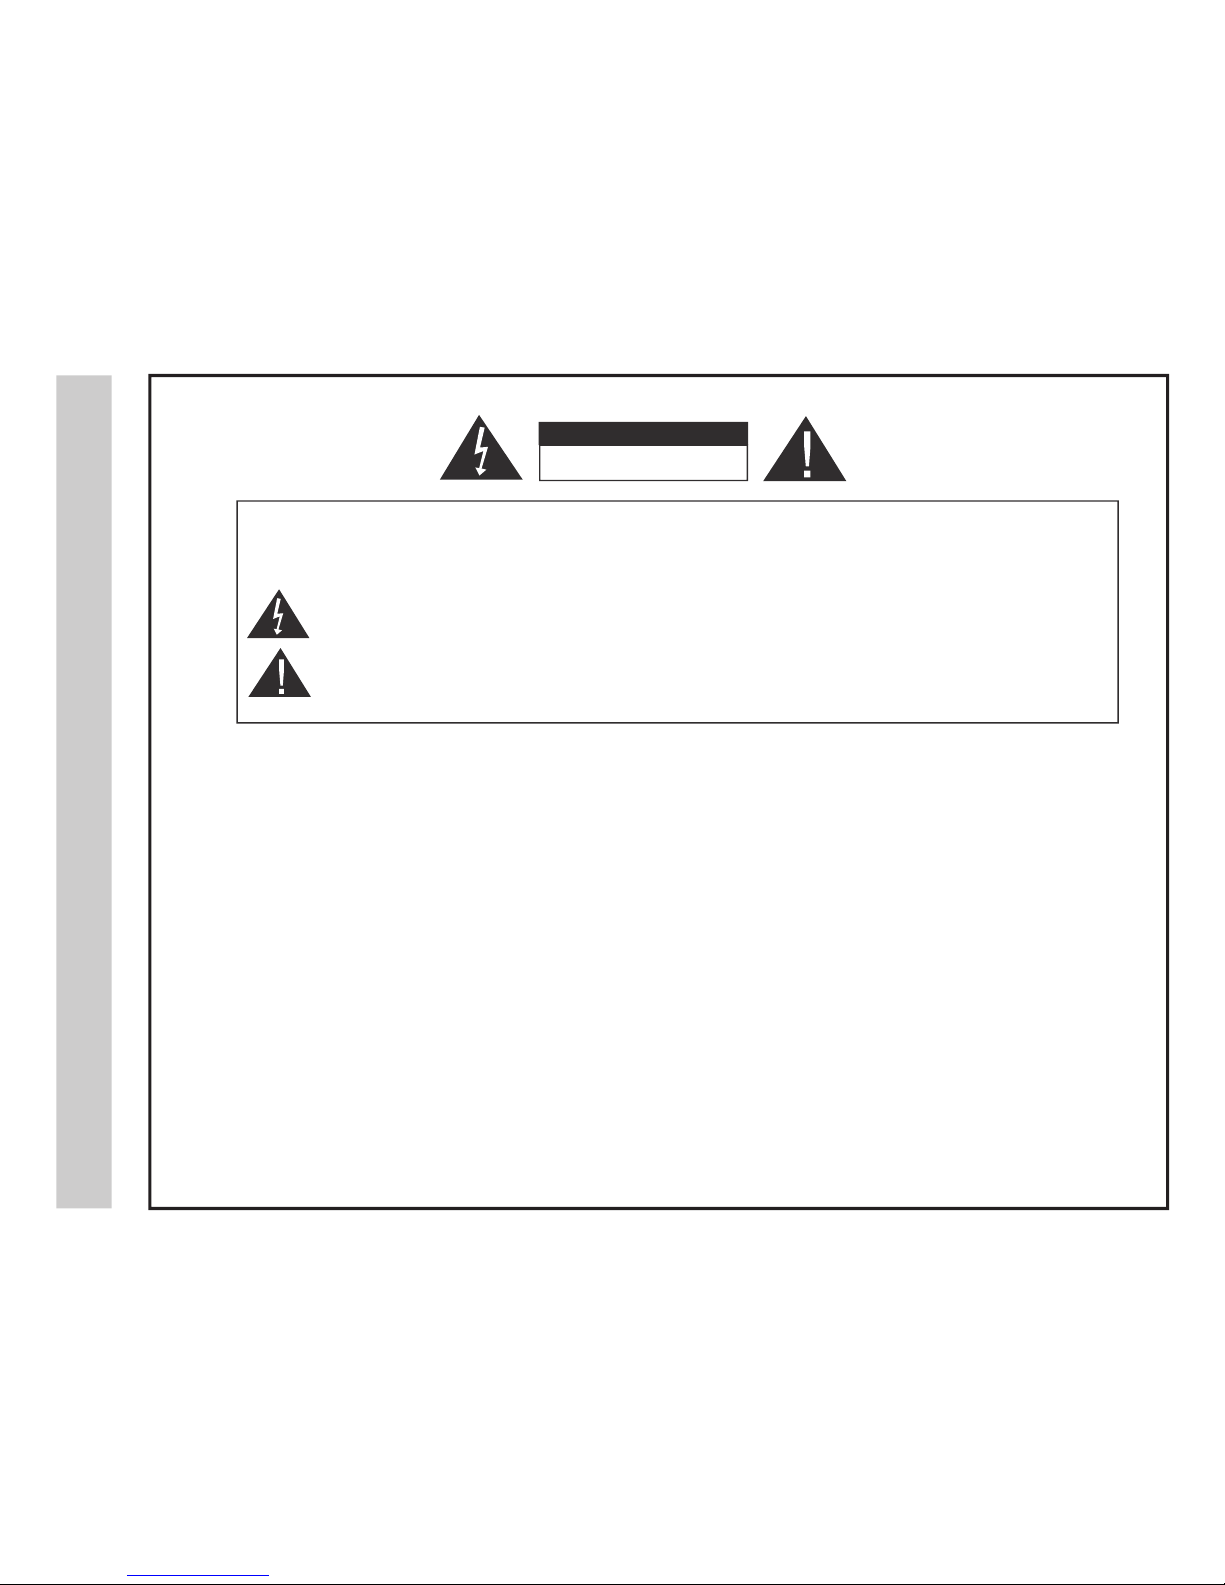
RISK OF ELECTRIC SHOCK
DO NOT OPEN
The lightning flash with arrowhead symbol, within an equilateral triangle, is intended to alert the user to the
presence of uninsulated “dangerous voltage” within the product’s enclosure that may be of sufficient magnitude
to constitute a risk of electric shock to the users.
The exclamation point within an equilateral triangle is intended to alert the user to the presence of important
operating and maintenance (servicing) instructions in the literature accompanying the television.
WARNING:
Safety:
TO PREVENT FIRE OR SHOCK HAZARDS, DO NOT EXPOSE THIS PRODUCT TO RAIN OR MOISTURE.
NOTE TO CABLE / TV INSTALLER:
This reminder is provided to call the CATV system installer’s attention to Article 820-40 of the National Electric Code
(U.S.A.). The code provides guidelines for proper grounding and, in particular, specifies that the cable ground shall
be connected to the grounding system of the building, as close to the point of the cable entry as practical.
FCC REGULATORY INFORMATION:
This television has been tested and found to comply with the limits for a Class B digital device, pursuant to Part 15
of the FCC Rules. These limits are designed to provide reasonable protection against harmful interference in a residential
installation. This television generates, uses and can radiate radio frequency energy and, if not installed and
used in accordance with the instructions, may cause harmful interference to radio communications. However, there
is no guarantee that interference will not occur in a particular installation. If this television does cause interference
to other electronic equipment, which can be determined by turning the television off and on, then the user is
encouraged to try to correct the interference by one or more of the following measures:
- Reorient or relocate the receiving antenna.
- Increase the separation between the equipment and television.
- Connect the equipment into an outlet on a circuit different from that to which the television is connected.
- Consult your dealer or an experienced radio / TV technician for assistance.
Any changes or modifications not expressly approved by the party responsible for compliance may void the user’s
authority to operate the equipment.
TO REDUCE THE RISK OF ELECTRICAL SHOCK DO NOT REMOVE COVER (OR BACK). NO
USER SERVICEABLE PARTS ARE INSIDE. REFER TO QUALIFIED SERVICE TECHNICIAN ONLY.
s
noi
t
cu
r
tsn
I
y
t
e
f
aS
CAUTION
32A66-2

s
n
o
i
t
c
u
r
t
s
n
I
y
t
e
f
a
S
32A66-3
cabinet,
Pthe
at
To protect
y
;
This TV is equipped with a three-wire grounding type plug,a plug
with a third (grounding) pin. As a safety feature, this plug will only
fit into a grounded power ourlet. If you are unable to insert the plug
into the outlet, contact your electrician to replace the obsolete outlet.
Do not defeat the safety purpose of the grounding-type.

s
noi
t
cu
r
tsn
I
y
t
e
f
aS
32A66-4
qualified service technician.
technician

s
tn
e
tn
o
C
f
oe
l
b
a
T
32A66-5
Safety Instructions ................................................................................................
Table of Contents .................................................................................................
Introduction / What’s In the Box ...........................................................................
Remote Control
Remote Control - Battery Install ...........................................................................
Remote Control Overview ....................................................................................
TV Overview
Side Panel ............................................................................................................
Rear Panel ...........................................................................................................
Pedestal Stand Removal / Wall Mounting ............................................................
Installation
Connection to Coaxial / RF Cable / Antenna
Satellite Box / Connection to HDMI Inputs ............................................................
Connection to Component (Y Pb Pr) Input .............................................................
Connection to AV Composite Input........................................................................
Connection to a Personal Computer .....................................................................
......................................................
Connection to a Receiver / Amp ...........................................................................
Initial TV Setup
Initial Setup Wizard ...............................................................................................
TV Channel Setup & Channel Auto Scan .............................................................
Picture Settings
Contrast ................................................................................................................
Brightness .............................................................................................................
Color .....................................................................................................................
Tint ........................................................................................................................
Sharpness .............................................................................................................
Color Temperature ................................................................................................
.....................................................................................................
Troubleshooting
Specifications
..................................................................................................
Index ....................................................................................................................
Audio Settings
Bass / Treble / Balance .........................................................................................
Audio Language ....................................................................................................
Date & Time Settings
.......................................................................................
Setup Settings
Menu Language ....................................................................................................
Transparency.... ....................................................................................................
Aspect Mode ..........................................................................................................
Noise Reduction ...................................................................................................
DLC ......................................................................................................................
Restore Default ....................................................................................................
Closed Caption Settings ....................................................................................
Advanced Setting for PC .......................................................................................
Parental Control - USA.........................................................................................
Parental Control - Canada ....................................................................................
TV Settings
Favorite .................................................................................................................
Add / Delete ............................................................................................................
Channel Label ......................................................................................................
DTV Signal ...........................................................................................................
Aspect Modes ........................................................................................................
USB Modes ........................................................................................................
2-4
5
6
7
8
9
10
10
11
12
13
14
15
16
17
Connection to the Power Source ............................................................................ 17
18
19
19
19
19
19
19
30
31
32
20
20
21
22
22
22
22
22
22
23
24
25
26
27
27
27
27
28
29

n
o
itcudor
t
nI
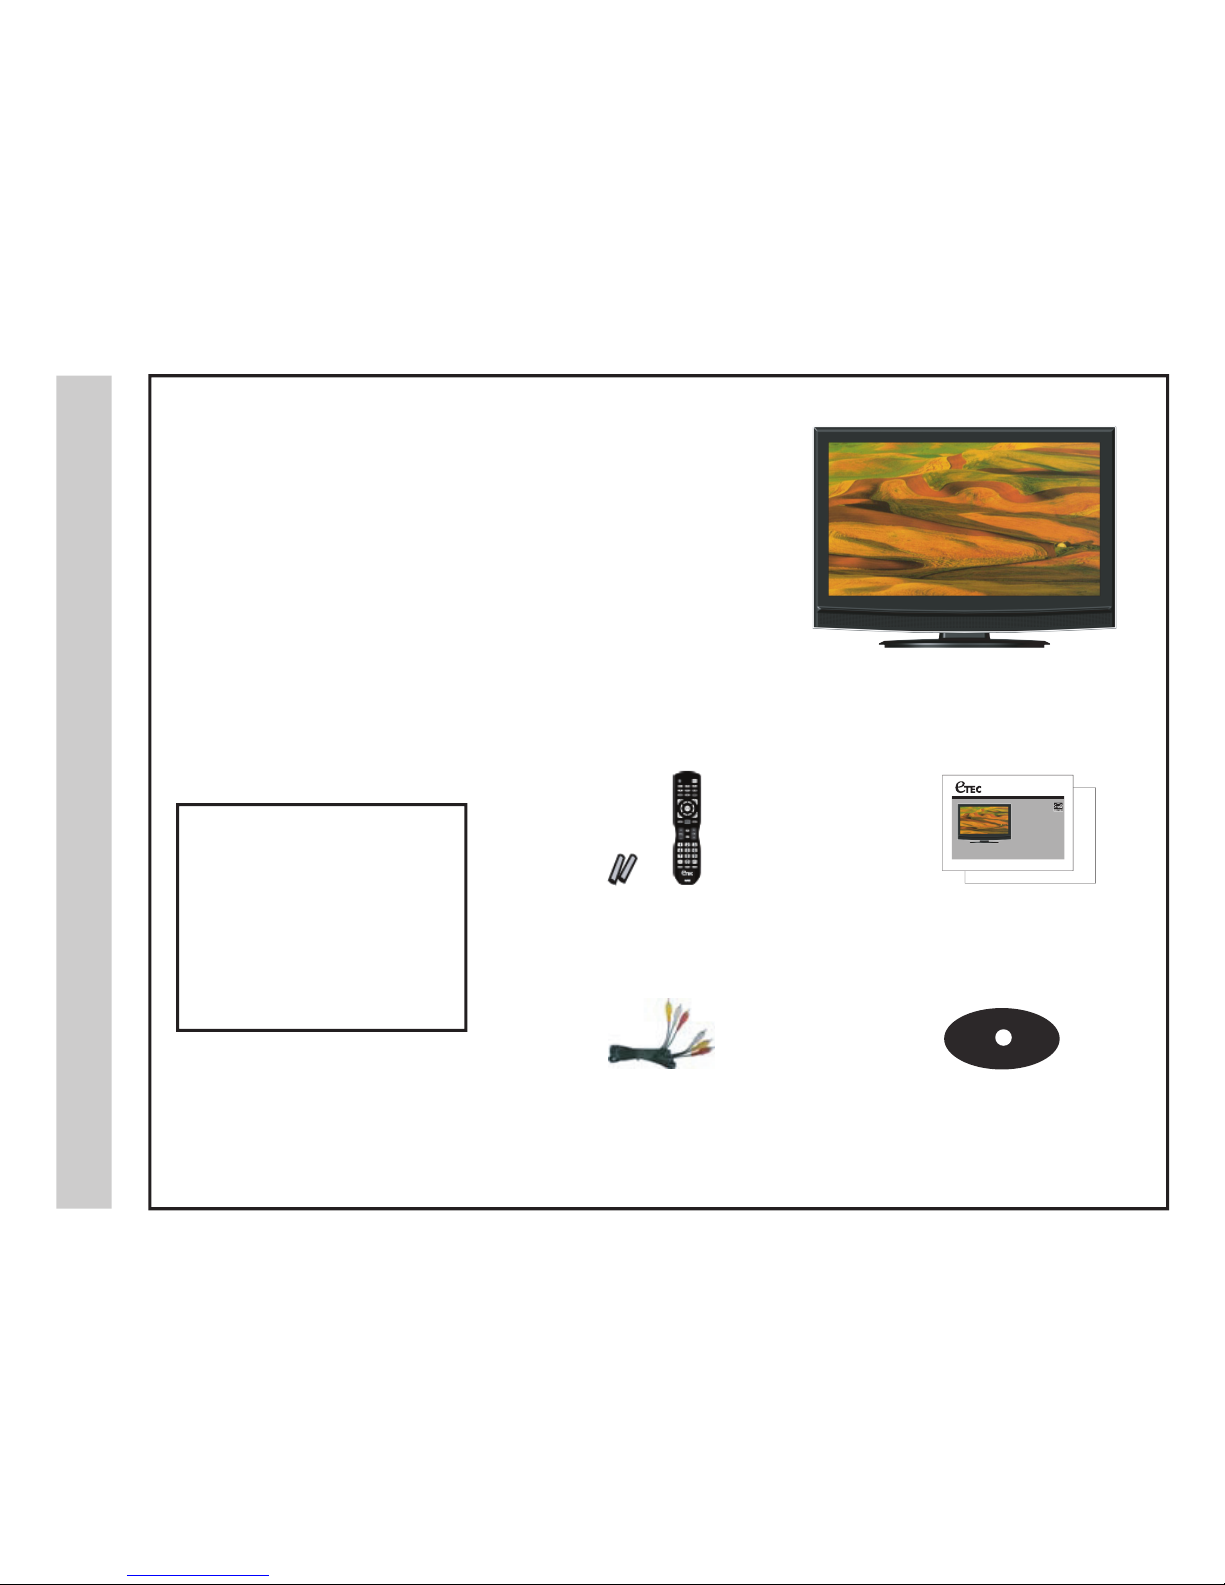
The 32A66 LCD package includes
the following items. Save the carton
& packing for future shipping
.
• Pedestal Base / Hardware
• Remote Control
• AAA Batteries (2)
• Quick Start Guide
• User Manual
• Audio / Video Cable
• Pedestal Base
xoB
e
h
T
nIs’tahW
32A66-6
• User manual
• Quick Start Guide
QUICK S TART GUIDE
• Remote Control
• AAA Batteries x 2
32A66
USER’S MANUAL
32” LCD TELEVISION
19A88
Thank you for purchacing the energy efficient 32A66 LCD television. It has been designed to
offer today’s high definition television experience. With a display resolution of 1366x768
you are assured of one of the finest quality televisions available today.
Your television provides both analog and digital inputs including two (2) High Definition
Multimedia Interface (HDMI) interconnects for the purest audio and video digital signal
when connected to compatible HD sources (ie: HD set-top box, high definition DVD player
or gaming console).
We recommend that you read the user manual thoroughly before use to familiarize yourself
with the installation and adjustment options available to you; thereby, enjoying all the
features of the 32A66 for many years to come.
• Audio / Video Cable

lo
r
tn
o
Ce
tome
R
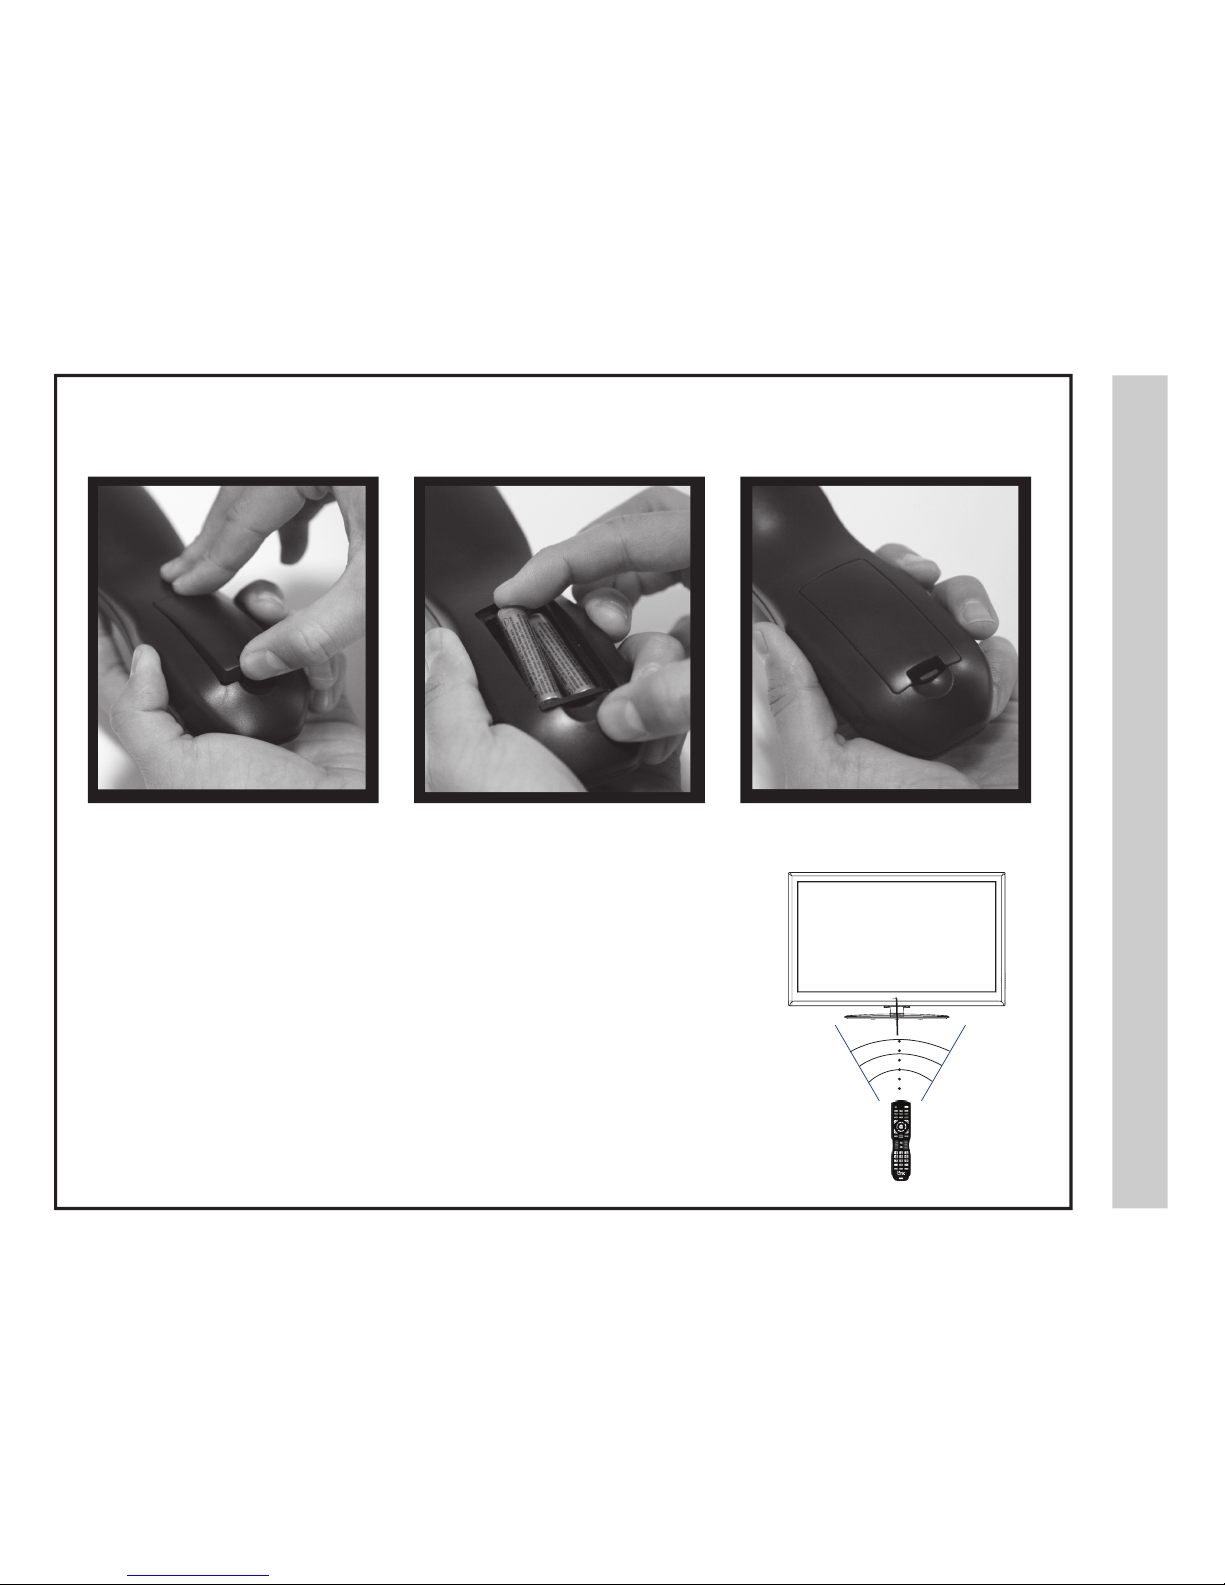
Your remote cont rol handset is p owered by t wo (2) AAA type b atteries
l
lats
n
I
y
r
e
t
t
aB
32A66-7
•
•
When pointed towards the television, the effective range of the remote is approximately 16 feet from the
front of the TV IR receiver and at an angle of no greater than 30° to the left / right or 20° up / down.
To avoid possible damage from battery chemical leakage, remove the batteries if you do
not plan to use the remote control for an extended period of time. Do not mix batteries of
different age and/or type. Always discard used batteries safely.
Do not expose the remote control to liquids, direct sunlight or sources of excessive heat.
The IR receiver on the TV will not work properly if the set is in direct sunlight or an object is in the path
between the remote control and the IR receiver on the front of the TV.
•
•
• To insert the batteries, turn the remote
control over and remove the battery
cover.
• Place two (2) “AAA” batteries into the battery
compartment with the “+” and “-“ ends facing the
correct way as shown in the battery compartment.
• Replace the cover.
NOTE: Improper use of batteries can result in a chemical leakage or explosion.
30° 30°
IR Receiver

lortno
Ce
tomeR
we
ivr
ev
O
32A66-8
The Remote Control
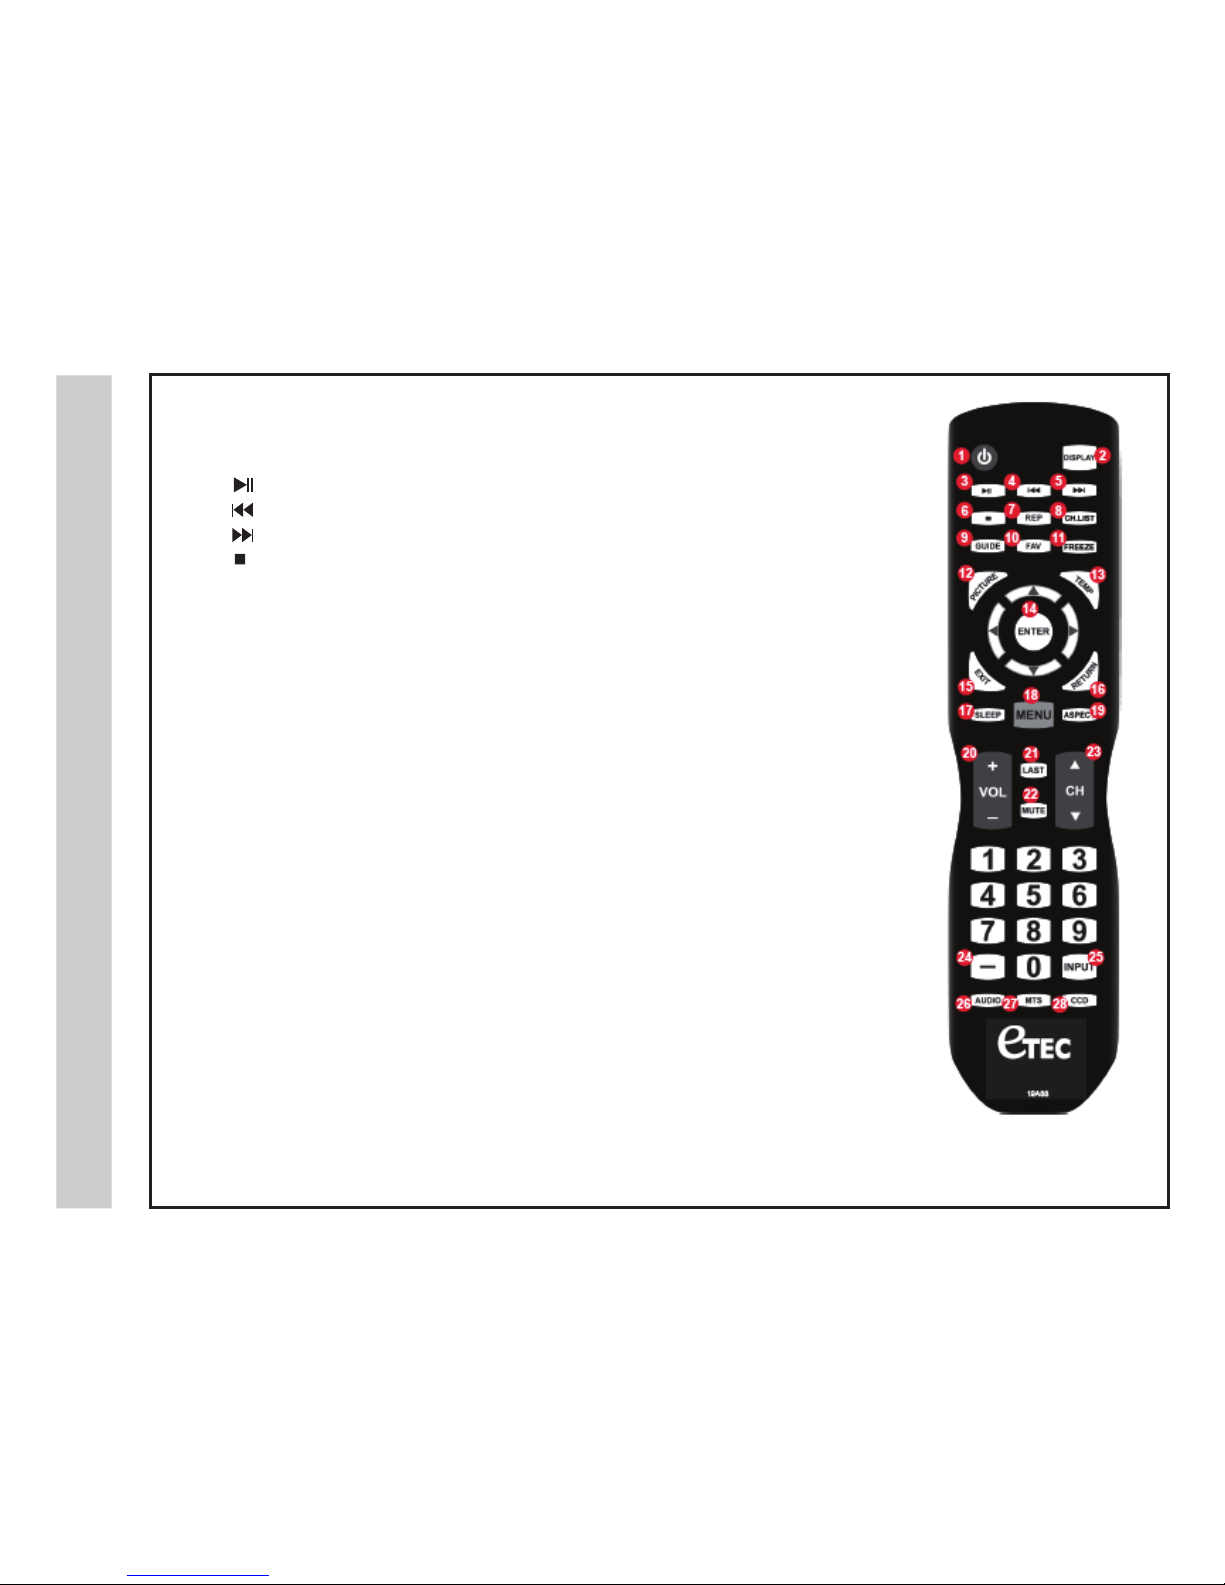
POWER – 1. Turn the LCD display ON or OFF (Standby).
DISPLAY – 2. Provides program information currently viewed.
–
3. PAUSE (USB)
–
4. PREVIOUS (USB)
–
5. NEXT (USB)
– 6. STOP (USB)
7.
8. Press to display a list of channels saved in the TV tuner memory.
Pause and still-frame the current image on the display. Press again for live TV.
GUIDE –
9. Press to review scheduled programming for the currently viewed channel.
FAV –10. Press to display a listing of your favorite TV channels. (pg. 27)
FREEZE –
11.
REPEAT (USB)
REP –
CH.LIST –
PICTURE – 12. Select from various preset picture modes: Dynamic > Standard > Movie > Personal. (pg. 19)
TEMP – 13. Select the Color Temperature COOL > NORMAL > WARM. (pg. 19)
14. ARROWS / ENTER – Press the navigation buttons for moving through the menu options.
Press the ENTER button to select / confirm.
EXIT –
15. Press to exit a displayed menu.
RETURN – 16. Press to return to the previous menu.
SLEEP –
17. Press to activate the Sleep function. The TV will automatically turn off after; 5> 10> 15> 30>
45> 60> 90> 120> 180> 240> (minutes)> OFF.
MENU –
18. Press to display the Main menu.
ASPECT –
19. Select the viewable display aspect options: Normal, Wide, Zoom, or Cinema. (pg. 28)
VOLUME (+/-) – 20. Adjust the volume up (+) or the volume down (-).
LAST –
21. Press to switch between the current channel and previously viewed channel.
MUTE –
22. Press to temporarily turn off the TV audio. Press again to resume.
CHANNEL –
23. / Change the channel up or down.
NUMBERS / DASH –24. Select desired TV channel directly. For example: to select digital channel 4-1,
press “4”, press “-”, and press “1” = (4-1).
INPUT –
25. Press to display all of the input sources on screen. (pgs. 10-15)
AUDIO – 26. Press to select from various preset audio modes: PERSONAL> STANDARD> MUSIC> MOVIE (pg. 20)
MTS –
27. Press to select a program’s second audio channel (if available).
CCD –
28. Press to select closed caption subtitles (if available) OFF> ON. (pg. 23) NOTE: When using the remote
control, point it directly at the TV.
1
345
678
910
12
15
17
20
18
21
22
24
26 27 28
25
14
13
16
19
23
11
2
19A88

1
2
3
4
5
wei
v
r
e
vO
V
T
IR Receiver
Side
l
e
n
aPe
d
i
S
&
t
n
or
F
32A66-9
Panel
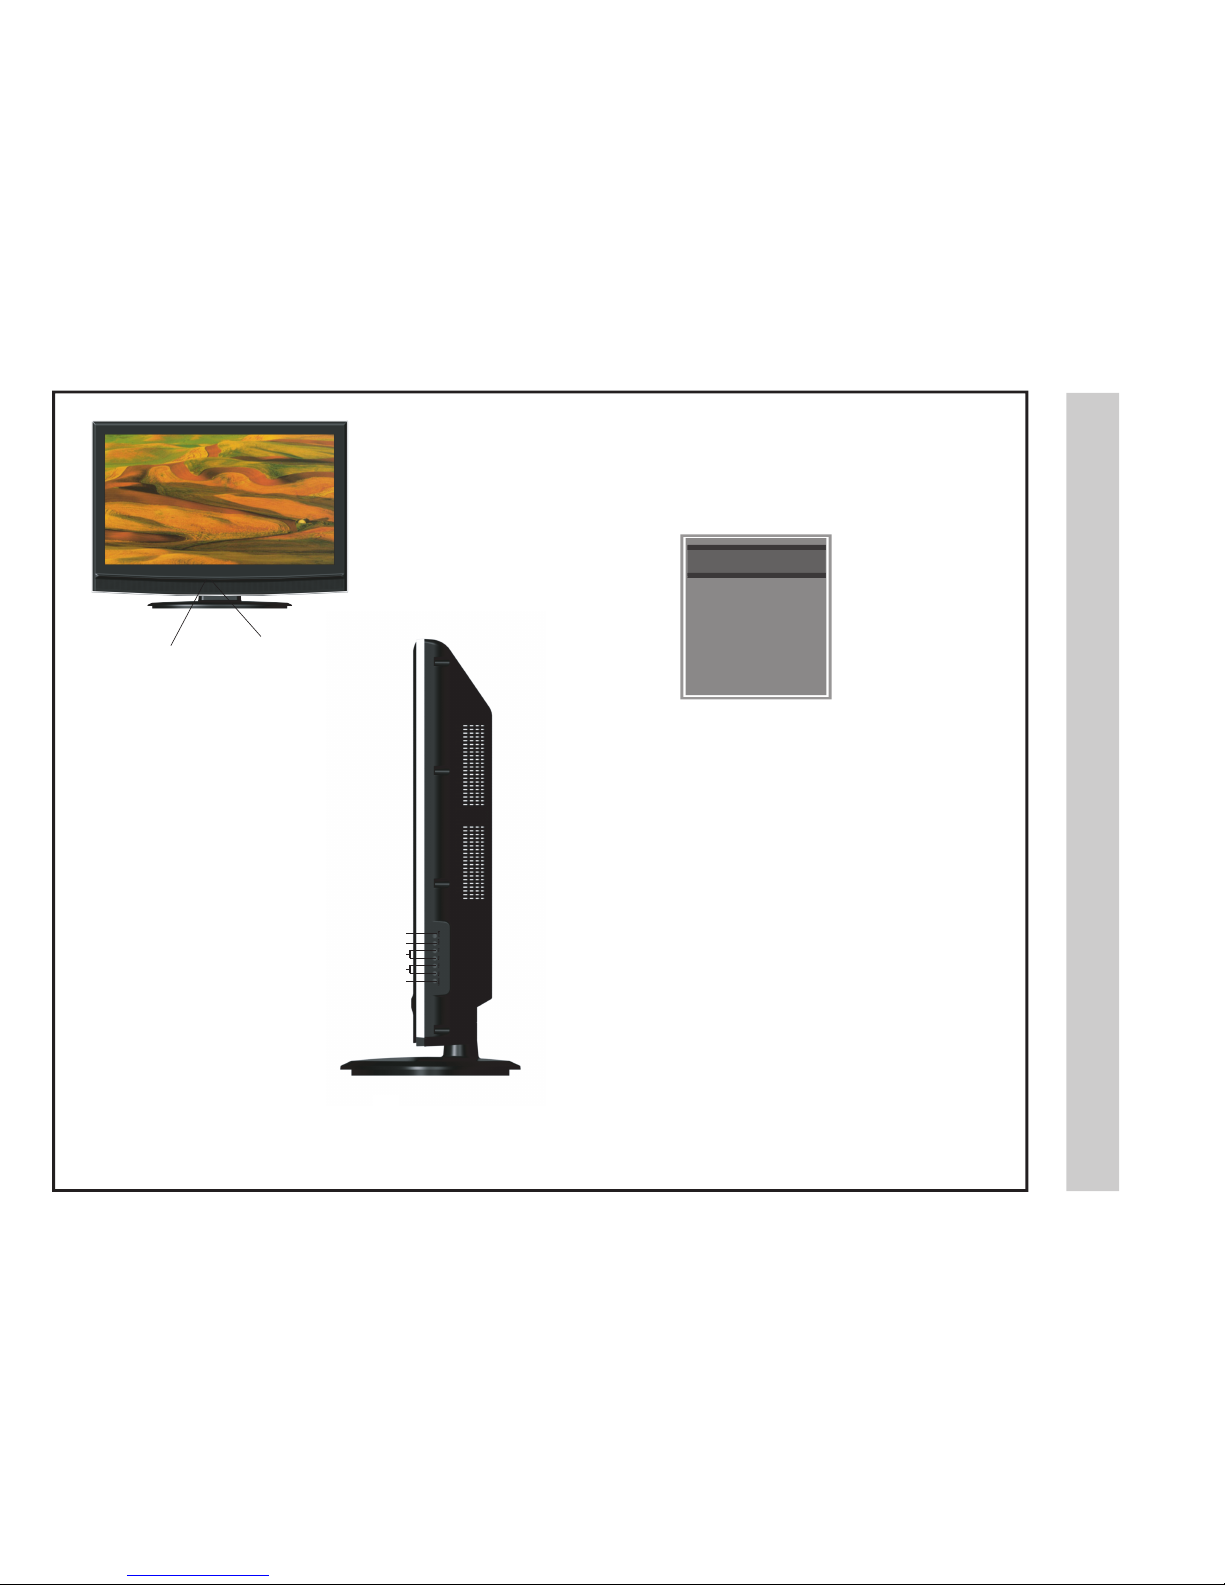
A soft blue light illuminates
when the television power is on.
1. Input - After connecting your DVD, cable box, etc., select the
appropriate input source to view. Press the INPUT button to display
the input options. Press the CH+ / CH- buttons to highlight the input
source and press the VOL+ button to select.
2. Menu - Press the MENU button to display. Press VOL+ to
select from the 6 menu options available. Press the CH+ / CH-
buttons to select a feature from the selected menu then press the
VOL+ / VOL- buttons to adjust the volume settings.
3. Channel (CH+ / CH-) - Press the CH+ / CH- buttons to select
a channel in the TV mode.
4. Volume (VOL+ / VOL-) - Press the VOL+ / VOL- buttons to
adjust the volume up or down.
5. Power - Press the POWER button to turn the LED display ON /
OFF (standby). When the power is on, the blue LED illuminates. The
screen image will appear within a few seconds.
INPUT SOURCE
INPUT SOURCE
TV
AV
Component
HDMI 1
HDMI 2
USB
VGA

weiv
r
evOVT
l
e
n
aP
r
aeR
l
av
om
e
Rl
ats
e
d
eP&
32A66-10
Wall Mounting
It is recommended that you call your local TV
dealer or a licensed contractor to secure the
television to the wall using a suitable VESA
400 x 200 wall mount hardware.
Removal of TV Pedestal
for Wall Mounting
To remove the pedestal base from the
television, unscrew the (5) Philips head
screws and remove the entire assembly.
1. AC Power Plug – Insert power plug during initial setup.
2. USB Input Port - Connect to portable USB device such as USB
flash / hard drive (max storage capacity 400GB), supports MP3 and JPEG.
3. HDMI Inputs (2) -Connects to digital AV equipment that feature HDMI
video and
connectivity. HDMI supports enhanced high definition
up to 7.1 - channel digital audio all from one cable. Recommended
for best performance. HDMI cable not included.
4. PC IN - VGA Input - Connect an optional VGA cable (not included)
from your personal computer .
PC Audio Input (3.5mm) -3.5mm audio cable (not included)
for sound.
8. Headphone Jack - Connect a stereo headphone (3.5mm – not included)
for private listening.
5. Component Y Pb Pr Input -Connect to an AV device that
features component (Y Pb Pr) video and audio output jacks.
6. AV Input -Connect an external device to the composite VIDEO
(Y) and AUDIO (L / R) output jacks found on most video equipment.
7. RF Input -Connect an antenna or cable connection
for television reception.
Note: Use an outdoor antenna, cable or satellite for best reception.
9. L / R Audio Out -Connect to audio receiver.
1 2 3 4 5 6 89
POWER
AUDIO OUT
USB
7
Inhaltsverzeichnis
Andere Etec Fernseher Handbücher
Beliebte Fernseher Handbücher anderer Marken

Philips
Philips Colour Television Bedienungsanleitung

Toshiba
Toshiba 27A10 Bedienungsanleitung

Philips
Philips 42PF9630A/37 Bedienungsanleitung

Hitachi
Hitachi 32FX48B Bedienungsanleitung

DAEWOO ELECTRONICS
DAEWOO ELECTRONICS DTQ-14V1FC Bedienungsanleitung

Changhong Electric
Changhong Electric uhd55b6000is Bedienungsanleitung