
eVision LCD21 Bedienungsanleitung

MANUALE TECNICO
LCD21
Monitor LCD
090000817

2
MANUALE TECNICO - LCD21 -090000817 - TECHNICAL MANUAL
AVVERTENZE - FOREWORD
PER L’INSTALLATORE:
Attenersi scrupolosamente alle normative vigenti sulla realizzazione di impianti elettrici e sistemi di sicurezza, oltre che alle prescrizioni del costruttore
riportate nella manualistica a corredo dei prodotti.
Fornire all’utilizzatore tutte le indicazioni sull’uso e sulle limitazioni del sistema installato, specificando che esistono norme specifiche e diversi livelli di prestazioni di sicurezza
che devono essere commisurati alle esigenze dell’utilizzatore.
Far prendere visione all’utilizzatore delle avvertenze riportate in questo documento.
PER L’UTILIZZATORE:
Verificare periodicamente e scrupolosamente la funzionalità dell’impianto accertandosi della correttezza dell’esecuzione delle manovre di inserimento
e disinserimento. Curare la manutenzione periodica dell’impianto affidandola a personale specializzato in possesso dei requisiti prescritti dalle norme vigenti. Provvedere a
richiedere al proprio installatore la verifica dell’adeguatezza dell’impianto al mutare delle condizioni operative (es. variazioni delle aree da proteggere per estensione, cambiamento
delle metodiche di accesso ecc...)
Questo dispositivo è stato progettato, costruito e collaudato con la massima cura, adottando procedure di controllo in conformità alle normative vigenti. La piena rispondenza
delle caratteristiche funzionali è conseguita solo nel caso di un suo utilizzo esclusivamente limitato alla funzione per la quale è stato realizzato, e cioè:
LCD21 Monitor
Qualunque utilizzo al di fuori di questo ambito non è previsto e quindi non è possibile garantire la sua corretta operatività.
I processi produttivi sono sorvegliati attentamente per prevenire difettosità e malfunzionamenti; purtuttavia la componentistica adottata è soggetta a guasti in percentuali
estremamente modeste, come d’altra parte avviene per ogni manufatto elettronico o meccanico. Vista la destinazione di questo articolo (protezione di beni e persone) invitiamo
l’utilizzatore a commisurare il livello di protezione offerto dal sistema all’effettiva situazione di rischio (valutando la possibilità che detto sistema si trovi ad operare in modalità
degradata a causa di situazioni di guasti od altro), ricordando che esistono norme precise per la progettazione e la realizzazione degli impianti destinati a questo tipo di applicazioni.
Richiamiamo l’attenzione dell’utilizzatore (conduttore dell’impianto) sulla necessità di provvedere regolarmente ad una manutenzione periodica del sistema almeno
secondo quanto previsto dalle norme in vigore oltre che ad effettuare, con frequenza adeguata alla condizione di rischio, verifiche sulla corretta funzionalità del sistema
stesso segnatamente alla centrale, sensori,avvisatori acustici, combinatore/i telefonico/i ed ogni altro dispositivo collegato. Al termine del periodico controllo l’utilizzatore
deve informare tempestivamente l’installatore sulla funzionalità riscontrata.
La progettazione, l’installazione e la manutenzione di sistemi incorporanti questo prodotto sono riservate a personale in possesso dei requisiti e delle conoscenze necessarie
ad operare in condizioni sicure ai fini della prevenzione infortunistica. E’ indispensabile che la loro installazione sia effettuata in ottemperanza alle norme vigenti. Le parti interne
di alcune apparecchiature sono collegate alla rete elettrica e quindi sussiste il rischio di folgorazione nel caso in cui si effettuino operazioni di manutenzione al loro interno prima
di aver disconnesso l’alimentazione primaria e di emergenza. Alcuni prodotti incorporano batterie ricaricabili o meno per l’alimentazione di emergenza. Errori nel loro collegamento
possono causare danni al prodotto, danni a cose e pericolo per l’incolumità dell’operatore (scoppio ed incendio).
FOR THE INSTALLER:
Please follow carefully the specifications relative to electric and security systems realization further to the manufacturer’s prescriptions indicated in the manual provided.
Provide the user the necessary indication for use and system’s limitations, specifying that there exist precise specifications and different safety performances levels that should
be proportioned to the user needs. Have the user view the directions indicated in this document.
FOR THE USER:
Periodically check carefully the system functionality making sure all enabling and disabling operations were made correctly.
Have skilled personnel make the periodic system’s maintenance. Contact the installer to verify correct system operation in case its conditions have changed (e.g.: variations
in the areas to protect due to extension, change of the access modes, etc…)
This device has been projected, assembled and tested with the maximum care, adopting control procedures in accordance with the laws in force. The full correspondence to
the functional characteristics is given exclusively when it is used for the purpose it was projected for, which is as follows:
LCD21 Monitor
Any use other than the one mentioned above has not been forecasted and therefore it is not possible to guarantee its correct operativeness.
The manufacturing process is carefully controlled in order to prevent defaults and bad functioning. Nevertheless, an extremely low percentage of the components used is
subjected to faults just as any other electronic or mechanic product. As this item is meant to protect both property and people, we invite the user to proportion the level of
protection that the system offers to the actual risk (also taking into account the possibility that the system was operated in a degraded manner because of faults and the like),
as well reminding that there are precise laws for the design and assemblage of the systems destinated to these kind of applications.
The system’s operator is hereby advised to see regularly to the periodic maintenance of the system, at least in accordance with the provisions of current legislation,
as well as to carry out checks on the correct running of said system on as regular a basis as the risk involved requires, with particular reference to the control unit,
sensors, sounders, dialler(s) and any other device connected. The user must let the installer know how well the system seems to be operating, based on the results
of periodic checks, without delay.
Design, installation and servicing of systems which include this product, should be made by skilled staff with the necessary knowledge to operate in safe conditions in order
to prevent accidents. These systems’ installation must be made in accordance with the laws in force. Some equipment’s inner parts are connected to electric main and the-
refore electrocution may occur if servicing was made before switching off the main and emergency power. Some products incorporate rechargeable or non rechargeable
batteries as emergency power supply. Their wrong connection may damage the product, properties and the operator’s safety (burst and fire).
Timbro della ditta installatrice - Your dealer/installer:

MANUALE TECNICO - LCD21 - 090000817 - TECHNICAL MANUAL
3
1. GENERALITA’
Il formato 16:9 del monitor LCD21 è particolarmente adatto per si-
stemi TVCC che necessitano di essere operativi 24 ore. La risoluzio-
ne Full HD permette di sfruttare al massimo le uscite monitor dei
sistemi e-Vision.
2. CARATTERISTICHE TECNICHE
Modello: Monitor con ingressi multipli LCD21
Schermo: 21.5" TFT LCD
Numero di colori: 16,7 milioni
Dimensione schermo: 476,74 (H) x 268,11 (V) mm
Risoluzione: 1920 x 1080 - supported 1080p Full HD
Luminosità: 250 nit LED
Color processing: True 10 bits
Gestione colore: indipendente (IMC)
Controllo contrasto: dinamico (DCC)
Fattore di contrasto: 1000 : 1 tipico
Tempo di risposta: 3.8/1.2ms
Angolo di visualizzazione: 80° (sopra)
80° (sotto)
85° (sinistra)
85° (destra)
Rivelazione sincronismi: Automatica o manuale nei segnali video
compositi VGA
o con sincronismi separati.
Segnali video in ingresso: 1 ingresso DVI-D
1 ingresso HDMI Full HD
1 ingresso VGA connettore D-Sub 15 pin
Segnali audio In / Out: 2 connettori RCA di ingresso (L/R)
1 connettore jack di uscita diam. 3.5 x1
Altoparlanti: 2 integrati, 2W, 8Ohm
Comandi Pulsante di ON/OFF, pulsante di controllo delle
funzioni dell’OSD.
Montaggio: Con staffa o a parete
Staffa di fissaggio: 100 x 100 mm - 75 x 75 mm
standard VESA
Alimentazione: 240Vca 50Hz,
adattatore esterno 12Vcc/5A
Assorbimento: 24W
Temperatura di funz.: 0°C - 40°C // 10-85% u.r.
Temperatura di stoccaggio: -20°C - 60°C // 10-85% u.r.
Dimensioni: L 531 x H 322 x
P 61 mm
Peso: 4,8 Kg
Dotazione: Cavo di alimentazione, adattatore 12V, cavo
VGA DB-15, manuale tecnico.
1. GENERALS
LCD21 monitor 16:9 format is especially suitable for CCTV system
requiring 24 hours operation. Its FULL HD resolution allows to use
the great capacity of e-Vision systems’ monitor output.
2. TECHNICAL FEATURES
Model: LCD monitor with multiple inputs LCD21
Panel: 21.5" TFT LCD
Display colors: 16,7 milions
Display area: 476,74 (H) x 268,11 (V) mm
Resolution: 1920 x 1080 - supported 1080p Full HD
Brightness: 250 nits LED
Color processing: True 10 bits
Color management: Independent (ICM)
Contrast control: Dynamic contrast control (DCC)
Contrast ratio: 1000 : 1 typical
Response time: 3.8/1.2ms
View angle: 80° (UP)
80° (DOWN)
85° (LEFT)
85° (RIGHT)
Synch Detection: Automatic or manual detection of separate
synchronize and composite synchronize of
VGA signal.
Input signal: 1 DVI-D input
1 HDMI Full HD input
1 VGA input, D-Sub 15 pin connector
Segnali audio In / Out: INPUT = 2 RCA connectors (L/R)
OUTPUT = 1 phone jack conn., diam. 3.5x1
Speakers: 2 built-in speakers, 2W, 8Ohm
Operating Power ON/OFF switch,
OSD control function switch.
Mounting: with bracket or wall-mounted
Mounting bracket: 100mm x 100mm - 75 x 75 mm
VESA standard
Power supply: AC240V 50Hz,
12V/5A power adapter
Power consumption: 24W
Operating temperature: 0°C - 40°C // 10-85% r.h.
Storage temperature: -20°C - 60°C // 10-85% r.h.
Dimensions: L 531 x H 322 x
P 61 mm
Weight: 4,8 Kg
Supplied parts: Power cord, 12V power adapter, VGA cable
(DB-15), technical manual.

4
MANUALE TECNICO - LCD21 - 090000817 - TECHNICAL MANUAL
3. DESCRIZIONE DEL MONITOR
1 = Sorgenti video
Selezione degli segnale video: VGA, DVI, HDMI.
2 = Menu
Selezione del menu OSD.
3 = ITEM
Non attivo.
4 - 5 = Regola (SU/GIU’)
Aumenta o diminuisce il valore visualizzato nell’OSD.
SU: Aumenta il valore nel menu OSD.
GIU’: Diminuisce il valore nel menu OSD.
6 = Accensione
Pulsante di accensione ON / OFF, in condizione OFF il monitor è
in standby.
Led frontale = luce verde quando il monitor è acceso.
Led frontale = luce rossa se il monitor è in standby.
3. MONITOR DESCRIPTION
1 = Source
Select input signal from VGA, DVI, HDMI.
2 = Menu
OSD menu selection.
3 = ITEM
Disabled.
4 - 5 = Adjust (UP/DOWN)
Increase or decrease the value on OSD menu.
UP: Increase value on the OSD Menu.
DOWN: Decrease value on the OSD Menu.
6 = Power
Monitor power ON / OFF. At OFF mode, monitor will be at standby
status.
LED - Green Light = Power On
LED - Red Light = Standby mode

MANUALE TECNICO - LCD21 - 090000817 - TECHNICAL MANUAL
5
3.1 Connessioni
1- INGRESSO 12Vdc regolato
Plug per ingresso di alimentazione a 12Vcc del monitor.
2 - INGRESSO DVI-D
3 - INGRESSO HDMI Full HD
3 - INGRESSO VGA, D-SUB
4 - Uscite audio L/R
5 - Uscita cuffie
3.1 Connections
1- DC12V power input
Regulated DC12V power input.
2 - DVI-D INPUT
3 - HDMI Full HD INPUT
3 - VGA, D-SUB INPUT
4 - Audio output L/R
5 - Earphone output

6
MANUALE TECNICO - LCD21 - 090000817 - TECHNICAL MANUAL
4. MENU OSD
Premere il tasto MENU per visualizzare il menu OSD.
Utilizzare le frecce SU / GIU’ per selezionare il menu/sottomenu
desiderato, quindi premere il tasto MENU per entrare nei menu.
Utilizzare le frecce SU / GIU’ per variare i parametri.
4.1 Menu principale
4.1.1 Menu COLOR
Selezionare COLOR con le frecce, quindi premere il tasto MENU.
4. OSD MENU
Press the MENU button to bring up the OSD Menu.
Press UP / DOWN arrow keys to select the menu/submenu you
want.
Press UP / DOWN arrow keys to adjust menu parameters.
4.1 Main menu
4.1.1 COLOR menu
Select COLOR using arrows then press MENU key.

MANUALE TECNICO - LCD21 - 090000817 - TECHNICAL MANUAL
7
Contrasto
Permette la regolazione tra le aree illuminate e le aree scure di
una immagine. Agire sulla barra per selezionare il valore desiderato.
Luminosità
Permette la regolazione delle zone d’ombra e luminose.
Consiglio: usare il controllo Luminosità per visualizzare dei det-
tagli in una zona scura dell’immagine, insieme al comando Contras-
to per illuminaare corrrettamente l’immagine senza causare
disturbo e alterazioni del bianco.
Imposta colore
Impostazione dell’intensità dei colori RGB.
Imposta temperatura
Imposta temperatura colore: 9300, 6500, 5800, sRGB, USER.
Indietro
Uscita dal menu COLOR.
4.1.2 Menu IMMAGINE
Selezionare IMAGE SETTING con le frecce, e premere il tasto MENU.
Contrast
Permits adjustment for contrast between light or dark areas of
the picture. Use bottom bar to set new values.
Brightness
Adjusts the overall picture shade and brightness.
Tip: Use the Brightness to make details in the dark areas of the
picture to be just visible, and Contrast to "brighten" the picture with-
out causing noises and foreheads to turn white.
Color adjust
Adjust RGB color deepness.
Color Temperature
Adjust color temperature: 9300, 6500, 5800, sRGB, USER.
Back
Exit COLOR menu.
4.1.2 IMAGE SETTING menu
Select IMAGE SETTING using arrows then press MENU key.

8
MANUALE TECNICO - LCD21 - 090000817 - TECHNICAL MANUAL
Clock
Regolazione dell’estensione verticale dell’immagine a schermo.
Fase
Regolazione dell’estensione orizzontale dell’immagine a scher-
mo.
Nitidezza
Regolazione della luminosità e del fuoco delle immagini.
Posizione orizzontale
Regolazione della posizione orizzontale delle immagini.
Posizione Verticale
Regolazione della posizione verticale delle immagini.
Indietro
Uscita dal menu IMAGE SETTING.
4.1.3 Menu OSD
Selezionare OSD MENU con le frecce, e premere il tasto MENU.
Posizione orizzontale OSD
Regolazione della posizione orizzontale del menu.
Posizione verticale OSD
Regolazione della posizione verticale del menu.
Timer OSD
Imposta il tempo di visualizzazione del menu.
Lingua
Imposta la lingua del menu: inglese, francese, ecc.
Indietro
Uscita dal menu OSD.
Clock
Adjust image distortion appearing as vertical on the screen.
Phase
Adjust image distortion appearing as horizontal on the screen.
Sharpness
Adjust the clarity and focus of the screen images.
H Position
Move the screen image left / right.
V Position
Move the screen image up / down.
Back
Exit IMAGE SETTING menu.
4.1.3 OSD Menu
Select OSD MENU using arrows then press MENU key.
OSD H.Position
Move the OSD menu left / right.
OSD V.Position
Move the OSD menu up / down.
OSD Timer
Set the OSD menu display time.
Language
Set the menu language: English, French, etc.
Back
Exit OSD menu.

MANUALE TECNICO - LCD21 - 090000817 - TECHNICAL MANUAL
9
4.1.4 Menu SORGENTE SEGNALE
Selezionare il menu SIGNAL SOURCE con le frecce, e premere il
tasto MENU.
Selezionare la sorgente desiderata:
D-SUB = VGA
DVI = DVI-D
HD = HDMI FullHD
INDIETRO
Uscita dal menu SIGNAL SOURCE.
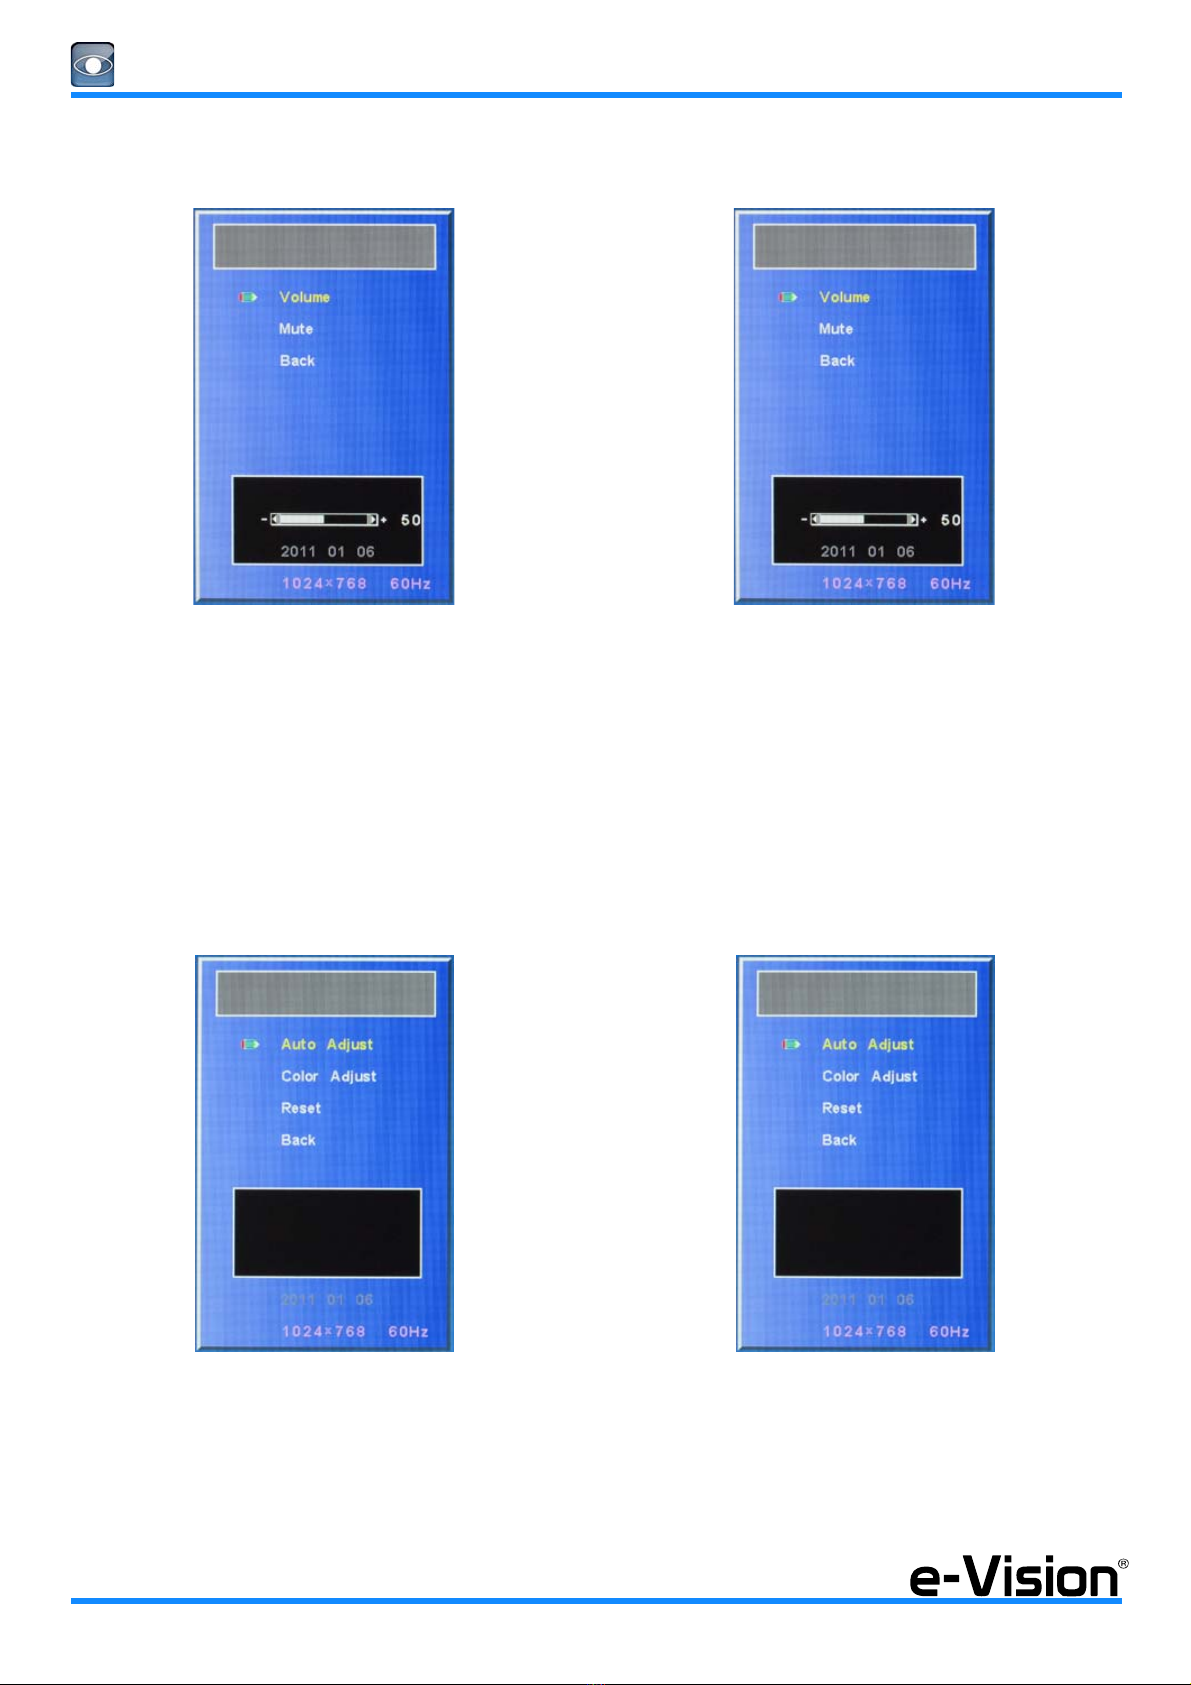
4.1.5 Menu AUDIO
Selezionare il menu AUDIO quindi premere il tasto MENU.
4.1.4 SIGNAL SOURCE Menu
Select SIGNAL SOURCE menu using arrows then press MENU
key.
Select signal source:
D-SUB = VGA
DVI = DVI-D
HD = HDMI FullHD
BACK
Exit SIGNAL SOURCE menu.
4.1.5 AUDIO Menu
Select AUDIO menu using arrows then press MENU key.
10
MANUALE TECNICO - LCD21 - 090000817 - TECHNICAL MANUAL
VOLUME
Regolazione del volume dell’altoparlante integrato.
Agire sulla barra per selezionare il valore desiderato.
MUTO
Disattivazione dell’uscita audio.
INDIETRO
Uscita dal menu AUDIO.
4.1.6 Menu MISC
Selezionare il menu MISC quindi premere il tasto MENU.
REGOLAZIONE AUTOMATICA
Regolazione automatica immagine.
REGOLAZIONE COLORE
Regolazione colori delle immagini.
VOLUME
Control built-in speakers output volume.
Use bottom bar to set new values.
MUTE
Disable the unit sound output.
BACK
Exit AUDIO menu.
4.1.6 MISC Menu
Select MISC menu using arrows then press MENU key.
AUTO ADJUST
Automatic adjustment of images.
COLOR ADJUST
Adjustment of images color.
Inhaltsverzeichnis


