Ezee Glow Celestial 36 Bedienungsanleitung

1
Rev B

2
When using electrical appliances basic precautions should be followed to reduce the risk of re, electric
shock and injury to persons, including the following:
• Read all instructions before using this heater.
• This heater is hot when in use. To avoid burning, do not touch hot surface. If provided, use handles
when moving this heater. Keep combustible materials, such as furniture, pillows, bedding, paper,
clothes and curtains at least 1m from the front of the heater and keep them away from the sides and
rear. In order to avoid over heating, do not cover the heater.
• Extreme caution is necessary when any heater is used near children or the inrm and whenever the
heater is left operating and unattended.
• Always unplug heater when not in use.
• Heater must not be located immediately below a socket-outlet.
• Do not operate heater with a damaged cord, plug or after the heater malfunctions or has been dam-
aged in any manner. Return heater to authorized service facility for examination, electrical/ mechanical
adjustment and repair.
• Indoor use only, do not use outdoors.
• This heater is not intended for use in bathrooms, laundry areas or similar indoor locations. Never locate
heater where it may fall into a bathtub or other water container.
• Do not run cord under carpeting. Do not cover cord with throw rugs, runners or similar coverings. Ar-
range cord away from trac areas, where it will not be tripped over.
• To disconnect heater, turn controls to off, then remove plug from outlet.
• Do not insert objects into any ventilation or exhaust openings, as this may cause an electric shock, re,
or damage the heater.
• To prevent a possible re, do not block air intakes or exhaust in any manner. Do not use on soft surfac-
es like a bed, where openings may become blocked.
• The heater has hot, arcing parts inside. Do not use it in areas where ammable liquids are used/stored.
• Use this heater only as described in the manual. Any other use not recommended by the manufacturer
may cause re, electric shock or injury to persons.
• DANGER - High temperatures may be generated under abnormal circumstances. Do not partially or
fully cover/ obstruct the front of this heater.
• This appliance is not intended for use by persons (including children) with reduced physical/ sensory
capabilities or by those with a lack of experience/ knowledge, unless they are provided with supervision
and instruction concerning use of the appliance by a person responsible for their safety.
• CAUTION - In order to avoid a hazard due to inadvertent resetting of the thermal cut-out, this appliance
must not be supplied through an external switching device, such as a timer, or connected to a circuit
that is regularly switched on/off by the utility.
Important Safety Information

3
WARNING - The heat functions H1 and H2, do not control the room temperature. Thermostat function
must be set-up to control room temperature. We recommend you do not use this heater in small rooms
when they are occupied by persons not capable of leaving the room on their own, unless constant super-
vision is provided.
Children less than 3 years old should be kept away from the appliance. Children aged from 3-8 years shall
only switch on the appliance, provided it is properly installed, have been given instruction on how to use it
and understand the hazards involved. Children aged 3-8 shall not plug in, clean, or perform maintenance
tasks on the appliance.
CAUTION - Some parts of this product can become very hot and cause burns. Particular attention must
be given when children and vulnerable people are present.
Electrical connections - UK plug wiring instruction
• If the plug must be changed because it is not suitable for your socket, or due to damage, please
follow the wiring instruction shown on this page. Cord length is 1.8m and exits the unit on the
right/ back of the re.
• The wires in the mains lead are coloured in accordance with the following code:
Brown: Live (L)
Blue: Neutral (N)
Green/Yellow: Earth (E)
As the colours of the wires in the mains lead of this appli-
ance may not correspond with the coloured markings
identifying the terminals in your plug, please see below:
• The BLUE wire is the NEUTRAL and must be con-
nected to the terminal which is marked with the
letter N or coloured BLACK.
• The BROWN wire is the LIVE and must be con-
nected to the terminal that is marked with the
letter L or coloured RED.
• The GREEN/YELLOW must be connected to the
terminal which is marked E or the earth symbol or
coloured GREEN or GREEN/YELLOW.
• Always ensure that the cord grip is positioned and
securely fastened.
• WARNING - THIS APPLIANCE MUST BE EARTHED.
• If a 13A (BS1363) fused plug is used it must tted with a BS1362 13A fuse. If in doubt consult a
qualied electrician.
Any electrical repairs or replacements must only be performed by one of our pre-approved
repairmen.
Important Safety Information

4
Key features
• 4 sizes - 36”, 50”, 60” & 72”.
• 1-sided, 2-sided and 3-sided built-in tting options.
• Energy Related Products (ERP) compliant.
• 11 fuel-bed effect settings & 5 brightness settings.
• 3 ame effect settings & 5 brightness settings.
• 11 downlight effect settings & 5 brightness settings.
• 3 ame speed settings.
• 2 heat settings.
• 7 day, 24hr programmable timer.
• Adjustable thermostat.
• Open window sensor.
• Over-heat safety cut-out.
Technical specication
• AC 220-240V, 50Hz.
• 1400-1600W heat output.
• W926mm, W1266mm, W1520m and W1826mm x H256mm
ame effects.
• LED ame effect, fuel-bed and downlights.
Key Features & Technical Specication

5
First things rst...
1. Decide where the re will be tted and measure the space
using the dimensions in this manual, making sure it ts.
2. Remove the re unit from the box and place it on a clean,
soft, dry surface.
3. Check the parts list to make sure you have all the parts
you need.
4. Recycle all packaging material at your local recycling cen-
tre.
Warning - This product includes several glass panels. Use ex-
treme caution when handling. Failure to do so could result in
personal injury or property damage.
Preparation

6
Required tools for installation:
• Phillips screwdriver
• Tape measure
• Spirit level
• Masonry or drywall screws, depending on your type of wall
• Circular saw or hand saw
• Drill and drill-bit set
Parts
B - Screws C - Drywall Anchors
A - Fire unit D - Remote Control
E - Logs F - Decorave Crystals G - Decorave Charcoal
H - ‘L-shape’ metal bracket I - Instrucon manual
Parts & Hardware

7
CELESTIAL RANGE DIMENSIONS (MM)
MODEL
NUMBER
ABCDEFG
36” 932 484 200 902 466 256 926
50” 1272 484 200 1242 466 256 1266
60” 1526 484 200 1496 466 256 1520
72” 1830 484 200 1800 466 256 1826
Dimensions
8
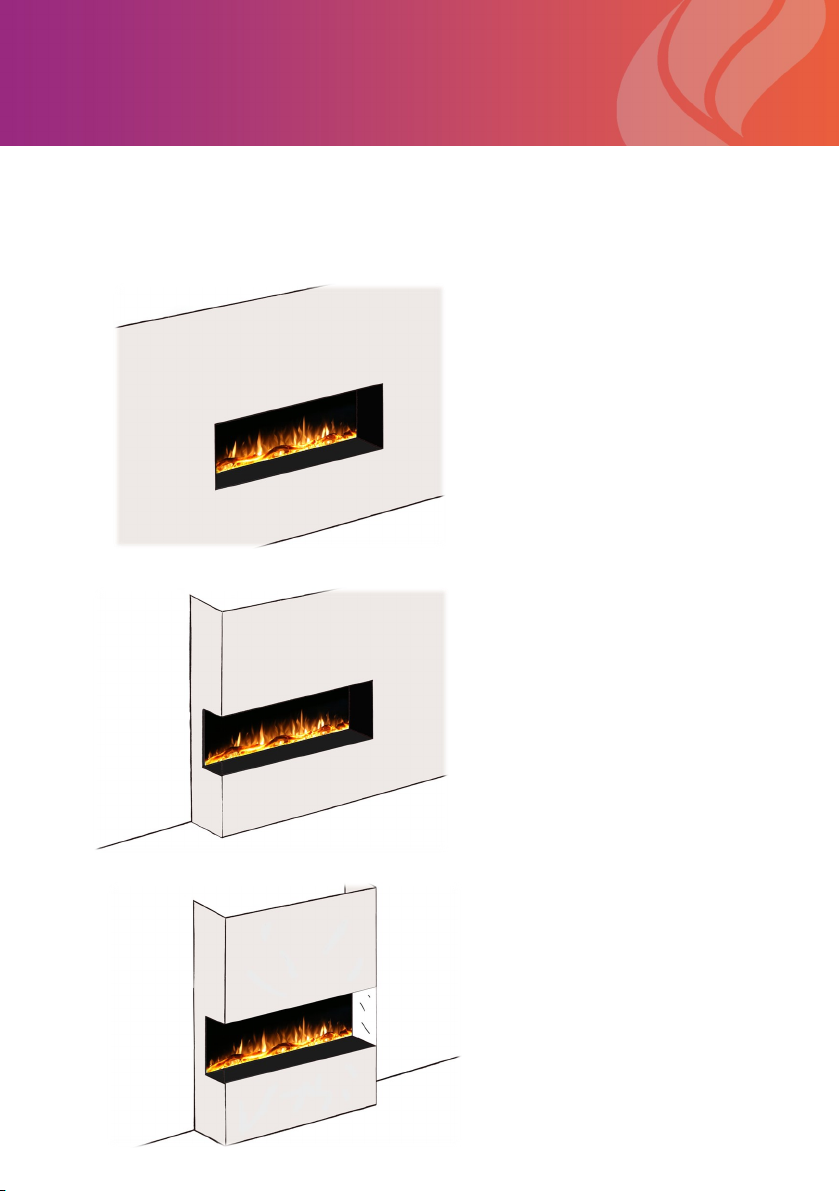
Your appliance allows for three installation congurations.
One sided
Glass exposed on the front
only.
Two sided
Glass exposed on the front
and left or right sides.
Three sided
Glass exposed on the
front, left and right sides.
Installation Overview

9
Your appliance is a recessed and/or mantel installed appli-
ance. Select a suitable location that is not susceptible to
moisture build-up. It must be located enough distance away
from curtains, furniture and high trac areas.
Note - Follow all local and national electrical regulations/
codes.
Note - A frame can be constructed that is ush with the re
unit on top, bottom and sides, as long as the vents on the
re unit are not obstructed and the frame is hollow to allow
for air-ow.
Note - We recommend you don’t place soft furnishings di-
rectly in front of the heater outlet.
MINIMUM CLEARANCES (MM)
Bottom 0
Sides 0
Back 30
Top (see notes above) 100
Front (Measured from glass, plas-
terboard is exempt) 200
Installation - Minimum Clearances

10
Note - Appliance is not load bearing. Carefully consider weight of nishing materi-
als when constructing rough framing.
Note - Ensure installation complies with all local building codes and requirements.
Note - The framing dimensions above applies to all three types of installation. The
illustration represents the three sided installation, but if one or two sided installa-
tion is preferred, simply extend the frame further on the closed glass side.
FRAMING DIMENSIONS (MM)
MODEL NAME WHD
Celestial 36” 935 490 245
Celestial 50” 1275 490 245
Celestial 60” 1529 490 245
Celestial 72” 1833 490 245
Installation - Rough framing
Andere Handbücher für Celestial 36
1
Dieses Handbuch passt für folgende Modelle
3
Inhaltsverzeichnis


