EZER Horus+ Scope Bedienungsanleitung

Horus+Scope
Digital Eye Fundus Camera
User Manual
DOC. No. 2014.01-A
Copyright@2014 MiiS Inc.
All right reserved.

Contents
Preparations
•Beforeuse 5
• Namesofcomponents 7
• Chargingthebattery 10
• Powerindicator 11
• Assembling 12
• UsingtheSetupmode 13
• EnteringthepatientID 18
Taking pictures
•Sequenceofoperations 21
• Photomode 22
• Videomode 23
• Fixationsettingandholdingposition 24
• Q&Atroubleshooting 26
Playback
•Displaymode 27
• Enlargedviewing 27
• Deletingpictures 28
Miscellaneous
•Filestransferring 29
• Viewingonacomputer/laptopscreen 29
• ViewingonaTVscreen 29
• Usagecautionsandnotes 29
• Technicaldescription 33
• Liability 34
• Disposition 34
• Symbolsandstandards 34

-4- -5-
Preparations
Preparations
Before use
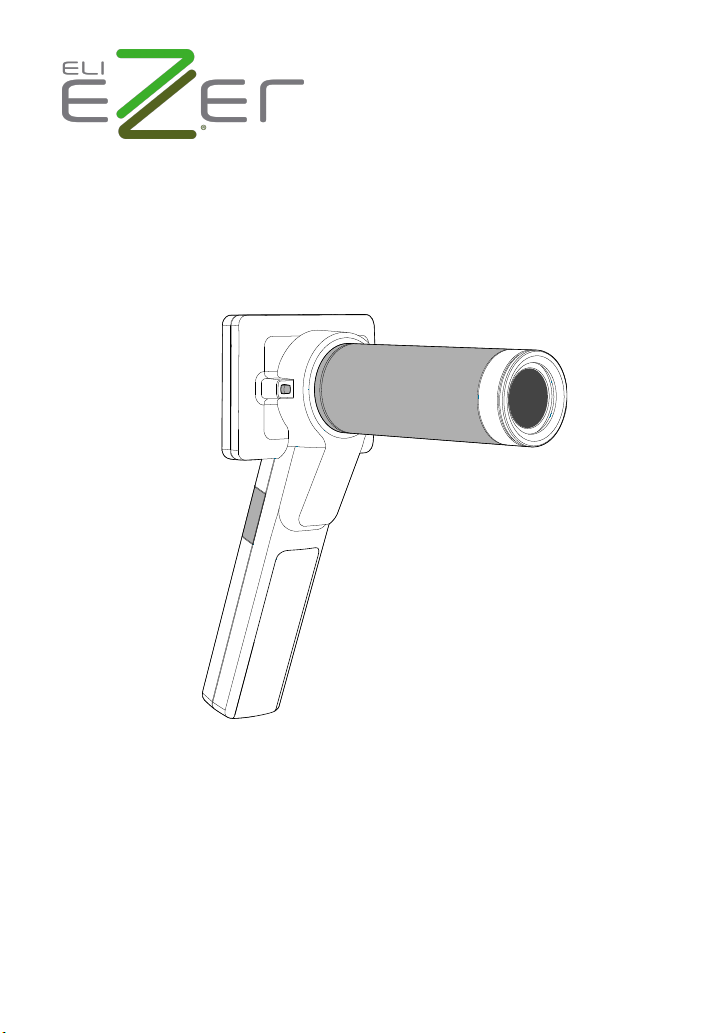
Prior to installaon and start-up of the digital eye fundus camera, carefully read the user
manual. As with all technical devices, the proper funcon and safety operaon of this device
depend on the user complying with the safety recommendaons presented in these operang
instrucons. In addion, please make sure it does not appear damaged or broken. If there are
breaks on the outer casing or other visual defects, please contact the manufacturer or a cer-
ed service facility.
Camera handling
Protect the camera from excessive vibraon, force, or pressure.
Avoid using the camera under the following condions, which may damage
the lens, the monitor, or the control unit and may also cause the camera to
malfuncon or prevent recording:
•Dropping or hing the camera against a hard surface
•Exerng excessive force on the lens or the monitor
The camera is not dust resistant, splash resistant, or waterproof. Avoid using the camera in
places with excessive dust or sand, or where water can come into contact with the camera.
Avoid using the camera under the following condions, which present the risk
that sand, water, or foreign material entering the camera through the lens or
gaps around buons. Be especially careful because these condions may dam-
age the camera, and such damage may not be repairable:
•In extremely dusty or sandy places
•Exposing the camera to rain or moisture
Condensaon (when the lens or the monitor is fogged up)
Condensaon may occur when the camera is exposed to sudden changes of temperature or
humidity. Avoid these condions because they may soil the lens or the monitor, cause mold,
or damage the camera.
If condensaon does occur, turn o the camera and wait for about two hours before using it.
Once the camera adjusts to the surrounding temperature, the fogging will clear naturally.
Safe eye screening
While no acute optical radiation hazards have been identified with the camera EZ-Horus 45, it
is recommended that the intensity of light directed into the patient’s eye be limited to the
mini-mum level necessary for diagnosis. Infants, aphakes, and persons with diseased eyes are
at greater risk. The risk may also be increased if the person being examined has had any
exposure to the same instrument or any other ophthalmic instrument that uses a visible light
source within the previous 24 hours. This will apply particularly if the eye has been exposed to
retinal photography. The intended use of this device is for routine ophthalmic exams of
typically less

-6- -7-
Preparations
than 60 seconds per eye. While any medical procedure has its benet versus risk factor, more
complicated exams should not exceed three minutes of exam me within 24 hours. Signicant
use of this device beyond its intended use is not recommended as it may cause harm to the
eyes.
During the operaon of using the camera, please follow the below instrucons.
• Always use the camera or accessories in accordance with the direcons and
recommendaons contained in this user manual.
• When operang the device, please make sure that the opcal lens does not
touch the eyes or nose of the paent in order to avoid harm.
• For illumination and photography with the EZ-Horus 45, do not select an
exposure higher than required. Do not shine light on the eye beyond the
recommended me during examinaon. Otherwise, the examined eye may
experience pain or be injured.
No compensaon for missed shots
We cannot compensate for missed shots if technical problems with the camera or card pre-
vent recording.
Also refer to “Usage cauons and notes”
Please also refer to “Usage cauons and notes” (→ 29) for more instrucons of the baery,
SD card, etc.
Please note that the actual controls and components, menu items, and
other informaon of your camera may dier from those in the illustraons
provided in these instrucons.
Names of components
Scope of Delivery
Product Name Model Name Accessories
Digital eye fundus
camera
Horus+ Scope EZ-
Horus 45
1. Eyecup
2. Baery
3. Power adapter
4. USB cable
5. AV cable
6. Charging staon
7. SD card
8. Foot switch (Oponal part)
9. Slit lamp Jig (Oponal part)
Intended for use
Horus+ Scope EZ-Horus 45 is a digital hand-held eye fundus camera used to record digital
photographs and video of fundus (including retina, macula, and optic disc) of the human
eye and surrounding area.
User interface
Control Unit (Horus+ Scope EZ-Horus 45)
Top view ››
Power buon
Lens lock

-8- -9-
Preparations
From view ››
3.5” LCD touch panel
Manual focus (-20D ~ +20D)
OK buon:
• Press down halfway
for auto focus
• Completely press down
to take a photo
• Back to photo/video mode
while previewing photos
Power indicator
Brightness decrease/increase
in photo mode (0B ~ 15B)
Boom view ››
AV out / foot switch
Mini USB
Strap hook
Optical Lens of Horus+ Scope EZ-Horus 45 (Digital Eye Fundus Camera)
Lens connect ring
Contact
surface Lens assembling mark
Signal pad
Rear view ››
Lens assembling mark
Cover glass and sensor
Lens connect ring
Lens connecng pins
Baery cover
‹‹ SD slot

-10- -11-
Preparations
Charging the battery
Always charge before rst use
Prior to rst use, insert the baery into the control unit and close the baery cover referred to
the below secon. Connect USB connector to the power adapter. Let the baery be charged
for at least ve hours.
Baery replacement
Open the baery cover by digging out the gap in the boom of baery cover with a nger or
something pointed.
•Tilt the baery cover and remove the baery cover by liing it up.
•Remove the original baery and replace a new baery along the correct direcon.
•Place the baery cover and secure it in place.
Power indicator
System status Power o Power on
Light color
No light Orange light Blue light Blinking blue
light
Mixed blue
and
orange light
Informaon System o Charging Normal opera-
on
Power less
than 25%
Connect to PC
via USB cable
or enable USB
live video
Power indicator
Connect to a power adapter

-12- -13-
Preparations
Assembling
Step 1. ↘
Align the marks of the opcal lens and control unit.
Mark on the
opcal lens
Mark on the control unit
Step 2. →
Hold the opcal lens and aach it to
the control unit. Rotate and fasten the
opcal lens in a clockwise direcon.
You will hear a click when the lens locks
into the control unit.
Step 3. ←
Turn on the power (→ 13). When
opcal lens and control unit are
assembled correctly, the informaon
icons will appear on the top of LCD touch
panel. The screen will turn on, and then the blue light of the
power indicator (→ 11) will also turn on.
Step 4. →
To unlock the opcal lens,
press the lens lock and then
rotate the opcal lens in a
counterclockwise direcon.
Then the opcal lens will be
unfastened.
Using the Setup mode
Turn on the power
To turn on the system, press the power buon (→ 7) to turn on the control unit. Approxi-
mately one to two seconds later, the boot screen will appear on the LCD panel.
Once the LCD panel shows the live image, it takes about 10 seconds for the on-screen display
(OSD) to be superimposed.
→ 10 seconds →
Enter the Setup mode
Using the [Setup] menu
It is recommended that all seng items are set according to user’s requirements for
rst-me use.
Bring up the [Setup] menu
Touch the photo icon and then touch the setup icon.

-14- -15-
Preparations
Exit the [Setup] menu
Once a seng adjustment is made, the new value aects the system immediately.
Use the upper back buon or the OK buon to exit the screen.
Sengs
[Aiming Light/Capture Light]
The default setting of [Aiming Light/Capture Light] is [IR/White LED]. In the setting,
EZ-Horus 45 employs IR illumination for alignment and focusing to assure patient
comfort. With IR, the user observes fundus images monochromatically. At the
moment of press-ing the shutter button, the system will turn on the white LED
instantly. Static images and motion pictures will be captured in full color.
If the seng is [White LED/White LED], then the user observes images in full color and
capture stac images and moon pictures in full color.
Sample images of monochrome and full color.
[Picture Color Temperature]
The picture color temperature has three levels; the default seng is medium.
[Low] sets the color temperature for a warmer color tone. [High] sets the color tem-
perature for a cooler tone.
[IR brightness]
The IR brightness has three levels; the default seng is low.
[UVC]
When you connect EZ-Horus 45 to a computer via USB cable, the product works as a
USB storage device. If UVC mode is on, pictures can be shown both on the LCD panel
of the product and the screen of the computer.
To display image on the computer, please install webcam applicaon prior to enabling

-16- -17-
Preparations
UVC mode. A freeware webcam applicaon (e.g., AMCap) is a soware that can re-
ceive UVC signal on the computer. User can search for relevant informaon over the
Internet.
[Standby]
User can set standby mode to be on or o. Once the mode is on, the LCD panel will be
turned o if the system is idle for three minutes. Tap on the item to toggle the seng.
[Date Seng]
User can change the current date seng from the screen.
[Time Seng]
User can change the current me seng from the screen.
[Format SD Card]
User can format the SD card.
NOTE
All informaon will be deleted aer SD card is formaed.
[Factory Seng]
User can recover the device to its factory sengs.

-18- -19-
Preparations
Entering the patient ID
Using patient ID as partial file name is supported in EZ-Horus 45.
File naming rule
Model Name Picture Name without ID Picture Name with ID
Eye
fundus
camera
EZ-Horus 45 ELHHMMSS.jpg
ERHHMMSS.jpg
ELXXXXXXXXXXHHMMSS.jpg
ERXXXXXXXXXXHHMMSS.jpg
Meaning of each symbol:
Symbol Meaning
EL Le eye photo taken by the eye fundus camera
ER Right eye photo taken by the eye fundus camera
HH Hour
MM Minute
SS Second
XXXXXXXXXX Paent ID, up to 10 characters.
Example:
E L 1 6 1 4 3 1 .jpg E L ABCD12345 1 6 1 4 3 1 .jpg
No ID ID: ABCD12345
Eye, Le
Hour
Minute
Second
Paent IDEye, Le
Hour
Minute
Second
The image name is explained as follows:
EL: Le eye photo taken by the eye fundus camera; hour: 16; minute: 14; and sec-
ond: 31.
If the given paent number is ABCD12345, the image name would be wrien as
ELABCD12345161431.jpg.
Create a new paent ID from scratch
By gently pressing the OK buon, the user always goes back to a shoong mode, either photo
or video mode; from the top informaon icons, tap to start the process.
Create a new paent ID on an exisng one
Aer a paent ID is set, the user can quickly create a new paent ID that is based on the exist-
ing ID plus 1 e.g., ABCD12345 → ABCD12346.
Inhaltsverzeichnis


