
Fri-Jado COLD DELI CD 3 Self Bedienungsanleitung

Service Manual Cold Deli CD3/4/5 form 9123583 rev.4/2015
WWW.FRIJADO.COM
SERVICE MANUAL
- NOTICE -
This manual is prepared for the use of trained Service Technici-
ans and should not be used by those not properly qualified. If
you have attended a trianing for this product, you may be quali-
fied to perform all the procedures in this manual.
This manual is not intended to be all encompassing. If you have
not attended a training for this product, you should read, in its
entirety, the repair procedure you wish to performto determine
if you have the necessary tools, instruments and skills required
to perform the procedure. Procedures for which you do not have
the necessary tools, instruments and skills should be performed
by a trained technician.
Reproduction or other use of this Manual, without the express
written consent of Fri-Jado, is prohibited.
MODELS
Premium curved and square
Essential curved and square
Self Service curved and square
COLD DELI 3/4/5 MERCHANDISERS
CD 3 Self service on underframe CD 5 Square on underframe

Page 2 Service Manual Cold Deli CD3/4/5 form 9123583 rev.4/2015
Page 3
Service Manual Cold Deli CD3/4/5 form 9123583 rev.4/2015
TABLE OF CONTENTS
Versions
Version Issue date
dd/mm/yy
Remarks
09/2007 01/09/2007 First release.
04/2015 01/04/2015 Curved models extended. Square models added.

Page 4 Service Manual Cold Deli CD3/4/5 form 9123583 rev.4/2015
TABLE OF CONTENTS
Index .......................................................................................................................................................... 4
General technical data.............................................................................................................................. 5
Technical data ....................................................................................................................................... 5
Programming instructions........................................................................................................................ 6
Removal and replacement of parts ........................................................................................................ 7
Panels left, right and middle back side ................................................................................................ 7
Contactor................................................................................................................................................ 7
Electronic ballast for lighting................................................................................................................ 8
Thermostat Danfoss EKC 102C .............................................................................................................. 8
Tumble switch light and cooling........................................................................................................... 9
Blower plate........................................................................................................................................... 9
Temperature sensor ............................................................................................................................. 10
Defrost sensor ...................................................................................................................................... 11
Blower(s)............................................................................................................................................... 12
Replacing a lamp ................................................................................................................................. 13
Gas spring............................................................................................................................................. 13
Front grip magnets curved model ...................................................................................................... 14
Curved glass ......................................................................................................................................... 14
Curved glass (alternative procedure when torques key is not available)............................. 15
Gas spring square model..................................................................................................................... 16
Front glass door square model ........................................................................................................... 17
Protection profile in front (bumper) .................................................................................................. 18
Side plate left and right, front side .................................................................................................... 18
Installation of optional parts ................................................................................................................. 19
Sliding doors for Essential model ....................................................................................................... 19
Evaporation drip tray .......................................................................................................................... 22
Electrical tests and service procedures.................................................................................................. 23
PTC 1K sensor test............................................................................................................................... 23
Temperature standard compliance..................................................................................................... 23
Adjusting Danfoss EKC 102C thermostat ........................................................................................... 24
Danfoss EKC 102C settings (part 1)..................................................................................................... 25
Danfoss EKC 102C settings (part 2)..................................................................................................... 26
Control location full serve and self serve ........................................................................................... 26
Troubleshooting ...................................................................................................................................... 27
Cold Deli 3/4/5 full serve & self serve.................................................................................................. 27
Exploded views and partlists................................................................................................................. 28
Cold Deli 3-4-5 Essential Square components drawing ..................................................................... 50
Cold Deli 3-4-5 Essential Square components drawing ..................................................................... 52
Cold Deli 3-4-5 Premium Square components drawing .................................................................... 54
Cold Deli 3-4-5 Premium Square components drawing .................................................................... 58
Circuit diagram CD 3............................................................................................................................ 60
Circuit diagrams ...................................................................................................................................... 60
Circuit diagram CD 3 remote .............................................................................................................. 61
Circuit diagram CD 4............................................................................................................................ 62
Circuit diagram CD 4 remote .............................................................................................................. 63
Circuit diagram CD 5............................................................................................................................ 64
Circuit diagram CD 5 remote .............................................................................................................. 65
INDEX

Type CD 3 CD 4 CD 5
Power (W) Self Service 900 1100 1200
Power (W) Essential 900 1100 1200
Power (W) Premium 1500 1700 1800
Fuses needed with power connection
230V, 1N ~ 50Hz (1 phase with zero)
1x 10 A 1x 10 A 1x 10 A
Standard plug from factory single pole Two-pole
earthed plug
16 A
Two-pole
earthed plug
16 A
Two-pole
earthed plug
16 A
sound pressure (dB(A)) < 70 < 70 < 70
Temperature class Self Service* 2M2 2M2 2M2
Temperature class Full Service* 3M1 3M1 3M1
Net weight Self Service (kg) 200 230 275
Net weight Essential (kg) 195 kg 225 kg 265 kg
Net weight Premium (kg) 235 kg 245 kg 305 kg
Gross Weight Self Service (kg) 235 kg 271 kg 324 kg
Gross Weight Essential (kg) 229 kg 265 kg 312 kg
Gross Weight Premium (kg) 276 kg 288 kg 359 kg
Heigth (mm) 1265 1265 1265
Width (mm) 1086 1419 1752
Depth curved model (mm) 1058 1058 1058
Depth square model (mm) 1063 1063 1063
Heigth with basis (mm) 1420 1420 1420
Maximum Loading height (mm) 100 100 100
Refrigirant** R134A R134A R404A
Amount of refrigirant (kg) 0.625 0.75 0.85
* Product temperature class according to NEN-EN 441-6
** The refrigerant complies with the environmental requirements applicable at the time of manufacturing of the unit.
Page 5
Service Manual Cold Deli CD3/4/5 form 9123583 rev.4/2015
GENERAL TECHNICAL DATA
TECHNICAL DATA
Tools
• Standard set of tools.
• Metric wrenches, sockets and hex socket key wrenches.
• Multi meter and AC current clamp meter.
• Temperature tester.
• Insulation value tester (megger)
This manual covers the Cold Deli Merchandisers. The Merchandisers are available in 3 sizes
which can be built into existing counters. Merchandisers can also be delivered on an under
frame.
The Merchandisers are available in 3 models:
• Self Service
• Essential
• Premium
All of the information, illustrations and specifications contained in this manual are based on
the latest product information availble at the time of printing.
GENERAL TECHNICAL DATA
PROGRAMMING INSTRUCTIONS
Page 6 Service Manual Cold Deli CD3/4/5 form 9123583 rev.4/2015
PROGRAMMING INSTRUCTIONS
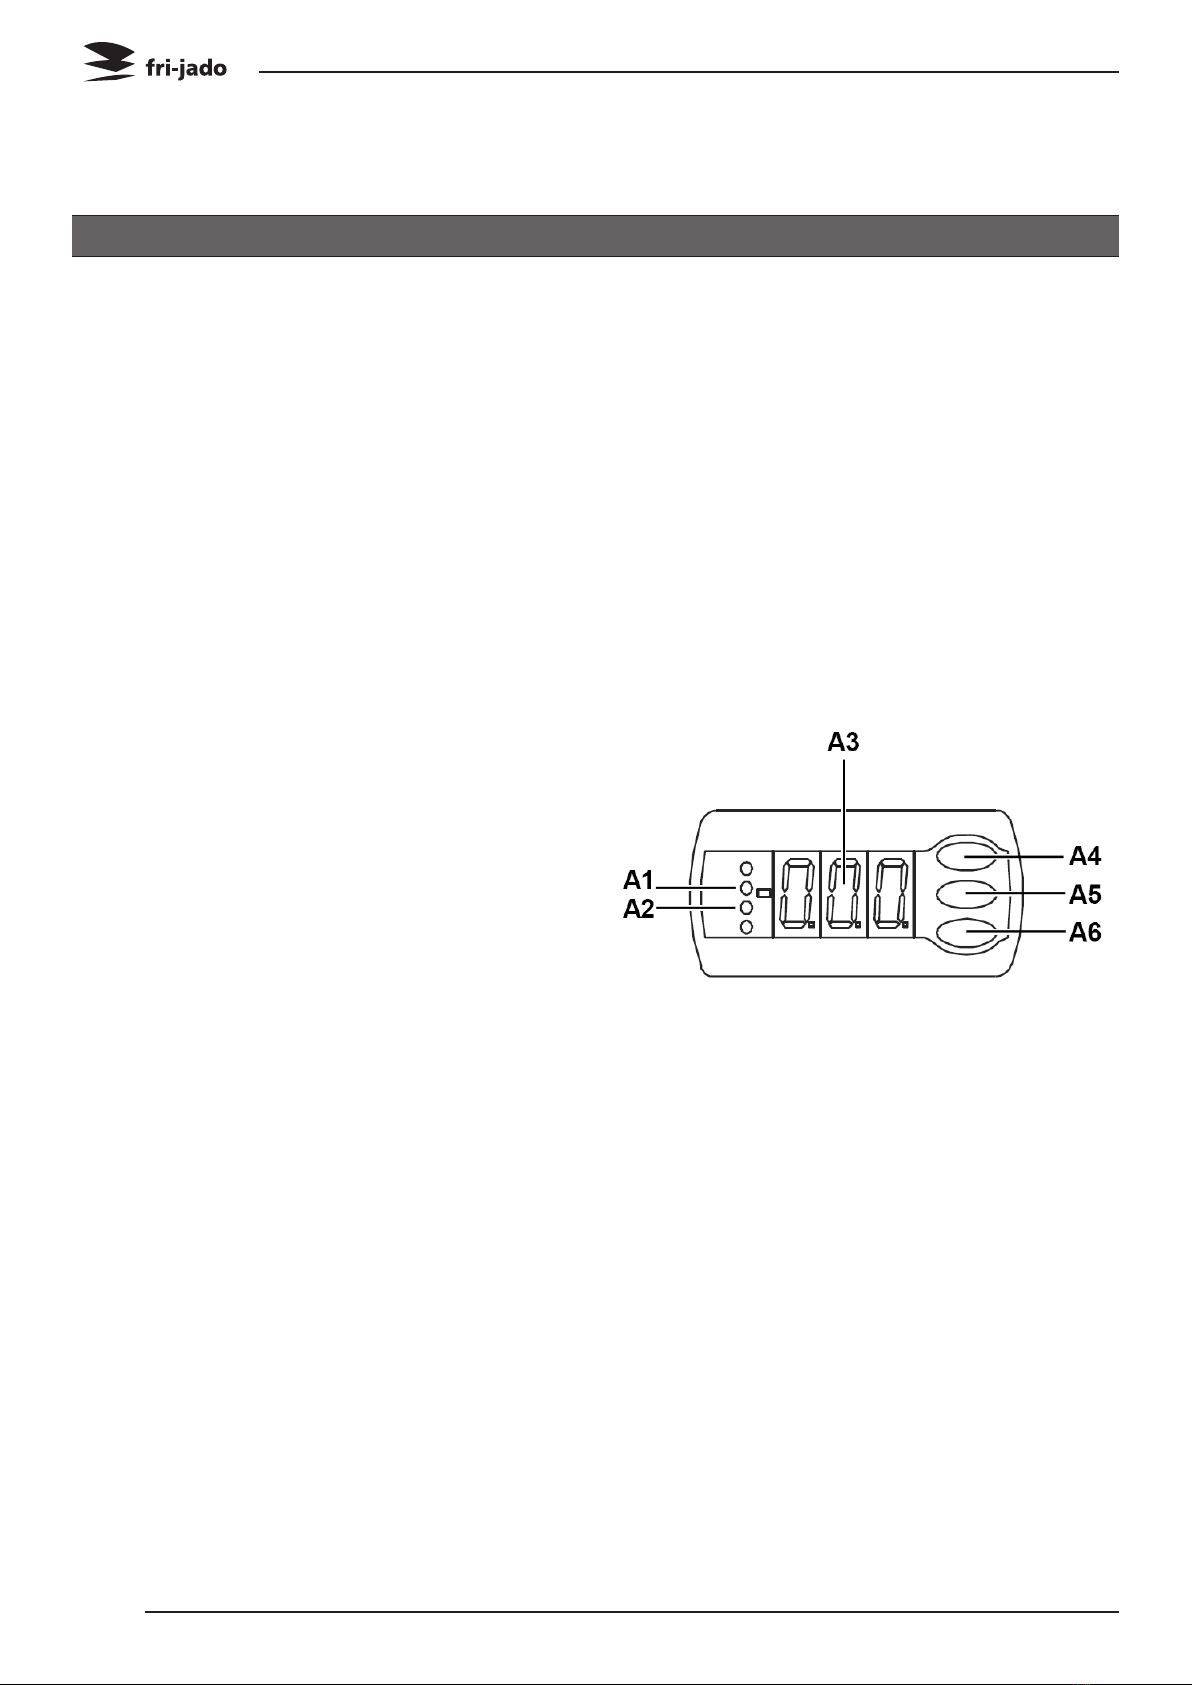
DISPLAY ALL MODELS
Switch on
1. Switch on the cooling with switch A7.
2. Switch on the lighting with switch A8.
Switch off
1. Switch off the lighting with switch A8.
2. Switch off the cooling with switch A7.
Check set temperature
During use the temperature is shown on dis-
play A3.
1. Press centre key A5.
The set temperature will be shown on the
display. The measured temperature will be
shown again after 20 seconds.
Check machine status
When the cooling unit has been switched on,
the indicator lamp A1 is lit.
A2 is lit during automatic defrosting of the
evaporator.
Set the temperature
1. Press centre key A5. The set value will be
shown on the display.
2. Set the required temperature using the
top (A4) and bottom (A6) keys.
3. Press centre key A5 to save.
REMOVAL AND REPLACEMENT OF PARTS
Service Manual Cold Deli CD3/4/5 form 9123583 rev.4/2015 Page 7
WARNING: Disconnect the electrical power to the machine
at the main circuit box. Place a tag on the circuit box indica-
ting the circuit is being serviced.
REMOVAL AND REPLACEMENT OF PARTS
1. Remove the socket screws that secure the
panel to the frame.
2. Turn panel towards yourself.
3. Reverse the procedure to install.
Note: The panels can be lifted out from their
hinges. First lift out the hinge on the middle
panel.
PANELS LEFT, RIGHT AND MIDDLE BACK SIDE
1. Remove the left, right and center panel
according to prior procedures.
2. Disconnect the wiring on the contactor.
3. Remove the screws fixating the contactor
and remove it.
4. Reverse the procedure to install.
CONTACTOR

REMOVAL AND REPLACEMENT OF PARTS
Service Manual Cold Deli CD3/4/5 form 9123583 rev.4/2015Page 8
ELECTRONIC BALLAST FOR LIGHTING
1. Remove the left panel according to prior
procedure.
2. Disconnect the wiring to the electronic
ballast.
3. Remove the screws securing the electronic
ballast and remove it.
4. Reverse the procedure to install.
Note: The screws are located underneath the
wiring.
Note: For better access it might be required
to remove the middle panel as well.
1. Remove the left and right hand panel ac-
cording to prior procedure.
2. Remove the left and right back panel by
lifting them out of the hinges.
3. Remove the socket screws that secure the
middle panel and turn the panel towards
yourself.
4. Loosen the blocking clips on the sides
of the thermostat and remove the ther-
mostat.
5. Disconnect the wiring.
6. Reverse the procedure to install.
Note: Set all parameters in the new ther-
mostat.
THERMOSTAT DANFOSS EKC 102C

REMOVAL AND REPLACEMENT OF PARTS
Service Manual Cold Deli CD3/4/5 form 9123583 rev.4/2015 Page 9
TUMBLE SWITCH LIGHT AND COOLING
1. Remove the middle panel according to
prior procedures.
2. Disconnect the wiring.
3. Remove the switch by pushing the clamps
on both sides.
4. Reverse the procedure to install.
BLOWER PLATE
1. Remove the flat plate; there are two lif-
ting eyes in the front which simplify this.
2. Remove the two screws with washers fixa-
ting the blower plate.
3. Turn over the blower plate by moving the
top of the plate towards the front of the
machine.
4. Reverse the procedure to install

REMOVAL AND REPLACEMENT OF PARTS
Service Manual Cold Deli CD3/4/5 form 9123583 rev.4/2015Page 10
TEMPERATURE SENSOR
1. Remove the blower plate according to
prior procedure.
2. Loosen the nut securing the sensor and
remove the sensor.
3. Remove the rear panels according prior
procedure.
4. Disconnect the wiring of the sensor on
the thermostat and remove the sensor.
5. Reverse the procedure to install
Note 1: The sensor wiring will pass through
the polyurethane foam (also known as PUR
or Great Stuff foam), when installing the new
sensor some extra sealant should be applied
to recreate a watertight fit.
Note 2: when refitting the sensor it is easiest
to guide the wiring of the sensor through
the hole starting in the product area.
Dieses Handbuch passt für folgende Modelle
8
Inhaltsverzeichnis
Andere Fri-Jado Kaufmann Handbücher


Beliebte Kaufmann Handbücher anderer Marken


True
True GDIM-26 Bedienungsanleitung

Structural Concepts
Structural Concepts Oasis Mobile Series Montageanleitung

Hussmann
Hussmann Q2-SS Original Betriebsanleitung

Haussmann
Haussmann RL Bedienungsanleitung

Howard McCray
Howard McCray R-CDS32E-4 Bedienungsanleitung

Hussmann
Hussmann microSC SHM-A Series Bedienungsanleitung


