
friendlyway empire 19 Bedienungsanleitung

Manual friendlyway empire 19, version 1.02
2
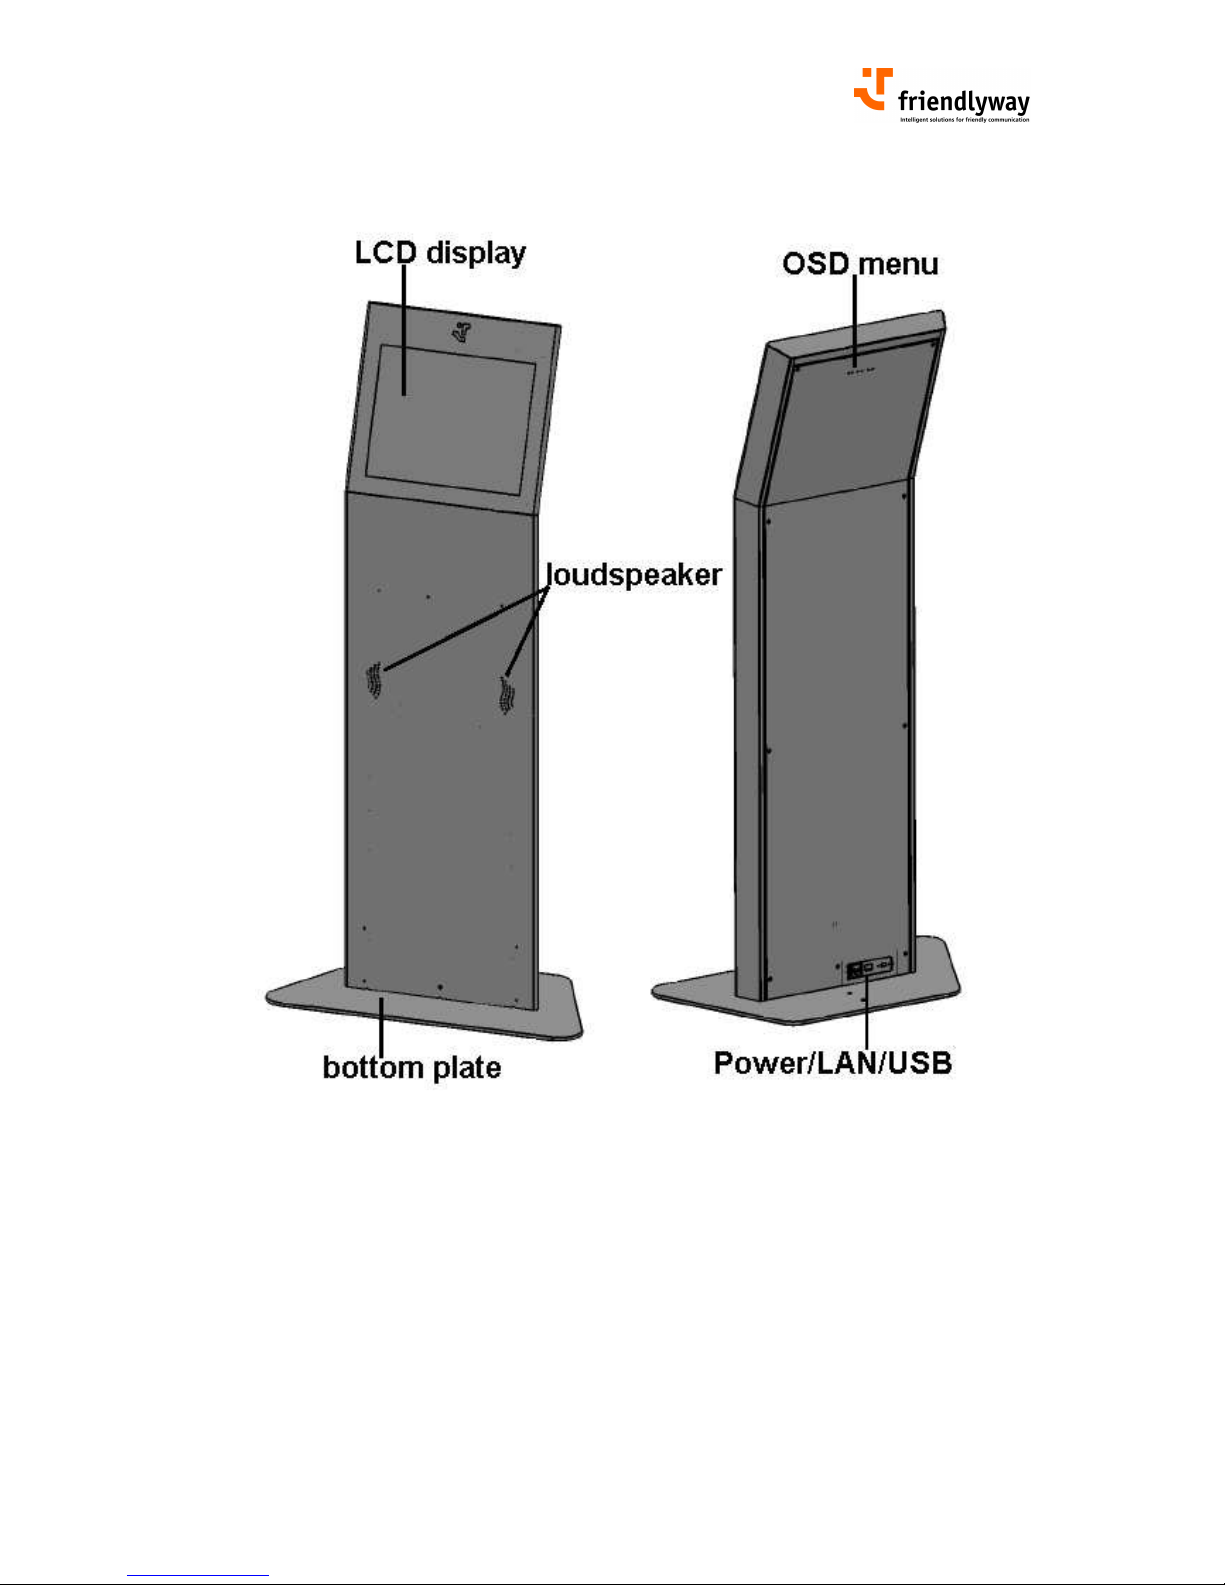
FRONT VIEW
REAR VIEW

Manual friendlyway empire 19, version 1.02
3
CONTENTS
1. Introduction .............................................................................................................................................4
1.1. Description of the product .............................................................................................................4
1.2. n the structure and content of this manual .................................................................................4
2. Important information ..............................................................................................................................5
2.1. Warnings, safety measures and ergonomics ................................................................................5
2.2. Information on care and upkeep ...................................................................................................6
2.3. Transportation ...............................................................................................................................6
3. Mounting and requirements for the surrounding area ............................................................................7
3.1. Requirements for the surrounding area ........................................................................................7
3.2. Mounting ........................................................................................................................................7
4. Connecting the unit and placing it in service ..........................................................................................8
4.1. Connecting terminal to the power supply ......................................................................................8
4.2. Connecting to the network ............................................................................................................8
4.3. Placing the PC in operation ...........................................................................................................8
5. Display settings ......................................................................................................................................9
5.1. SD control buttons and their functions .......................................................................................9
5.2. SD structure............................................................................................................................. 10
5.3. Functions on SD Menu ............................................................................................................ 11
6. Touch screen calibrating and adjusting other touch settings .............................................................. 13
6.1. Calibrating the touch screen ...................................................................................................... 13
6.2. Adjusting other touch properties ................................................................................................ 15
7. Access to PC ....................................................................................................................................... 17
7.1. Rear cover demounting .............................................................................................................. 17
7.2. Computer removing .................................................................................................................... 17
8. Variants and accessories .................................................................................................................... 18
9. Technical specifications....................................................................................................................... 19
9.1. empire 19 slim ............................................................................................................................ 19
9.2. empire 19 large .......................................................................................................................... 20
10. Warranty ............................................................................................................................................ 21
11. Contact .............................................................................................................................................. 21
Manual friendlyway empire 19, version 1.02
4
1. Introduction
1.1. Description of the product
The friendlyway empire is an interactive communication terminal for use in enclosed areas. Along with
a basic model many variants for special application purposes are available, as well as comprehensive
accessories. Please read this manual carefully before placing your terminal in service to avoid
improper operation. Be especially sure to read chapter ”Warnings, safety measures and ergonomics”.
This will help you to prevent possible damage to the unit and injury to persons due to improper
handling.
Subject to technical changes.
1.2. On the structure and content of this anual
The subject-matter of this manual is the friendlyway empire in its basic model equipped with a
multimedia PC and LCD display. If you need some information to special facilities of separate device
variants or to other accessories, please refer to respective documentation you can download from the
friendlyway homepage. This document describes how to set up and start up your terminal, what
settings are available on the monitor, how to calibrate the touch screen and adjust other touch
properties, as well as how to conduct routine maintenance. Chapter “Access to PC” is meant for
computer specialists or at least experienced users, who want to level the new software or to upgrade a
PC. For operation and maintenance of the empire no specific knowledge (computing, electronics, etc)
is required. therwise, it is explicitly indicated in the manual.
Danger of electric shock. Before you
disassemble the PC, turn the terminal off and
pull the power cord.
Warning
intended to prevent
injury to persons or da age to
property
When reassembling the PC
Useful infor ation
Connection:
Connect the device to the power supply with the
power connection cord (included with delivery).
The device is ready for operation.
Individual instruction
1.
2.
3.
Disconnect all cables from the computer.
Unscrew four fastening nuts.
Remove the computer.
Step
-
by
-
step instructions

Manual friendlyway empire 19, version 1.02
5
2. I portant infor ation
2.1. Warnings, safety easures and ergono ics
When setting up the unit and before placing it in service, please make note of the information in
chapter ”Mounting and requirements for the surrounding area”.
• Transport the unit only in its original packaging or in a suitable packaging that ensures it is
protected against bumps and impact.
• If the unit is brought from a cold environment into the room where it will be operated,
condensation may occur. Wait until the unit has reached the temperature of the room and is
completely dry before putting it in operation.
• Make sure that the local power supply does not exceed or fall short of the nominal voltage
range. Check the adjusted nominal voltage of the unit (see ”Connecting terminal to the power
supply” and see the identification plate).
• A safety-tested power line in compliance with the requirements of the country where it is being
used is required for this device. The device can only be connected to a grounded protected
power outlet.
• Make sure that the electrical socket of the device or the protected power outlet of the facility
installation is freely accessible.
• Lay the lines so that they do not create any hazards (danger of tripping) and so that they cannot
be damaged. Read chapter ”Connecting the unit and placing it in service” of these operating
instruction on connecting the device.
• Repairs on the device may only be performed by authorized specialists. Unauthorized opening
or improper repairs may result in considerable hazard for the user (electric shock, danger of fire).
• Proper operation of the device, in accordance with requirements (as per IEC 950/EN60950) is
only ensured if the housing is fully assembled and the rear side covers for installation locations
are in place (electric shock, cooling, fire protection, radio interference).
• Before opening the device, the device must be disconnected from the power supply by
removing the power plug. Follow the instructions and information in these operating instructions if
you open the device.
• Install only system add-ons that comply with the requirements and specifications for safety,
electro-magnetic compatibility and telecommunications terminal device equipment. Installing
other add-ons may violate these requirements and specifications or may damage the system.
You can obtain information about which system add-ons are permissible for installation from your
sales center or from our service department.
• If you install or replace system add-ons that cause defects to the device, the warranty is voided.
• The weight of the device in its slim version is approx. 40 kg, the weight of the device in its
deeper version is about 45 kg, but the exact weight depends on the configuration.
• If the unit keeps displaying the same pattern for a long period of time the image may be „stuck”
to the screen. To avoid image sticking it is recommended to use alternating or animated images
or a screensaver. Please see also the display manufacturer's directions.
• Keep this information on hand along with all of the documentation together with the unit. If you
transfer the unit to a third party, please transfer all of the documentation along with it.
• Data lines to peripheral devices must be equipped with adequate shielding.
• If your device is equipped with a DVD-R M drive, the following applies:
The DVD-R M drive contains a light-emitting diode (LED), classification in accordance with IEC
825-1:1993:LASER CLASS 1.
• You will find additional safety information in the respective manuals for PC and other
accessories or installation devices*.
* If ordered in addition.
Manual friendlyway empire 19, version 1.02
6
2.2. Infor ation on care and upkeep
Housing
• Do not clean with sharp objects, for example, metal sponge or similar cleaning objects! Clean only
with a damp cloth and gentle cleaning agents. Do not directly spray cleaner onto the unit.
Be careful with such optional devices as loudspeaker, camera and card reader.
Screen
• Clean with standard window cleaners. To prevent exposure to moisture, do not directly spray cleaner
onto the device. Instead of this, wipe off the screen with a moist cloth.
2.3. Transportation
Transport your terminal in the original package only or in other special transportation boxes. There are
two options available:
• reusable sturdy shipping container (ground transportation)
• reusable extremely sturdy flight case (air transportation)

Manual friendlyway empire 19, version 1.02
7
3. Mounting and require ents for the surrounding area
3.1. Require ents for the surrounding area
Your friendlyway empire was specially developed for use in enclosed areas and has specific
requirements for the surrounding area:
• Permissible ambient temperature: 15 - 30°C.
• No sources of warmth or heat (direct sunlight, heater) in the immediate vicinity, no direct effects of
heat.
• No high relative humidity.
The machine must only be operated under the environmental conditions listed above.
Please take this into consideration when selecting a place to set up the device.
3.2. Mounting
To prevent the terminal breakdown due to an external impact
(counter pressure, vandalism, etc.), the terminal must be screwed
to the floor. n the bottom plate there are two openings for the
mounting bolts.
To mount the terminal to the floor:
1. Make the corresponding drill holes in the floor.
2. Install the terminal in the desired floor location.
3. Screw through bottom plate to the floor.

Manual friendlyway empire 19, version 1.02
8
4. Connecting the unit and placing it in service
The device has a socket and fuse for power supply as well as a LAN connector and two USB
ports. These connections are located at the bottom of the rear panel:
Lay the connection cables so that no one can walk on or trip over.
4.1. Connecting ter inal to the power supply
You should only operate the device from a grounded alternating current socket for a 220-
240 V / 50 Hz power supply.
Connection:
Connect the device to the power supply with the power connection cord (included with
delivery).The device is ready for operation.
4.2. Connecting to the network
The network connection requires a trained staff that is also capable of making the required
communication settings.
4.3. Placing the PC in operation
After you have connected the device to the power supply, the computer will start and the operating
system will be loaded.
If you have bought the friendlyway empire with a terminal CPU, the demo version of the
PC-Sheriff software will be preinstalled on its operating system. This is a data recovery
and security solution allowing you to restore the operating system and your data to the
desired state. If you decide to use this software, call us at +49 89 959791-500 or email at
to get the permanent license key free of charge.

Manual friendlyway empire 19, version 1.02
9
5. Display settings
The terminals are preconfigured so that there is no need to set up anything under the normal
conditions. If you want to change some display settings, enter the n-Screen-Display ( SD) that is
called and controlled with buttons on the cover.
The activation buttons are deep in the openings, use a long tool for pressing the buttons.
POWER MENU SEL UP DOWN
The SD control buttons allow for easy function setup. Before using the SD control elements please
make sure that your system is turned on.
To avoid damaging image effects, please use a screensaver!
To reach optimal quality and position of the picture, autoconfiguration should be performed.
To ease the setup on the SD menu, the timeout parameter can be set to maximum.
5.1. OSD control buttons and their functions
Key
Function
MENU N/ FF menu-osd, going to from sub-icon to top icon.
D WN Decreases the adjustment of the selected item. Auto-adjust hot key in RGB.
UP In menu on, selects the sub-menu and increases the adjustment of the selected item.
SEL Selects the function (RGB/CVBS/SVHS/MPEG); in menu on, moves the cursor.
P WER Turns N/ FF the system.
Manual friendlyway empire 19, version 1.02
10
Working with the enu syste
1. With the SD off, push the MENU button to activate the main SD menu.
2. Use the SEL button to move to icon. As you move from one icon to another, the function name
changes to reflect the function or group of functions represented by that icon. Please refer to the
following clause on the next page to view a complete list of all of the functions available for the driver
board.
3. Press the DOWN button to auto-adjust clock, phase, position of PC input when osd off status. Press
the DOWN button to decrease value of the selected item.
4. Press the MENU button once to return to the main menu to select another function or press twice to
exit from the SD.
5. Press the UP button to select the sub-icon or press twice to increase value of the selected icon.
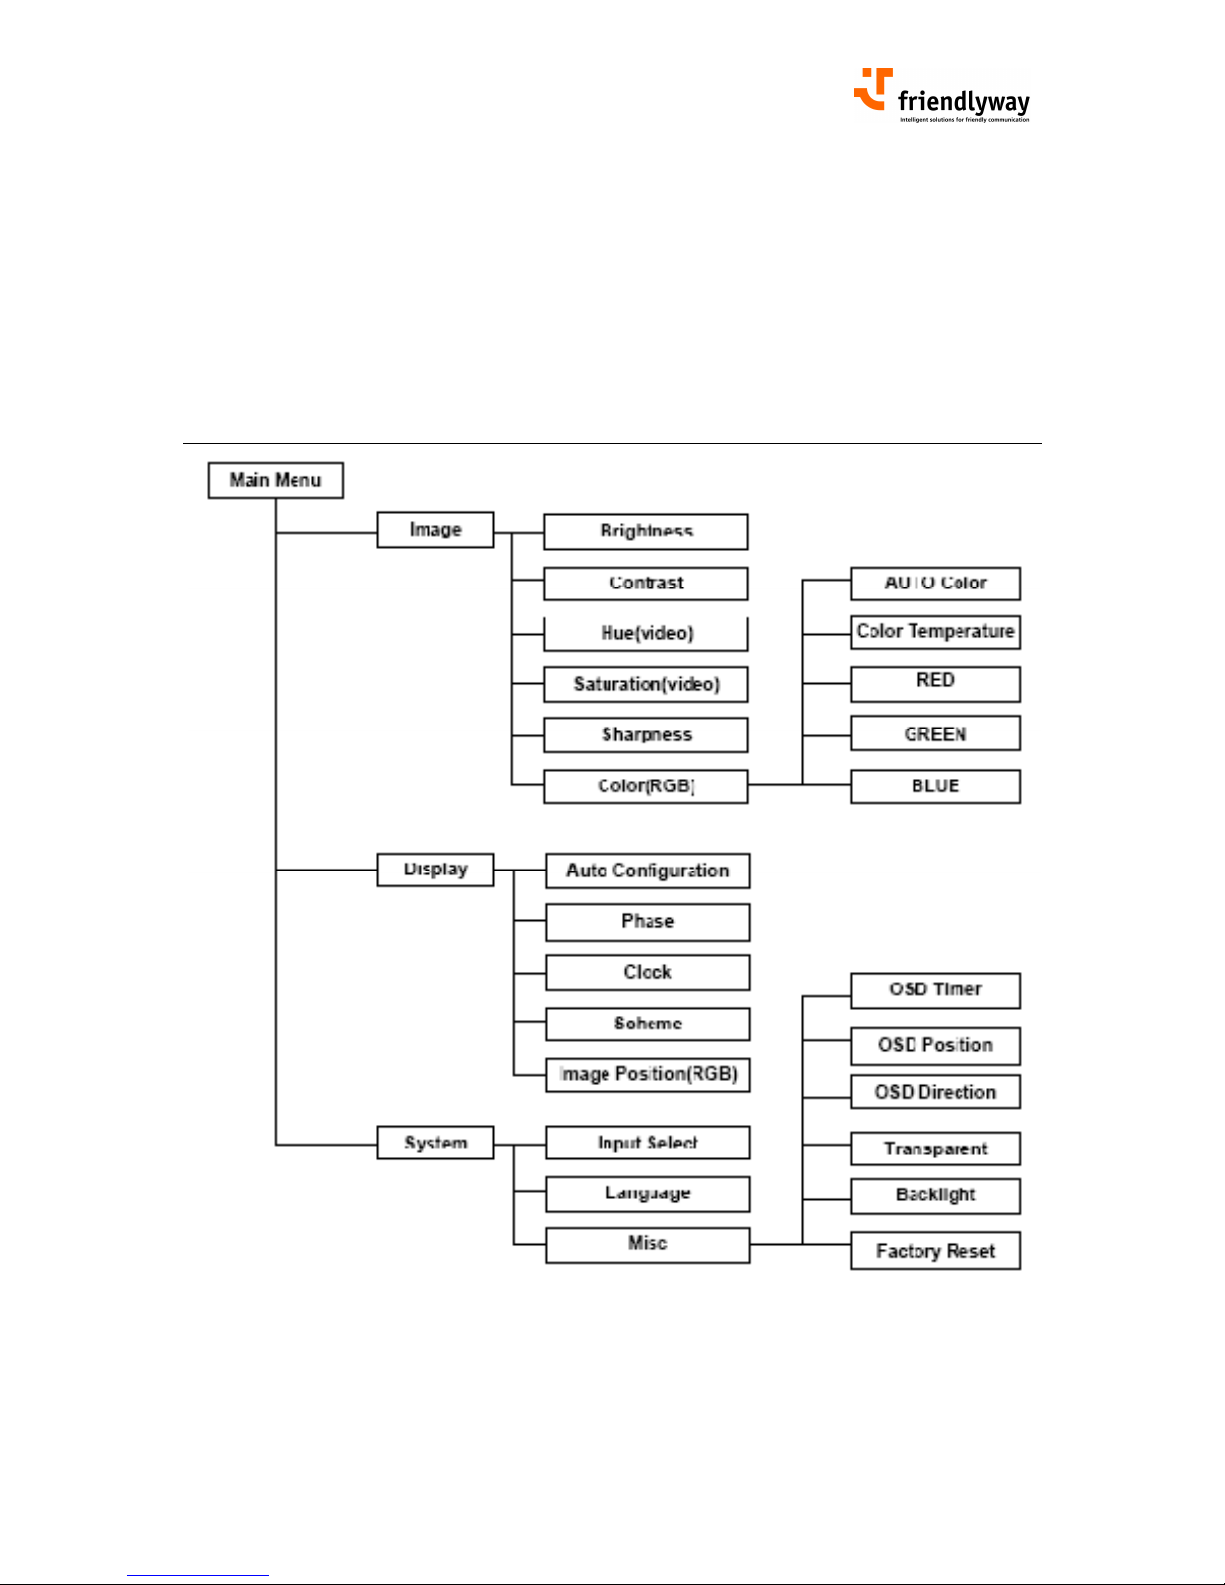
5.2. OSD structure
Inhaltsverzeichnis
Beliebte Touch-Terminal Handbücher anderer Marken

Wincor Nixdorf
Wincor Nixdorf iPOS plus Advanced Bedienungsanleitung

Ingenico
Ingenico AXIUM EX4000 Bedienungsanleitung

Heisei Electronics
Heisei Electronics Q-POS 815 Bedienungsanleitung

Amano
Amano MTX-15 Bedienungsanleitung

FLOWBIRD
FLOWBIRD CWT Compact Touch Bedienungsanleitung

Demco
Demco SP7 Bedienungsanleitung


Motorola
Motorola MTP850 Bedienungsanleitung

YASKAWA
YASKAWA 62H-MDC0 Bedienungsanleitung

MVG industries
MVG industries NeptuLink Bedienungsanleitung

Price Industries Limited
Price Industries Limited FDC Gebrauchsanweisung

Honeywell
Honeywell TemaKey Bedienungsanleitung

EBN
EBN BPC65-B-A16G Bedienungsanleitung