Gastrofrit TW Series Bedienungsanleitung

operation manual TW-Series
PASTACOOKER
Free-standing and built-in devices / electronics
English
Version 8.7
Thank you for choosing a Gastrofrit® product. Your
product was made entirely in Switzerland. Your
product has been subjected to a long-term test.
Please note that incorrect commissioning can lead
to damage. Before commissioning, check the exact
requirements for power consumption, voltage and
current to ensure that the device can be operated
without any worries.
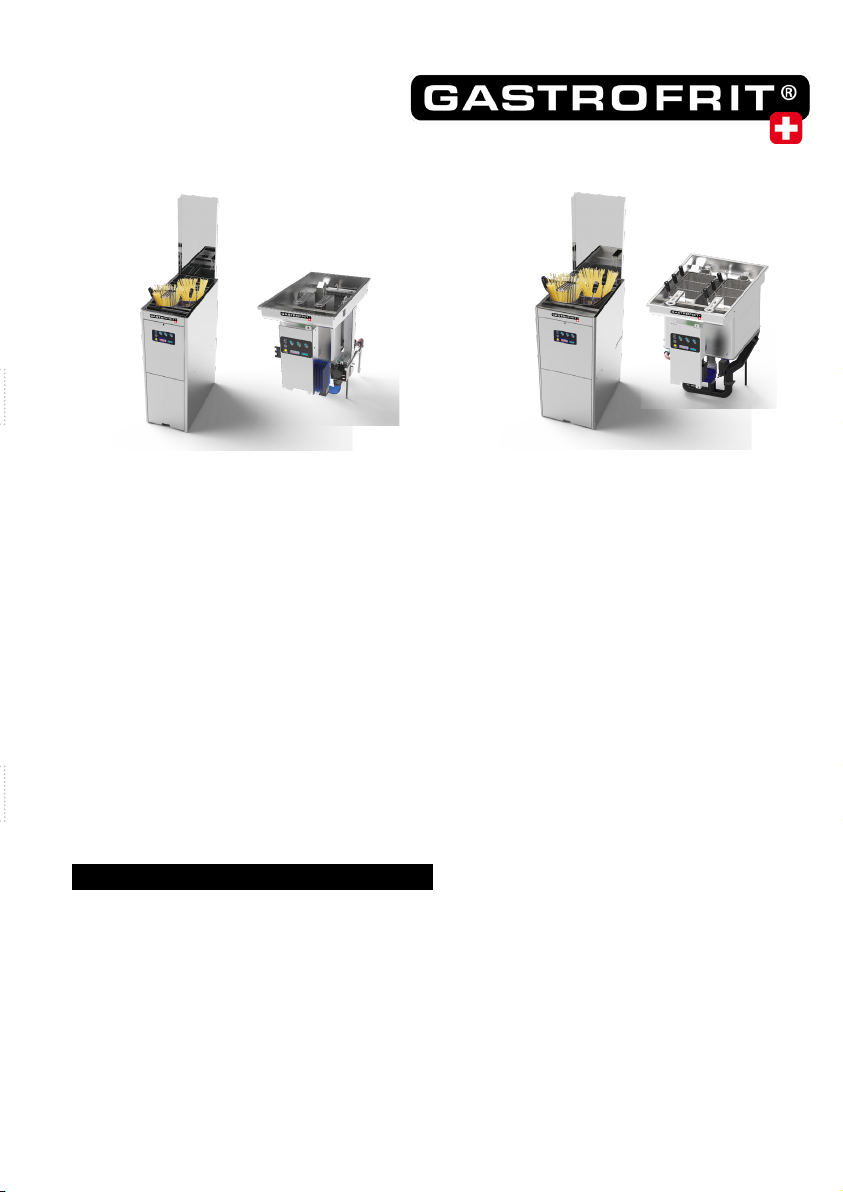
TW-350 / TW-350 built-in TW-400 / TW-400 built-in

Contents
3 Models and variants
3 Installation and setting up
4 Power connection and technical information
4 Technical specications
5 Support plate
6 Clues
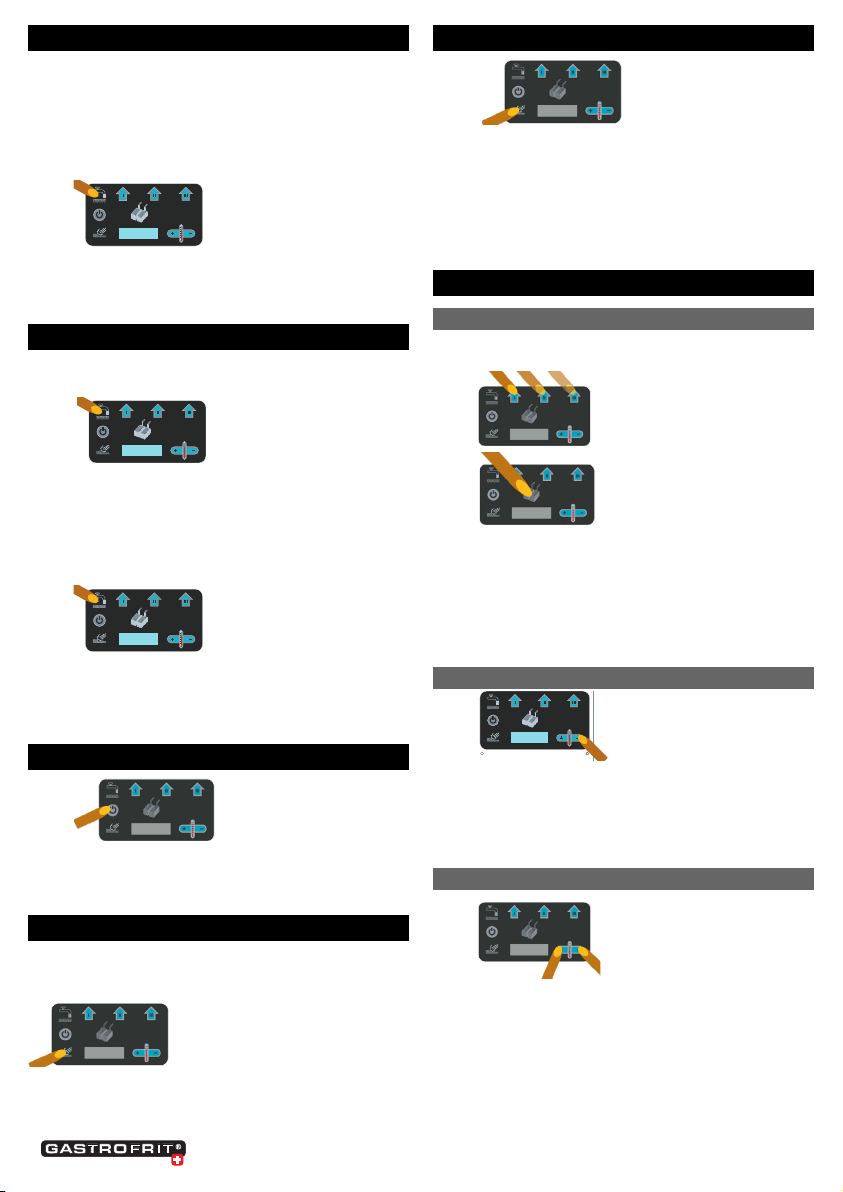
6 Keypad pasta cooker
7 Operational readiness
7 Operation
7 Call up the parameter menu
9 Parameter Matrix
10 Fill with water
10 Programming the lling quantity
10 Switch on the pasta cooker
10 Wash-o
10 Program the wash-o
10 Programming the parameters
10 Program the time (I, II, III und IV)
10 Temperature settings
10 Query current temperature
11 Cooking pasta
11 Reset
11 Options
11 Emptying / safety process
12 Automatic basket lift
12 Energy optimization
12 Salt check
12 Service functions
12 Change O-rings on the attachable heater
13 Possible malfunctions
13 Machine has no function, display dark
13 Warning message Error 1, PT-100 / PT-1000
13 Maintenance and customer service
13 Maintenance
13 Cleaning
14 Hazard warnings
15 Moving devices
15 Extended display
15 Key assignment in test mode
15 Test pages:
17 DIP Switch / Anschlussschemas
www.gastrofrit.ch © Switzerland Gastrofrit AG
2

Models and variants
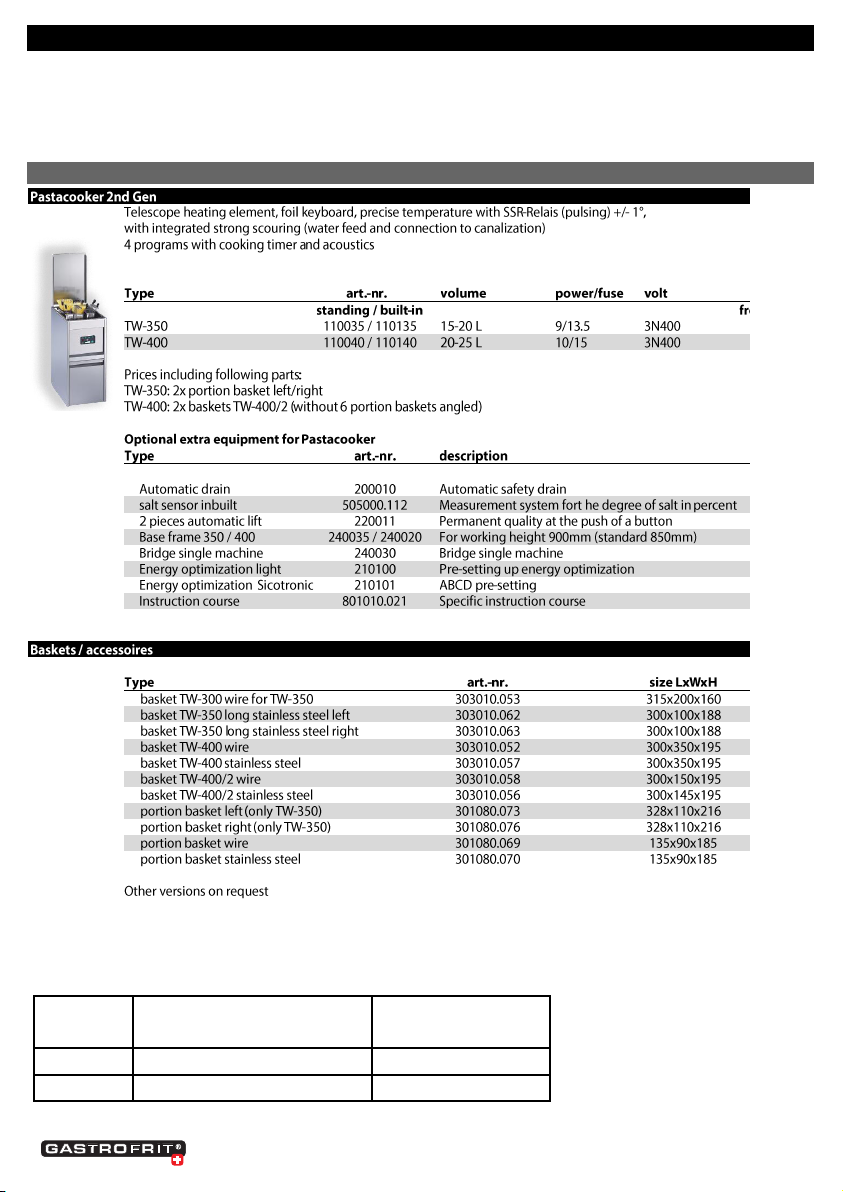
TW-350 Item No. 110035
TW-350 built-in Item No. 110135
TW-400 Item No. 110040
TW-400 built-in Item No. 110140
Installation and setting up
Floor standing devices
The following points must be observed when setting up the free-standing models:
• The distance from the rear wall of the devices to the next wall must be at least 100 mm.
• The pasta cooker must not stand on a ammable surface or be built into a ammable unit.
• The local safety, re police and building regulations also apply.
• The requirements of the food inspectorate must also be observed.
• The pasta cooker is a xed device. The roles are only intended to facilitate maintenance and cleaning work.
• These can be removed by simply notching them as required. The device must not be moved during operation.
• The standard height of the device is 850mm. This can be increased to 900mm with a substructure as required.
• The power plug must be accessible after setting up the device.
Stability (standing devices)
Due to insucient stability, the TW-350 devices must not be set up freely. They must be fastened with the angle
plate included in the scope of delivery. Self-tapping screws can be used for fastening in the sheet metal. For wall or
oor mounting, we recommend using screws with dowels.
Assembly substructure
• Loosen hexagon nuts (6pcs) on the inside of the oor
• Slide in the substructure
• Tighten the hex nuts again.
www.gastrofrit.ch © Switzerland Gastrofrit AG
3

Power connection and technical information
• The device may only be connected by trained specialists.
• After switching on the main switch, the device starts and an automatic calibration takes place.
• The software version (e.g. Gastro 8.67) can then be read on the display.
• The 3x400V (3L + N + PE) power connection is made with a standard-compliant CE plug.
Technical specications
Pastamenge:
Type Baskets per basin h performance
(Spaghetti a la minute)
TW-350 1 or 2 25 kg
TW-400 1, 2 or (6 or 9 Portion baskets) 30 kg
www.gastrofrit.ch © Switzerland Gastrofrit AG
4

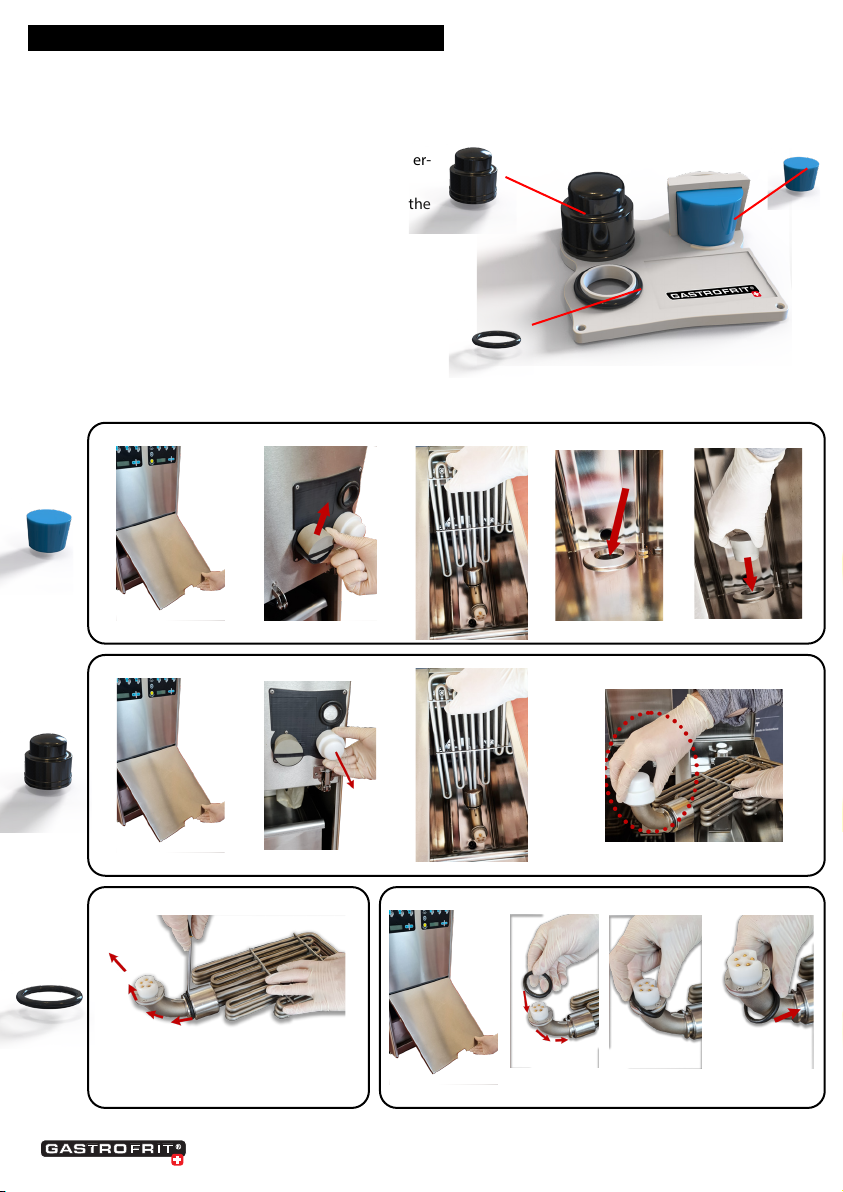
Support plate
The support plate is located inside the service door
and includes three security items.
1. Cone stopper (Art. No. 305010.050): The cone stopper
must be inserted so that no dirt can get into the heater
lead through the plug-on heater. This allows the inter-
ior of the pans to be cleaned.
2. Protective cap (Art. No. 501000-812): Protection of the
extended heater. The heater can be cleaned in the
appliance or dishwasher.
3. O-ring (Article No. 503000.030): This seals the plug-in
heater. The O-ring should be replaced every year.
Remove the old O-Ring with a
screwdriver. Pull on the new O-Ring by hand
www.gastrofrit.ch © Switzerland Gastrofrit AG
5

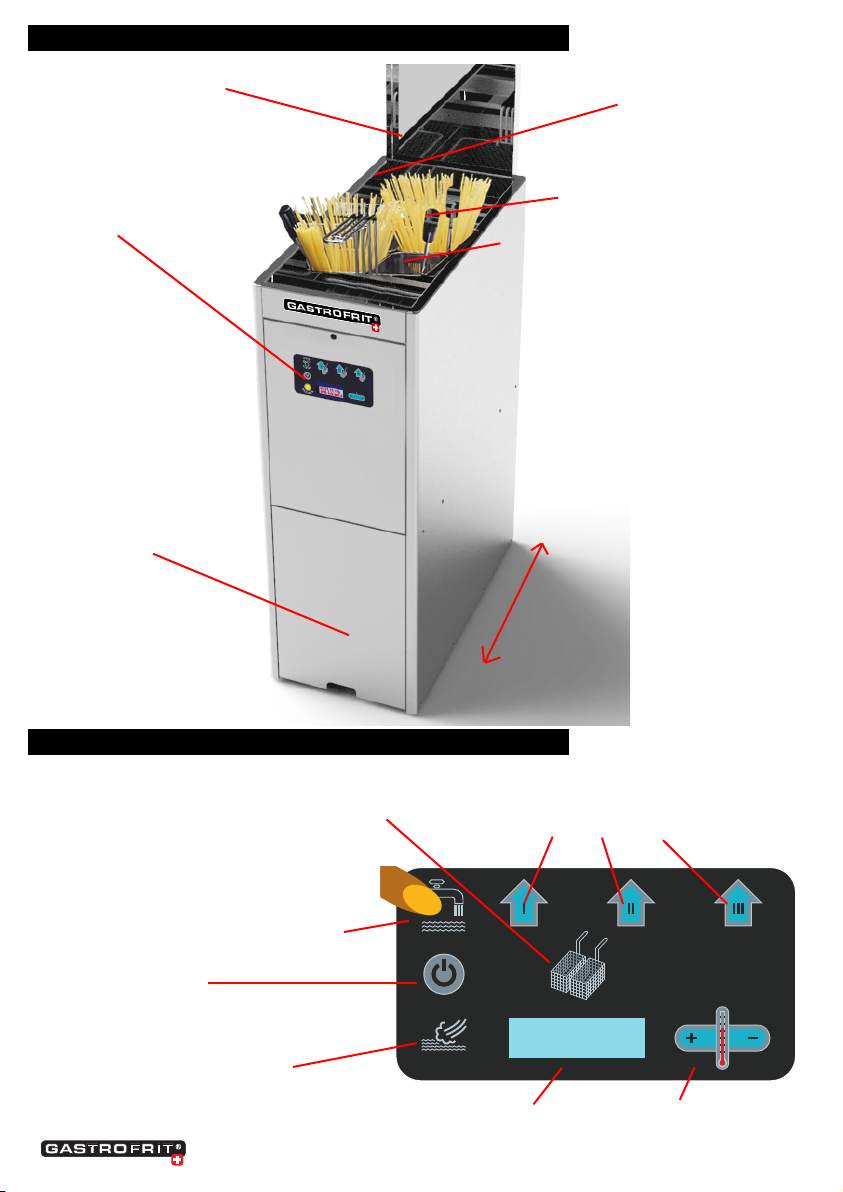
Automatic basket lift (optional) or
Timer function with acoustics
Automatic water lling
optional
On / o switch
Wash-o
optional
Digial display Temperature
or Menu control + / -
Keypad pasta cooker
Double basket or large basket
Automatic lift (optional) or
Acoustics timer function
Keypad with display
Service door can
be opened
Device can be rolled
(Only in the cold and
currentless state)
Clues
Safety and
over-foaming area
Cover
Korb Haltestange
Pasta basket
www.gastrofrit.ch © Switzerland Gastrofrit AG
6

Operational readiness
• Check the existing voltage and current fuse
protection with the type plate. If the security is
sucient, you can start the cooking process.
• Open the cover (re protection) on the device and
insert it at the back
• Remove the basket
• Close drain cock (safety drain cock closes automa-
tically)
• Fill in water up to the lling mark
Operation
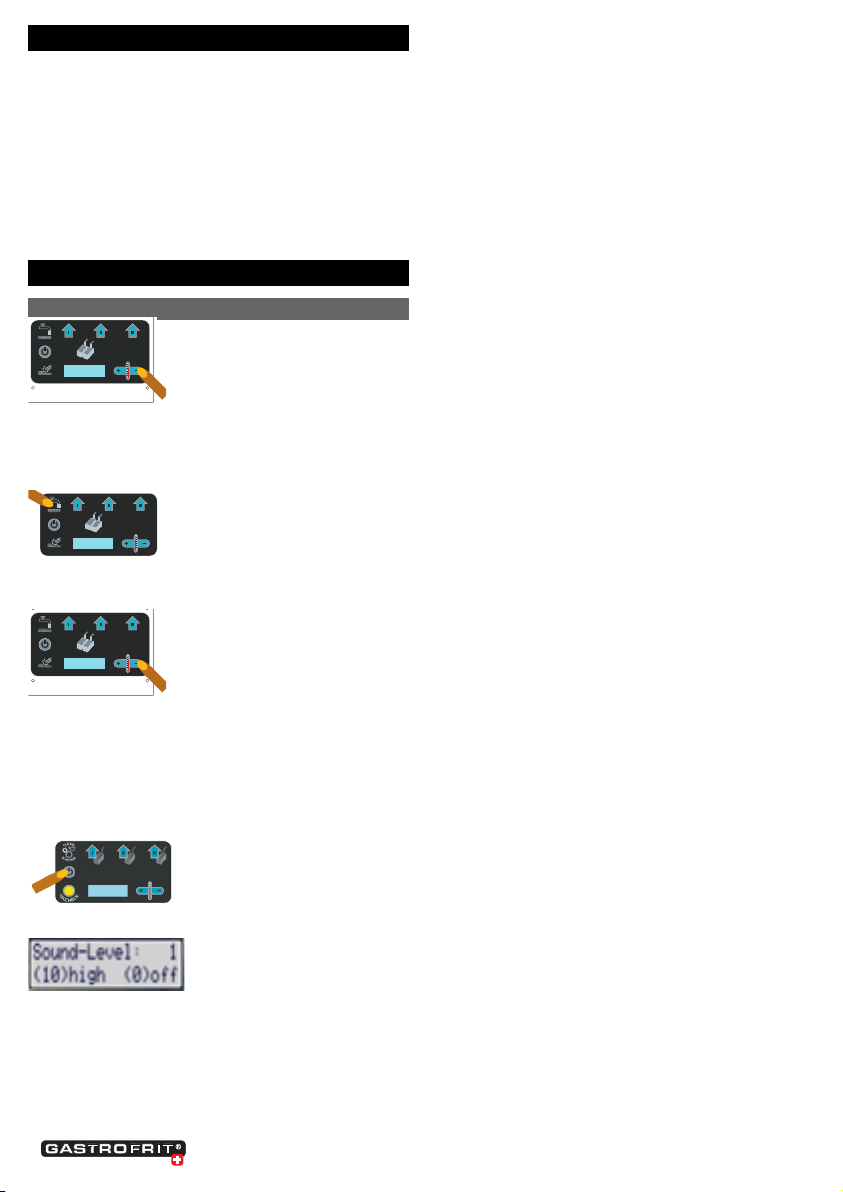
Call up the parameter menu
53, 21, 33, 170,
TPM: 11% t: 21 C
3 Sek
If the device is in the OFF state,
you can switch to the parameter menu by pressing the
„plus“ or„minus“ button for 10 seconds.
Change parameter pages
The various parameter pages can
be called up with the„Water lling“ button.
Change parameters
53, 21, 33, 170,
TPM: 11% t: 21 C
3 Sek
The parameters can be changed
with the„plus“ and„minus“ buttons.
Quit the parameter menu and save the new values.
To exit the parameter menu, press the„ON / OFF“
button. The changed values are saved and are retained
even in the event of a power failure.
Example parameter menu
Changeable parameters
1. Sound-Level
The volume of the buzzer can be changed bet-
ween 0 (o) and 10 (very loud).
2. Standby-time:
The standby time for the TW can be set between 5
and 120 minutes. If the„-“ button is pressed for 5
minutes, the standby mode is switched o.
3. Standby-temperature:
The standby temperature of the TW can be chan-
ged between 30 and 80 ° C.
4. Monitoring drying cycle:
After switching on, the temperature must not rise
more than the set temperature dierence (10-80 °
C) for the rst 60 seconds. If the temperature rises
more, an error message is issued (too little water)
and the control goes into the o state.
5. Temperature limit for the clean function (only
Deep fryer):
The limit temperature of the deep fryer can be set
between 30 and 170 ° C. If the temperature is hig-
her than this set temperature, the clean function
is blocked.
6. Automatic ltration (deep fryer only):
Automatic ltration can be activated on the deep
fryer. The programmed times are called up one
after the other and the oil pump and ball valve
are operated automatically. If the clean button is
pressed again, the active time is canceled. When
the On / O button is pressed, the automatic
ltration is canceled.
7. Time (Time 1) for automatic emptying (deep fryer
only): During this time the ball valve is open and
the oil ows out.
8. Time (Time 2) for automatic circulation (deep fryer
only): During this time, the ball valve is open and
the pump is active. The oil ows out and at the
same time oil is pumped in.
9. Time (Time 3) for automatic lling (deep fryer
only): During this time, the ball valve is closed and
the pump is active. The tub lls with oil.
10. Monitoring oil quality (deep fryer only):
The oil quality (TPM) of the deep fat fryer can be
set between 10 and 40%. If this value is exceeded,
a program (I-III) cannot be started. With the setting
OFF, a program can always be started.
11. Monitoring salt water:
With the TW, the monitoring of the salt content
(salinity alarm) can be set between 1 ‰ and 30
‰ (default values: low = 8 ‰ and high 12 ‰). If
this value is not reached(too little salt), after the
set time (Salinity-Alarm Time: 1-60 seconds) an
acoustic alarm (Salinity-Alarm-Sound) occurs and
the background color changes to purple. If there
is too much salt, the background lighting changes
to blue and an acoustic alarm (Salinity alarm
sound) may sound. If the salt content changes
back into the valid range, the background lighting
changes to the normal color and the acoustic
alarm is ended. Press the “+”and “-” key combinati-
on to display the salt content and press the“+” key
www.gastrofrit.ch © Switzerland Gastrofrit AG
7

to reset the alarm . Interval of the acoustic alarm:
10s. Dierent tone sequences when exceeding or
falling below the limit value.
12. Salinity-Alarm (Sound):
a. O: no acoustic alarm
b. On: acoustic alarm when the TW is switched on
c. Temp: acoustic alarm when the TW is switched
on and the temperature is> 90 ° C
d. Lift: acoustic alarm if TW is switched on, temp.>
90 ° C and a HUB is active.
13. Interval time for contactor control (only witht
relay operation, not with SSR):
The interval time can be set from 2 to 60 seconds.
The following settings then apply:
a. Interval time: 2-9 sec., If the temperature
deviates by> 1 ° C, heating takes place.
b. Interval time: 10-19 sec., If the temperature
deviates by> 2 ° C, heating takes place.
c. Interval time: 20-60 sec., If the temperature
deviates by> 4 ° C, heating takes place.
14. Dry run monitoring:
The drying cycle monitoring can be switched on
or o.
15. Demo-Mode:
If the demo mode is activated (20-240 seconds),
a key press is simulated after the set time. First a
key press„PROG1“ and the next time a key press
„PROG3“ is simulated. The programmed time will
run down normally and then the time (demo
mode time) will be waited until the next key is
simulated. A program can be canceled at any time.
This demo mode is intended for a long-term test
or for a demonstration during presentations.
16. ABCD-Bus (Sicotronic Energy management): The
ABCD interface for energy management can be
switched on or o via the menu (changeable para-
meters) for controls that do not have a ball valve
(SW2-3) or a lifting motor (SW1-8). If the control
has neither a ball valve nor a lift motor, the lift
motor 2 OPEN relay is used as output A.
When the ABCD bus is activated (changeable
parameters) it is not monitored whether a ball
valve or lifting motor has been activated with the
DIP switches or not.
17. Time for the HUB motor movement:
The time can be set between 3:00 and 10:00
seconds. The 50/60 Hz DIP switch no longer has
any function. This option is only possible from
version 8.72
ABCD interface for Sicotronic EAM-N module::
A (Pin 2) Relay ball valve (230VAC) Gastro8 is switched on
Relay lift motor 2 open (230VAC)
B (Pin 12) Relay heating (230VAC) Heating should be on
C(*) Ext.relay/contactor (230VAC) The relay contact must be the control line from the SSR
or interrupt contactor
D (Pin 13) Neutral conductor (N) PE (Pin 15) Protective conductor
www.gastrofrit.ch © Switzerland Gastrofrit AG
8

TW deep fr. Tex t Min. Wert Max. Default
X X Sound-Level 0 = O 10 1
X X Standby-Time O / 5 min. 120 min. 45 min.
X Standby-Temperature 30°C 80°C 50°C
X Standby-Temperature 30°C 150°C 130°C
X X Power-On Temperature di. 10°C 80°C 15°C
X Level Clean-Temperatur 30°C 170°C 150°C
X Oillimit Hub OFF O / TPM 10 TPM =40 TPM =5%
X Auto. Filtrierung O On O
X Auto. Emptying (Time 1) 5 sec. 500 sec. 180 sec.
X Auto. circulation (Time 2) 5 sec. 500 sec. 180 sec.
X Auto. Filling (Time 3) 5 sec. 500 sec. 180 sec.
X Salinity-Alarm (Low) 1‰ 30‰ 8‰
X Salinity-Alarm (High) 1‰ 30‰ 12‰
X Salinity-Alarm (Time) 1 sec. 60 sec. 10 sec.
X Salinity-Alarm (Sound) O On On
X X Relais-Time 2 sec. 60 sec. 20 sec.
X X Drying cycle O On On
X X Demo-Mode-Time O / 20 sec. 240 sec. O
Parameter Matrix
Kongurationsübersicht Parameter- Menü
www.gastrofrit.ch © Switzerland Gastrofrit AG
9

Fill with water
1. Close the drain cock. (See emptying)
2. Attention with the option„electrical drain cock“
the drain cock is always closed as soon as the
device is de-energized. To operate the electrical
drain valve, read chapter 7.4 Electrical ball valve
(drain).
3. Press the„Water lling“
button. Machine lls according to programm-
ing. Programming. Attention, do not exceed the
maximum mark!
Programming the lling quantity
• •The machine must be switched o to program
the lling.
• Press and hold the„Water
lling“ button for 10 seconds.
• The lling switches on. Water runs in.
• „Learn to ll“ appears on the display. Now you
have to wait until the pool is lled between the
min. and max. Level.
• By pressing the «water ling”
button again, the amount is set or the lling time
is saved.
Switch on the pasta cooker
• Press the key . With pasta
cookers, the contactor switches on audibly and
the display shows 170 ° C and ashes every
second.
Wash-o
The wash-o function continuously adds fresh water
to reduce the starch and replace the water lost
through the boiling process and evaporation.
Press the„wash away“ button.
On / O rhythm wash-o runs on the factory setting
level„medium“ Switching o the wash-o function:
Press the ush button again
Program the wash-o
1.
Press the„wash-o“ button for 10 seconds.
2. Change intensity with +/- key
3. Levels: very weak; weak; medium; strong; very
strong
4. To save, press the ushing button
Programming the parameters
Program the time (I, II, III und IV)
1. Press program buttons I / II / III for at least 10
seconds each.
(Double basket button)
2. The time to be set appears on the display.
3. Set the time with the„plus“ and„minus“ buttons.
4. Press program buttons I / II / III again each time
5. The respective program is now programmed over
time and can be used.
Temperature settings
•
53, 21, 33, 170,
TPM: 11% t: 21 C
3 Sek
The target value of the
temperature can be increased with the„+“ key and
decreased with the„-“ key.
• As long as the value is ashing, the specied
temperature has not been reached.
Query current temperature
•
Simultaneously press the„plus“ and„minus“
buttons
• The current measured temperature is displayed.
The measurement is done with a PT-1000 and has
an accuracy of +/- one degree Celsius.
www.gastrofrit.ch © Switzerland Gastrofrit AG
10
Dieses Handbuch passt für folgende Modelle
6
Inhaltsverzeichnis