GE AGH08 Originalbetriebsanleitung

GE Appliances
Room
Air
Conditioners
Pub. No. 49-7368-2 CG 12-97
AGH08
AGP08
AGV08
Owner’s Manual &
Installation Instructions

Customer Service Troubleshooting Tips Operating Instructions Safety Instructions
Installation Instructions
Congratulations!
You Are Now Part of the GE Family
Welcome to the GE family. We’re proud of our
quality products and we are committed to providing
dependable service. You’ll see it in this easy-to-use
Owner’s Manual and you’ll hear it in the friendly
voices of our customer service department.
Best of all, you’ll experience these values each time
you use your air conditioner. That’s important,
because your new air conditioner will be part of your
family for many years. And we hope you will be part
of ours for a long time to come.
We thank you for buying GE. We appreciate your
purchase, and hope you will continue to rely on us
whenever you need quality appliances for your home.
GE & You, A Service Partnership.
Safety Information
Safety Precautions . . . . . . . . . . . . .3
Use of Extension Cords . . . . . . . . .3
Use of Adapter Plugs . . . . . . . . . . .3
Operating Instructions
Controls . . . . . . . . . . . . . . . . . . .4, 5
Care and Cleaning . . . . . . . . . . . . .6
Installation Instructions
Preparing to Install the
Air Conditioner . . . . . . . . . . . . . . . .7
Window Installation . . . . . . . .8–12
Troubleshooting Tips
Before You
Call For Service . . . . . . . . . . . . . .13
Normal Operating Sounds . . . . . .13
Customer Service
Warranty . . . . . . . . . . . . . . . . . . .15
Service Telephone
Numbers . . . . . . . . . . . .Back Cover
FOR YOUR RECORDS
Write the model and serial numbers here:
##
You can find them on a label on the side of the air conditioner.
Staple sales slip or cancelled check here.
Proof of the original purchase date is needed to obtain service
under the warranty.
Inside you will find many helpful hints on how to use and maintain
your air conditioner properly. Just a little preventive care on your
part can save you a great deal of time and money over the life of
your air conditioner.
You’ll find many answers to common problems in the
Before You
Call For Service
section. If you review our chart of
Troubleshooting
Tips
first, you may not need to call for service at all.
READ THIS MANUAL
IF YOU NEED SERVICE
If you do need service, you can relax knowing help is only a phone
call away. A list of toll-free customer service numbers is included in
the back section. Or, you can always call the GE Answer Center® at
800.626.2000, 24 hours a day, 7 days a week.
IMPORTANT!
Fill out and return the Consumer Product Registration Card that is
packed with this product.
2

IMPORTANT SAFETY INFORMATION.
READ ALL INSTRUCTIONS BEFORE USING.
WARNING!
For your safety, the information in this manual must be followed to minimize the risk of fire, electric shock
or personal injury.
■ This air conditioner must be properly
installed in accordance with the Installation
Instructions before it is used.
■ Repair or replace immediately all electric
service cords that have become frayed or
otherwise damaged.
■ Turn the mode control to
OFF
and unplug
your air conditioner before making any
repairs.
NOTE:
We strongly recommend that any
servicing be performed by a qualified
individual.
SAFETY PRECAUTIONS
The use of an extension cord is not
recommended. However, if an extension cord
is required to reach the nearest wall receptacle,
use only a UL-listed, 3-wire, grounded, 14
gauge, 15A, 125V appliance extension cord.
USE OF EXTENSION CORDS
Because most 2-prong outlets are not
grounded, we strongly advise against using an
adapter plug. However, a temporary
connection may be made where local codes
permit and if the 2-prong wall outlet is properly
grounded. UL-listed adapters are available at
most hardware stores.
When you plug the adapter in, make sure the
larger prong goes into the larger slot to provide
the proper polarity for the power cord.
For Proper Grounding:
■ Screw the adapter to the outlet, using the
outlet cover screw.
■ Ground the outlet through the house wiring.
When disconnecting the power cord from the
adapter, hold the adapter close to the outlet
while pulling the plug out. If this is not done,
the grounding connector is likely to break with
repeated use.
If the grounding connector breaks,
DO NOT USE
the air conditioner until a proper ground has
again been made.
USE OF ADAPTER PLUGS
3
Read and follow this Safety Information carefully.
SAVE THESE INSTRUCTIONS
Customer ServiceTroubleshooting Tips
Operating Instructions
Safety Instructions Installation Instructions

4
Customer Service Troubleshooting Tips Operating Instructions Safety Instructions
Installation Instructions
Customer Service Troubleshooting Tips Installation Instructions Safety Instructions
Operating Instructions
Customer Service Troubleshooting Tips Installation Instructions Safety Instructions
Operating Instructions
About the controls on the air conditioner.
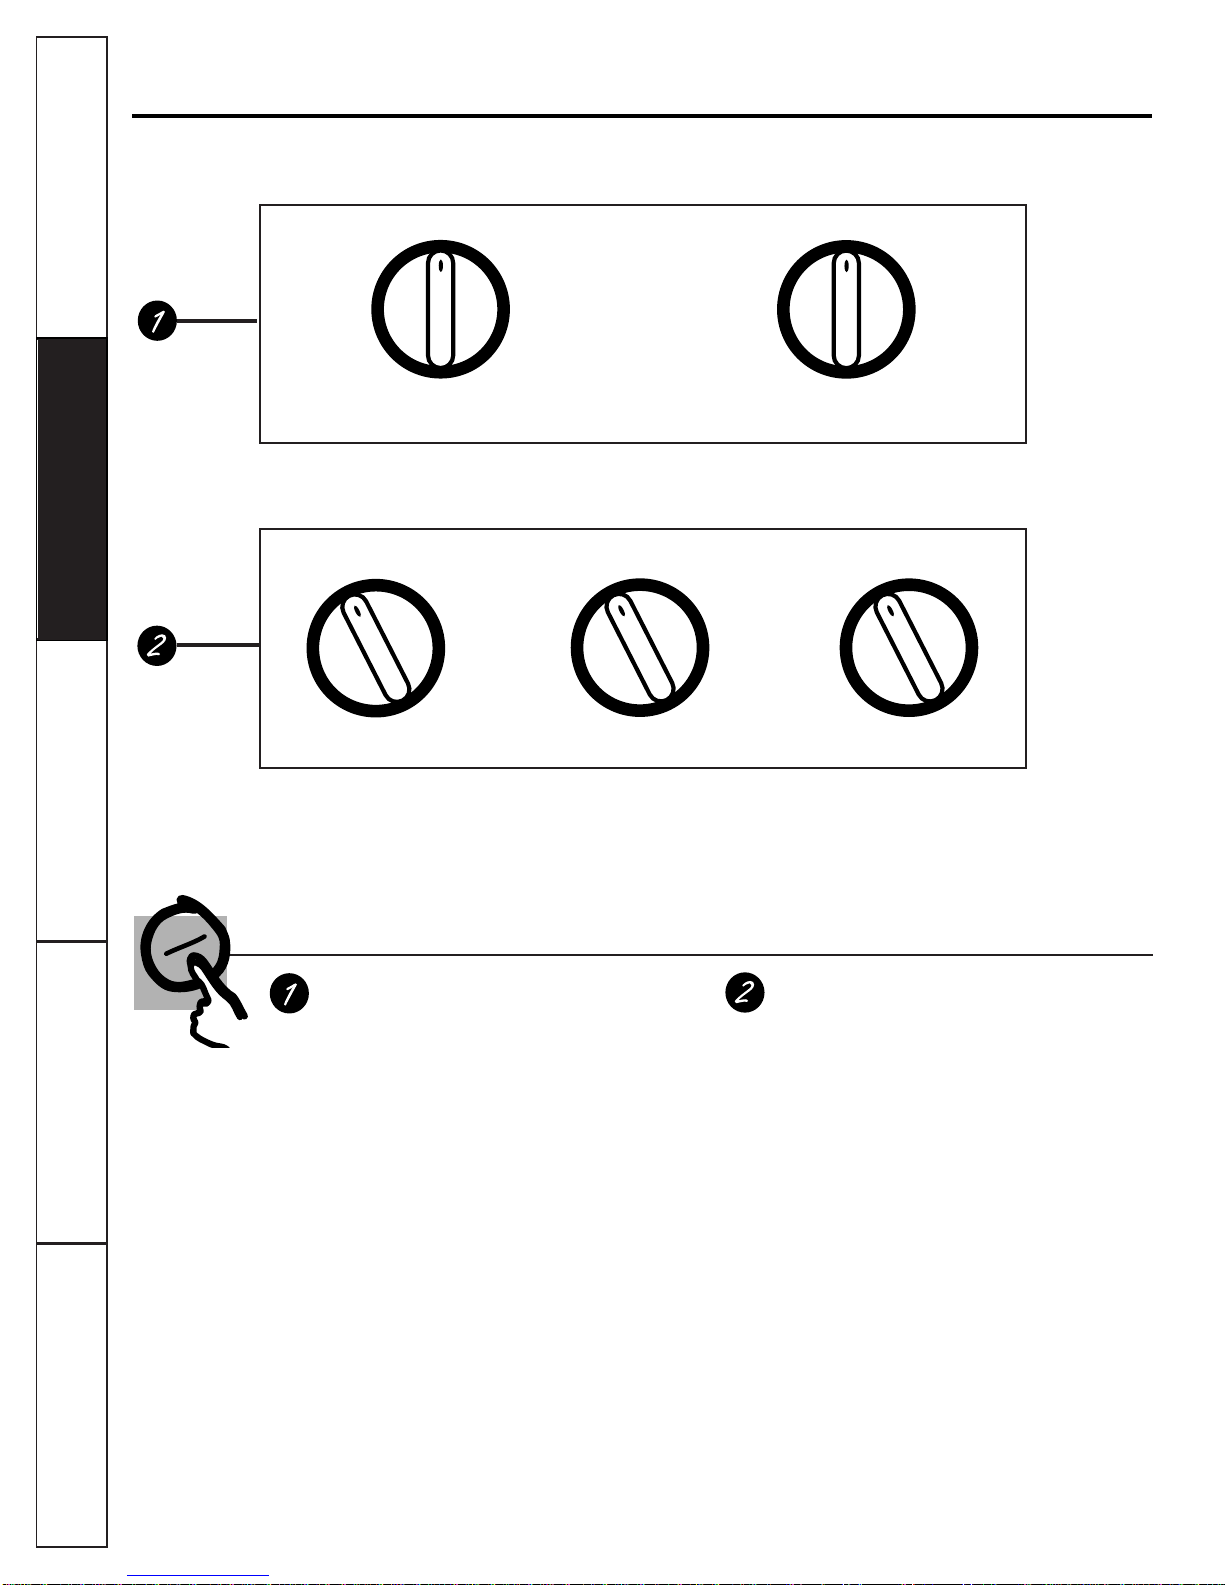
The controls will look like one of the following.
Controls
Mode Controls
HIGH COOL, MED COOL
and
LOW COOL
provide
cooling with different fan speeds.
LOWFAN
or
HIGH FAN
provides air circulation
and filtering without cooling.
NOTE: If you move the switch from a cool setting to OFF or to
a fan setting, wait at least 3 minutes before switching back to
a cool setting.
Cooling Descriptions
For Normal Cooling
—Select
HIGH COOL
or
MED
COOL
with the temp control at midpoint.
For Maximum Cooling
—Select
HIGH COOL
with the
temp control at the highest number available on
your knob.
For Quieter & Nighttime Cooling
—Select
LOW COOL
with the temp control at midpoint.
Temp Controls
The temp control is used to maintain the
room temperature. The compressor will cycle
on and off to keep the room at the same level
of comfort. When you turn the knob to a
higher number the indoor air will become
cooler. Turn the knob to a lower number and
the indoor air will become warmer.
OFF
LOW
FAN LOW
COOL
HI
FAN HI
COOL
OFF
LOW
FAN
LOW
COOL
HIGH
FAN HIGH
COOL
MED
COOL
1
2
3 4
5
6
1
2
3
4 5
6
7
8
1
2
3
4
56
7
8
9
10
MODE CONTROLS
TEMP CONTROLS

Customer ServiceTroubleshooting Tips
Operating Instructions
Safety Instructions Installation Instructions
Additional controls and important information.
5
Vent Control
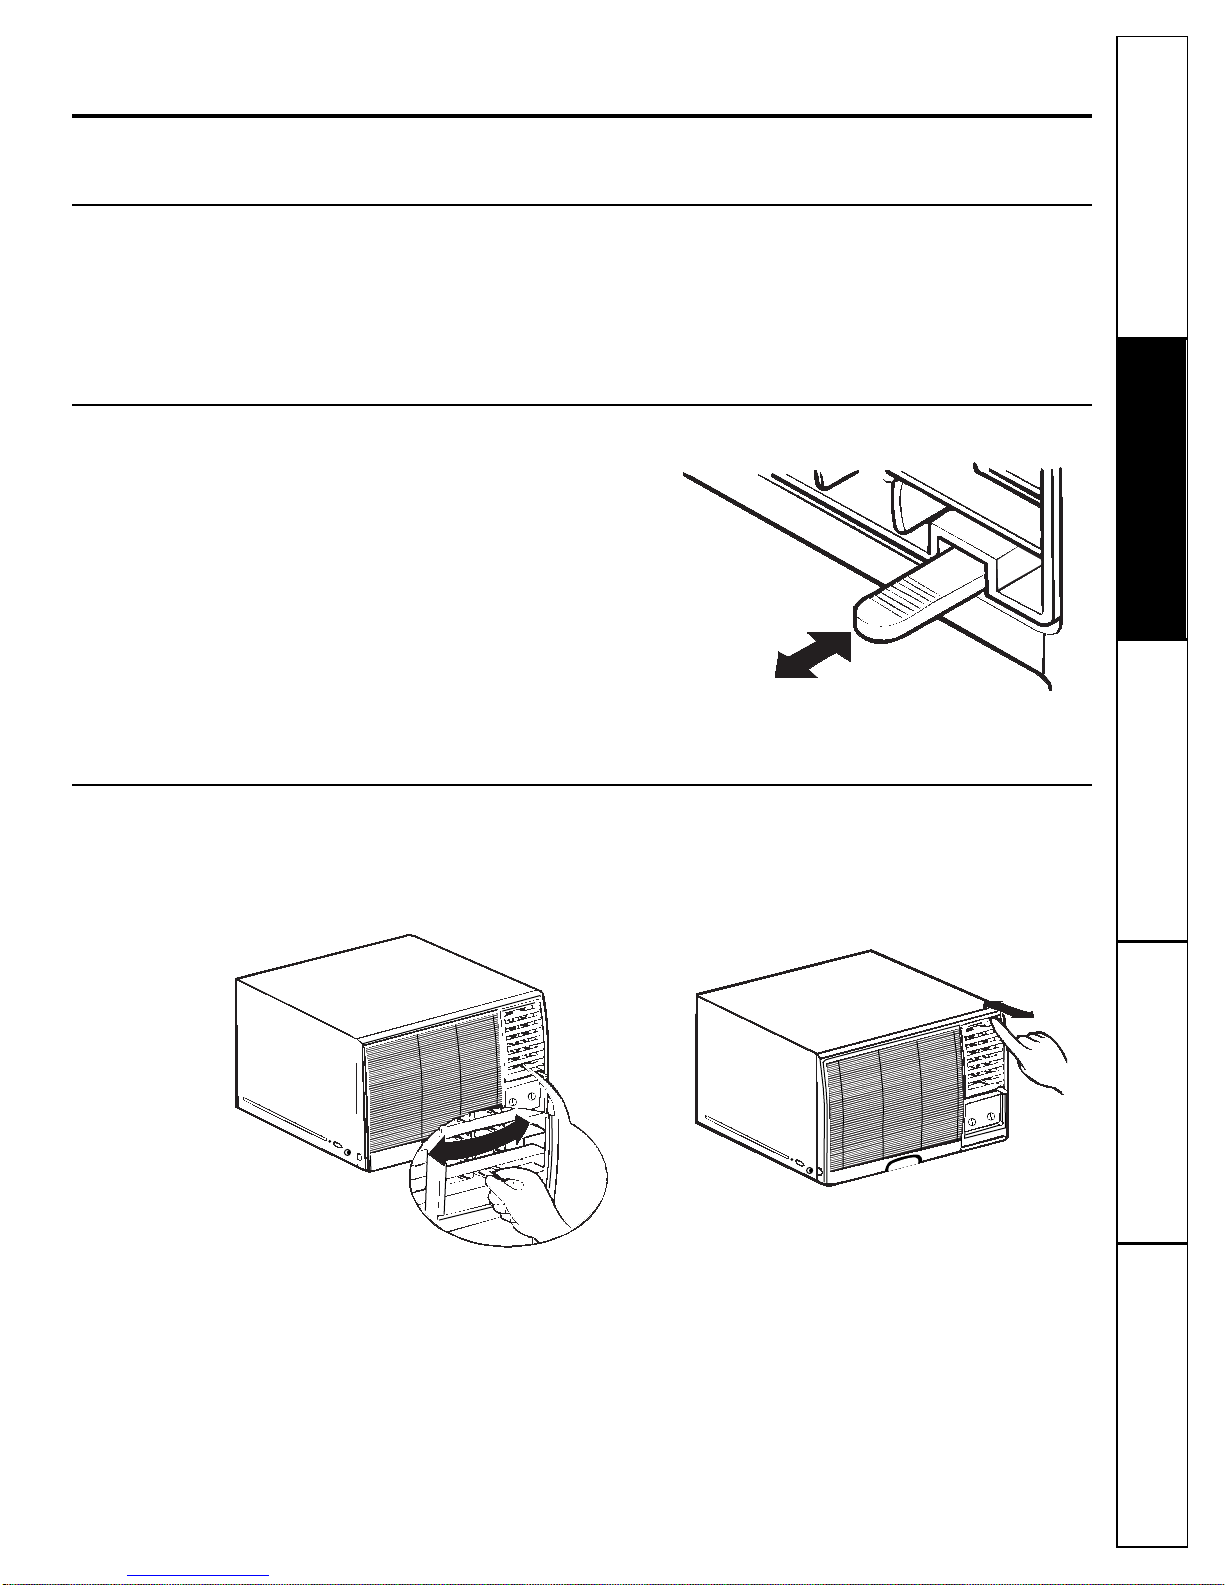
The vent control is located above the control knobs.
When set at
CLOSE
, only the air inside the room will
be circulated and conditioned. When set at
OPEN
,
some inside air is exhausted outside.
To open the vent, pull the lever toward you.
To close it, push it in.
Air Direction
The horizontal air direction is adjusted by moving
the lever to the left or right.
Fingertip pressure on the horizontal louvers adjusts
the air direction up or down.
Energy Saver
(on some models)
The energy saver switch controls the fan.
ENERGY SAVER ON
—The fan and compressor cycle
on and off together. This results in wider variations
of room temperature and humidity.
ENERGY SAVER OFF
—The fan runs all the time, while
the compressor cycles on and off.

6
Customer Service Troubleshooting Tips Operating Instructions Safety Instructions
Installation Instructions
Customer Service Troubleshooting Tips Installation Instructions Safety Instructions
Operating Instructions
Customer Service Troubleshooting Tips Installation Instructions Safety Instructions
Operating Instructions
Care and cleaning of the air conditioner.
Air Filter
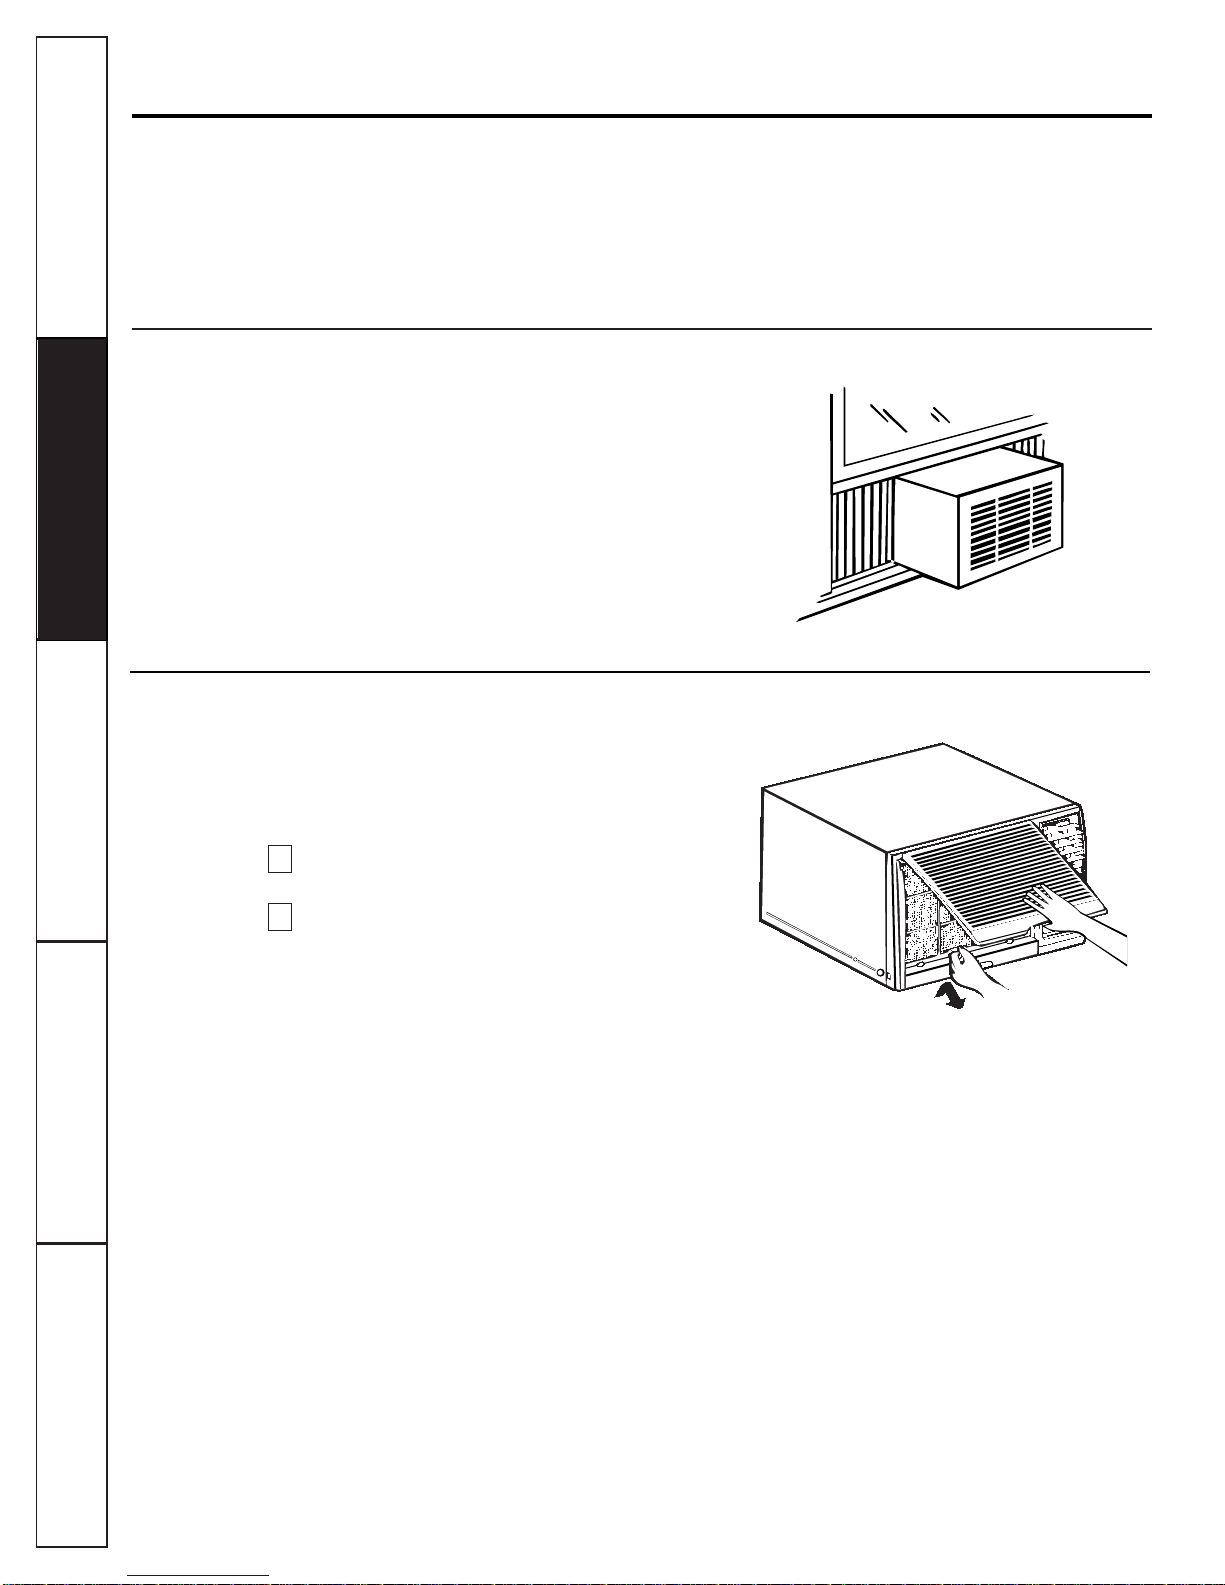
The air filter behind the front grille should be
checked and cleaned at least every 30 days or more
often if necessary.
To remove:
Open the inlet grille upward by pulling out the
bottom of the inlet grille.
Using the tab, pull up slightly on the filter to
release it and pull it down.
Clean the filter with warm, soapy water. Rinse and
let the filter dry before replacing it.
CAUTION: DONOT operate the air conditioner without a
filter because dirt and lint will clog it and reduce performance.
2
1
Outdoor Coils
The coils on the outdoor side of the air conditioner
should be checked regularly. If they are clogged
with dirt or soot they may be professionally steam
cleaned, a service available through your GE
service outlet.
Grille and Case
Turn the air conditioner off and remove the plug
from the wall outlet before cleaning.
To clean, use water and a mild detergent. Do not
use bleach or abrasives.

Customer ServiceTroubleshooting Tips
Operating Instructions
Safety Instructions Installation Instructions
7
Preparing to install the air conditioner.
Read these instructions completely and carefully.
NOTE TO INSTALLER: Leave these instructions with
the air conditioner after installation is completed.
NOTE TO CONSUMER: Keep this Owner’s Manual
and Installation Instructions for future use.
IMPORTANT NOTES:
For personal safety, this air conditioner must be
properly grounded.
It is important to have the wall outlet and circuit
checked by a qualified electrician if there is any
doubt as to whether a proper ground exists.
Follow National Electric Codes (NEC) and/or local
codes and ordinances.
CAUTION:
Do not, under any circumstances, cut or
remove the third (ground) prong from the
power cord.
Do not change the plug on the power cord
of this air conditioner.
Aluminum house wiring may present
special problems—consult a qualified
electrician.
Before You Begin
This model requires a 115/120-volt a.c.,
60 Hz grounded outlet protected with
a 15-amp time delay fuse or circuit breaker.
The 3-prong grounding plug minimizes the
possibility of electric shock hazard. If the wall outlet
you plan to use is only a 2-prong outlet, it is your
responsibility to have it replaced with a properly
grounded 3-prong wall outlet.
Electrical Requirements
■ Phillips-head screwdriver
■ Flat-blade screwdriver
■ Ruler or tape measure
■ Scissors or knife
■ Pencil
■ Level
Tools You Will Need

8
Customer Service Troubleshooting Tips Operating Instructions Safety Instructions
Installation Instructions
Customer Service Troubleshooting Tips Installation Instructions Safety Instructions
Operating Instructions
Customer Service Troubleshooting Tips Installation Instructions Safety Instructions
Operating Instructions
Window Installation Instructions
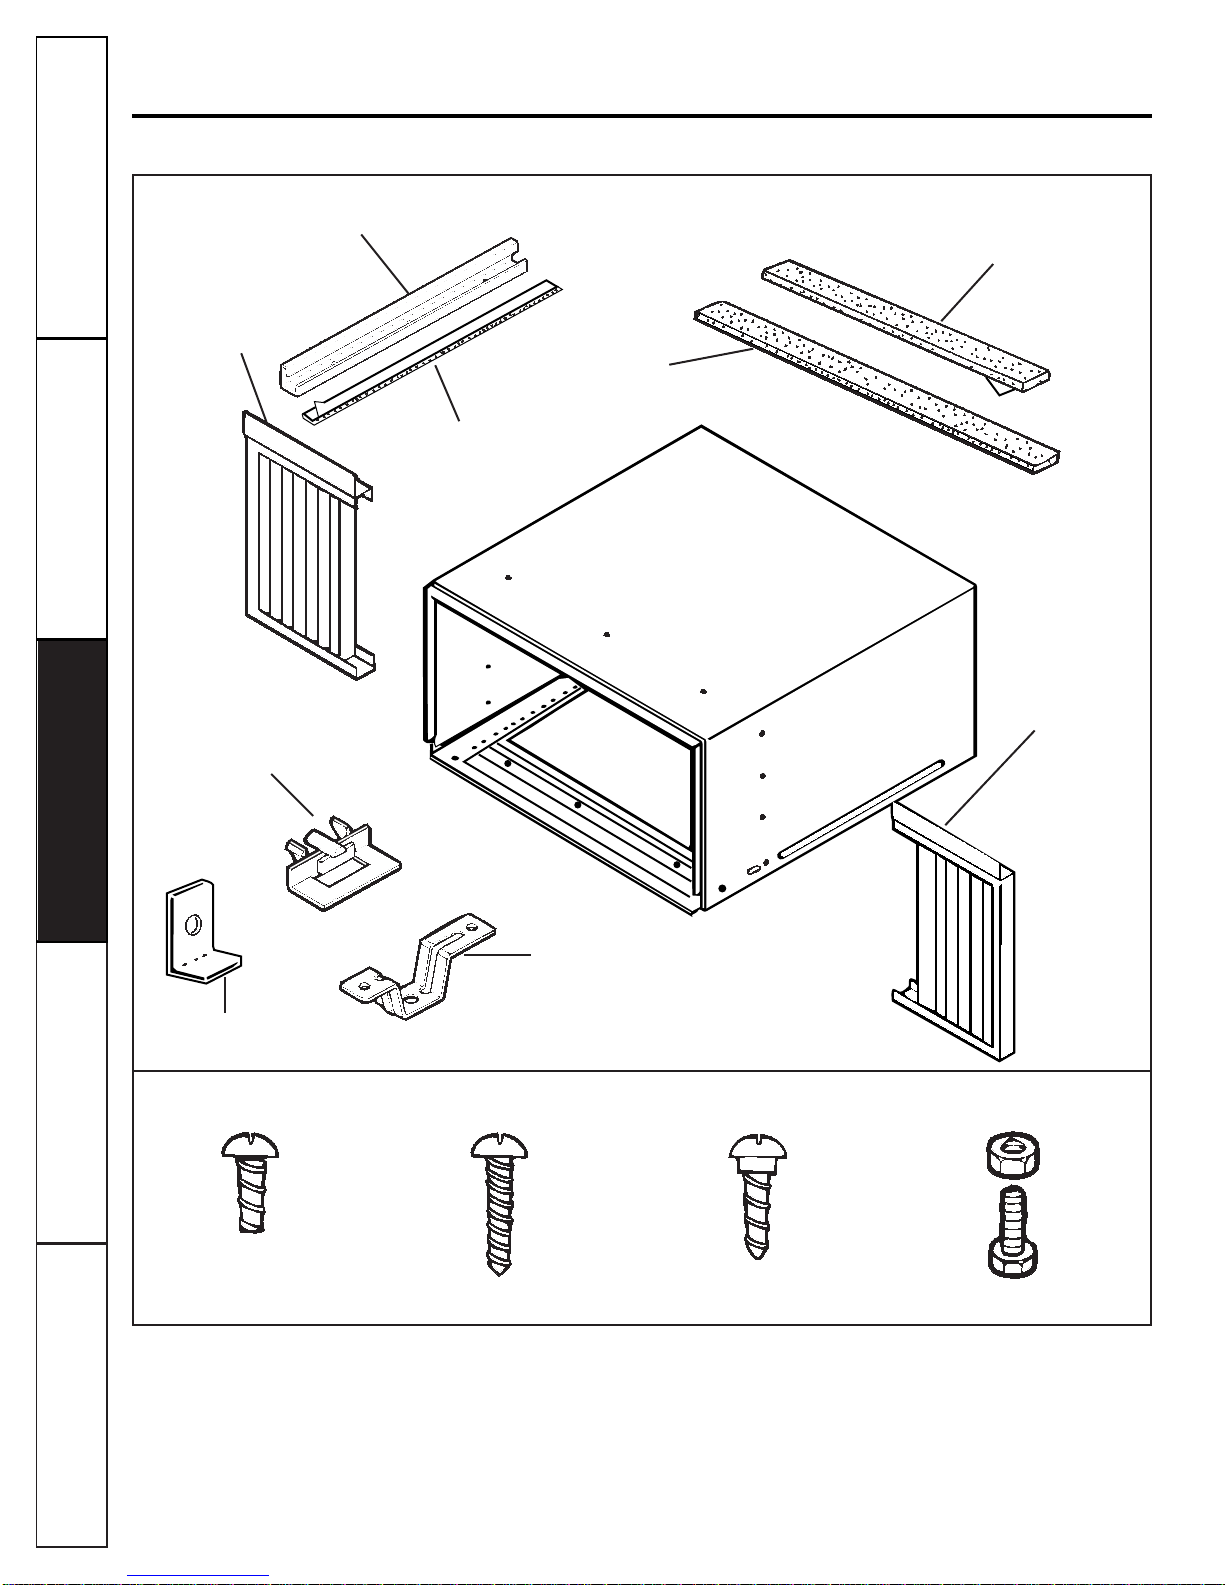
Parts Included
Type A (16)
Sill support (2)
Window locking
bracket
Frame guide (2)
Top mounting rail
Top mounting rail
seal strip
Right
accordion
panel
Foam top
window gasket
Window
sash seal
Left
accordion
panel
Type B (3) Type C (5)
Bolt (2)
Nut (2)

Customer ServiceTroubleshooting Tips
Operating Instructions
Safety Instructions Installation Instructions
Read completely, then follow step-by-step.
Window Requirements
■These instructions are for a standard double-
hung window. You will need to modify them for
other types of windows.
■The air conditioner can be installed without the
accordion panels if needed to fit in a narrow
window. See the window opening dimensions to
the right.
■All supporting parts must be secured to firm
wood, masonry or metal.
■The electrical outlet must be within reach of the
power cord.
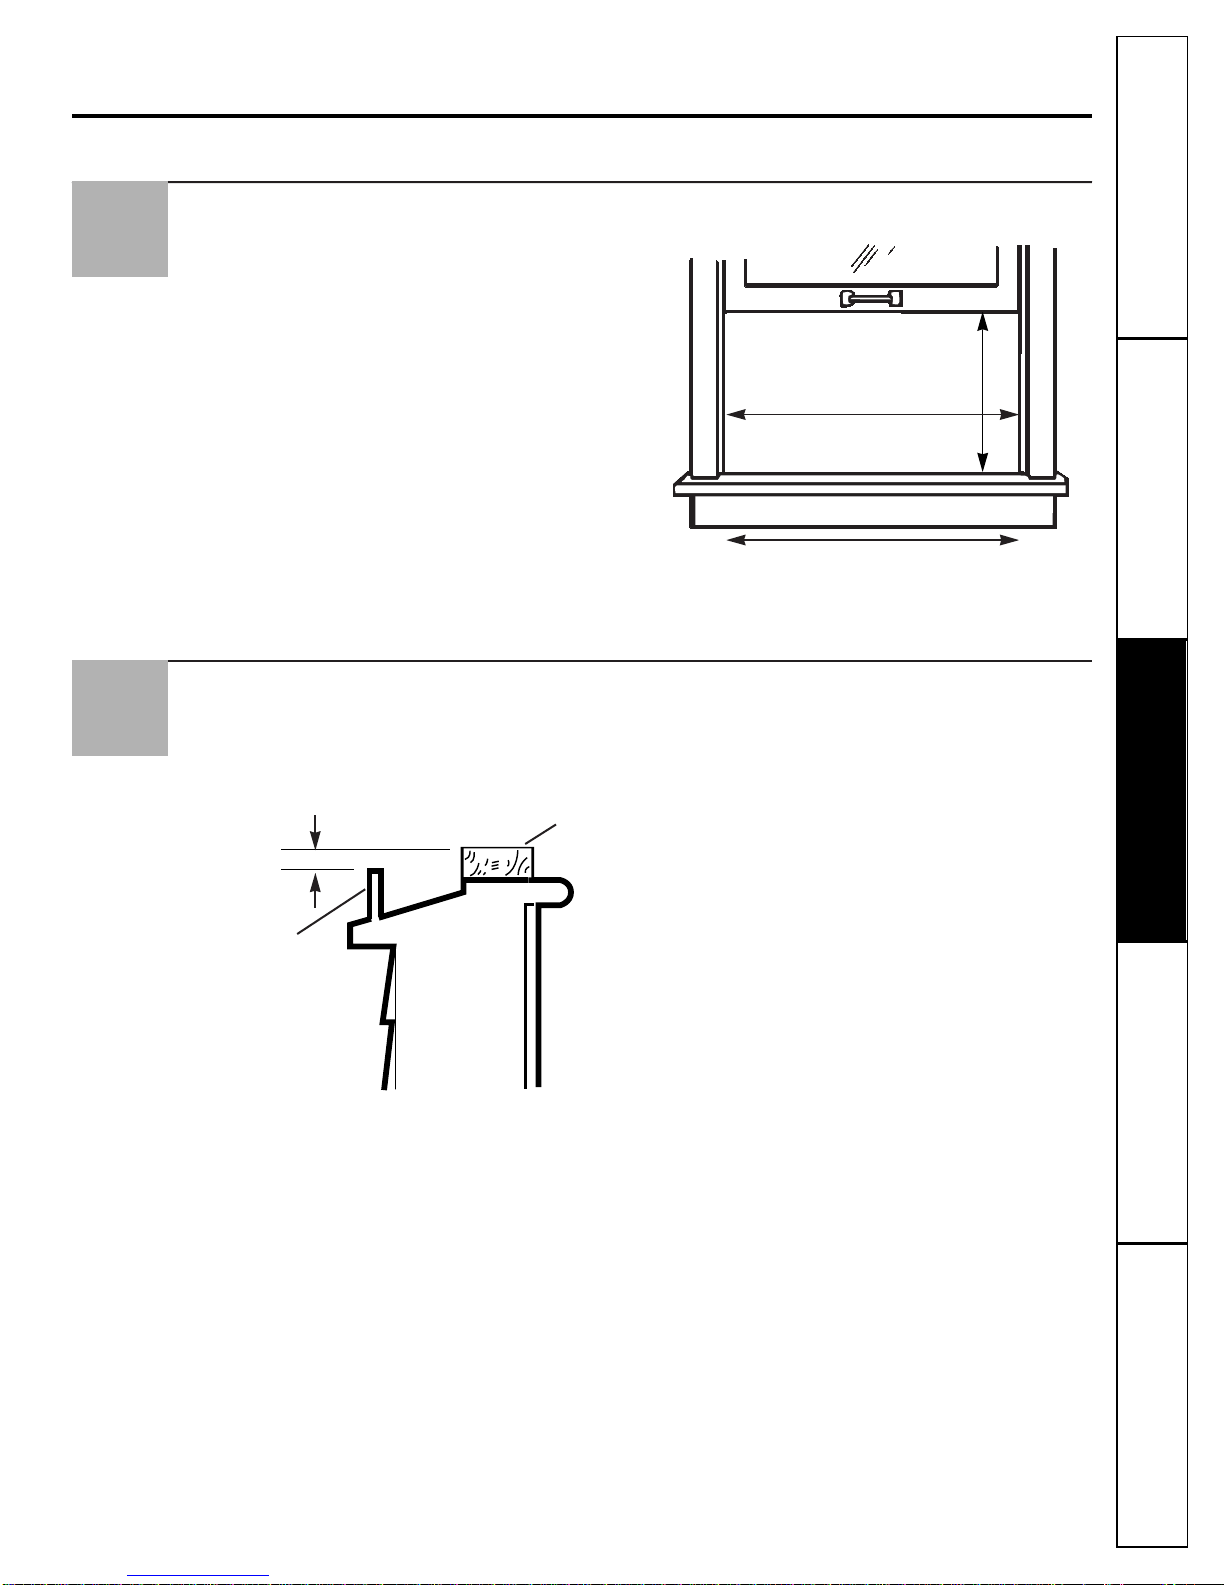
Window opening dimensions are for a standard double-hung
window.
14²min.
25²to 36²
(With accordion panels)
201/8²min.
(Without accordion panels)
Storm Window Requirements
A storm window frame will not allow the air
conditioner to tilt towards the outside and will keep
it from draining properly. To adjust for this, attach a
piece of wood to the stool.
WOOD PIECES—
WIDTH:
2²
LENGTH:
Long enough to fit inside the window
frame.
THICKNESS:
To determine the thickness, place a
piece of wood on the stool to make it 1/2²higher
than the top of the storm window frame.
Attach securely with nails or screws provided by
the installer.
1/2²higher
than frame
Storm window
frame
Wood
Stool
1
2
9

10
Customer Service Troubleshooting Tips Operating Instructions Safety Instructions
Installation Instructions
Customer Service Troubleshooting Tips Installation Instructions Safety Instructions
Operating Instructions
Customer Service Troubleshooting Tips Installation Instructions Safety Instructions
Operating Instructions
Window Installation Instructions
Prepare the Window and the Case
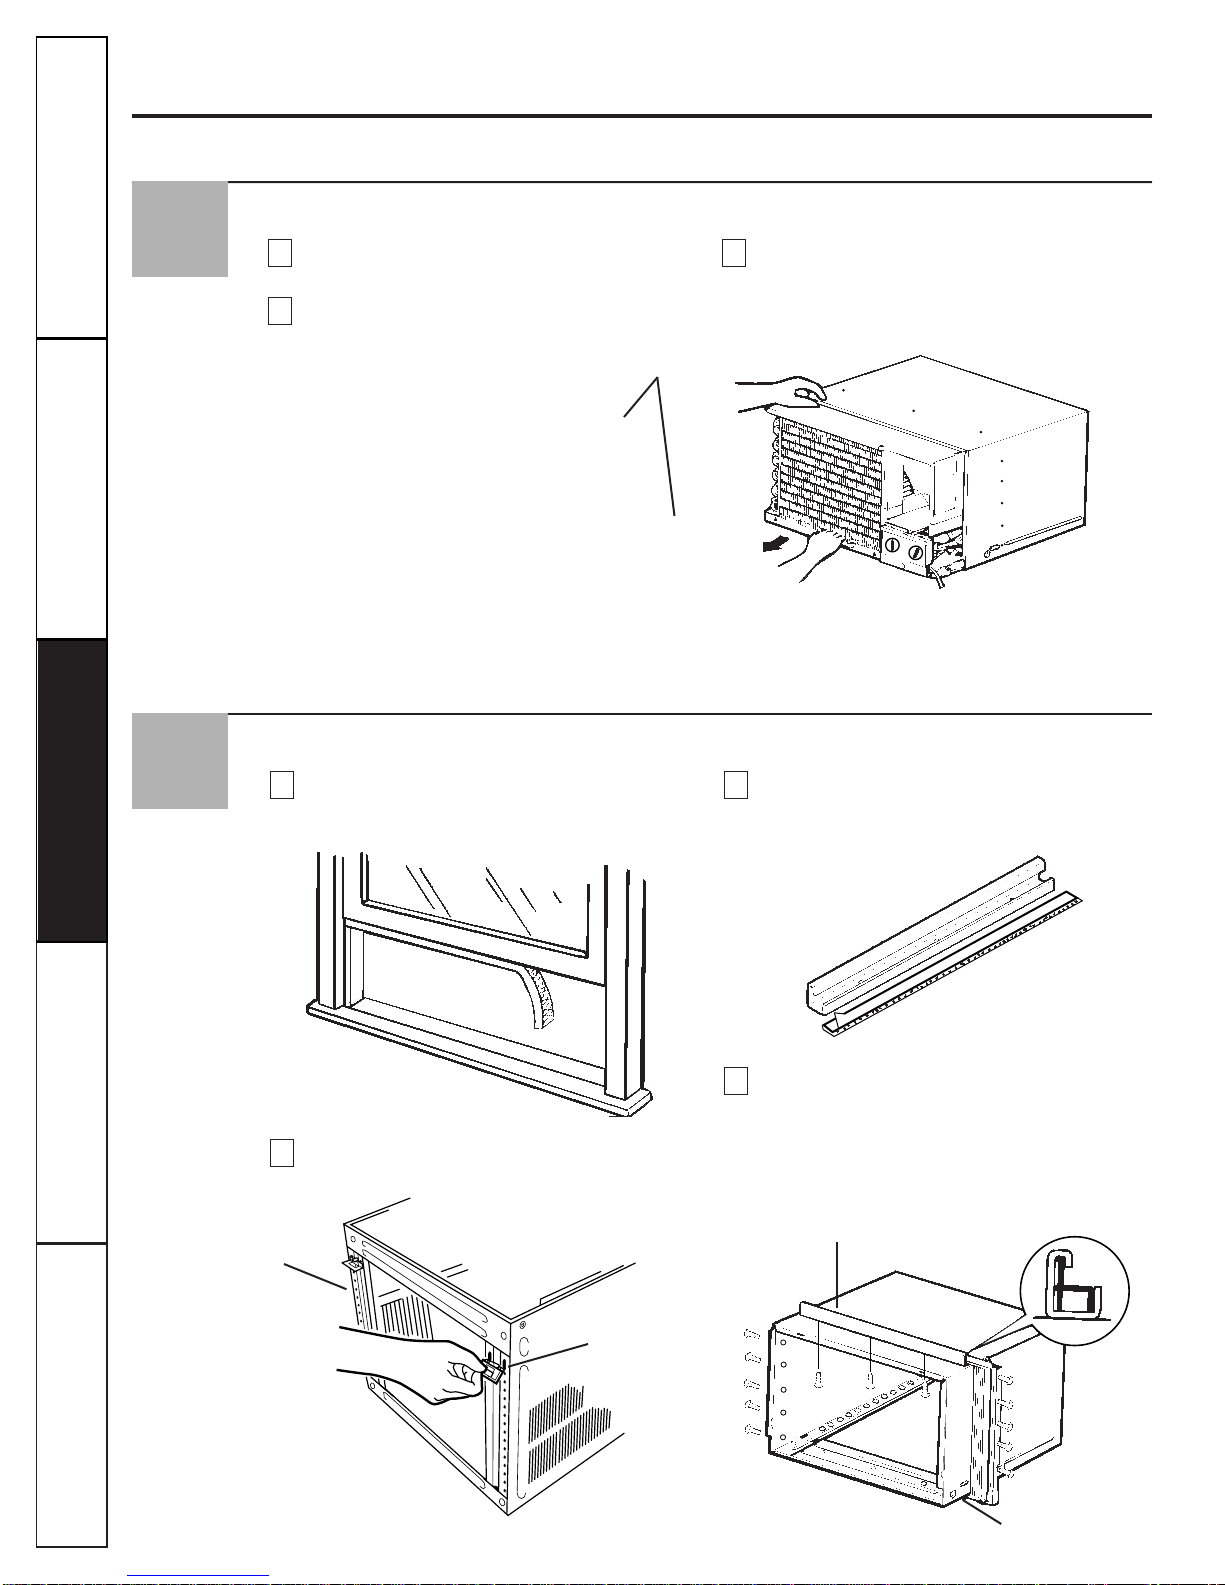
Cut the window sash seal to the proper length.
Peel off the backing and attach the seal to the
underside of the window sash.
Carefully insert the plastic frame guides into
the bottom of the case on each side.
Remove the backing from the top mounting
rail seal strip and attach it to the bottom of the
top mounting rail.
Install the top mounting rail with 3 type A
screws on the inside of the case. Insert the
frames for the accordion panels into the top
mounting rail and the frame guides. Attach the
accordion panels to the side of the case using
4 type A screws.
D
C
B
A
Remove the Air Conditioner From the Case
Remove the 2 shipping screws from the back of
the case.
Remove the 2 screws on each side of the case.
Keep these for later use.
Slide the air conditioner from the case by
gripping the base pan handle and pulling
forward while bracing the case.
C
B
A
3
4
Top mounting rail
Frame guides
Bottom of case
Frame guide
Shipping screws
Andere Handbücher für AGH08
1
Dieses Handbuch passt für folgende Modelle
2
Inhaltsverzeichnis
Andere GE Klimaanlage Handbücher

GE
GE AJM10AF Benutzerhandbuch

GE
GE AKV05 Betriebsanleitung

GE
GE AZ61H12DAB Betriebsanleitung

GE
GE AHL05 Betriebsanleitung

GE
GE AJCQ10DCD Series Betriebsanleitung

GE
GE ASH08 Originalbetriebsanleitung

GE
GE AEW08 Series Betriebsanleitung

GE
GE AGP07 Originalbetriebsanleitung

GE
GE AHS06 Bedienungsanleitung

GE
GE AGN05 Betriebsanleitung

GE
GE AEW10AN Betriebsanleitung

GE
GE AJCH Series Bedienungsanleitung

GE
GE AHP10 Bedienungsanleitung

GE
GE AEM24 Series Betriebsanleitung

GE
GE AEQ12DM Handbuch

GE
GE Appliances ASP05 Betriebsanleitung

GE
GE AW18 Schulungshandbuch

GE
GE ASR05 Betriebsanleitung

GE
GE AEH14 Betriebsanleitung

GE
GE AEQ24DL Gebrauchsanweisung