GILMAN gemini GSJ15S Bedienungsanleitung

1
MODEL NO 型號: GSJ15S
150W
SLOW JUICER
慢磨榨汁機
A GILMAN GROUP BRAND

2
• Please read these instruction carefully and retain them for future reference.
• Use this appliance solely in accordance with these instructions.
• This appliance is for household use only, not for commercial purpose.
• Remove all packaging material from the appliance before use.
• This appliance shall not be used by children of 0 to 8-year old.
• This appliance can be used by children older than 8-year old and persons
with reduced physical, sensory or mental capabilities or lack of experience
and knowledge, but only if they have been given supervision or instruction
concerning use of the appliance in safe way and understand the hazards
involved.
• Children should be supervised to ensure that they do not play with the appliance.
• Cleaning and maintenance must not be done by children.
• Keep the appliance and the cable out of reach of children.
• Have any repairs carried out solely by a qualied electrician. Never try to
repair the appliance yourself.
• Do not handle the plug or appliance with wet hands.
• Do not immerse the main body in water.
• Do not touch moving parts.
• Children shall not play with the appliance.
• Do not leave the appliance unattended when connected to the mains supply.
• Keep hair, loose clothing, ngers and all parts of the body away from openings
of the appliance.
• Only use the attachments/accessories supplied with the product.
• The parts and accessories are not suitable for cleaning in a dishwasher.
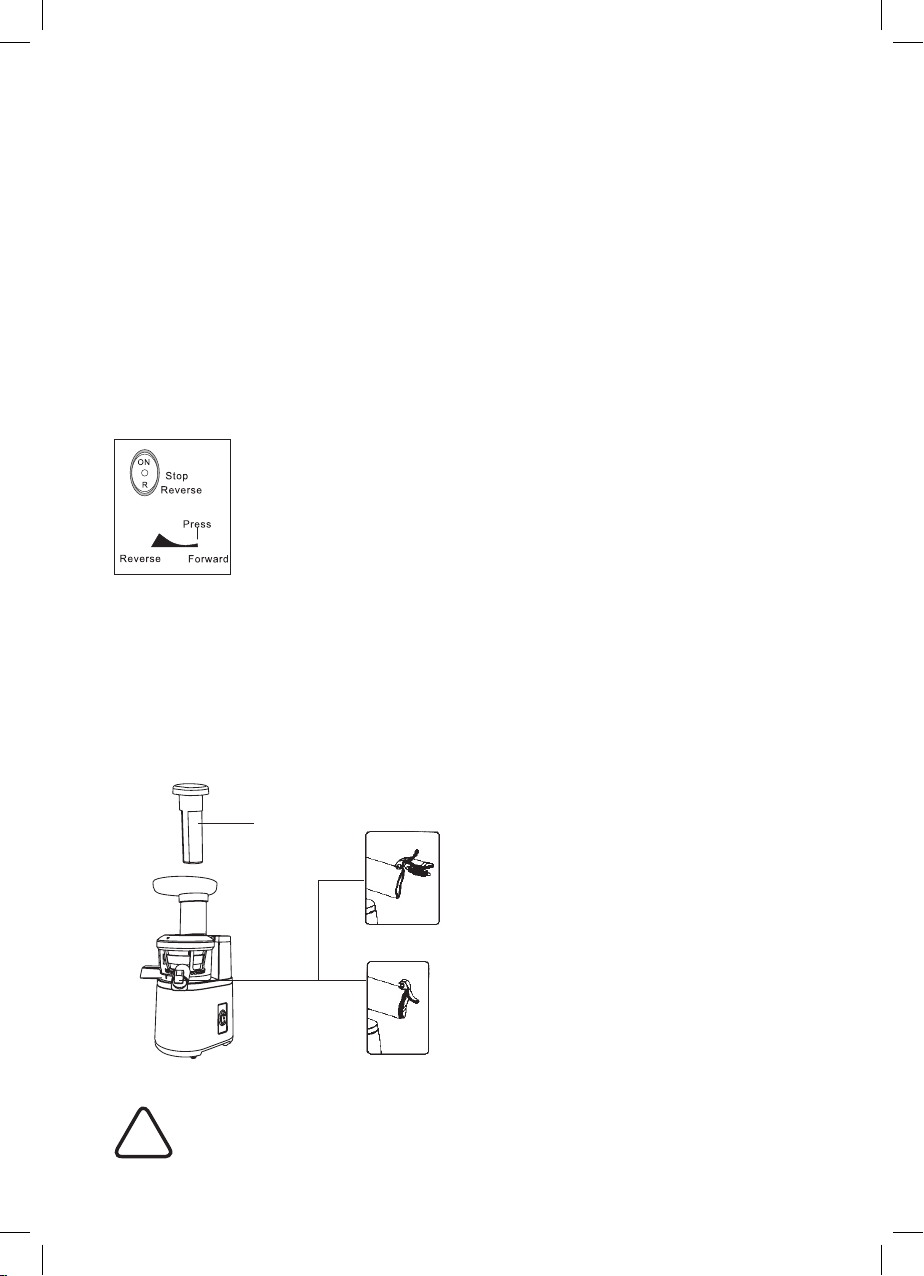
• Do not insert objects into the appliance when operating. If fruit becomes
lodged or blocked, press switch “R” for 2 - 3 seconds before disassembling
and cleaning.
• Do not operate the appliance when it is empty.
• Do not use ngers, rice ladle and cropsticks to push the ingredients to the
feed chute on the hopper.
• Verify that the mains voltage is the same as that indicated on the rating plate
on the appliance before use.
• Make sure that you always use a grounded wall socket to connect the appliance.
• Always remove the plug from the wall socket when the appliance is not in use.
• Remove the plug from the wall socket by pulling the plug, not the power cord.
• Make sure that the power cord and plug do not make contact with water.
• Make sure that the appliance, the power cord and plug do not make contact
with hot surface, such as a hot hob or naked ame.

3
• Check the appliance’s power cord regularly to make sure it is not damaged.
• Do not use the appliance if the power cord is damaged. If the power cord is
damaged, it must be replaced by an electrical technician or a person with
similar qualication, in order to avoid any hazards.
• Never use the appliance in the vicinity of ammable material.
4
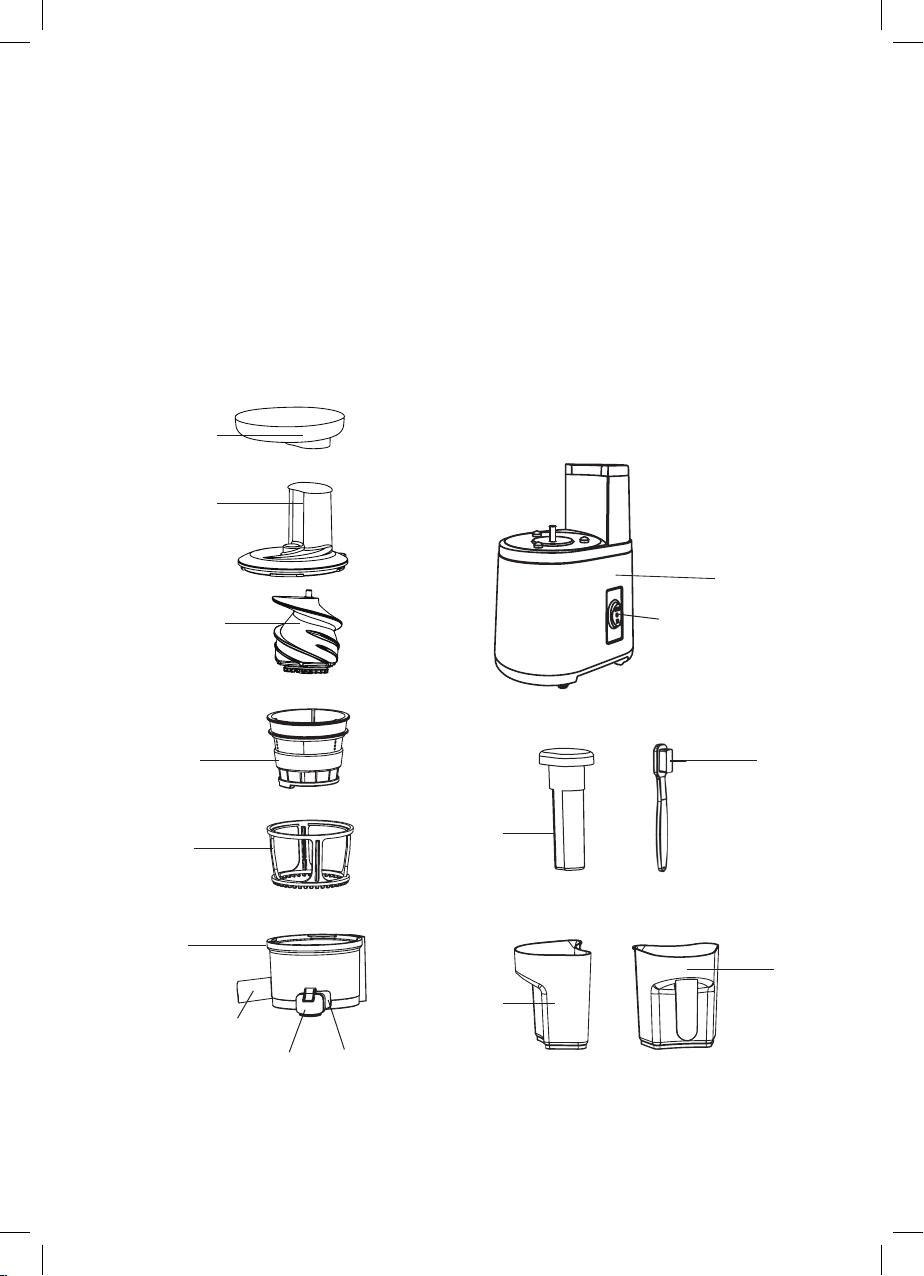
1a. Top of Hopper
1b. Hopper
2. Squeezing Screw
3. Strainer
4. Spinning Rack
5. Juicing Jug
1b
1a
2
5
Juice outlet
Pulp outlet
6
ON/OFF or
Reverse button
7
10
11
8
9
3
4
6. Main unit
7. Cleaning Brush
8. Pusher
9. Pulp Cup
10. Juice Cup
11. Juice Outlet Stopper
5
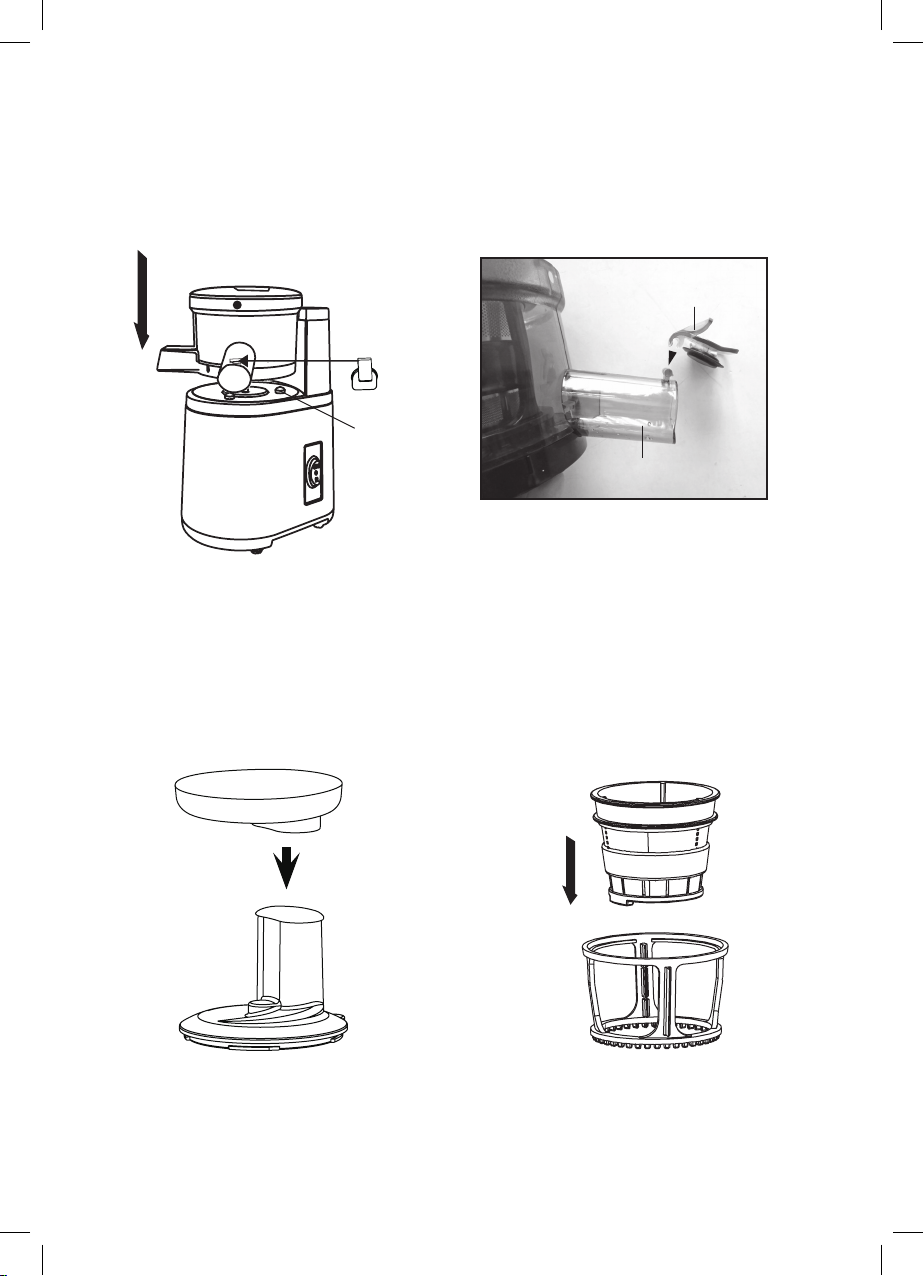
1. Fit the juicing jug to the main unit by aligning the 3 location pins of the jug and
main unit. (see below image)
2. Fit the top of hopper into hopper. 3. Fit the strainer into spinning rack.
*Insert the “C” lock area of juice outlet
stopper to the embossed part of juice
outlet as above position. Make sure the
joint is interlocked before operation.
Location pin
6
5. Insert the squeezing screw into the strainer and turn until it locates in position.
4. Insert the strainer and spainning rack into the juicing jug
(refer the step of TIPS below) and turn until it locates in position.
Ensure the arrow of the strainer and white dot on the jug
should be aligned and hold in position as above image.
Make sure the hexagon slot (A)
of Squeezing Screw perfectly
connect to the hexagon driving
head (B) on juicing jug
(A)
(B)
7
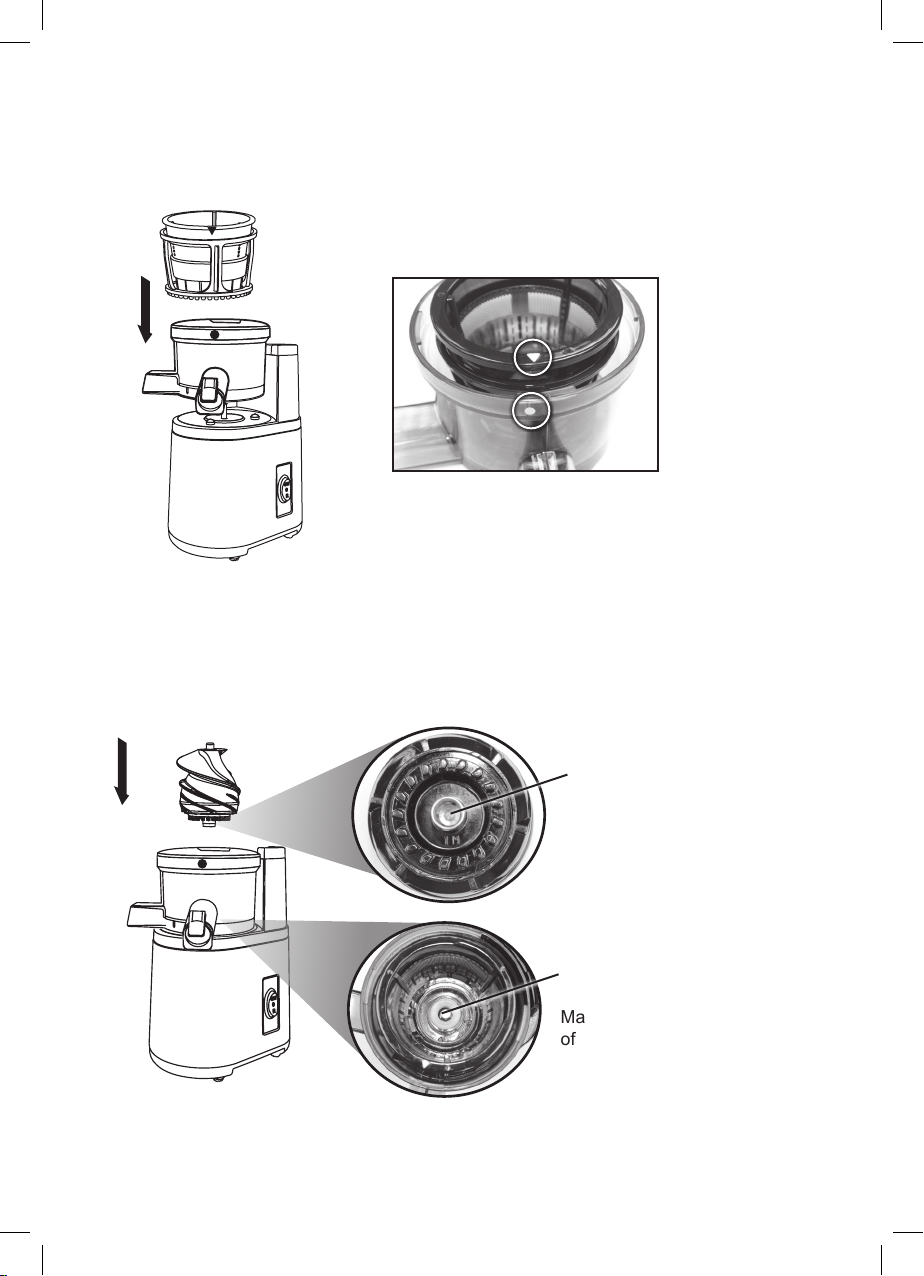
6. Lock the hopper to the top of the jug, aligning the arrows on the hopper and the jug
as below diagrams.
Twist the hopper in clockwise direction on juicing jug until both arrows are locked in right
position.
There is a safety switch to protect the user. The unit will only start operation when the
hopper is locked in place.
*Clockwise direction = locked
Anti-clockwise direction = unlocked
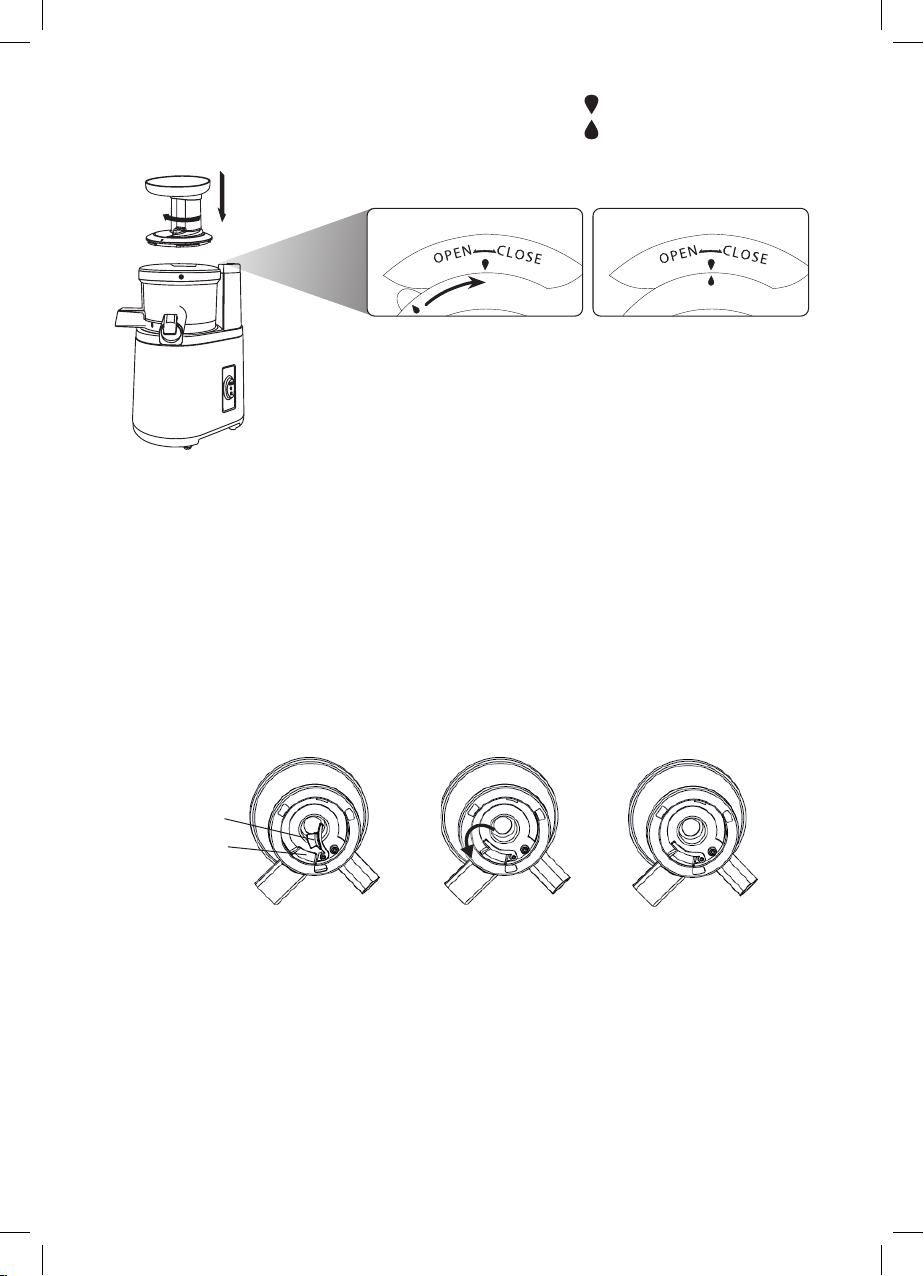
Pull out the rubber plug slightly and clean. After clean, re-install the rubber plug according
to the diagram below.
1. Pull out the rubber plug by clockwise direction from the channel of pulp outlet which
located in bottom of juicing jug. (Pic.1)
2. After cleaning, insert the rubber plug into channel of pulp outlet to anti-clockwise direction.
(Pic.2)
3. Make sure the channel of pulp outlet is closed tightly. (Pic.3)
The rubber plug must be placed correctly. Otherwise, the jug will have leakage
problem.
(Pic.3)(Pic.2)(Pic.1)
8
• Always clean the juicer and the parts using the brush provided after each use.
• Do not overll the hopper. Insert vegetables / fruit slowly to allow the juicer time to work.
The pusher should only be used if vegetables / fruit becomes lodged. Push down gently.
• Vegetables must be cut into pieces less than 2 cm length.
• Carrots must be cut into strips and the diameter must be less than 2 cm.
• Before rst use, clean all removable parts in warm soapy water and dry thoroughly.
• Ensure that the slow juicer is correctly assembled.
• Position the pulp cup under the pulp outlet on the left of the unit and position the juice
cup under the juice outlet on the right of the unit.
• Prepare your ingredients by cutting and de-seeding them if required.
• Plug the slow juicer into the mains socket.
• Insert your prepared ingredients into the feed chute on the hopper.
• Switch on the juicer with the switch at the side of the unit.
• If there is a blockage in the juicer, stop the juicer immediately. The reverse function “R”
can be used to help unblock and clear the obstruction. When the obstruction has been
cleared, the parts should be cleaned thoroughly before using again.
• After operation, please press switch “R” for 2-3 seconds before disassembling and
cleaning.
ON
9
• Periodically clean the rubber parts of the spinning rack.
• Thoroughly clean all parts immediately after every use to maintain the performance of
the product.
• After operation, please press switch “R” for 2 - 3 seconds before disassembling and
cleaning.
• Do not use harsh chemicals or abrasives to clean the parts of the juicer.
• Never clean the parts in a dishwasher as
• Rubber plug located in bottom of juicing jug need to clean properly after use. (Refer to
Page 7 “INSTALLATION OF RUBBER PLUG”)
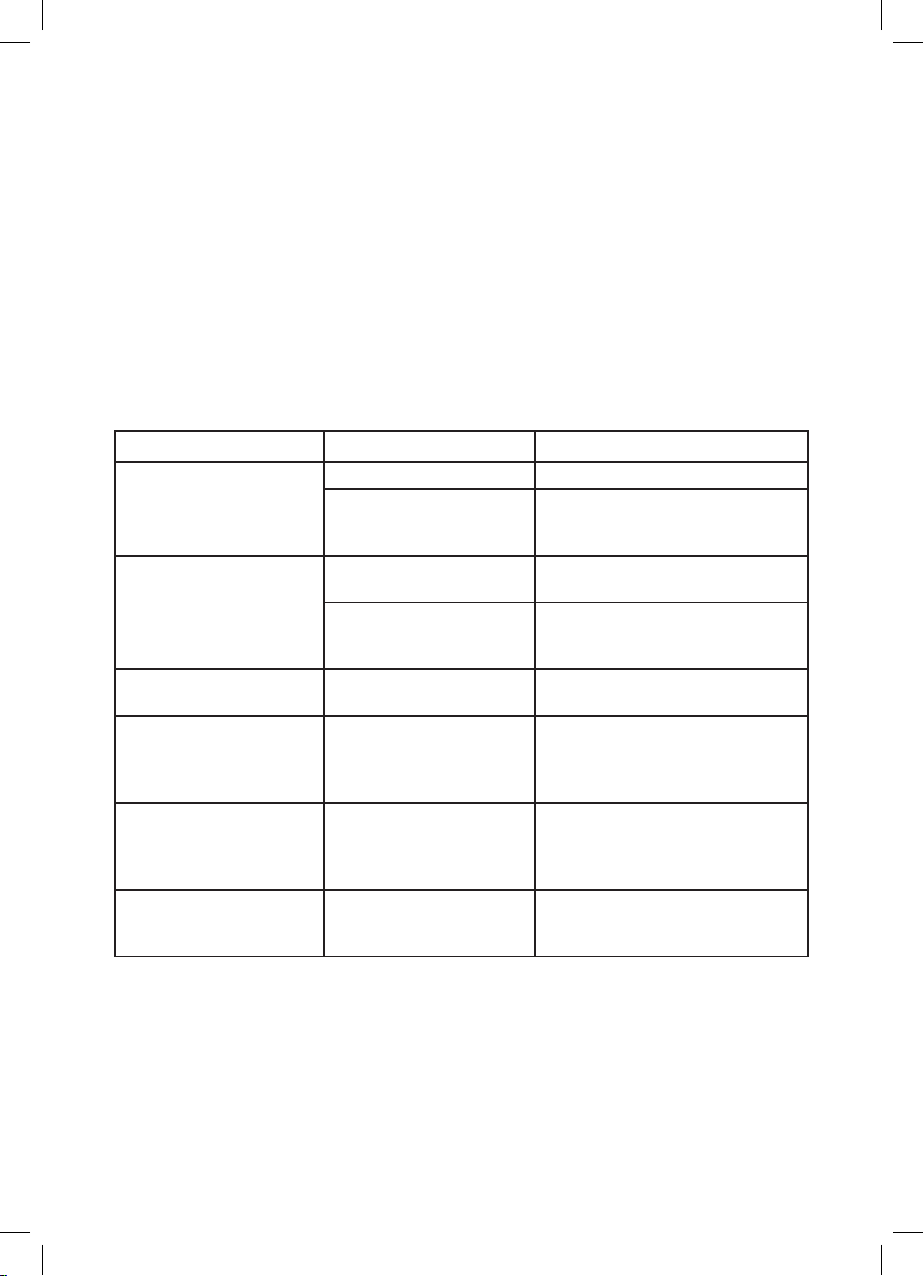
Problem Possible Cause What To Do
No function of juicer.
Juicer is not plugged in.
Check the juicer is plugged in.
Incorrect assembly. Re-assemble the juicer as per
the instructions. Ensure the lid
is locked correctly.
The motor has stopped.
There is a blockage in
the juicing jug.
Press the reverse button to
clear the blockage.
The motor has cut out
due to over-use.
Switch off, unplug and allow
to cool down for 10 minutes
before using again.
Leaking underneath
the juicing j ug.
The rubber plug is not
correctly inserted.
Remove all parts and check
the position of the rubber plug.
Staining on parts. This is the natural color
from juice.
This is normal. To reduce
discolouration, ensure you
rinse and clean the appliance
immediately after use.
Squeaking noise when
j uicing.
Friction between the
squeezing screw and
juicing jug or food /
fruit.
The squeaking sound is
perfectly normal. Do not operate
the juicer without any ingredents.
Too much pulp coming
out with j uice.
There is excess
food / fruit in the juicing
jug
clogging the strainer.
Cut food / fruit, especially
fibrous food into smaller
pieces.
Model No.: GSJ15S
Voltage: 220-240V
Frequency: 50/60Hz
Power: 150W
Product dimension: 165(W) x 410(H) x 210(D) mm

10
閱讀下列說明事項並請妥善保管,以供日後參考。
在使用本產品之前,應仔細閱讀下列事項及使用說明,閱後並請妥善保管,以供
日後參考:
- 請按照這些說明事項, 使用本產品。
- 本產品僅供家用,不作商業用途。
- 使用前,請將所有包裝材料。
- 0至8歲的兒童不應使用本產品。
- 超過8歲的兒童可使用本產品,但請勿由肢體不健全、感覺或精神上有障礙或缺
乏相關經驗和知識的人使用,除非有負責他們安全的人對他們使用本產品進行監
督或指導。
- 請務必看顧好兒童,以確保他們不玩耍本產品。
- 兒童不應清潔或維修本產品。
-
當需進行任何維修,必須由專業維修人員進行維修。永遠不要嘗試自己修理本產品。
- 手濕時不可以接觸電源插頭或本機。
- 主體不可以浸入水中。
- 不可接觸轉動中的零件。
- 兒童不可以把玩本機。
- 本機開著後不可以無人監管。
- 當本機開著時,頭髮、鬆身衣物、手指和身體其他部份都要離開本機。
- 只可以使用隨機附件。
- 本機的零件和配件都不適合放入洗碗碟機清洗。
- 本機開動時不可以插入物件,如果在榨汁杯中的蔬果已把本機出汁口 / 出渣口塞
住,請按“R”按鈕 2 – 3 秒後才拆開相關部件進行清潔。
- 本機內沒有食物時不要開動本機。
- 機體的進料口禁止用手指、飯勺、筷子把蔬果推進。
- 使用相符的電源和電壓,以防止觸電。
- 本產品只能使用帶接地線的電源插座。
- 當本產品不使用時,請從牆上的插座中拔掉插頭。
- 從牆上插座中拔掉插頭時,應拿著插頭而不是電源線。
- 確保本產品的電源線和插頭不與水接觸。
一般安全
安全指引-電子產品
Inhaltsverzeichnis
Andere GILMAN Entsafter Handbücher


