
Gulfstream La Tulip 2 Bedienungsanleitung

Chair 9622 Chair 9640Chair 9620-1
PLEASE SAVE THIS MANUAL
FOR FUTURE REFERENCE
OWNER MANUAL
Cleanjet MAX®, La Tulip2 and La Tulip 3™, Gulfstream Inc.®are trademarks of Gulfstream Inc.
Patent #D709619, #8726430, #8680699, #D701318, #8662848, #8531048, #8366418, #D670938, #D670354, #D662340, #D660444,
#D650084, #D646082, #D636090, #D632798, #D628704, #D615326, #D613099, #D612509, #D610697, #D600950, #D596883, #D596882,
#D590188, #D589285, #D588844, #D583960, #D583576, #D583171, #D565739, #D556480, #7111334, #6991182
© 2014 All rights reserved. Design and Specifications are subject to change without notice.

Table of Contents
Safety and Precautions ...................................................................................... 1-2
Identifying Parts.................................................................................................. 3-4
Foot-Spa Clearance ........................................................................................... 5
INSTALLATIONS
Attaching Seat .................................................................................................... 6
Jet Assembly ...................................................................................................... 7-8
Plumbing Connections ....................................................................................... 9-10
Operations and Use ........................................................................................... 11-12
Cleaning & Maintenance .................................................................................... 13-14
Warranty & Service ............................................................................................ 15
Owner Manual

SAFETY & PRECAUTION 1
Thank you for purchasing the La Tulip 2 - 3 spa from Gulfstream Inc. Please carefully read the instructions before
installing the spa. Carefully follow the instructions and your spa will give you years of beauty and service.
This product is to be connected to a branch circuit outlet protected by a Class A GROUND FAULT CIRCUIT
INTERRUPTER (GFCI), and the GFCI shall be tested regularly for continued protection and correct
operation. If a Class A GFCI protected outlet is not available, DO NOT USE THIS PRODUCT! Please
contact a licensed electrician for installation of a Class A GFCI according to local electric codes, or equivalent.
THIS PRODUCT IS FOR IN DOOR USE ONLY
DISCONNECT POWER SUPPLY CORD BEFORE SERVICING AND CLEANING
Foot-spa must be installed by a licensed plumber and electrician in accordance with local codes. Plumbing and
Electrical Installation instructions must be adhered to in order for the warranty to be in effect and to ensure the utmost
in safety. Chair and spa have a maximum seating capacity of 350 pounds.
The foot-spa is not intended to be stood in or used as a step. The portable foot-spa model is movable, standing in tub
or using as a step may cause severe damage to the unit as well as possible serious injury to the person.
Warning
If a crack occurs in the glass bowl, DO NOT manually handle the bowl unless the proper attire is worn.
Under no circumstances may the bowl be used by your customers as you could be held accountable for
any injury that may occur. Gulfstream is not liable for any injury that may occur.
Warning
BASIC PRECAUTIONS SHOULD ALWAYS BE OBSERVED, INCLUDING THE FOLLOWING:
1. Read and follow all instructions
2. DANGER. To reduce the risk of injury, do not permit children to use this unit unless they are supervised
at all times
3. Use this unit only for its intended use as described in this manual. Do not use attachments that are not
recommended by the manufacturer.
4. Never drop or insert any object into any opening.
5. Do not block jets during whirlpool operation.
6. The unit must be connected to an electrical supply circuit that is protected by a ground fault circuit interrupter.
7. The clean jet motor is magnetically driven and is insulated twice. Therefore it does not require to be bonded.
Save these instructions
1. Excessive water temperature is dangerous and should be checked BEFORE use.
2. Maximum temperature of the water should never exceed 100 degrees F.
3. Always enter and exit the Foot Spa slowly and carefully.
4. NEVER bring and / or operate any electrical devices into or near the Foot Spa.
Warning

SAFETY & PRECAUTION 2
GROUNDING METHODS
Because this unit must be connected to a circuit with a ground-fault circuit interrupter (GFCI),
DO NOT use a grounding adapter.
The use of a grounding adapter is prohibited in Canada by Part I of the Canadian Electrical Code.
GROUNDING INSTRUCTIONS
This appliance must be plugged into an outlet equipped with a ground-fault circuit interrupter. The ground-fault
interrupter can be in the out-let shown in illustration A or in the circuit breaker (fuse) box. If your outlet or circuit breaker
(fuse) box is not equipped with a ground-fault interrupter, you must have your electrician install one (5 amps/unit
required).
In the event of an electrical short-circuit, the ground-fault circuit interrupter will turn off the electrical power to the unit
immediately, greatly reducing the likelihood of serious injury. This appliance is for use with a nominal 120-volt circuit and
has a grounding plug that looks like the plug illustrated in the sketch. The outlet must be properly installed and grounded
in compliance with all local codes and ordinances.
If it is necessary to use an extension cord, use only a three-wire extension cord that has a three-blade grounding plug
and a three-slot receptacle that will accept the plug on the appliance.
Replace any damaged cord.
OPERATION AND USE INSTRUCTIONS, (READ AND FOLLOW ALL INSTRUCTIONS)
1. DANGER: To reduce the risk of injury, do not permit children to use this unit unless they are closely supervised
at all times.
2. CAUTION: This unit should not be used by persons with open wounds, cuts or sores on their feet or legs, or by
persons with poor circulation, or by persons with heart conditions. If in doubt, the client should consult with his
or her physician.
3. Use this unit only for its intended use as described in this manual. Do not use attachments not recommended
by the manufacturer
4. Do no operate with a damaged cord or plug. If unit malfunctions or is damaged in any manner,
contact an authorized service representative for examination or repair.
5. Never drop or insert any objects into any opening.
6. Do not block jets during pedicure operation.
7. Water temperature should be checked before use. Water temperature should never exceed 100 degrees
Fahrenheit.
8. Never bring any electrical devices into the unit or operate electrical devices near it.
9. The unit must be connected to a supply circuit that is protected by a ground-fault circuit interrupter (GFCI).
10. Connect the unit only to a properly grounded outlet. See grounding instructions.
11. Close supervision is necessary when the unit is used by, on or near children or invalids.
IMPORTANT! At the end of the day, ALWAYS turn the main power OFF!
including the power switch on the chair.
Warning
Grounding PIN
GROUND-FAULT
INTERRUPTER OUTLET
NEMA 5-15R
NOT INCLUDED
A B
COMPLIANCE WITH LOCAL CODES AND/OR
INSPECTIONS IS THE RESPONSIBILITY OF
THE PURCHASER AND/OR INSTALLER

IDENTIFY YOUR FOOT-SPA 3
1. Chair Remote Control
2. Headrest Pillow
3. Back Cushion & Massage
4. Seat Cushion
5. Wooden Armrest
6. Flip-up Manicure Tray
(Swing-out Accessories Bowl Access is available
in the 9622 and 9620-1 chairs.)
7. Glass Bowl
8. Jet Control
9. Water Mixer Control
10. Hand Spray under Footrest
11. Adjustable Footrest
12. Drain Control
13. Jet
14. Drain
15. Discharge Pump Switch (Optional)
14
13
Front
Back
2
3
4
1
5
6
10
8 79
12
11
15 12

SEAT OPERATION
SPA DIMENSION
IDENTIFY YOUR FOOT-SPA 4
15’’
55’’
43’’
1
2
3
Armrest can be raised up/down
Manicure tray can be folded up/down
Chair Sliding
Reclining 25°
Swing out manicure tray to use
accessories bowl
(Swing-out Accessories Bowl Access is
available in the 9622 and 9620-1 chairs.)

TYPICAL FOOT-SPAS
WALL CLEARANCE
Wall
20’’
34.5’’
Distance from center drain
to the back of the spa
60’’
60’’
16’’16’’ 16’’ 16’’
28’’
Foot-spa #1
Center Center
Foot-spa #2
Clearance
27’’ 27’’
FOOT-SPA CLEARANCE 5

INSTALLATIONS 6
Attaching The Seat to The Base
Align the seat with the pre-drilled holes on the base then
tightly secure with the nuts and bolts provided.
Attach trays or remote stand to armrest with screws provided.

Cleanjet Unit Removal
Plate & Anchors located on tub/bowl wall
Impeller HousingBanana Plug
Top Plate
Wall
Ball
Bushing
Anchor Pegs
To remove the jet unit from tub/bowl.
Gently pull out the jet unit from the anchor pegs
To remove the jet unit components. Pull-out Banana Plug then
turn the top plate counter-clockwise in the arrow direction
Jet Unit Components
Screws
To install the jet unit. Assemble all jet unit components in order as before removal, snap the jet unit onto the anchor pegs
located on tub/bowl wall securely.
Note: All jet unit components must be assembled in sequence of order to avoid malfunction.
Please call manufacturer for repair or replacement
INSTALLATIONS 7
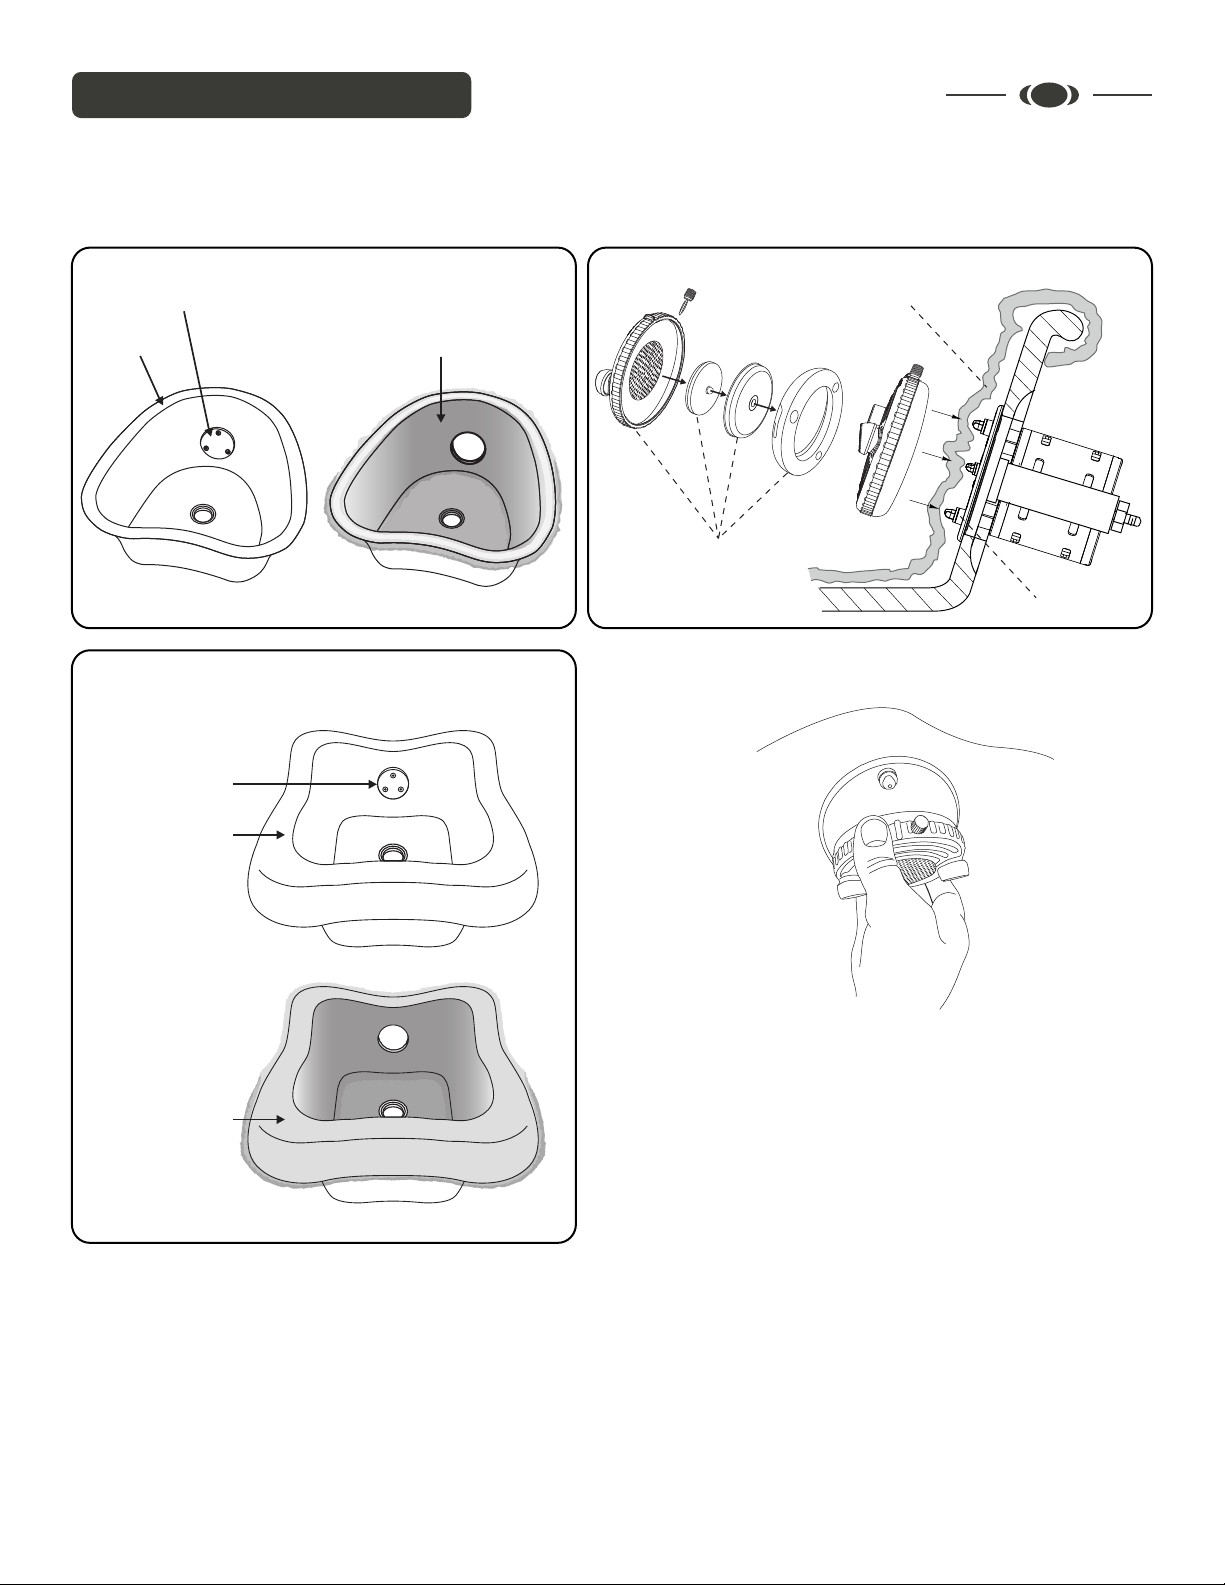
Poly Liner Installation
Fit elastic edge over bowl rim and form liner to bowl contours as
shown in the Fig.1
Align the impeller unit onto the anchor pegs and pushit onto the
base plate as shown in Fig.2
To remove, gently pull the impeller unit as shown in Fig.3 from the
base plate and pierce liner over drain, then once drained, pull up
the plastic liner.
To avoid risk of infection disease, discard the liner after each use.
INSTALLATIONS 8
Fig.3
Soft Plastic Liner
on the Glass Bowl
Soft Plastic Liner
on the Glass Bowl
Base Plate Fixed
to Motor Behind
Fig.1 (La Tulip 3)
Glass Bowl
Fig.1 (La Tulip 2)
Base Plate Fixed
to Motor Behind
Glass Bowl
Soft Plastic Liner
Impeller Housing
Anchor Pegs
Fig.2
Dieses Handbuch passt für folgende Modelle
4
Inhaltsverzeichnis
Andere Gulfstream Whirlpool Handbücher


Beliebte Whirlpool Handbücher anderer Marken

Bestway
Bestway Lay-Z-Spa 54189 Bedienungsanleitung

Jacuzzi
Jacuzzi ARGA ARG101C0110 Stücklistenhandbuch

Morphy Richards
Morphy Richards Essentials PC4006 Bedienungsanleitung

Softub
Softub PRESTIGE Bedienungsanleitung

JNJ SPAS
JNJ SPAS SPA-318 Installationshandbuch

KIRAMI
KIRAMI Comfort Family Bedienungsanleitung


