
Hagleitner XIBU Montageanleitung

www.hagleitner.com
Innovative Hygiene.
XIBU Tips and Tricks
eng
January 2018

Content
XIBU TISSUEPAPER
Technical package .......................................................................................................................................................................... 4
Replacing the cover assembly.................................................................................................................................................... 5
Change the lid clip .......................................................................................................................................................................... 6
XIBU senseFOAM / XIBU senseDISINFECT / XIBU senseDISHES / senseSEATCLEANER
Technical package ........................................................................................................................................................................... 7
Replacing the cover assembly.................................................................................................................................................... 8
Replacing the potentiometer axis ............................................................................................................................................ 9
Battery tray assembly ..................................................................................................................................................................... 9
Changing the soap/disinfect tank .......................................................................................................................................... 10
XIBU senseSEATCLEANER / XIBU senseMOISTCARE / XIBU touchSEATCLEANER
Technical package ........................................................................................................................................................................... 11
Replacing the cover assembly .................................................................................................................................................. 12
XIBU touchFOAM
Technical package .......................................................................................................................................................................... 13
Replacing the technical package assembly ..................................................................................................................... 14
XIBU touchSEATCLEANER
Technical package ........................................................................................................................................................................... 15
Replacing the technical package assembly ..................................................................................................................... 16
XIBU senseTOWEL
Technical package .......................................................................................................................................................................... 17
Replacing the cover assembly.................................................................................................................................................... 18-19
Cover microswitch .......................................................................................................................................................................... 20
Replacing the battery tray ............................................................................................................................................................ 21
Tensioning roller spring ................................................................................................................................................................. 22
Replacing the cutting unit assembly ...................................................................................................................................... 23-24
Replacing the lower counter roller / ESD film installation ........................................................................................ 25-26
Replacing the top counter roller ............................................................................................................................................... 27-28
XIBU touchTOWEL
Technical package ........................................................................................................................................................................... 29
Replacing the cover assembly.................................................................................................................................................... 30-31
Tensioning roller spring ................................................................................................................................................................. 32
Insert spring ........................................................................................................................................................................................ 33
Replacing the cutting unit assembly .................................................................................................................................... 34-35
Exchange the spring time interval .......................................................................................................................................... 36
XIBU senseFRESHAIR
Replacing the AF adjustment pin ............................................................................................................................................ 37
Replacing the technical package assembly / Battery tray assembly ................................................................... 38
XIBU XL senseFLUID
Technical package ........................................................................................................................................................................... 39
Replacing the technical package assembly ....................................................................................................................... 40
Installation of various XIBU dispensers using two-sided adhesive tape
Foam/Disinfect, SEATCLEANER, senseMOISTCARE, tissuePAPER................................................................... 41
FRESHAIR, MULTIFOLD, XIBU XL senseFLUID.............................................................................................................. 42-43
Installation of various XIBU dispenser on mirrors
Screw mounting of XIBU dispensers on mirrors ............................................................................................................. 44
2 |Tips & Tricks |January 2018
XIBU senseTOWEL
XIBU touchTOWEL
XIBU touchMULTIFOLD
XIBU touchSEATCLEANER
XIBU senseSEATCLEANER
XIBU senseMOISTCARE
XIBU XL senseFLUID
XIBU
touchTISSUEPAPER
XIBU senseFRESHAIR XIBU senseFOAM
XIBU senseDISINFECT
XIBU senseDISHES
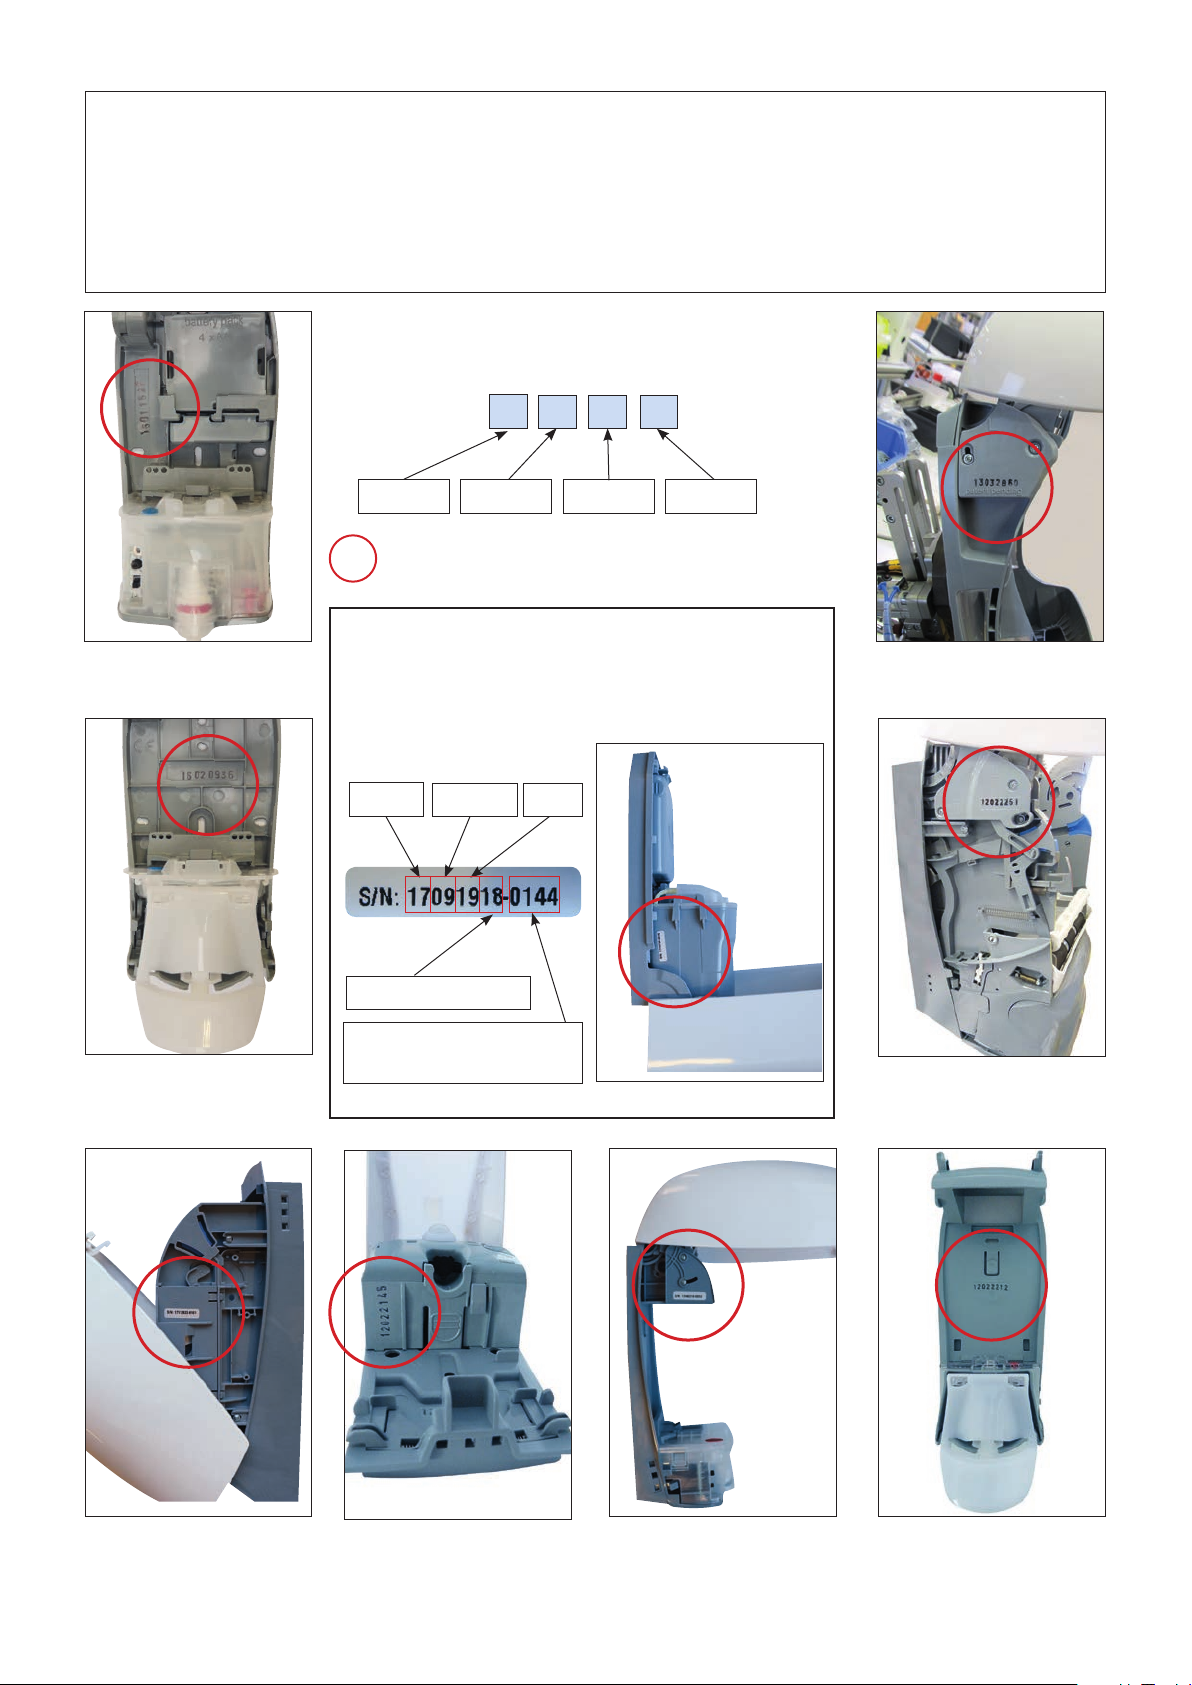
Batch number
The batch number for 20 January 2012
is formed as follows:.
Year Month Day Pers.
Checklist for troubleshooting on site
This checklist serves an aid for the fast detection of malfunctions and signs of wear
in the dispensers and, if possible, for carrying out on-the-spot repairs.
The overriding principle must be that dispensers have to be repaired on site and that
only hopeless cases are dismantled and sent to the headquarters.
16 01 20 XX
XIBU touchFOAM
January 2018 |Tips & Tricks |3
Batch-number
Since 14.9.2016 printed on all dispensers.
The batch number is formed as follows:
For example the date 17.09.2019.
The batch number is printed on the
respective dispenser here
Year Month Day
Pers.
serial number per day

XIBU TISSUEPAPER
Abb. 1: XIBU touchTISSUEPAPER
Spare part name:
XIBU touchTISSUEPAPER techn. package
Article no.
492011730000
Technical package
XIBU touchTISSUEPAPER
Article no.
411010065000
Abb. 2: XIBU touchTISSUEPAPER Technical package
4 |Tips & Tricks |January 2018

XIBU TISSUEPAPER
Replacing the cover assembly
Replacing the cover assembly
Open the dispenser with the XIBU key.
Press the red (grey) locking lever on the left
side wall (Fig. 2) and slide it upwards (Fig. 3).
Fig. 1: Cover assembly
Fig. 4 Fig. 5 Fig. 6
Fig. 2
Spare part name:
WC cover white XIBU
Article no.
492011620000
Fig. 3
Press the right side of the cover lightly
to the outside so that the cover can be turned
to the side wall via the latch (Fig. 5).
Turn the cover down and then remove it from
the pivot on the side wall (Fig. 6).
The installation of the new cover takes place
in the reverse order!
rotation point
Remove the gear rack from the gear.
(Fig. 4)
January 2018 |Tips & Tricks |5

XIBU TISSUEPAPER
Spare part name:
XIBU WC lid clip
Artikel number:
492011830000
Change the lid clip
Change oft he lid clip:
Twist the lid clip counterclockwise until it
strikes and remove it. (Fig. 1 + 2)
The insert of the lid happens in the opposite
order.
Fig. 2
Fig. 1
6 |Tips & Tricks |January 2018

XIBU senseFOAM / XIBU senseDISINFECT / XIBU senseDISHES
Spare part name:
XIBU senseDISINFECT techn. package
Article no. 492011820000
Fig. 3
Spare part name:
XIBU senseDISHES techn. package
Article no. 492011880000
Fig. 4
XIBU senseFOAM
Article no. 411020105000
Fig. 1
XIBU senseFOAM Technical package
XIBU senseDISHES Technical packageXIBU senseDISINFECT Technical package
Spare part name:
XIBU senseFOAM techn. package
Article no. 492011650000
Fig. 2
January 2018 |Tips & Tricks |7

XIBU senseFOAM / XIBU senseDISINFECT / XIBU touchFOAM / XIBU senseDISHES
Replacing the cover assembly
Spare part name:
SE cover white XIBU
Article no.
492011575000
Fig. 1: Cover assembly, white
Fig. 2 Fig. 3
Slide the new cover into the guide on the
swivel joint and put back together in the re-
verse order.
Spare part name:
SE cover white XIBU touch
Article no.
492011765000
Spare part name:
DI cover white XIBU
Article no.
492011645000
XIBU senseDISINFECT
XIBU senseFOAM
XIBU touchFOAM
Spare part name:
XIBU senseDISHES cover
Article no.
492011895000
XIBU senseDISHES
Tools used:
Phillips screwdriver size PH1
Replacing the cover:
Open the dispenser with the XIBU key
Loosen the screws on the left and the right
side of the cover, (Fig. 2 and 3) so that the
cover can be pushed back. (Fig. 3)
The cover can now be removed.
8 |Tips & Tricks |January 2018

XIBU senseFOAM / XIBU senseDISINFECT / XIBU senseDISHES
January 2018 |Tips & Tricks |9
Replacing the potentiometer axis
Tools used:
Pin punch (Fig. 6)
Needle nose pliers
XIBU key
Requem:
Broken potentiometer axis
Solution:
Replace the potentiometer axis
Push the remainder of the potentiometer shaft
out with the pin punch (Fig. 2)
Insert the new potentiometer shaft (Fig. 3 and
4) with the needle nose pliers and press it in
lightly by hand (Fig. 5)
Fig. 1
Fig. 6
Battery tray assembly
Fig. 7: Battery tray assembly
Spare part name: SE battery case XIBU
Article no. 492011590000
Spare part name:
SE potentiometer axis XIBU
Article no. 492011580000
Request:
No blinking signal, dispenser without function
Possible causes: Batteries are completely
empty, the battery springs are broken, the
battery contacts are oxidised
Solution:
Replace the batteries and/or battery tray
Fig. 2 Fig. 3
Fig. 4 Fig. 5
Battery tray assembly
XIBU senseFOAM / XIBU senseDISINFECT / XIBU senseDISHES / XIBU senseSEATCLEANER /
XIBU senseMOISTCARE

Changing the soap/disinfect tank
Request:
intake bag broken
fill level display does not work
third party product was filled in
technical package has to be replaced
Fig. 1
Fig. 2
Solution:
replace the tank
Remove the dispenser from the wall and turn
it around.
Press in the notches with the screwdriver,
and pull out the tank (Fig. 1-2).
Insert the new soap tank and press in until the
tank snaps into place (click).
Spare part name:
XIBU SE-S Tank komplett HAG
Article no.: 492012000000
Spare part name:
XIBU DIS Tank komplett HAG
Article no: 492012010000
10 |Tips & Tricks |January 2018
XIBU senseFOAM / XIBU senseDISINFECT / XIBU senseDISHES / XIBU senseSEATCLEANER /
XIBU senseMOISTCARE
Andere Handbücher für XIBU
1
Inhaltsverzeichnis
Andere Hagleitner Badezimmerarmatur Handbücher


