Hanin HM-Z3 Bedienungsanleitung

Caution Symbol
Never touch the thermal head immediately after the printer has been used. Let the thermal
head cool for a few minutes before touching it.
This symbol is indicate that it is easily damaged. Observe the precautions for handling
electrostatic sensitive devices.
Safety Precautions
To use this product in safety, please follow the precautions given below.
WARNING
If you notice smoke, a strange smell, or a strange sound, turn off the power immediately, and
remove the USB cable and/or battery pack. Then contact the dealer.
If any foreign material (metal scraps, water, or other fluid) enters the printer, immediately turn off
the printer and remove the USB cable and/or battery pack. Then, contact your dealer for advice.
Continued use of the printer could result in a fire.
Never attempt to repair the printer yourself. Also do not disassemble or modify the product. Doing
so could lead to injury, fire, or electric shock.
Do not touch the tear bar.
There is a tear bar inside the paper outlet slot. Neither put your hand in the paper outlet slot
while printing is in progress, or put your hand into the outlet even when printing is not in progress.
The printer cover can be opened when replacing the paper. However, since the tear bar is on the
inside of the printer cover, be careful not to place your face or hands too close to the tear bar.
During and immediately after printing, the area around the thermal head is very hot.Do not touch it,
as you could be burned.
If any battery fluid gets on your skin or clothing, immediately wash the affected area with fresh
water. Otherwise, skin damage may result.
The battery pack may be hot immediately after the product has been used.
Please be sure to read

Using the Printer
Some semiconductors can be damaged by static electricity.Be sure to turn off the printer when
inserting or removing the battery pack.
Do not drop the printer or hit it against a hard object.
Do not open the printer cover while the printer is printing.
Before you open the printer cover, make sure that printing data is not being sent to the printer.
Do not unplug or plug in a USB cable while the printer is printing or during communication.
Do not touch a USB connector while the printer is printing.
Turn off the printer when you are not using it.
When the printer is used in a low temperature environment, the battery's performance will be
diminished, and the amount of time that you can use the printer for may be reduced.
Do not pull out paper while the printer cover is closed.
The heating element and the driver IC of the thermal head are easily damaged. Do not touch them
with metal objects, sandpaper, etc.
Printing quality may suffer if the thermal head heating element becomes soiled by being touched
with your hands. Do not touch the thermal head heating element.
There is a risk of damage to the driver IC of the thermal head from static electricity.Never directly
touch the IC.
Do not operate the printer if there is moisture on the front surface of the head from condensation,
etc.
Thermal Paper Handling
Only use thermal paper with the designated specifications.The printing quality and working life of
the thermal head cannot be guaranteed if any paper other than that recommended is used. In
particular, if ion concentration of [Na+, K+, Cl-] is high, it may drastically reduce the working life of
the thermal head. Please exercise caution.
Store the thermal paper in a cool, dry, dark location.
Do not rub the thermal paper with a hard object.
Do not leave the thermal paper in contact with plastic film, an eraser, or adhesive tape for a long
period of time.
Do not stack the thermal paper on fresh diazo copies or wet-type copies.
Do not use chemical glue on the thermal paper.
Do not use thermal paper that has been stored for a long period.

Operating Environment for the Printer
Before actually unpacking the printer, remember the following points when doing this.
Do not use the printer in an environment in which it will be subject to strong shaking while it is
printing.
Be careful to ensure that the printer is not exposed to direct sunlight.
The appropriate environment for using the printer is described below.
Temperature: -10°C to 52°C
Humidity: 10% RH to 85% RH (no condensation)
Do not place the printer near a copying machine or other device that produces a strong
electromagnetic field.
Keep the printer sufficiently removed from heaters and other sources of heat.
Use the printer in a clean, low-humidity environment that is free from dust.
Avoid using the printer in high-humidity rooms.
Printer Maintenance
Please perform the following maintenance every 6 months.
Thermal head
Dip a cotton swab in an alcohol solvent (ethanol, methanol, or isopropyl alcohol), and clean the
heating area of the head.
Platen
While turning the platen, use a soft dry cloth to lightly rub the entire surface of the platen and
remove any foreign objects.
Paper storage unit and the surrounding area
Remove any dirt, dust, pieces of paper, etc., from the paper storage unit.

Contents
1. Product Overview.......................................................................................................................................1
1.1 Printer & Accessories....................................................................................................................... 2
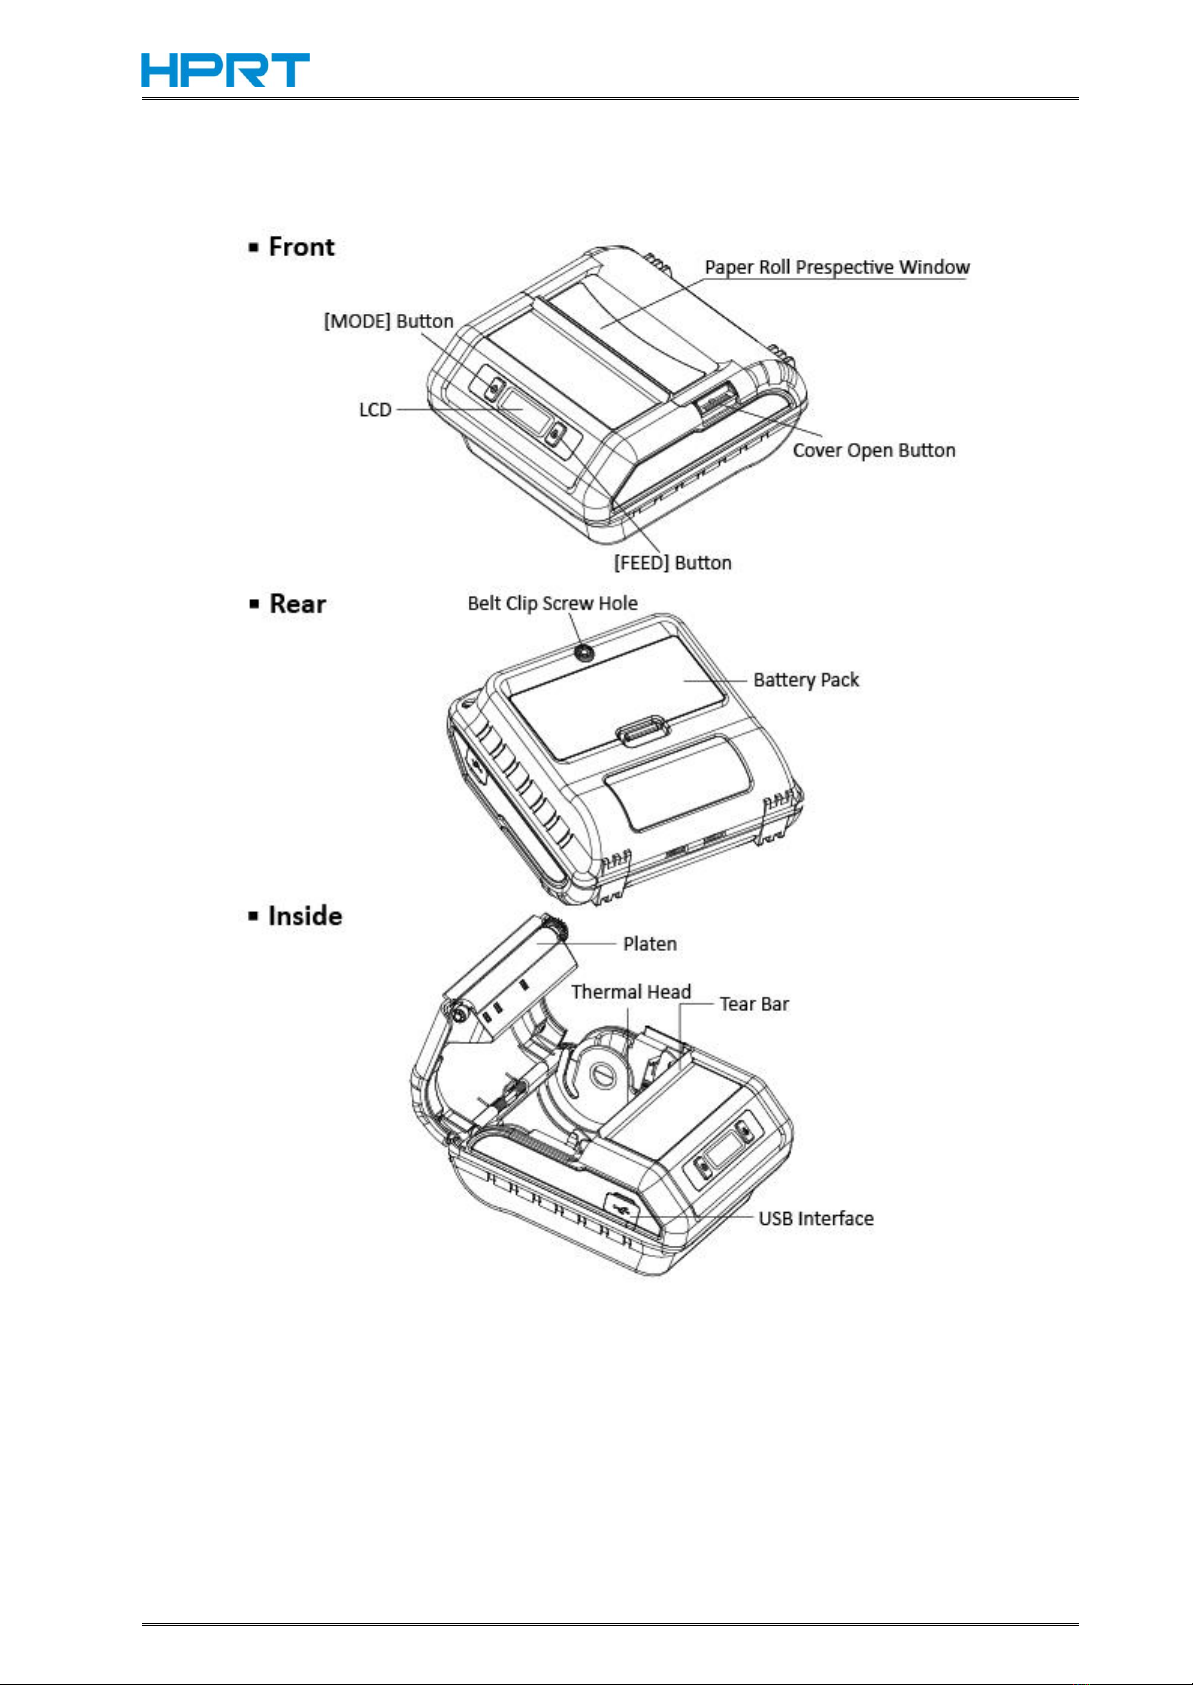
1.2 Appearance and Components..........................................................................................................3
2. Setup...........................................................................................................................................................4
2.1 Battery Pack......................................................................................................................................4
2.1.1 Inserting into the Printer.......................................................................................................4
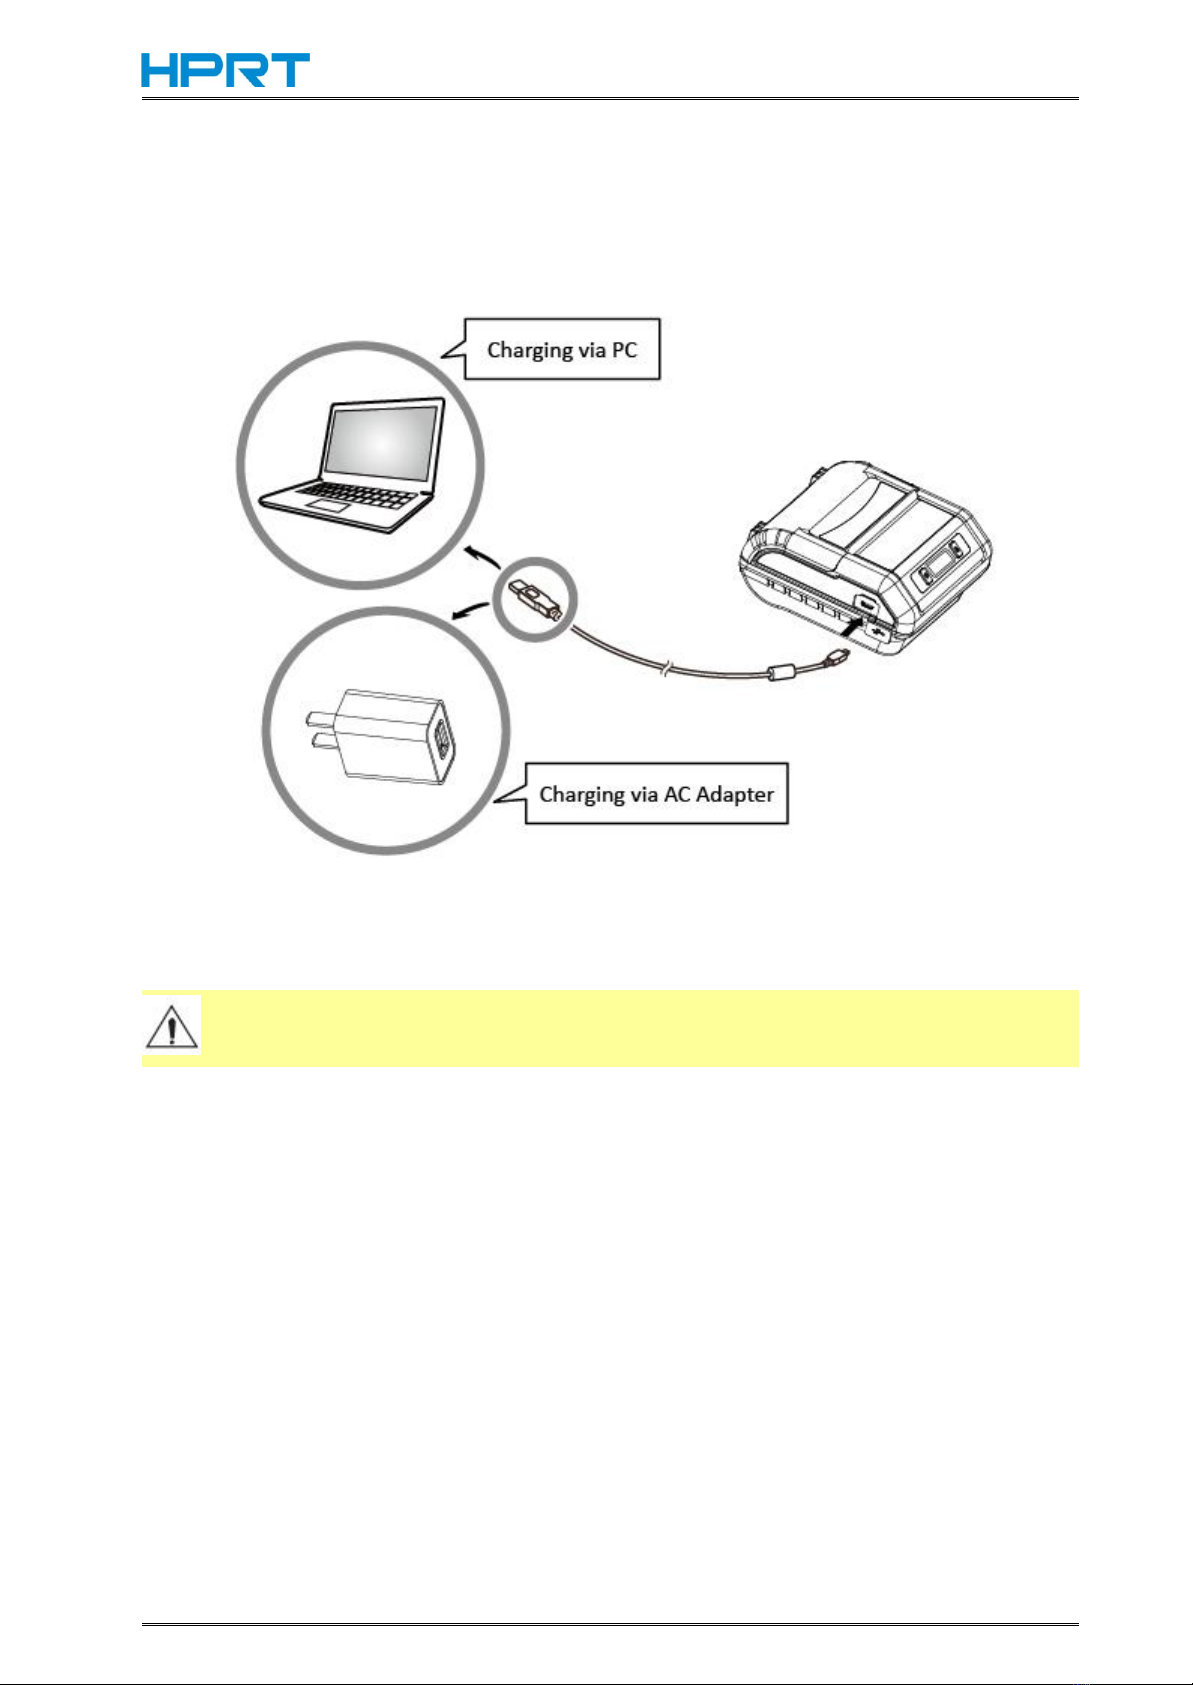
2.1.2 Charging the Battery............................................................................................................. 5
2.2 Bluetooth..........................................................................................................................................8
2.3 Loading Paper...................................................................................................................................9
2.4 Menu Settings................................................................................................................................ 11
2.5 Belt Clip.......................................................................................................................................... 12
2.5.1 Install the Belt Clip.............................................................................................................. 12
2.5.2 Using the Belt Clip............................................................................................................... 12
3. Printer Features........................................................................................................................................13
3.1 Control Panel.................................................................................................................................. 13
3.1.1 Button..................................................................................................................................13
3.1.2 LCD Indication......................................................................................................................14
3.1.3 Buzzer Description...............................................................................................................14
3.2 Self Test...........................................................................................................................................15
3.3 Instruction for Standby(Sleep) Mode.............................................................................................15
4. General Specification................................................................................................................................16
5. Detailed Specification...............................................................................................................................18
6. Interface................................................................................................................................................... 19
6.1 USB for Battery Charge...................................................................................................................19
6.2 Bluetooth........................................................................................................................................20
7. Specifications of Accessories....................................................................................................................21
7.1 Battery Pack....................................................................................................................................21
7.2 Belt Clip.......................................................................................................................................... 21
8. Troubleshooting Procedure......................................................................................................................22
8.1 Troubleshooting Guide................................................................................................................... 23
8.1.1 Power Supply Failure...........................................................................................................23
8.1.2 Printing Failure.................................................................................................................... 23
8.1.3 Faulty Sensor....................................................................................................................... 24
8.1.4 Paper Feed Failure...............................................................................................................24
8.1.5 Error Message(Printer Status indication on the LCD)......................................................... 25

HM-Z3 User Manual
1
1. Product Overview
This printer is perfect for mobile banking systems, retail, POS (point of sale) terminals and other forms of
mobile computing.
The characteristics of this printer are listed below:
•Pocket size (109x108x51.2mm)
•Extremely light and mobile (372g including Battery pack)
•Very silent printing thru direct thermal printing method
•Print speed 60mm/s
•Support Bluetooth Ver3.0/4.0[BLE] Dual Mode
•Belt Clip as a standard accessory
•Support text and graphic printing
•Drop-in design that makes it easy to load paper
•A printer cover that can be opened with the touch of a button
•Printer cover open sensor, Paper-out sensor, Black mark sensor, Voltage detection, TPH temperature
detection, Label gap detection

HM-Z3 User Manual
2
1.1 Printer & Accessories
The printer is packaged with the following accessories.
If any of these accessories is broken or missing, please contact the dealer that you bought the product.
Note:
1) The AC adapter vary by local or region.
2) The packing materials are actually dependent on the order.

HM-Z3 User Manual
3
1.2 Appearance and Components

HM-Z3 User Manual
4
2. Setup
2.1 Battery Pack
2.1.1 Inserting into the Printer
1. Make sure that the printer has been turned off before you insert or remove the battery pack.
2. Insert the battery pack into the back of the printer as in the figure shown below, following the
direction of the arrow. Press down on the battery pack until the hooks click into place.
3. To remove the battery back, pull back the hook, and use the opposite procedure from the one you
used to insert the battery pack.
NOTE:
This printer can only use the company's original equipment or approved special battery, otherwise, it may
cause damage to the product, battery leakage, fire or explosion.

HM-Z3 User Manual
5
2.1.2 Charging the Battery
Insert the battery pack into the printer to charge it.
Plug in socket with USB charging.
When battery pack runs out of power, the battery icon will flash. It powers off automatically when
continues printing. If you want to go on, please charge it.
Notes about the Battery Pack
General Battery Characteristics
The battery is a consumable and its performance over time gradually decreases.
While not in use, the battery will slowly discharge itself.
Prepare a battery pack that has been charged relatively recently (1 to 2 days earlier).
To ensure that the battery lasts for a long time, we recommend that you turn off the printer
whenever possible.
When used at low temperatures, battery performance will temporarily decline. Be sure to have a
fully-charged spare battery standing by if the printer will operate in a cold environment.
Charging the Battery Pack
The battery pack can be charged at ambient temperatures between 0 and 40°C.
The time required to charge the battery pack varies depending on the voltage and the ambient
temperature.
Normally, it takes 3 to 4 hours to charge the battery pack.
Inhaltsverzeichnis
Andere Hanin Drucker Handbücher


