HDPlex H5 Bedienungsanleitung

Page 1of 25
2nd Gen H5 Fanless HTPC Chassis
Installation Guide V 1.5

Page 2of 25
HDPLEX Reward Program
We will reward 30USD to any customer for reviewing HDPLEX fanless computer case. It's simple. Take
two or three photos of your PC build with HDPLEX H5 fanless case, write feedbacks or suggestions in any
language you prefer and post it on one of the following forums: Silentpcreview.com,
Computeraudiophile.com, HKEPC, Chiphell, AVSForum, Hardwareluxx.de, Forum.hardware.fr,
Overclock.net, Hardforum.com, Forum.Kodi.TV, Tweak.dk, or your blog or Facebook page. Send the
review link to reward@hdplex.com. We will reward you with 30USD right away (either through Paypal or
refund to your order)!
HDPLEX 特典プログラム
HDPLEX ファンレス PC ケースをご購入されたお客様は、以下の手続きを踏むことで 30 ドルの報酬を受け取ることができます。
ブログまたは Facebook などのインターネットコミュニティに、ご購入された PC ケースをインストールしているお客様ご自身の写
真2~3枚をご意見・ご感想(言語は問いません)と共にアップロードしていただきます。その後、掲載したページのリンク(URL
アドレス)を rew[email protected] までお送りください。30 ドルの報酬を(Paypal または購入時のアカウントへ)お支払い致しま
す!
HDPLEX Reward Programm
Alle Kunden, die ein HDPLEX lüfterloses Gehäuse gekauft haben (egal wo), können eine 30USD
Rückerstattung/Belohnung erhalten Es ist sehr einfach diese Rückerstattung/Belohnung zu bekommen:
2 oder 3 Bilder mit etwas Text/Kritik/Vorschlägen, den Sie in einem beliebigen öffentlichen
erfreuen sich an einer unmittelbaren Paypal/Rückerstattung zu Ihrem Auftrag.
Offre de remboursement HDPLEX
Recevez 30 dollars US pour tout achat d'un boitier HDPLEX. Pour bénéficier de cette offre, rien de plus
simple: prenez deux ou trois photos de votre installation HDPLEX H5 accompagnées de vos
commentaires ou suggestions (dans la langue de votre choix) puis postez-les sur un blog, sur Facebook,
ou sur n'importe quel forum. Envoyez le lien àrewar[email protected]. Nous vous rembourserons 30 dollars
US dans les plus brefs délais (via Paypal ou déduits de votre commande).
HDPLEX 客戶獎勵活動
任何 購買 HDPLEX 無風扇機箱的客戶,無論您是通過何種渠道購買的,都可以參加本活動。
您只需拍攝 2-3 張用 HDPLEX H5 機箱裝配完成的電腦,並簡單寫幾句略對 HDPLEX 機箱使用的感受和建議。把這篇
評論發表在 HKEPC,Chiphell 論壇或者個人 Blog 上,並將評論的鏈接 email 至reward@hdplex.com。我們會將
30 美金的獎勵立即發到您指定的賬戶(Paypal,支付寶,或者您訂單的返現)。

Page 3of 25
Package Contents
H5 Chassis Body
Top Plate
Bottom Plate
Left Side Panel
Right Side Panel
Back Plate
Four Feet with Rubber Cushion
H5 Chassis Faceplate
Faceplate (Silver or Black)
H5 Heatsink System
Aluminum Top Plate
Heatpipe Installation Plate (H-9) x4
Copper Baseplate
High Quality Thermal Paste 3.5g
Eight 6mm OD Coppper Heatpipes
Dumbbell Tool to apply thermal paste
Installation Screw Kit
Intel CPU Bottom Plate
H5 Accessories
Multipurpose HDD Rack x 2
ATX/SFX/FlexPower Supply Rack x 1
Side I/O PCB x 1
Internal AC Extension Cord x 1
HEX Screw Driver X 2 (2.5/4.0mm Tip)
DC Socket Adapter Plate x 1
AC Socket Adapter Plate x 1
PCI Cover Bracket x 4 (Low Profile x 1)
Installation Screw Kit
Cable Organizer
Aluminum Power Button x 1
Installation Screw List:
A:M3*6mm Round Head Screw with Cushion 44pcs for motherboard/AC
adapter plate/PCI bracket installation

Page 4of 25
B:M5*8 CUP Head HEX Screw-Black 8pcs For Front and Black Plate Installation
C:M4*8 Flat Head HEX Screw-Black 16pcs For Feet/Top Plate/Bottom Plate/Side
Panel/Back Panel Installation
D:M3*5 Flat Head Screw –Black 20pcs For SSD mounting/AC IEC installation
E: 12mm Copper Post for Side I/O PCB Installation 4pcs
F:6-32 Thread 6mm Screw- Silver 8pcs For 3.5”HDD Installation
G:Copper Screw Post Various Length for HDD Rack:10mm,30mm,40mm,50mm

Page 5of 25
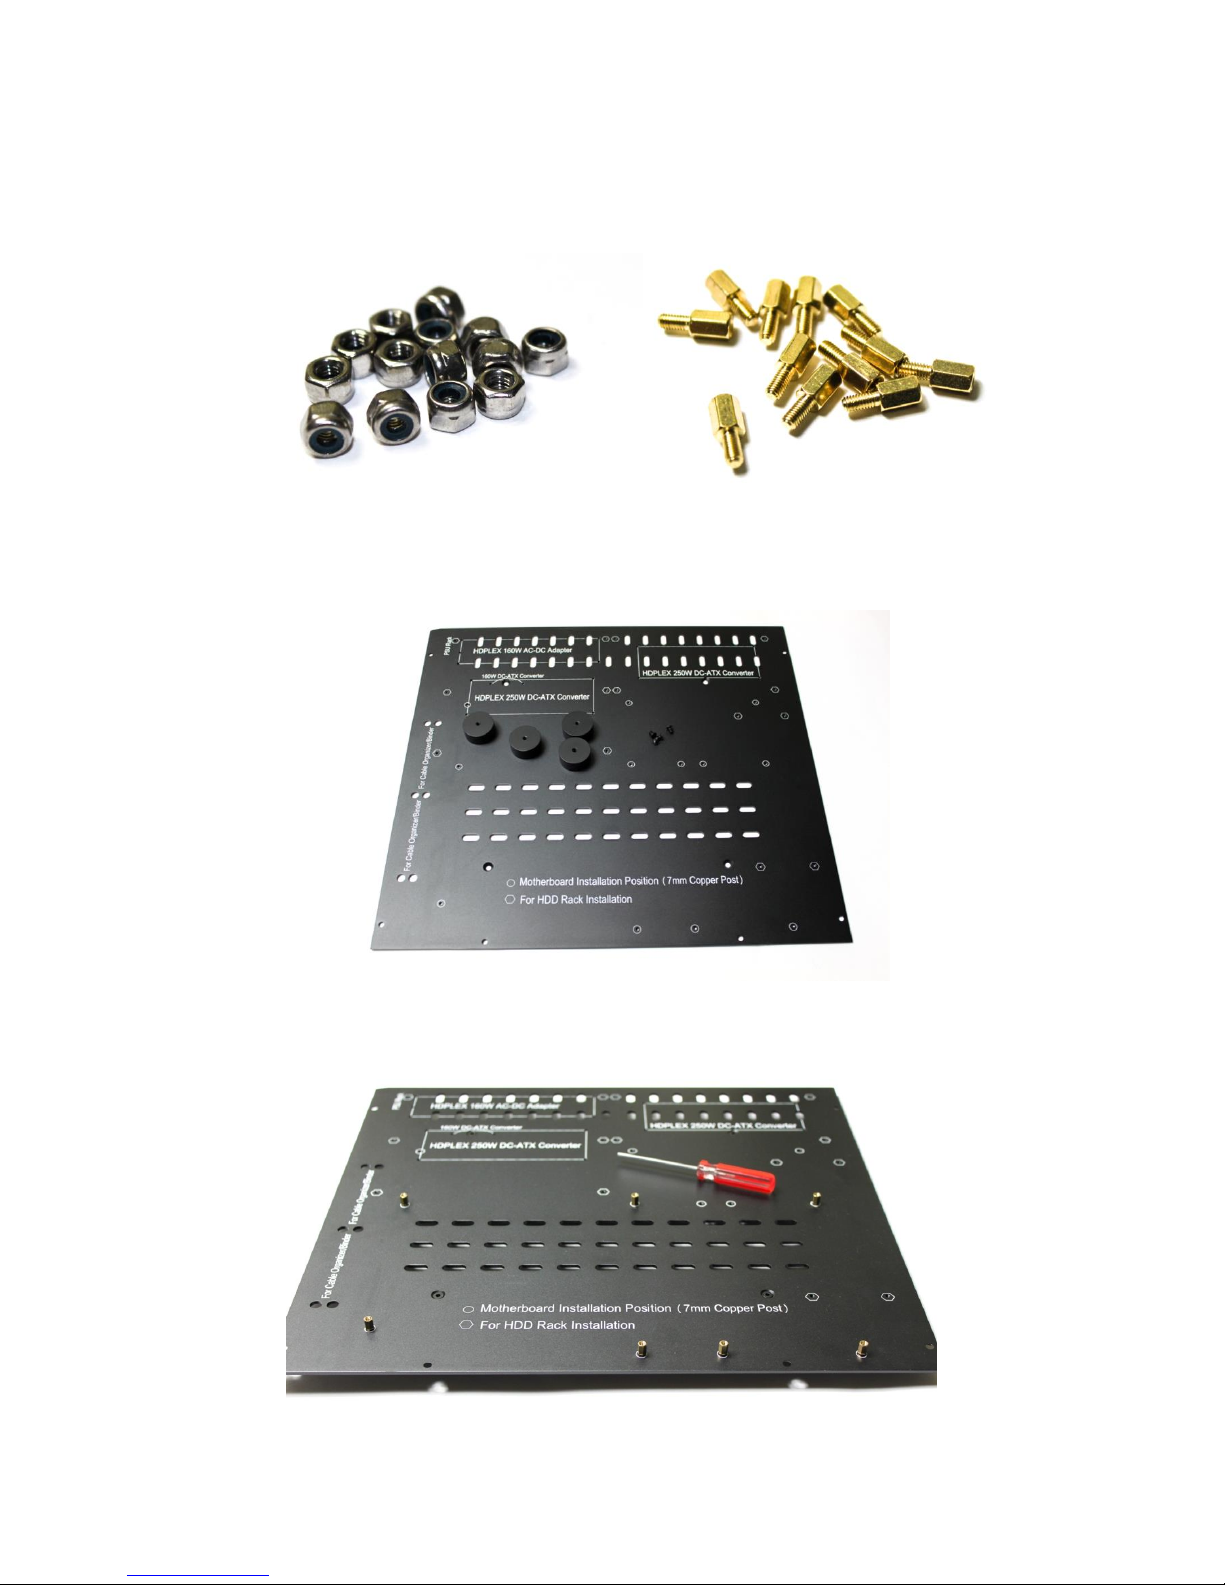
J:M3 Self-Tightening Nut-Silver 25pcs
K: Copper Post M3*6+7mm (7mm is the M3 post length and 6mm is the M3
thread length) for Motherboard Installation 12pcs
Installation
Install four feet with rubber cushion to the bottom plate back side using 4pcs C
Install Copper Post M3*6+7mm Kto the bottom plate, matching your
motherboard installation position

Page 6of 25
Install Jto the external side of the H5 bottom plate, lock the copper post M3
exposed thread for motherboard.
Put the aluminum power button in the right-side panel and install 4pcs 12mm
copper post E. Right-side refers to the motherboard CPU side. The Power button
is on the bottom and 3.5mm speaker jack is on the top.
Install side I/O PCB using 4pcs A screws and connect the LED wire to the corner
2PIN on the PCB.

Page 7of 25
Install right-side panel onto the H5 bottom plate using 2pcs C.The right-side
panel should be beside the cable organizer hole or you install right-side panel
upside down to the left side of the H5 case incorrectly.
H5 CPU Heatsink System Installation
CPU Heatsink Installation Kit List:
H-1: M3*3 Flat Head Silver 8pcs
H-2: M3*10 CUP Head HEX Screw Silver 8pcs
H-3: M 3*35 Round Head Screw Silver 4pcs
H-4: M3*14 Flat Head Screw Black 16pcs
H-5: Intel and AMD CPU Bottom Rack 4pcs
H-6: Intel CPU LGA115x Bottom Rack 1pcs
H-7: Bottom Holder and Double Tape 4pcs
H-8: Plastic Screw Holder Black 4pcs
H-9: Aluminum Plate for Heatpipe Installation 4pcs

Page 8of 25
Remove the protect cover from the copper base plate and install two H-5 rack
on the copper bottom plate using 4pcs H-1
Install the H-8 holder on to the tip of the two racks. Please make sure the
direction of part H-8 is correct. Install 4pcs H-3 into the H-8 holder.

Page 9of 25
Apply a thin layer of thermal paste to the copper base plate.
Warning: Do not over apply thermal paste as it will decrease heat transfer efficiency.
Put the Intel CPU Bottom Rack H-6 on the back side of the motherboard Intel
CPU socket (LGA1151/1155/1150) or use 4pcs white double tape to paste the
four bottom holder H-7 to the back of the AMD socket.

Page 10 of 25
Install the motherboard on the H5 bottom plate copper post using A
Install the copper base with rack onto the motherboard. Please make sure
heatpipe slot direction is vertical to the side panel.
Tight the four H-3 screws in even fashion. Do NOT over tight the H-3 screw or
apply too much torque. Avoid put too much pressure on the CPU top plate.
For the latest AM4 socket, please use the updated AMD rack.
Andere Handbücher für H5
3
Inhaltsverzeichnis