
HEEYOUNG MC13H series Bedienungsanleitung

User’s Manual
MC13H & MM13H series

2
1. Safety Instructions………………………………………..………………….…..4
2. Regulatory Information………………………………………….….…….……..5
3. Precautions………………………..………………………………………….…..6
4. Before setting up…………………………………..…………………..…….…..7
5. Features & checking the products…….…………………………..…….….….8
Features of Lumimed series…………………………………………………...8
Checking the products………………………………………………………….8
6 Setting up the LCD Monitor…………………………………………….……......9
Features of Connectors…………………………………………………….....9
Description of Connectors…………………………………………….……....9
Connecting the LCD Monitor………………………………………………...10
Warm-up Time………………………………………………………….……...10
7. Adjusting of OSD Menu………………………………………………………....11
Features of OSD Controls…………………………………………..………..11
Description of Control ports………………………………………..…………11
OSD Operation……………………………………………………………..….12
8.Adjusting the Viewing angle………………………………………………..……13
9.Appendix…..………………………………………………………………..……..14
CONTENTS
3
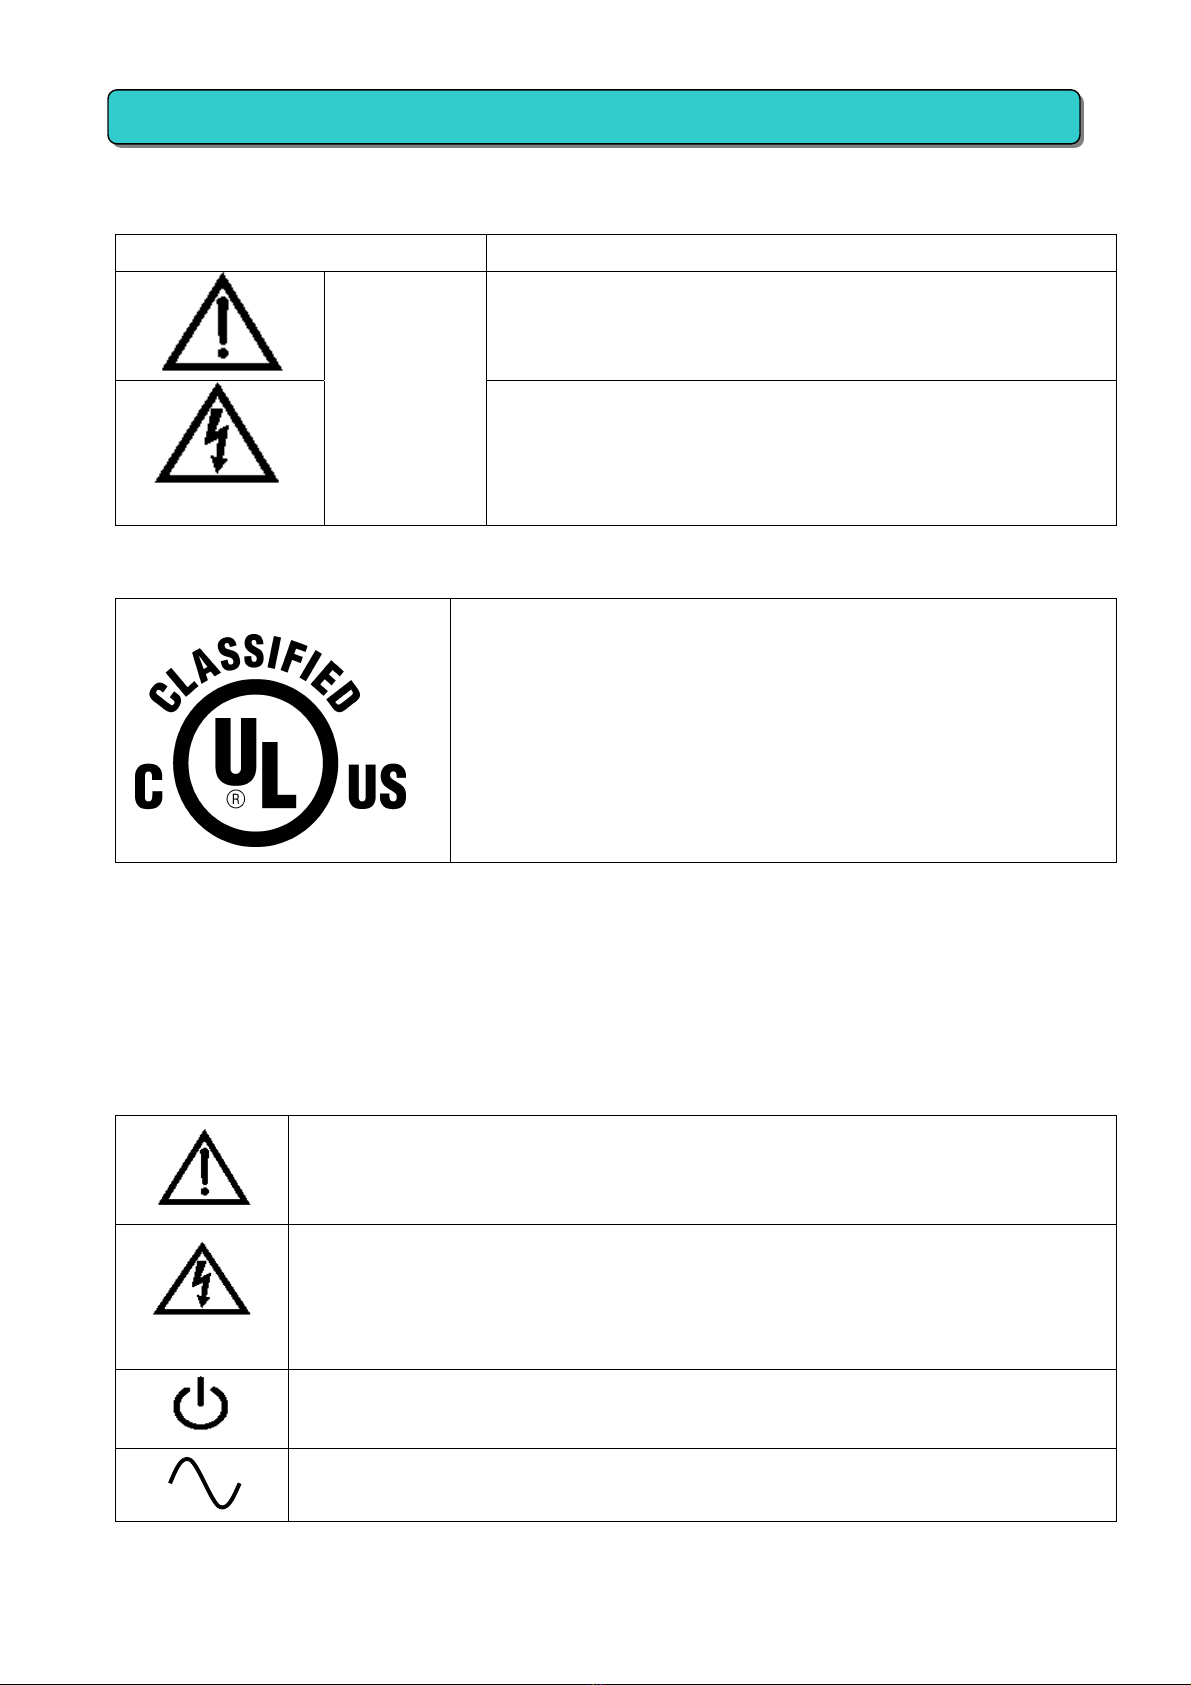
Symbol Explanation
RISK OF ELCTRIC SHOCK
DO NOT OPEN
CAUTION !
TO REDUCE THE RISK OF ELECTRIC SHOCK,
DO NOT REMOVE COVER(OR BACK)
NO USER-SERVICEABLE PARTS INSIDE
REFER SERVICING TO QUALIFIED SERVICE PERSONNEL
MEDICAL EQUIPMENT
13XX
E246477
WITH RESPECT TO ELECTRIC SHOCK.FIRE AND MECHANICAL
HAZARDS ONLY IN ACCORDANCE WITH UL60601-1,
AND CAN/CSA C22.2 NO. 601.1 MEDICAL EQUIPMENT
CERTIFIED FOR CANADA
Grounding Reliability can only be achieved when the equipment is connected to an equivalent receptacle
with marked “Hospital Only” or “Hospital Grade”
Explanation of Graphical Symbols
Attention, consult ACCOMPANYING DOCUMENTS
The lightning flash with arrowhead symbol, within an equilateral triangle ,is
intended to alert the be user to the presence of un-insulated ”dangerous voltage”
within the product’s enclosure that of may sufficient magnitude to constitute a risk
of electric shock to persons
Stand-by Switch. Press to turn the monitor on or off(Stand-by mode).
Alternating Current
Safety Instructions

4
FCC RF
INTERFERENCE STATEMENT
This equipment has been tested and found to comply with the limits for a Class B digital device,
pursuant to part 15 of the FCC Rules. These limits are designed to provide reasonable protection
against harmful interference when the equipment is operated in a commercial environment. This
equipment generates, uses, and can radiate radio frequency energy and, if not installed and used in
accordance with the instruction manual, may cause harmful interference to radio communications.
However, there is no guarantee that interference will not occur in a particular installation. If this
equipment does cause harmful interference to radio or television receptions, which can be determined
by turning the equipment off and on, the user is encouraged to try to correct the interference by one or
more of the following measures:
-. Reorient or relocate the receiving antenna.
-. Increase the separation between the equipment receiver.
-. Connect the equipment into an outlet on a circuit different from that to which the receiver
is connected.
-. Consult the or an experienced radio /TV technician for help.
CAUTION: Any changes or modifications not expressly approved by the
party responsible for compliance could void the user’s authority
to operate the equipment.
CE MARKING DECLARATION OF CONFORMITY
This LCD Monitor complies with the requirements of the EC Directive 89/336/EEC”EMC Directive” and
93/42/EEC - Medical Device directive
The electro-magnetic susceptibility has been chosen at a level that gives correct operation in
residential areas. Business and light industrial premises and small-scale enterprises, inside as well as
outside of the buildings. All places of operation are characterized by connection to the public low
voltage power supply system.
Classification:
- Protection against electric shock: Class I
- Applied Parts No Applied Parts.
- Protection against harmful ingress of water: ordinary IPX0
- Mode of operation: Continuous
- Degree of safety in the presence of flammable anesthetics mixture with air or with oxygen
or with nitrous oxide
- Not suitable for use in the presence of a flammable anesthetics mixture with air or with
oxygen or with nitrous oxide.
Regulatory Information

5
● Plug the power cord into a properly grounded outlet. There is the risk of electric shock.
● If you hear a noise or smell smoke from the view box or power cord, unplug the power
cord immediately, and call service center. There is the risk of electric shock or fire
● Do not overload an electrical outlet with too many devices. There is the risk of fire
● Do not unplug from the outlet by pulling the power cord or when your hands are wet.
Do not bend the power cord excessively or place heavy objects on it.
Keep children and pets away from the power cord as they may cause damage the power cord.
● Do not use a damaged power cord or plug. Make sure the plug fits snugly into the outlet.
● Unplug the Power cord for isolation from supply if you use not monitor for a long time..
● Do not expose this monitor to the direct sun-light.
● Do not allow any object or liquid to enter inside this monitor.
There is the risk of electric shock, fire, or damage to the monitor
● Do not attempt to disassemble, unfix or modify the monitor.
● Keep the monitor away from high temperature, humidity and dust etc..
-> Operating environment Temperature : 10~40 degrees Celsius (℃)
Humidity : 10~80 relative humidity (%)
● Use a proper voltage/current level indicated.
● The device could be send back to the manufacturer for recycling or proper disposal
after their useful lives. Alternatively the device shall be disposed in accordance with
national laws after their useful lives.
● Equipment with signal input / signal output connectors should either indicate the connected
equipment comply with IEC 60601-1 and / or IEC 60601-1-1 harmonized national standard
or the combination should be evaluated.
● This medical monitor is designed for viewing medical X-Ray Images
Precautions

6
Before setting up the LCD monitor, please read this manual to help your understanding of
the Monochrome TFT-LCD Monitor.
● Install the LCD Monitor on a flat place.
● Don’t install in the place with much of water or moisture
● Put the LCD Monitor in a place with low humidity and a few of dust.
● Don’t overload an electrical outlet with too many devices. There is the risk of fire.
● Don’t expose the LCD monitor to the direct sun light.
● Keep the monitor away from high temperature.
● Do not place the monitor in hazardous position.
● Please clean the panel and cabinet of monitor with a clean damp cloth and then wipe
and dry with a clean soft cloth
● Please do not use volatile organic solvents such as alcohol, thinner, and benzenes
when cleaning.
These can be damaged to the front panel
● Do not attempt to service, modify or dismantle this product.
Recommended service should be done at the prescribed intervals by Heeyoung Service
engineer, Agent or a trained Technician.
Before setting up
NOTIC
E

7
● High luminance & High contrast ratio
● Built-in 10-bit LUT
● Integrated Stable Brightness Control System
● OSD control for user control
● Digital Video Interface
● Video mode(CVBS,S-Video) support
● Narrow bezel design for space-saving
The following accessories are included in package.
Check to see if they are enclosed with the monitor.
If anything is missing or damaged, please contact your local dealer.
■Monitor
● TFT-LCD Monitor
■Accessory Box
● 15Pin D-sub cable
● Power Cord
● Power DC adaptor
● User Manual
● DVI-D Signal Cable
● RCA Cable
● S-Video cable
Features & checking the products
C
h
ec
kin
g
t
h
e
p
r
oducts
Features
of
Lumimed
series
8
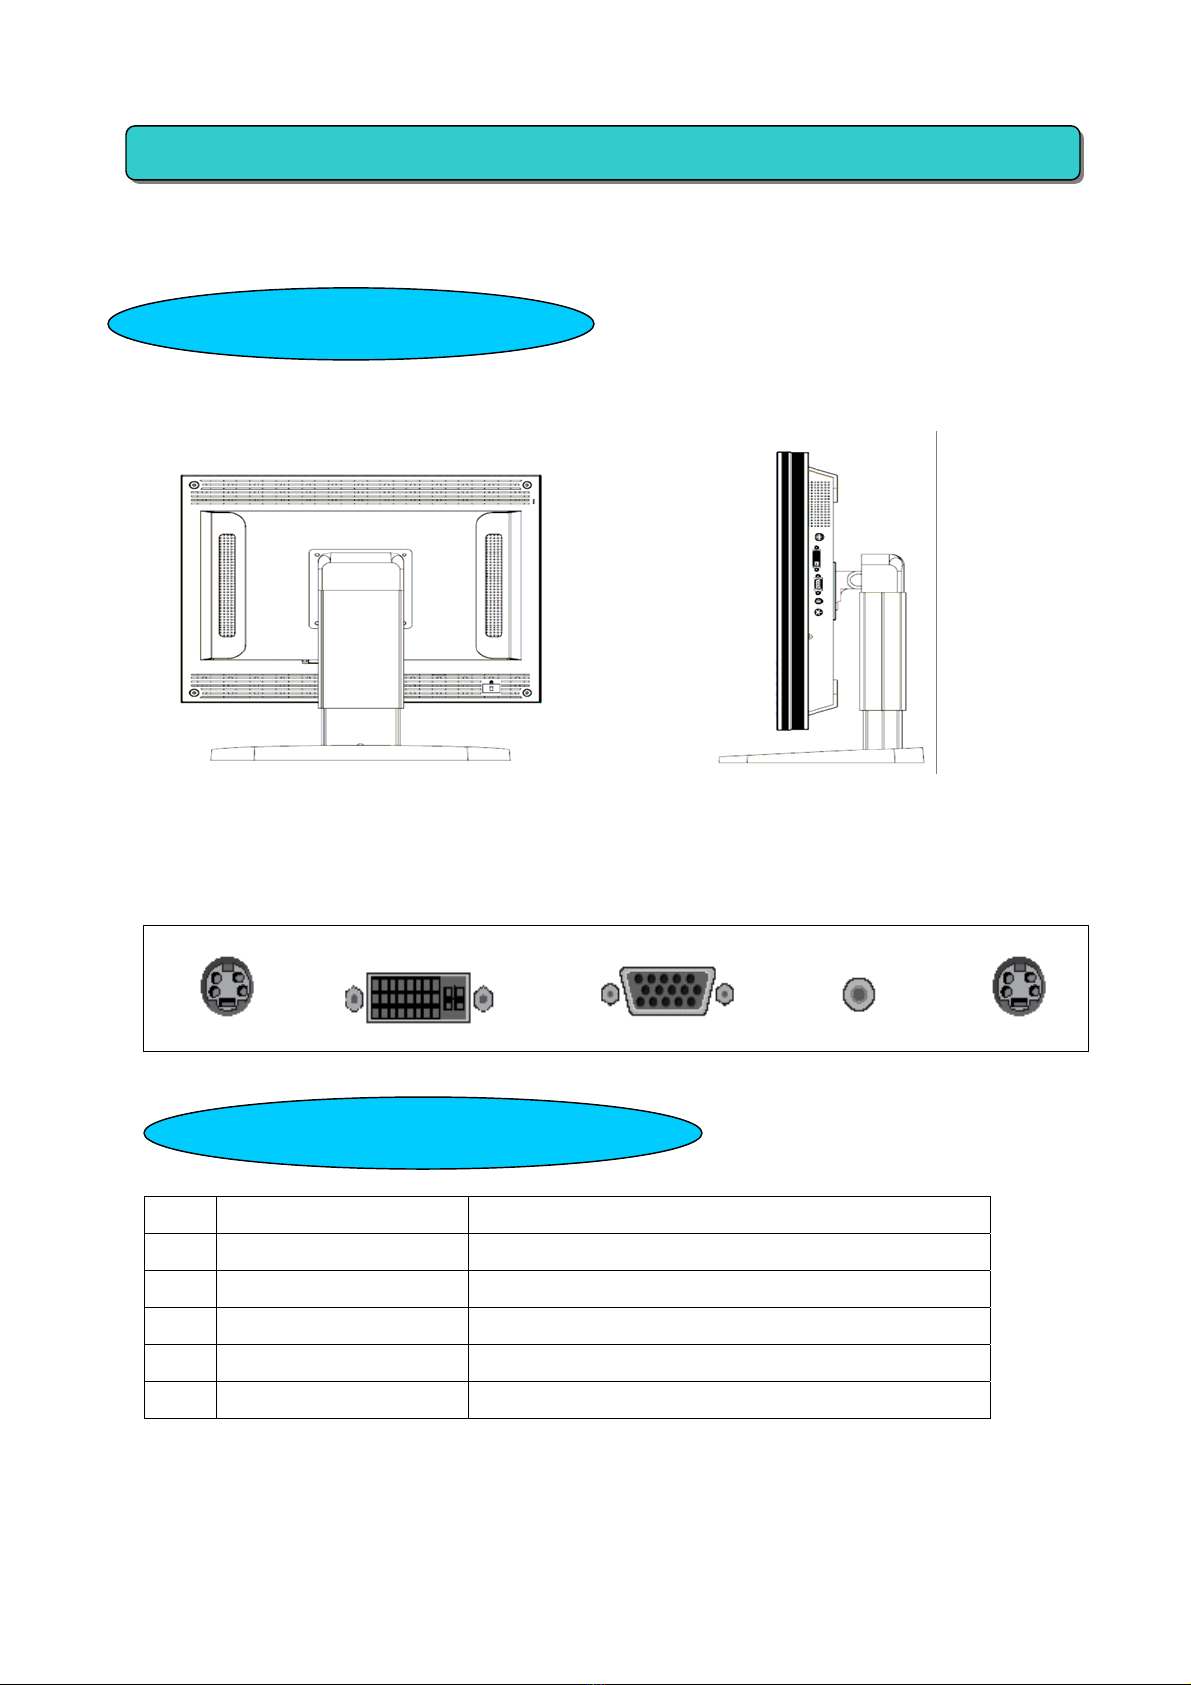
<Landscape> <Portrait>
No Name Cable Connections
① DC input Connect the DC jack of the Power adaptor
② DVI Digital Video Interface connection from PC
③ PC 15 Pin D-sub cable connection from PC
④ Video Connect the RCA cable from the video system
⑤ S-video Connect the S-video cable from the video system
Setting up the LCD Monitor
Description of Connectors
Feature of Connectors
9
1) Connect the DVI-D signal cable to the signal port of the Graphic Card in your computer.
2) Connect the D-sub signal cable to the signal port of the Graphic Card in your computer.
3) Connect the DC input cable to the DC input port on the rear side of the monitor
4) Connect the RCA,S-video cable to the video system like a DVD
5) Turn on the monitor with the power switch of the user control port.
The adoption of the new VESA Plug & Play solution eliminates complicated and time
consuming setup. It allows you to install your monitor in a Plug and Play compatible
system without the usual manual hassles and confusion. Your PC system can easily
identify and configure itself for use with your display. This monitor automatically
tells the PC system its Extended Display Identification Data(EDID) using
Display Data Channel(DDC) protocols so the PC system can automatically configure
itself to use the flat panel display.
All LCD monitors need time to become thermally stable whenever you turn on the monitor
After letting the monitor be turned off for a couple of hours.
Therefore, to achieve more accurate adjustments for parameters, allow the LCD monitor to be
Warmed up for at least 20 minutes before making any screen adjustments.
Warm-up Time
Connecting the LCD Monitor
Setting up the LCD Monitor
Plug & Play
10
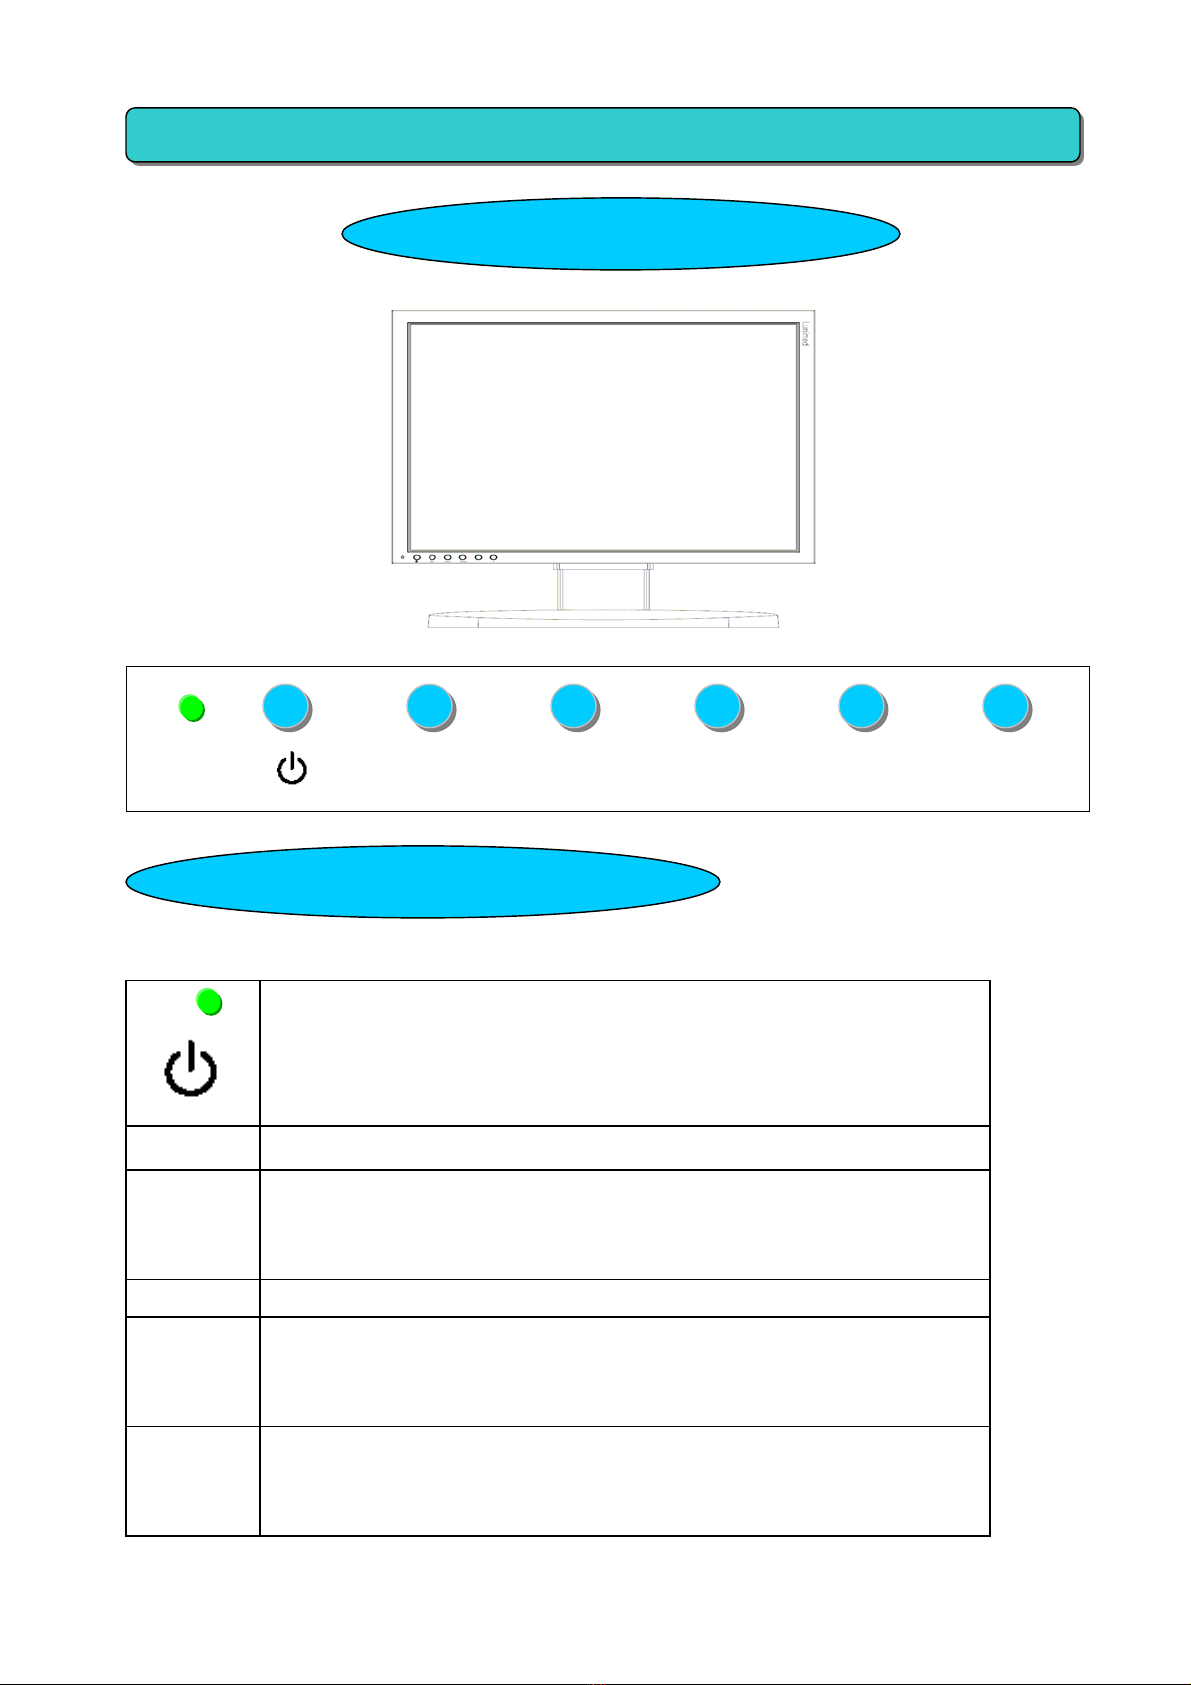
LED MENU SELECT SOURCE - +
.
Indicate Monitor power status by LED color
Normal Operation : Green color
Power Saving : Amber color
Off Mode : off.
Power on / off toggle button
MENU Launch OSD Menu
SELECT Menu select button. .
In Directly hot-key function, you can adjust Auto-balance
for various input mode of PC system
SOURCE Select the input signal source
- “-“ Menu shift button.
Press the “-“ button to decrease
You can adjust directly Brightness with +/- button
+ “+” Menu shift button.
Press the “+” button to increase the brightness
You can adjust directly Contrast with +/- button
Description of Control ports
Features of OSD Controls
Adjusting of OSD MENU
Dieses Handbuch passt für folgende Modelle
1
Inhaltsverzeichnis
Andere HEEYOUNG Monitor Handbücher


