
HERMITAGE BATH 97 Series Bedienungsanleitung
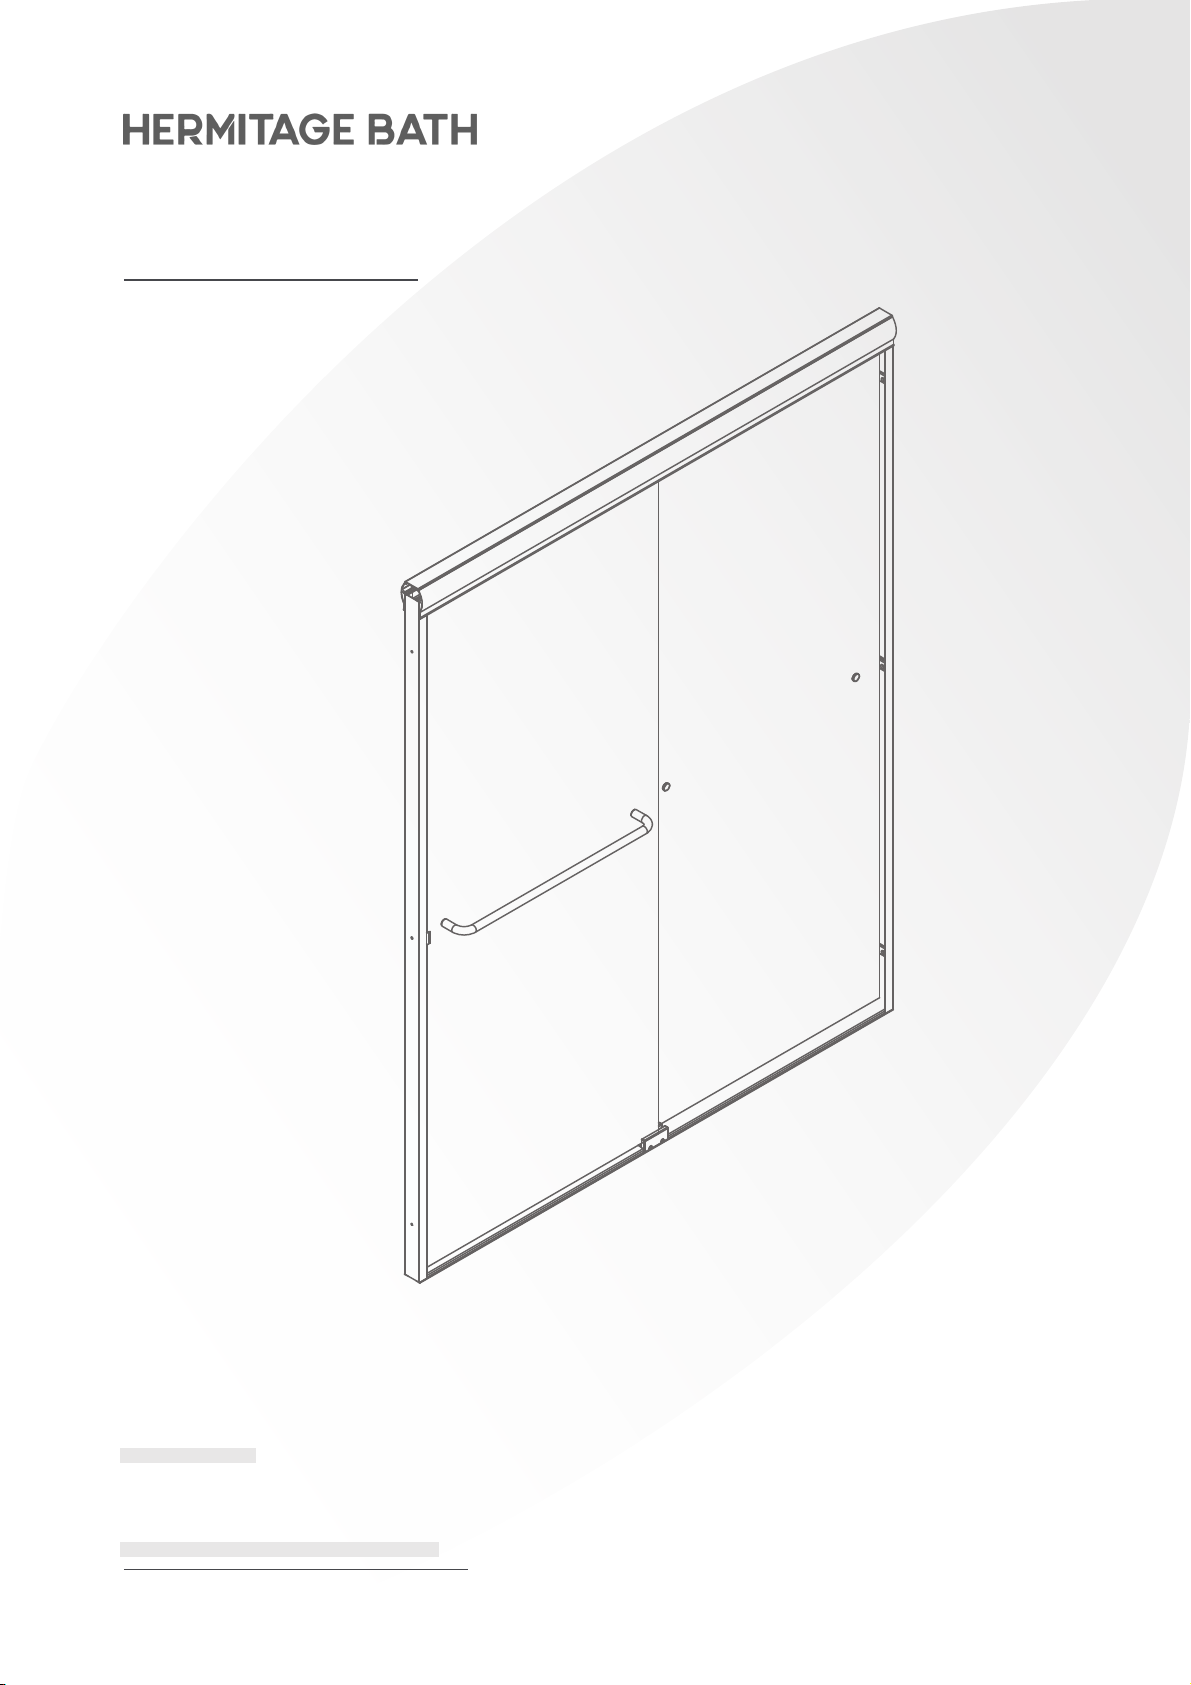
Installation Manual
Manual de Instalación
For technical suppo contact
Para sopoe técnico, póngase en contacto con
60 pulgadas de ancho × 60 pulgadas de alto
626-341-5763
http://www.homebandc.com/
Model Number/Número de modelo: 97 Series
60 in. W × 60 in. H
Sliding Framed
Tub Door
Puea de Bañera
Corrediza con Marco

Detalles del componente
Instrucciones previas a la instalación
9-12
7
8
IPasos de instalación
Component Details
Pre-Installation Guidelines
3-6
1
2
Installation Steps
English
01
Español
02
TABLE OF
CONTENTS

Detailed Diagram of
Shower Door Components
PARTS LIST.
TOP TRACK (1 pcs)
BUMPER GUIDE (2 pcs) WALL BUMPER (6 pcs) GLASS HANGER (4 pcs) ROLLER (4 Pcs)
TOWEL BAR WRENCH
(2 3/8" LONG 1 pcs)
1 1/2" SCREW (6 pcs)WALL PLUG (6 pcs)
3/8" SCREW (2 pcs)
BOTTOM TRACK (1 pcs) WALL JAMB (2 pcs) DOOR PANEL
(INSIDE / OUTSIDE) TOWEL BAR (2 pcs) PANEL GUIDE (1 Pcs)
1
2 3/8"
Before You Sta
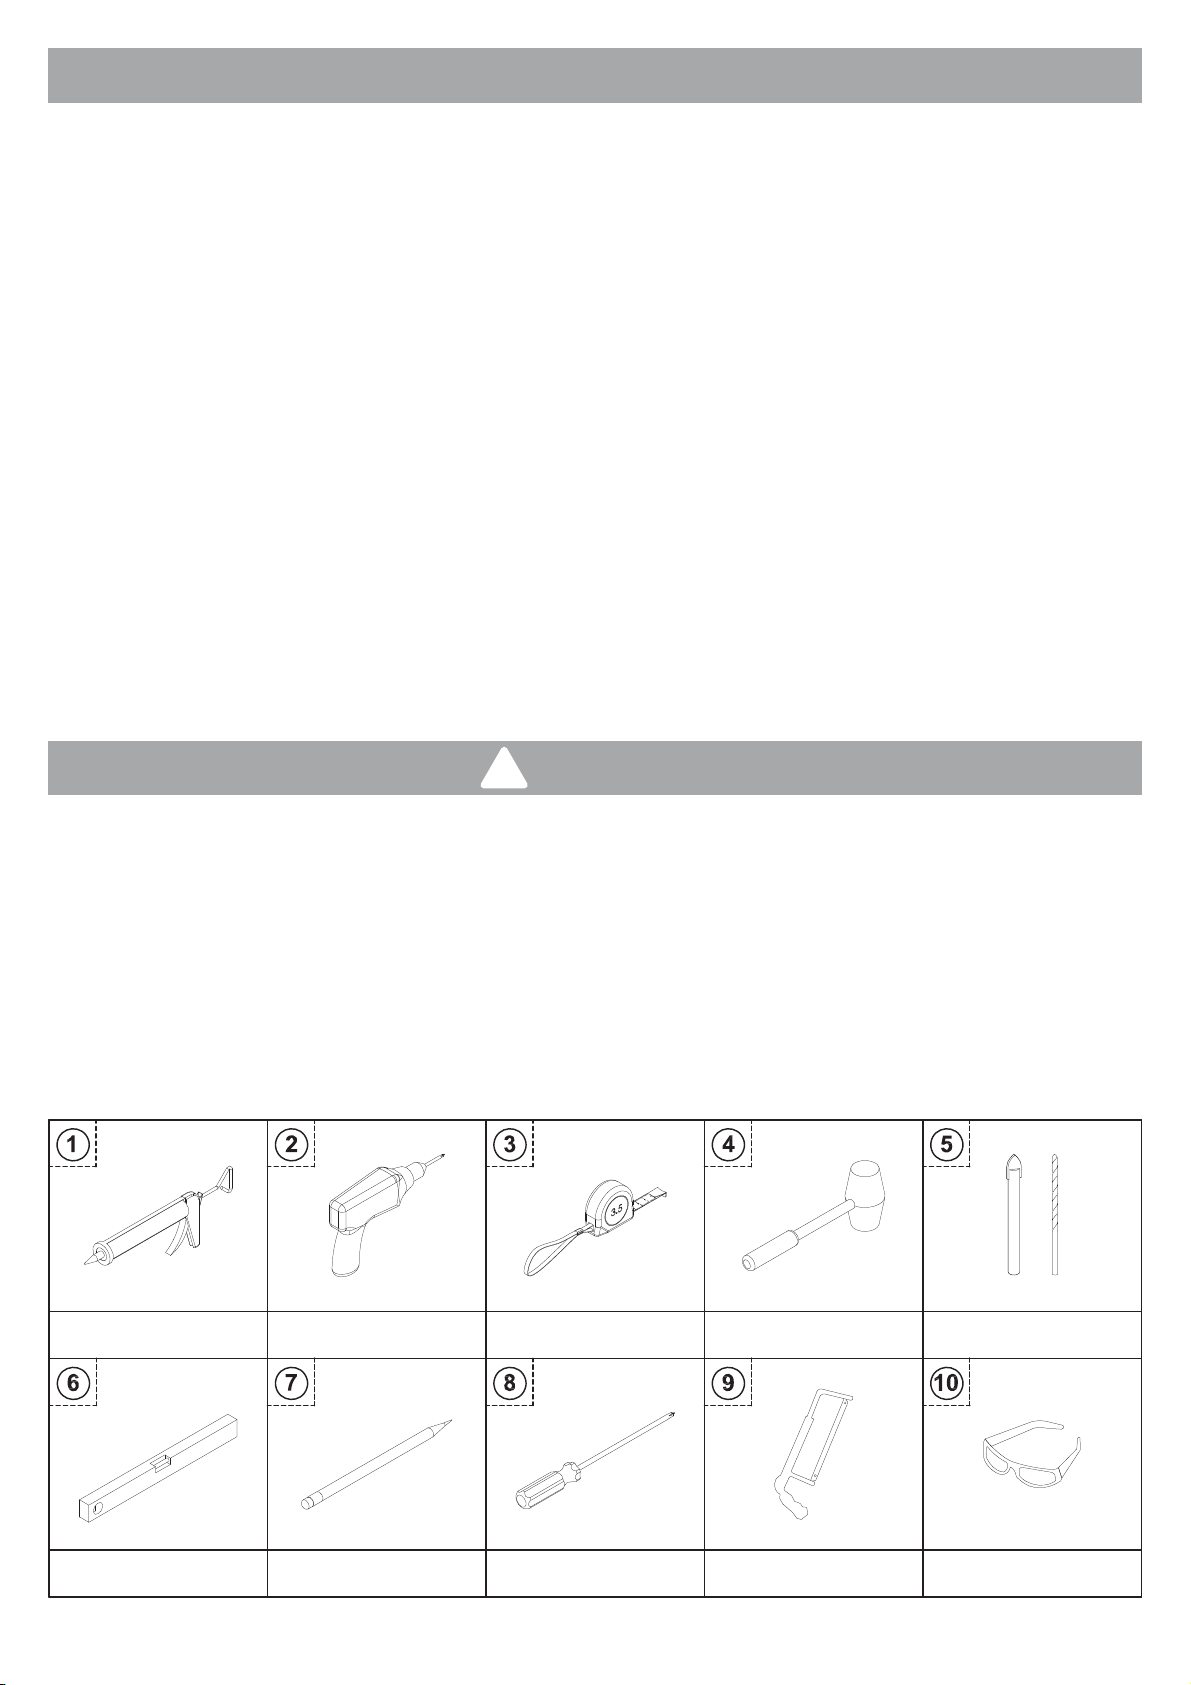
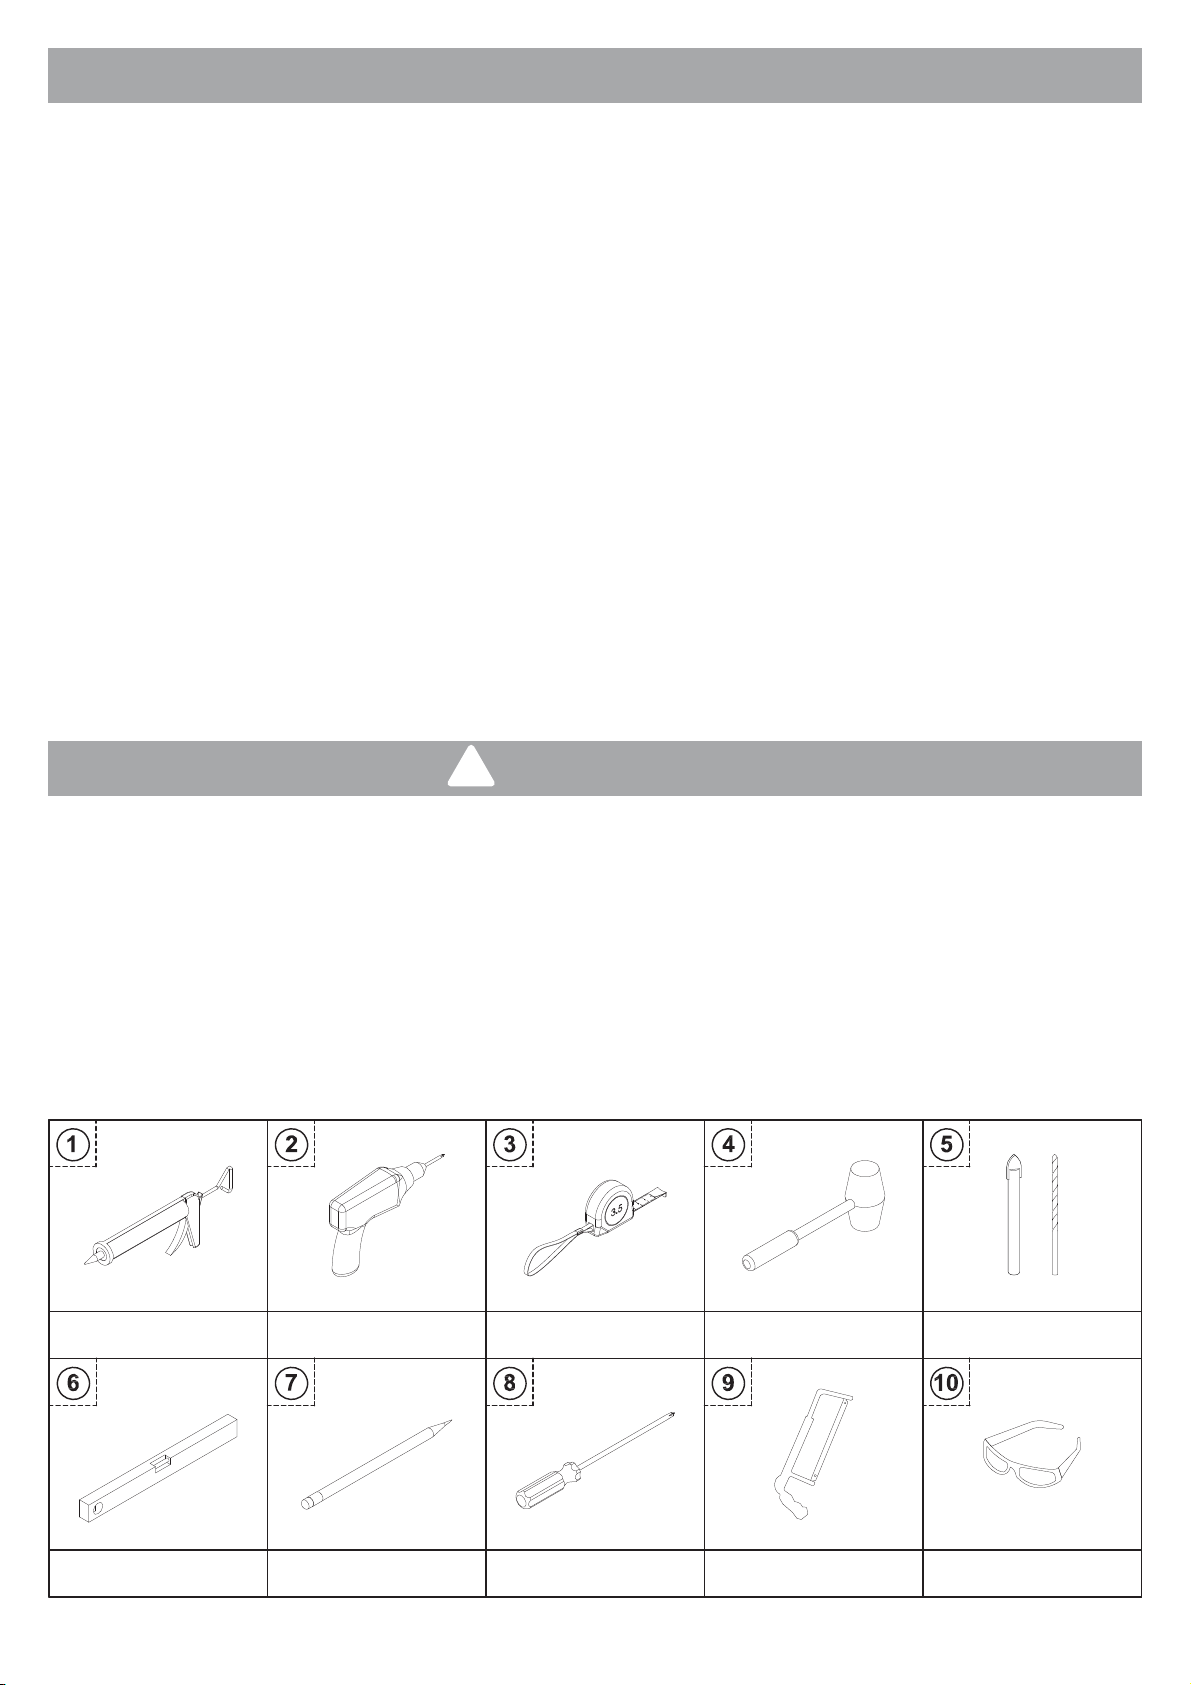
Required Tools
SILICONE
LEVEL PENCIL
DRILL MEASURE TAPE
SCREW DRIVERS HANDSAW SAFETY GLASSES
RUBBER MALLET DRILL BITS
1/4" and 1/8" Drill Bits
2
Thank you for choosing our sliding shower door. We aim to provide you with the most satisfying
product and user experience. Please carefully read through this manual as it contains impoant
product information and step-by-step installation instructions. Failure to follow the instructions
may aect the product's warranty.
1.Before installation, please inspect the boxes for any damage caused during shipping. If any
pas are missing or defective, please contact our customer seice by email at info@lifeupinc.net
within 7 business days from the delive date. Please note that we will not provide free
replacements for damaged products or missing pas if you contact us more than 7 business days
after product installation. Feel free to reach out if you have any questions related to your
purchase order number.
2.Ensure that you consult your local building codes if you have any questions about installation
standards. Building and plumbing codes may va depending on your location.
3.Verify that the installation suace or level is strong enough to suppo the weight of the shower
door. Do not install it on plastic shower modules or dwall unless additional suppo is provided
behind the wall.
4.This shower door is quite heavy and should be installed by a professional.
1.Always wear safety glasses when cutting or drilling.
2.Unframed tempered glass should never come into contact with rigid suaces, as it may shatter.
Avoid touching the edge of the tempered glass panel with tools or any rigid object, and refrain
from placing the unframed tempered glass edge directly on the oor.
3.Do not t to cut tempered glass, as it will shatter.
Warnings
!
3
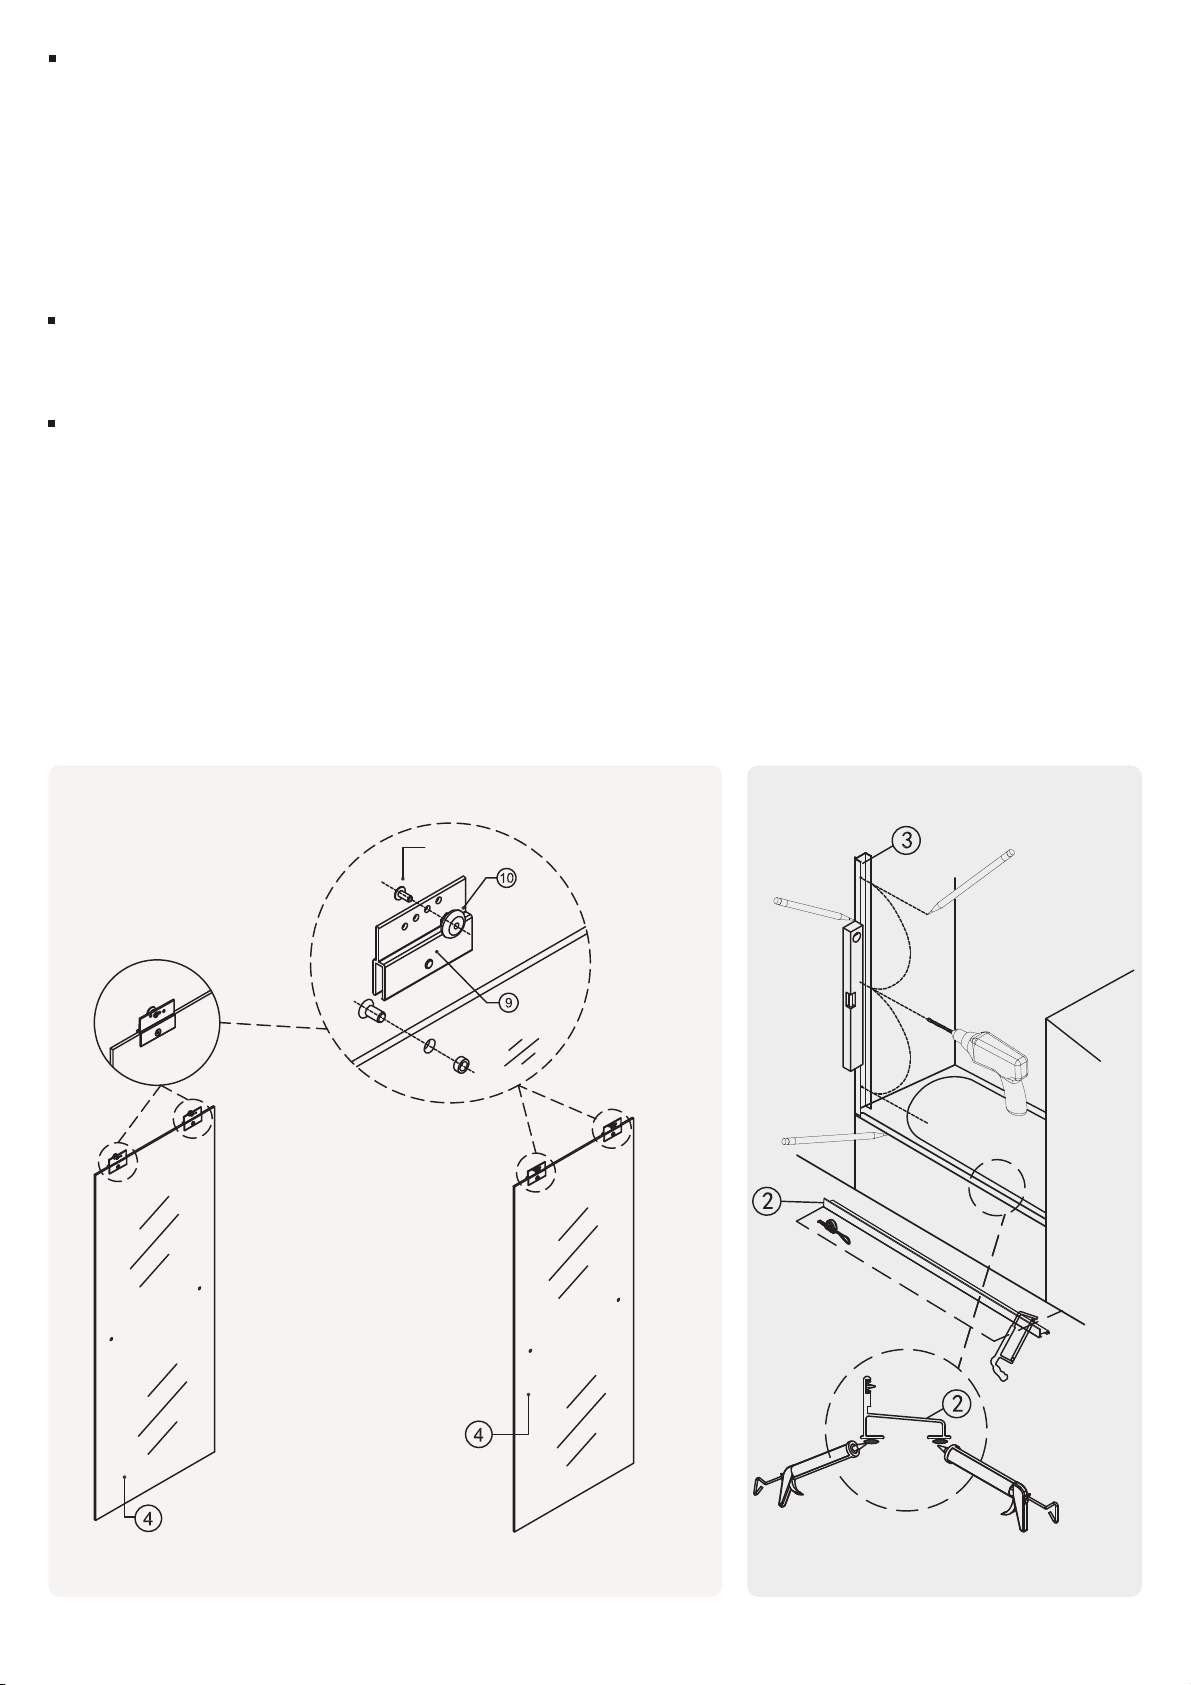
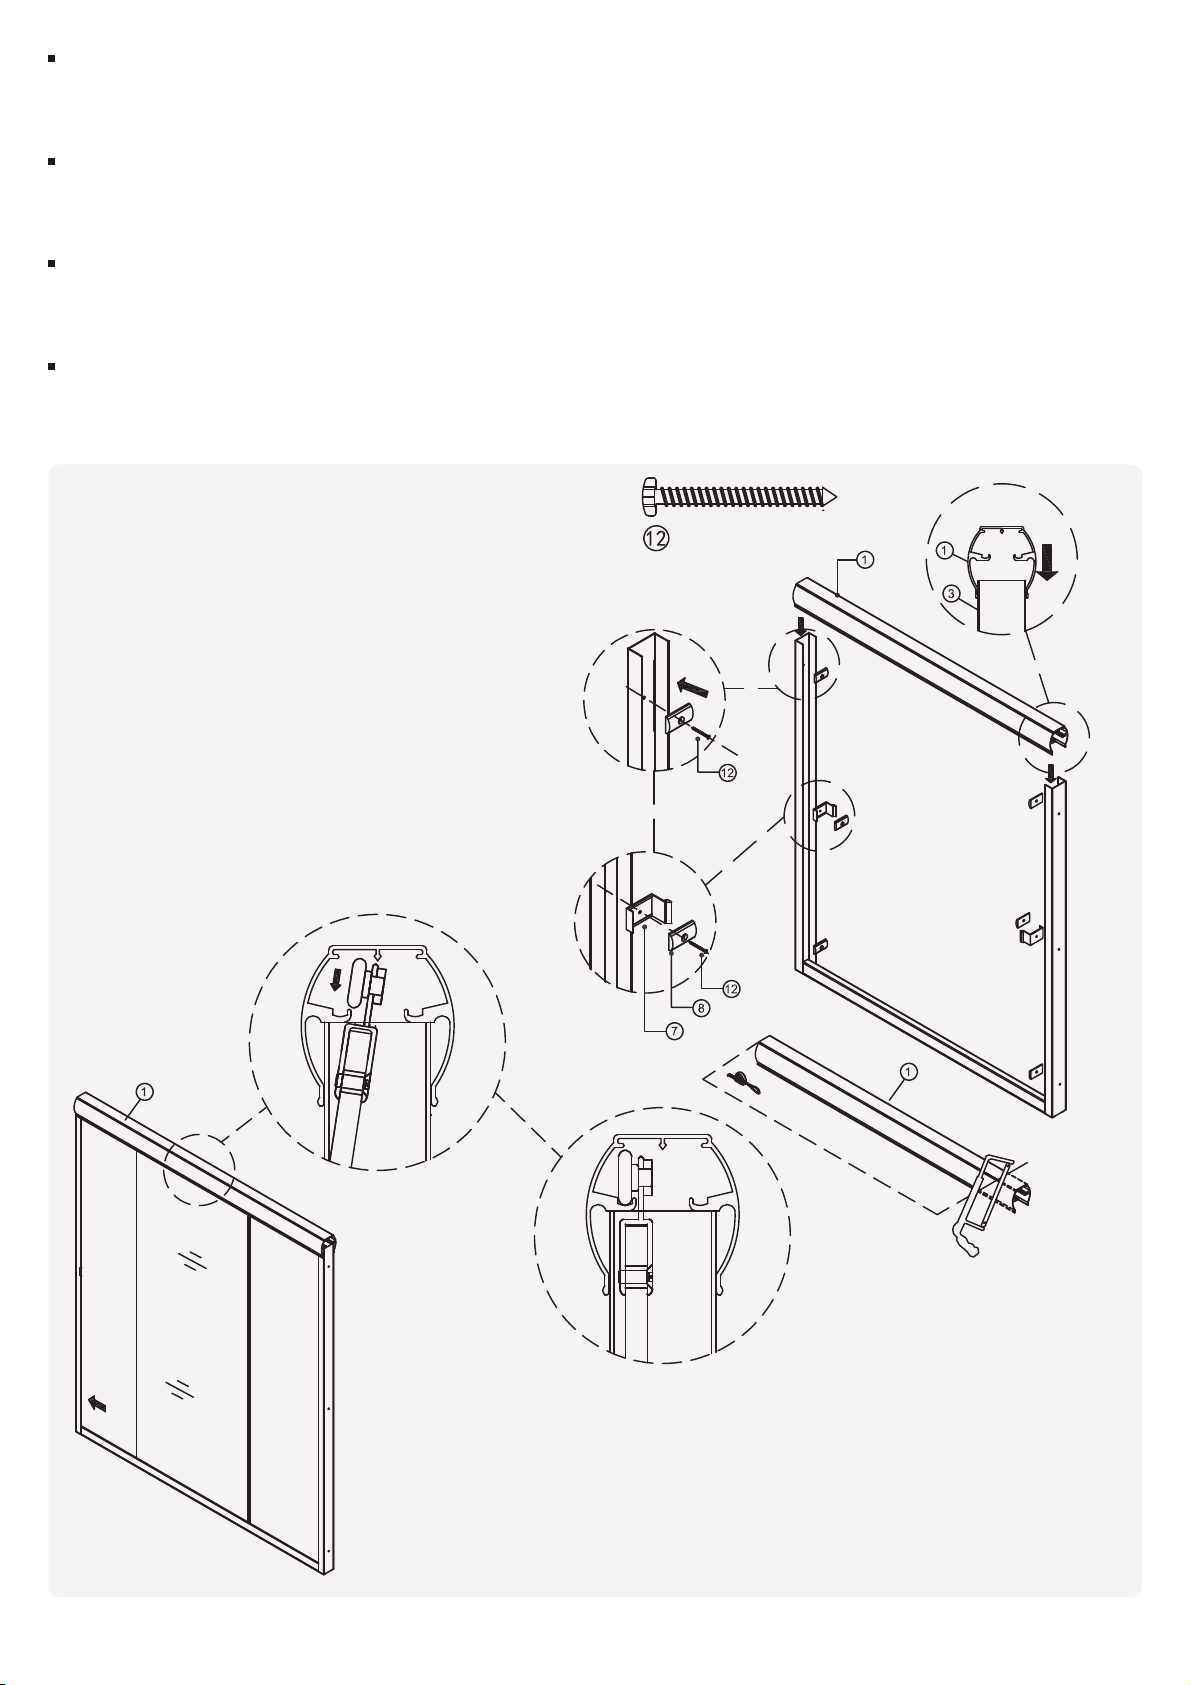
Attach rollers to hanger clips on both panels. Rollers should be mounted so that the head of the
mounting screw is on the same side of the panel as the screw head set into the hanger clip (see
inset drawing).
STEP 1
Measure opening on bottom and cut Bottom track (pa②) 1/8" shoer than opening.
STEP 2
Place the wall jamb down over the bottom track so that the back of the jamb is between the
bottom track and the wall. Using a level to ensure the jamb is plumb, mark the hole locations.
Remove the jamb, and drill holes about 1 1/2" deep at each of the marked locations.
STEP 3
NOTE: When drilling into ceramic, glass, or stone, use a 1/4" MASONRY drill bit. When installing
on berglass or aclic, use a 1/8" drill bit and discard the wall plugs. When installing on
berglass or aclic, you may need to le the side jambs at the bottom to t the contour of the
unit.For dwall that is more than 10-12mm in thickness, please ensure you use specied dwall
anchors for installation. If the dwall is less than 10-12mm in thickness, make sure to install the
brackets on the stud.
NOTE: The various holes in the hanger clip are used to ne-tune the adjustment of the panel to
compensate for walls that are slightly out of square or not peectly veical. For best results,
sta with all rollers in the second hole from the top and then make adjustments as needed.
STEP 2
STEP 1
STEP 3
GLASS HANGER
ROLLER
SCREW
DOOR PANEL(OUTSIDE)
DOOR PANEL(INSIDE)
L=actual openimg - 1/8"
4
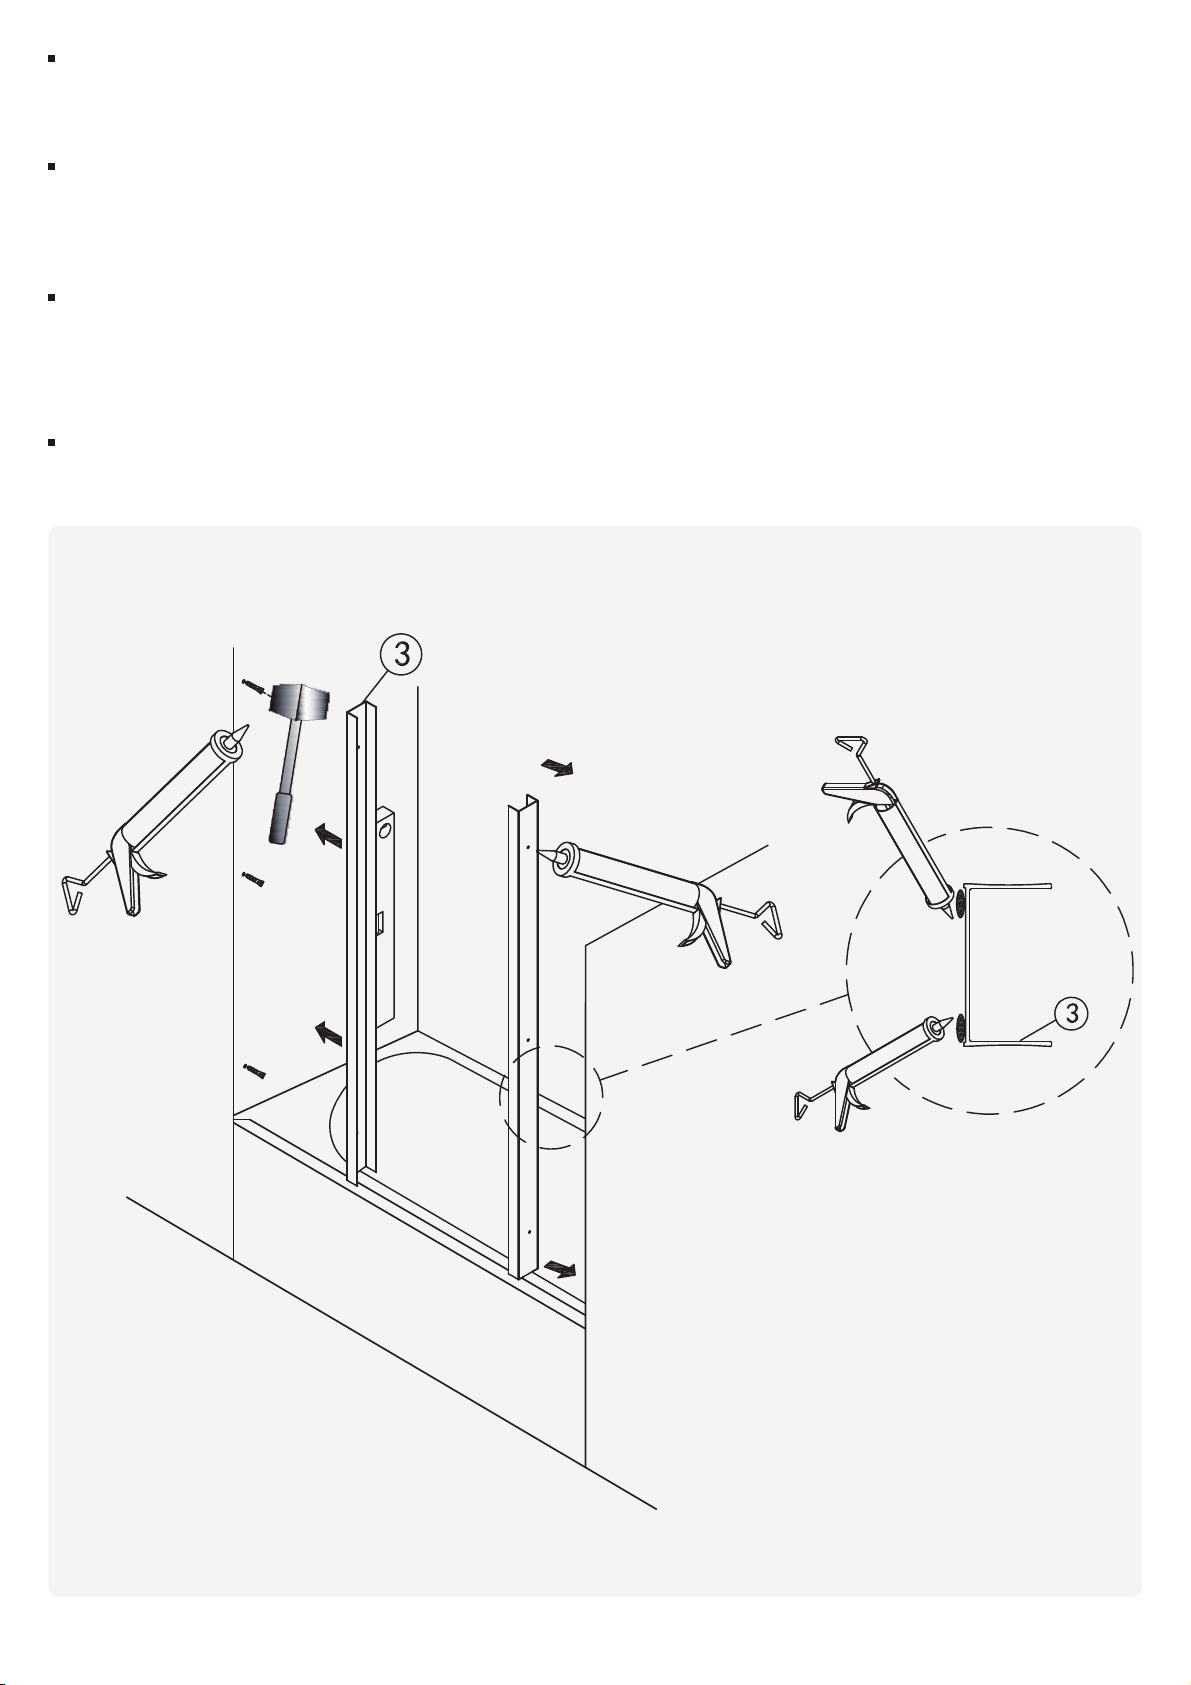
Repeat step 3 on the other side.
STEP 4
Run a thin bead of silicone caulk down the entire length of both bottom ledges on the bottom
track. Place the bottom track into position and press down rmly along the length of the track.
STEP 5
Push wall plugs into holes drilled in step 3 and tap them in with a rubber mallet.
STEP 6
Caulk a thin bead of silicone on the entire bottom ledges of the wall jamb.
STEP 7
NOTE: If you are installing on berglass or aclic, skip this step and discard the wall plugs.
STEP 5/6/7
TOP VIEW
5
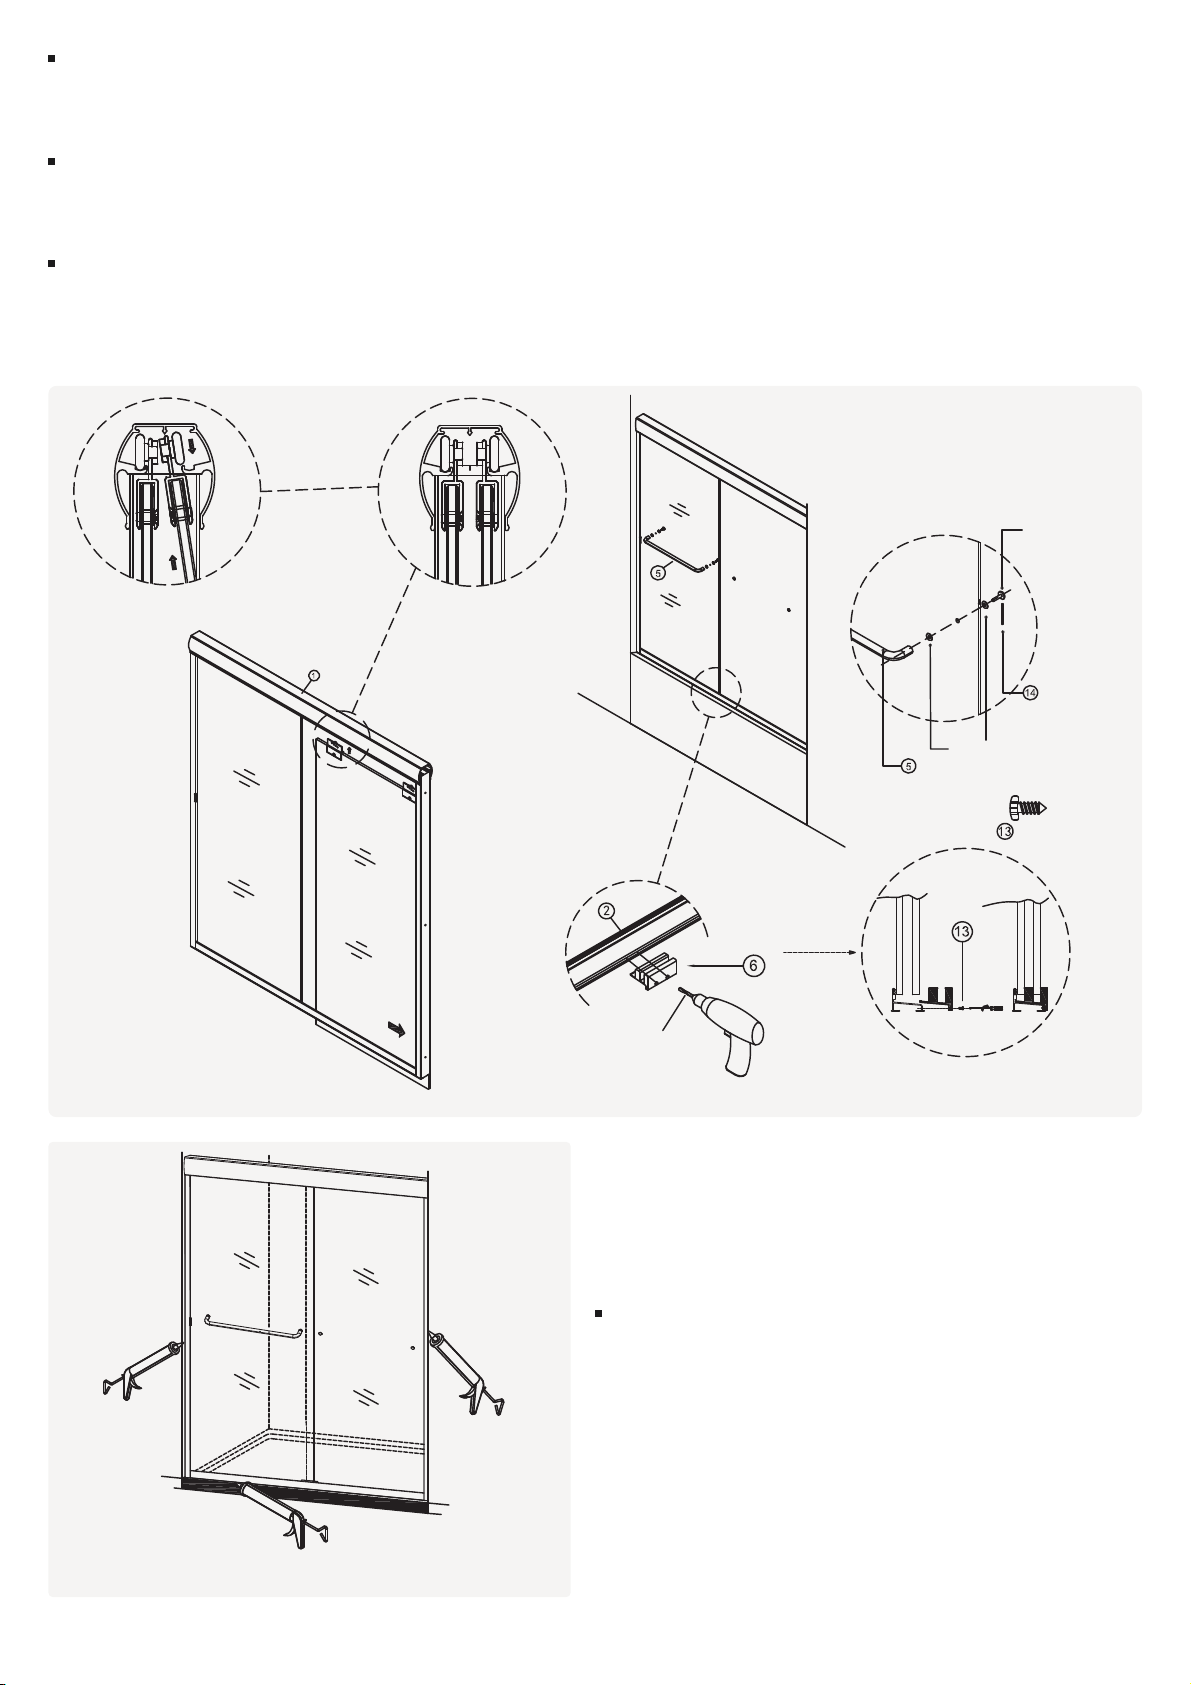
Use 1 1/2" screws to anchor wall bumper and bumper guide into center hole on each side.
STEP 8
Measure opening at top of wall jamb , cut Top track (pa①) 1/16" shoer than opening.
STEP 9
Place Top track down over wall jambs as shown.
STEP 10
Install outer Door panel by lifting up & into Top track (pa①) ( Do not lift by towel bar, be
careful not to bump panel against metal track.)
STEP 11
STEP 9
STEP 8
STEP 10
STEP 11
SIDE VIEW
SIDE VIEW
1 1/2" SCREW
L=actual openimg - 1/16"
6
Install inner door panel by lifting up and into Top track ( Do not lift by towel bar ).
STEP 12
Install Towel bars (pa⑤).
STEP 13
Position panel guide in center of Bottom track. Drill two 1/8" holes through screw holes in guide
and into Bottom track. Position panels in guide as shown in inset drawing and attach guide to
bottom track using 3/8" screws.
STEP 14
Caulk both sides of the shower door frame to
seal. Keep the entire area d for a minimum of
24 hours. Your installation is now complete.
FINAL STEP:
STEP 12
STEP 13
STEP 14
SIDE VIEW
TOWEL BAR
SCREW
TOWEL BAR
SCREW
CLEAR SLEEVE
SIDE VIEW
SIDE VIEW
CAULK ALL SIDES
3/8" SCREW
INTERIOR
SHOWER SIDE
1/8" DRILL BITS
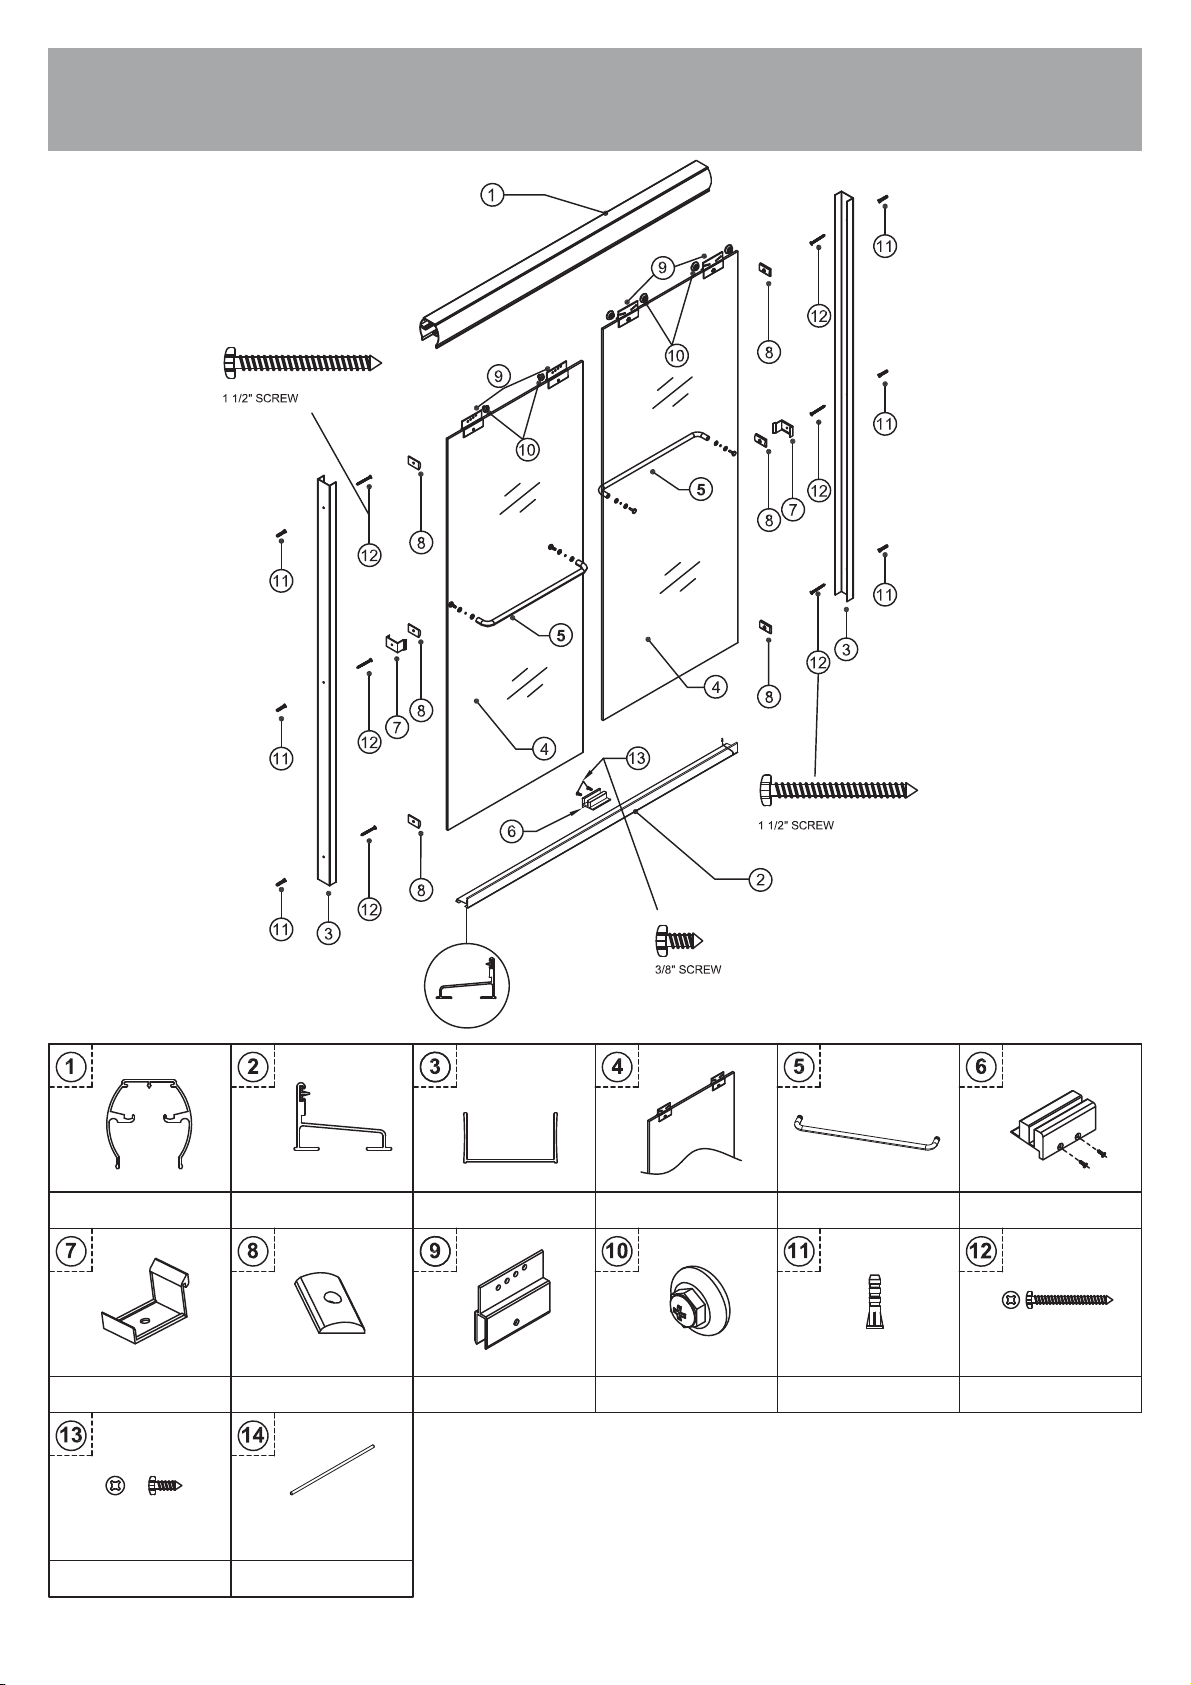
Diagrama Detallado de los
Componentes de la Puea de la Ducha
PARTS LIST.
RAÍL SUPERIOR
(1 pieza)
GUÍA DE PARACHOQUES
(2 piezas)
TOPE DE PARED
(6 piezas)
COLGADOR DE VIDRIO
(4 piezas)
RODILLO
(4 piezas)
LLAVE DE BARRA DE TOALLA
(LARGO 2 3/8" 1 pieza)
TORNILLO DE 1 1/2"
(6 piezas)
TACO DE PARED
(6 piezas)
TORNILLO DE 3/8"
(2 piezas)
RAÍL INFERIOR
(1 pieza)
MARCO DE PARED
(2 piezas)
PANEL DE PUERTA
(INTERIOR / EXTERIOR)
BARRA DE TOALLA
(2 piezas)
GUIA DEL PANEL
(1 pieza)
7
2 3/8"
Antes de Comenzar
Outils nécessaires
SILICONA
NIVEL LÁPIZ
PERFORADORA CINTA MÉTRICA
DESTORNILLADORES SIERRA DE MANO GAFAS DE SEGURIDAD
MARTILLO DE GOMA PUNTAS DE TALADRO
Puntas de taladro de 1/4" y 1/8"
8
Gracias por elegir nuestra puea de ducha corrediza. Nuestro objetivo es brindarle el producto
más satisfactorio y una experiencia de usuario óptima. Lea detenidamente este manual, ya que
contiene información impoante del producto e instrucciones de instalación paso a paso. No
seguir las instrucciones puede afectar la garantía del producto.
1.Antes de la instalación, por favor inspeccione las cajas en busca de cualquier daño causado
durante el envío. Si falta alguna pieza o hay piezas defectuosas, por favor contacte a nuestro
seicio de atención al cliente por correo electrónico a inf[email protected] dentro de los 7 días
hábiles a pair de la fecha de entrega. Tenga en cuenta que no proporcionaremos reemplazos
gratuitos para productos dañados o piezas faltantes si nos contacta más de 7 días hábiles
después de la instalación del producto. No dude en ponerse en contacto si tiene alguna pregunta
relacionada con el número de pedido de su compra.
2.Asegúrese de consultar los códigos de construcción locales si tiene alguna pregunta sobre las
normas de instalación. Los códigos de construcción y plomería pueden variar según su ubicación.
3.Verique que la supeicie de instalación esté lo sucientemente fuee como para sopoar el
peso de la puea de ducha. No la instale en módulos de ducha de plástico o en paneles de yeso
a menos que se proporcione sopoe adicional detrás de la pared.
4.Esta puea de ducha es bastante pesada y debe ser instalada por un profesional.
1.Siempre use gafas de seguridad al coar o peorar.
2.El vidrio templado sin marco nunca debe entrar en contacto con supeicies rígidas, ya que
puede romperse. Evite tocar el borde del panel de vidrio templado sin marco con herramientas u
objetos rígidos, y absténgase de colocar el borde del vidrio templado sin marco directamente en
el suelo.
3.No intente coar el vidrio templado, ya que se romperá.
Adveencias
!
Inhaltsverzeichnis
Sprachen:
Andere HERMITAGE BATH Badezimmerarmatur Handbücher


