HQ Power VDPCRGB2 Bedienungsanleitung

VDPCRGB2
DMX CONTROLLER FOR LED STRIPS - 3 CHANNEL
DMX-CONTROLLER VOOR LEDSTRIPS - 3 KANALEN
CONTRÔLEUR DMX POUR FLEXIBLES LED - 3 CANAUX
CONTROLADOR DMX PARA CINTAS CON LEDs - 3 CANALES
DMX-CONTROLLER FÜR LED-STREIFEN - 3 KANÄLE
USER MANUAL 3
GEBRUIKERSHANDLEIDING 7
NOTICE D’EMPLOI 11
MANUAL DEL USUARIO 15
BEDIENUNGSANLEITUNG 19

VDPCRGB2
30.06.2009 ©2009 Velleman nv
2
A address selection
B DMX input
C DMX output
D power connector
A adresinstelling
B DMX-ingang
C DMX-uitgang
D voedingsaansluiting
A adressage
B entrée DMX
C sortie DMX
D prise d’alimentation
A selección de la dirección
B entrada DMX
C salida DMX
D entrada de alimentación
A Einstellung der Adresse
B DMX-Eingang
C DMX-Ausgang
D Anschluss
Stromversorgung

VDPCRGB2
30.06.2009 ©2009 Velleman nv
3
User manual
1. Introduction
To all residents of the European Union
Important environmental information about this product
This symbol on the device or the package indicates that
disposal of the device after its lifecycle could harm the
environment. Do not dispose of the unit (or batteries) as
unsorted municipal waste; it should be taken to a specialized
company for recycling.
This device should be returned to your distributor or to a
local recycling service. Respect the local environmental rules.
If in doubt, contact your local waste disposal authorities.
Thank you for choosing the Velleman! Please read the manual
thoroughly before bringing this device into service. If the device was
damaged in transit, don't install or use it and contact your dealer.
2. Safety Instructions
Keep this device away from children and unauthorized
users.
Keep this device away from rain, moisture, splashing and
dripping liquids. Never put objects filled with liquid on top of
or near the device.
Be very careful during the installation: touching live wires
can cause life-threatening electroshocks.
•Damage caused by disregard of certain guidelines in this manual is
not covered by the warranty and the dealer will not accept
responsibility for any ensuing defects or problems.
•All modifications of the device are forbidden for safety reasons.
Damage caused by user modifications to the device is not covered
by the warranty.
•A qualified technician should install and service this device.
•Do not switch the device on immediately after it has been exposed
to changes in temperature. Protect the device against damage by
leaving it switched off until it has reached room temperature.
•Make sure that the available voltage does not exceed the voltage
stated in the specifications of this manual.

VDPCRGB2
30.06.2009 ©2009 Velleman nv
4
3. General Guidelines
Refer to the Velleman® Service and Quality Warranty on the last
pages of this manual.
•The VDPCRGB2 should only be used indoors.
•Protect this device from shocks and abuse. Avoid brute force when
operating the device.
•Protect the device against extreme heat and dust.
•Familiarise yourself with the functions of the device before actually
using it. Do not allow operation by unqualified people. Any damage
that may occur will most probably be due to unprofessional use of
the device.
•Only use the device for its intended purpose. Using the device in an
unauthorised way will void the warranty.
4. Features
•small intelligent 3 channel DMX controller for LED RGB strips
•DMX or auto program selection via DIP switches
•for use with: CHLR4RGB
5. Overview and use
Refer to the illustrations on page 2 of this manual.
•For wiring instructions, see table below. Do not plug the power
supply into the mains before all connections are made!
terminal connect to
DC- GND of power supply
DC+ positive pole of power supply
COM positive pole of LED-strip
CH1 LED-strip channel 1
CH2 LED-strip channel 2
CH3 LED-strip channel 3
Notes:
1. Do not use a 24VDC power supply to power 12VDC LED strips.
2. Never connect the COM terminal to ground! It is internally
connected to the DC+ terminal!
•When using a DMX system, set the DMX address
(see §6) and plug in the DMX-cable [B].
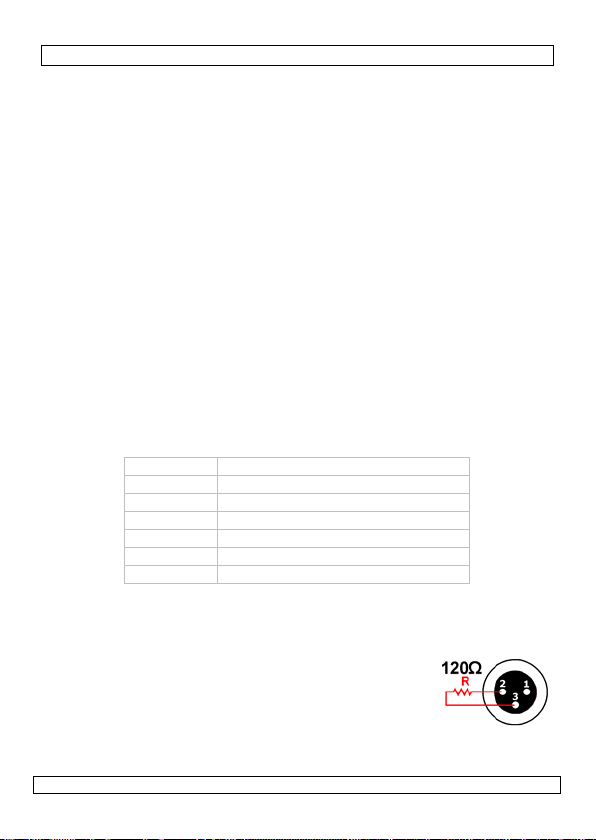
•Connect a DMX cable to the DMX-output [C] to
continue the DMX line or terminate the chain with
a 120Ωresistor between pin 2 and 3.
•Connect the power supply to the mains.

VDPCRGB2
30.06.2009 ©2009 Velleman nv
5
6. DIP switch settings
•The controller can work in 2 modes:
oDMX mode
ointernal program mode
DMX mode
•To enable DMX mode, switch 10 must be set in the OFF position.
•Switches 1 ~ 9 determine the DMX starting address. The address is
determined by the switches in the ON-position. E.g.:
Switches 1, 3 and 6 are ON. The address becomes:
switch value
1 001
3 004
6 032
total:
037
The DMX address for this example is 037.
Built-in programs
•To enable the internal program mode, switch 10 must be set in the
ON position.
•The other switches determine the current program.
switch position
program
1 ON red
2 ON green
3 ON blue
4 ON yellow
5 ON purple
6 ON cyan
7 ON white
8 ON changing colours (adjustable speed)
9 ON fading colours (adjustable speed)
•When in changing or fading colours mode, the changing or fading
speed is determined by switch 1~7.
oswitch 1 ON: slowest speed
oswitch 7 ON: fastest speed.
Note: When multiple speed switches are set, the highest setting will
be used.

VDPCRGB2
30.06.2009 ©2009 Velleman nv
6
7. Maintenance
•All screws should be tightened and free of corrosion.
•The electric power supply cables must not show any damage. Have
a qualified technician maintain the device.
•Disconnect the device from the mains prior to maintenance
activities.
•Wipe the device regularly with a moist, lint-free cloth. Do not use
alcohol or solvents.
•There are no user-serviceable parts.
•Contact your dealer for spare parts if necessary.
8. Technical specifications
DMX channels 3 (red - green - blue)
power supply 12-24VDC (PSU not incl.)
power consumption < 1W
power output 12V < 216W
24V < 432W
output current 6A (each channel)
max. load 25m
dimensions 125 x 55 x 42mm
weight 0.12kg
Use this device with original accessories only. Velleman nv
cannot be held responsible in the event of damage or injury
resulted from (incorrect) use of this device. For more info
concerning this product, please visit our website
www.velleman.eu. The information in this manual is subject to
change without prior notice.
© COPYRIGHT NOTICE
This manual is copyrighted. The copyright to this manual is
owned by Velleman nv. All worldwide rights reserved. No part of
this manual may be copied, reproduced, translated or reduced to any
electronic medium or otherwise without the prior written consent of
the copyright holder.

VDPCRGB2
30.06.2009 ©2009 Velleman nv
7
GEBRUIKERSHANDLEIDING
1. Inleiding
Aan alle ingezetenen van de Europese Unie
Belangrijke milieu-informatie betreffende dit product
Dit symbool op het toestel of de verpakking geeft aan dat, als het na
zijn levenscyclus wordt weggeworpen, dit toestel schade kan
toebrengen aan het milieu. Gooi dit toestel (en eventuele batterijen)
niet bij het gewone huishoudelijke afval; het moet bij een
gespecialiseerd bedrijf terechtkomen voor recyclage. U moet dit toestel
naar uw verdeler of naar een lokaal recyclagepunt brengen. Respecteer de
plaatselijke milieuwetgeving.
Hebt u vragen, contacteer dan de plaatselijke autoriteiten betreffende de
verwijdering.
Dank u voor uw aankoop! Lees deze handleiding grondig voor u het toestel in
gebruik neemt. Werd het toestel beschadigd tijdens het transport, installeer het
dan niet en raadpleeg uw dealer
2. Veiligheidsinstructies
Houd buiten het bereik van kinderen en onbevoegden.
Bescherm tegen regen, vochtigheid en opspattende vloeistoffen.
Plaats geen objecten gevuld met vloeistof op het toestel.
Wees voorzichtig bij de installatie: raak geen kabels aan die onder
stroom staan om dodelijke elektroshocks te vermijden.
•De garantie geldt niet voor schade door het negeren van bepaalde richtlijnen in
deze handleiding en uw dealer zal de verantwoordelijkheid afwijzen voor
defecten of problemen die hier rechtstreeks verband mee houden.
•Om veiligheidsredenen mag u geen wijzigingen aanbrengen. Schade door
wijzigingen die de gebruiker heeft aangebracht valt niet onder de garantie.
•Laat dit toestel installeren en onderhouden door een geschoolde technicus.
•Om beschadiging te vermijden, zet u het toestel best niet aan onmiddellijk
nadat het werd blootgesteld aan temperatuurschommelingen. Wacht tot het
toestel op kamertemperatuur gekomen is.
•De beschikbare netspanning mag niet hoger zijn dan de spanning in de
specificaties achteraan de handleiding.
3. Algemene richtlijnen
Raadpleeg de Velleman®service- en kwaliteitsgarantie achteraan de
handleiding.
•Gebruik de VDPCRGB2 enkel binnenshuis.
•Bescherm tegen schokken. Vermijd brute kracht tijdens de bediening.

VDPCRGB2
30.06.2009 ©2009 Velleman nv
8
•Bescherm tegen extreme temperaturen en stof.
•Leer eerst de functies van het toestel kennen voor u het gaat gebruiken.
•Gebruik het toestel enkel waarvoor het gemaakt is. Bij onoordeelkundig gebruik
vervalt de garantie.
4. Eigenschappen
•kleine en intelligente 3-kanaals DMX-controller voor RGB ledstrips
•instelling van de DMX- of automatische sturing via DIP-schakelaars
•voor gebruik met CHLR4RGB
5. Omschrijving
Raadpleeg de figuren op pagina 2 van deze handleiding.
•Vervolledig eerst alle aansluitingen alvorens de controller op het lichtnet aan te
sluiten!
terminal sluit aan op
DC- GND voeding
DC+ positieve pool voedingsadapter
COM positieve pool ledstrip
CH1 ledstrip kanaal 1
CH2 ledstrip kanaal 2
CH3 ledstrip kanaal 3
Opmerkingen:
1. Gebruik geen 24VDC-voeding met ledstrips van 12 VDC.
2. Sluit de COM-terminal nooit aan de massa! De COM-terminal is aangesloten
op de DC+-terminal.
•Stel het DMX-adres in (zie §6) en sluit de DMX-kabel [B]
aan.
•Sluit een DMX-kabel aan de DMX-uitgang [C] voor een
volgende toestel of eindig de serie met een weerstand van
120 Ωtussen pin 2 en 3.
•Sluit de voeding aan.
6. DIP switch settings
•De controller heeft 2 aanstuurmodi:
oDMX-aansturing
oaansturing via het interne programma
DMX-aansturing
•Plaats DIP-schakelaar 10 op OFF.
•Stel het DMX-adres in met DIP-schakelaars 1 ~ 9.

VDPCRGB2
30.06.2009 ©2009 Velleman nv
9
Voorbeeld:
Schakelaars 1, 3 en 6 op ON. DMX-adres =
schakelaar waarde
1 001
3 004
6 032
totaal:
037
Het DMX-adres in dit voorbeeld: 037.
Intern programma
•Plaats DIP-schakelaar 10 op ON.
•Stel het programma in met DIP-schakelaars.
schakelaar positie programma
1 ON rood
2 ON groen
3 ON blauw
4 ON geel
5 ON purper
6 ON cyaan
7 ON wit
8 ON kleurverandering (instelbare snelheid)
9 ON kleurverandering met fade (instelbare snelheid)
•Stel de snelheid van de kleurverandering in met DIP-schakelaars 1 ~ 7.
oSchakelaar 1 ON: laagste snelheid.
oSchakelaar 7 ON: hoogste snelheid.
Opmerking: De controller kiest automatisch de hoogst ingestelde snelheid.
7. Onderhoud
•Alle gebruikte schroeven moeten goed zijn aangespannen en mogen geen
sporen van roest vertonen.
•De voedingskabels mogen niet beschadigd zijn. Laat het toestel onderhouden
door een geschoolde technicus
•Ontkoppel het toestel van het lichtnet voor u aan onderhoudswerkzaamheden
begint
•Maak het toestel geregeld schoon met een vochtige, niet pluizende doek.
Gebruik geen alcohol of solvent.
•De gebruiker mag geen onderdelen vervangen.
•Bestel eventuele reserveonderdelen bij uw dealer.

VDPCRGB2
30.06.2009 ©2009 Velleman nv
10
8. Technische specificaties
DMX-kanalen 3 (rood - groen - blauw)
voeding 12 ~ 24 VDC (voedingsadapter niet meegelev.)
verbruik < 1 W
vermogen 12 V < 216 W
24 V < 432 W
uitgangstroom 6 A (elk kanaal)
max. last 25 m
afmetingen 125 x 55 x 42 mm
gewicht 0,12 kg
Gebruik dit toestel enkel met originele accessoires. Velleman nv is niet
aansprakelijk voor schade of kwetsuren bij (verkeerd) gebruik van dit
toestel. Voor meer informatie over dit product, zie www.velleman.eu. De
informatie in deze handleiding kan te allen tijde worden gewijzigd zonder
voorafgaande kennisgeving.
© AUTEURSRECHT
Velleman nv heeft het auteursrecht voor deze handleiding.
Alle wereldwijde rechten voorbehouden. Het is niet toegestaan om deze
handleiding of gedeelten ervan over te nemen, te kopiëren, te vertalen, te
bewerken en op te slaan op een elektronisch medium zonder voorafgaande
schriftelijke toestemming van de rechthebbende.
Inhaltsverzeichnis
Sprachen:
Andere HQ Power Controller Handbücher

HQ Power
HQ Power VDSMP33 Bedienungsanleitung

HQ Power
HQ Power VDP1500SM3TC Bedienungsanleitung

HQ Power
HQ Power VDPCRGB3 Bedienungsanleitung

HQ Power
HQ Power VDPC009 Bedienungsanleitung

HQ Power
HQ Power VDPLC006 Bedienungsanleitung

HQ Power
HQ Power VDDPL300RC Bedienungsanleitung

HQ Power
HQ Power VDPLC010 Bedienungsanleitung

HQ Power
HQ Power VDPLTC Bedienungsanleitung

HQ Power
HQ Power VDPDMXC173 Bedienungsanleitung

HQ Power
HQ Power VDLD1 Bedienungsanleitung