Hummer H-120 Bedienungsanleitung

H-120 & H-240
ARGB

EN - Warning
Improper installation will result in damage to the processor. Never switch the computer system on until the cooler and the
fans are connected to the motherboard power connector.
Always use the included screws. Screw the radiator with care to avoid damaging it.
Electrostatic discharge (ESD) can damage system components. Use and ESD-controlled workstation. If a worksation is not
available, wear an antistatic wrist strap or touch an earthed surface before handling any PC components.
PT - Atenção
Uma instalação imprória poderá danicar o processador. Nunca ligue o computador sem vericar se o cooler e as ventoinhas
estão ligadas na motherboard.
Utilize sempre os parafusos fornecidos. Aparafuse o radiador com cuidado de forma a evitar possíveis danos.
Descargas eletroestáticas (ESD) poderão danicar componentes do PC. Use uma bancada com controle de ESD. Caso não
tenha uma bancada disponível, utilize uma pulseira anti-estática ou toque uma superfície aterrada antes de manusear
qualquer componente do PC.
ES - Advertencia
Una instalación inapropriada puede provocar daños al procesador. Nunca encienda el ordenador antes de que el cooler y los
ventiladores estén conectados al conector de corriente de la placa madre.
Utilice siempre los tornillos originales. Cuidado con no dañar el radiador al atornillar.
Descargas electrostáticas (ESD) pueden dañar componentes en el sistema. Use una estación de trabajo con control de ESD.
Si no tiene disponible dicho lugar de trabajo, colóquese una muñequera antiestática o toque una supercie conectada a tierra
antes de tocar cualquier componente en el PC.
FR - Advertissement
Une installation incorrecte endommagerait le processeur. N’allumez jamais l’ordinateur avant que le ventilateur e le
refroidisseur ne soit connecté au connecteur d’alimentation de la carte mère. Ne mettez jamais le système sous tension
jusqu’à ce que le refroidisseur et les ventilateurs soient connectés au connecteur d’alimentation de la carte mère.
Utilisez toujours les vis fournies. Vissez le radiateur avec précaution pour éviter de l’endommager.
Une décharge électrostatique (ESD) peut endommager les composants du systéme. Utilisez une station de travail protégée
contre l’ESD. Si vous ne disposez pas d’une telle station de travail, portez un bracelet antistatique ou touchez une surface
connectée à la masse avant de manipuler les composants du PC.
DE - Warnung
Fehler bei der Installation können zu Schäden am Prozessor führen. Schalten Sie das Computersystem niemals ein, bis der
Kühler und die Lüfter an den Netzanschluss angeschlossen sind.
Verwenden Sie immer die mitgelieferten Schrauben. Schrauben Sie den Kühler sorgfältig, um eine Beschädigung zu
vermeiden.
Die Systemkomponenten können durch elektrostatische Entladung beschãdigt werden. Benutzen Sie einen for ESD
schützenden Arbeitsplatz. Sollte ein solcher Arbeitspaltz nicht verfügbar sein, tragen Sie ein antistatisches Armband or
berühren Sie eine geerdete Oberãche vor dem hantieren mit PC Komponenten.
IT - Avvertimento
L’installazione non corretta si tradurrà in danni al processore. Non accendere il sistema informatico no al dispositivo di
raffreddamento ei ventilatori sono collegati al connettore di alimentazione della scheda madre.
Usare sempre le viti in dotazione. Avvitare il radiatore con cura per evitare di danneggiarla.
Le scariche elettrostatiche (ESD) possono danneggiare i componenti del sistema. Uso e workstation ESD-controllato. Se un
worksation non è disponibile, indossare un bracciale antistatico o toccare una supercie messa a terra prima di maneggiare
qualsiasi componente del PC.

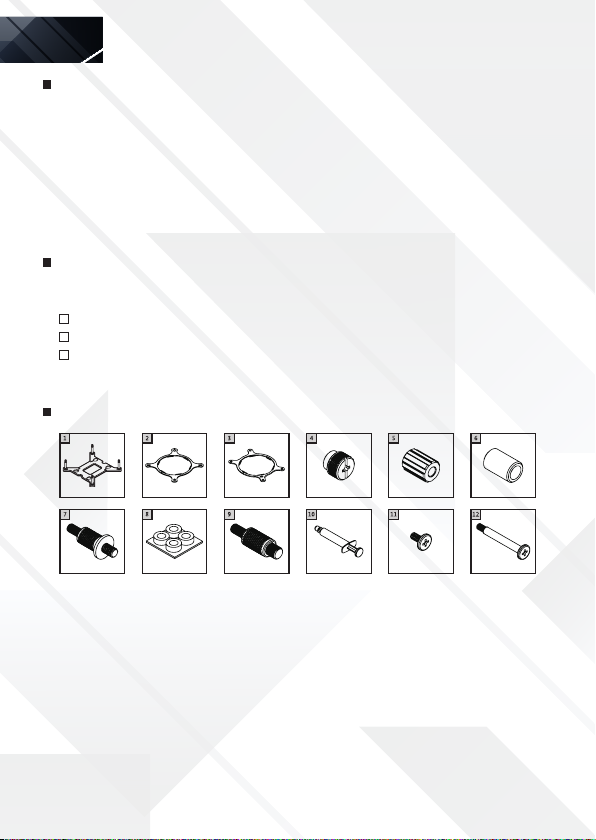
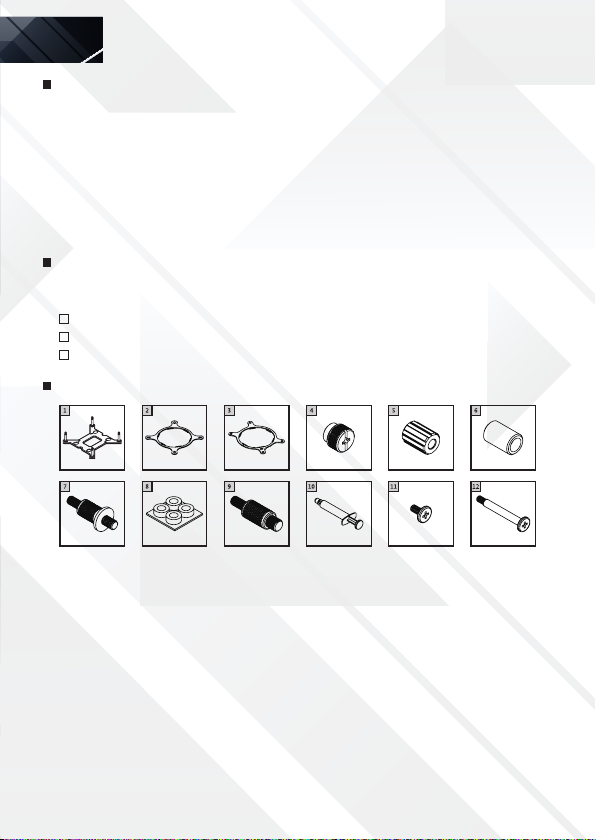
Components description
Important announcement
Please read this user’s manual carefully before installation to get the water cooler’s best
performance by optimized installation. Nox Xtreme is not responsible for any damage to the product
or injury caused by incorrect installation or user’s carelessness. The water cooler may cause
interference with some motherboards. If you face an interference between Hummer cooler and
your motherboard, please stop installing it. Be careful not to hurt yourself by the radiator while
installating & disassembling the water cooler. Do not move the water cooler around after the
installation to prevent CPU damage. Please, do not use the water cooler for any other usage apart
from the original purpose.
Warranty
For your warranty claims, please contact Nox Xtreme overseas distribution partners in your
country. Find the distribution partner list at www.nox-xtreme.com
Warranty: 2 years from purchasing date. (Depending on the laws of each country)
URL: www.nox-xtreme.com
EN
1) LGA 1700/120 backplate [x1]
2) Intel bracket [x1]
3) AMD bracket [x1]
4) Tightening nut [x4]
5) LGA 1700 standoff [x4]
6) LGA1200/115X standoff [x4]
7) AMD standoff [x4]
8) Plastic insulator [x4]
9) LGA20XX standoff [x]
10) Thermal grease [x1]
11) Radiator mounting screw [x8]
12) Fan mounting screw [x8]
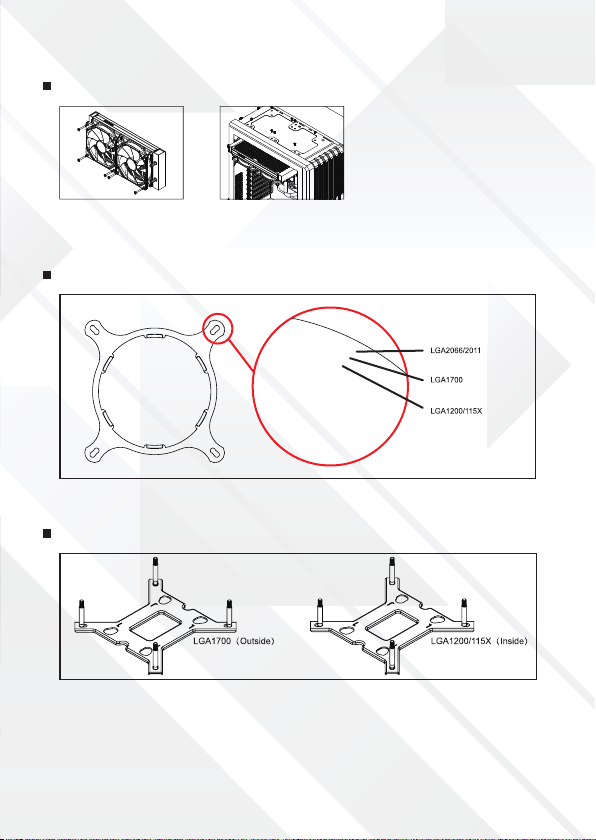
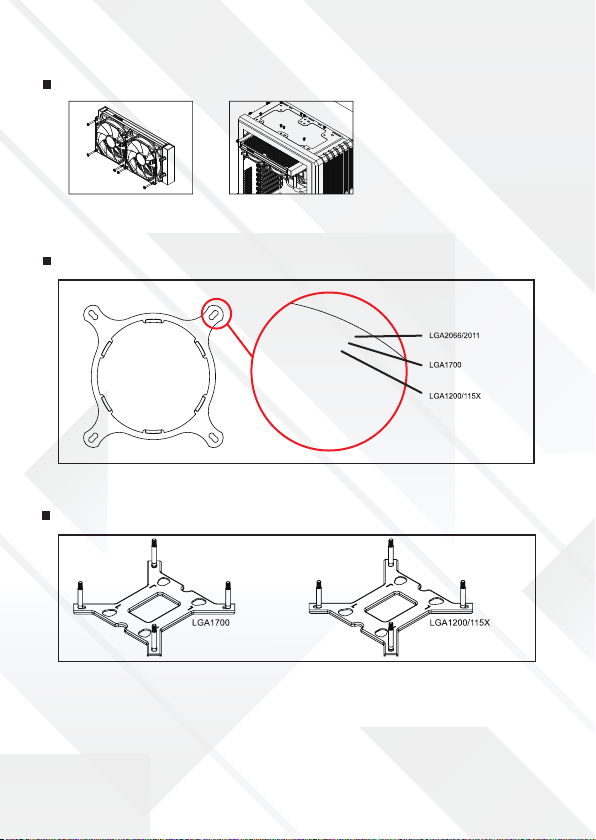
Intel bracket illustration
Intel backplate illustration
The Intel backplate is designed for LGA1700 and LGA1200/115X sockets. Push the screws to the
outside for LGA1700. Push the screws to the inside for LGA1200/115X.
Fan & radiator mounting
Use the fan mounting screws to secure
the fan(s) onto the radiator.
Use the radiator mounting screws to
secure the radiator to the case panel.

1. Thread the LGA2066/2011 standoff
into the motherboard CPU cooler
mounting holes.
2. Clean the CPU surface and apply a
thin layer of thermal grease onto
the CPU.
3. Put the pump onto the CPU.
Secure the block using the
tightening nuts.
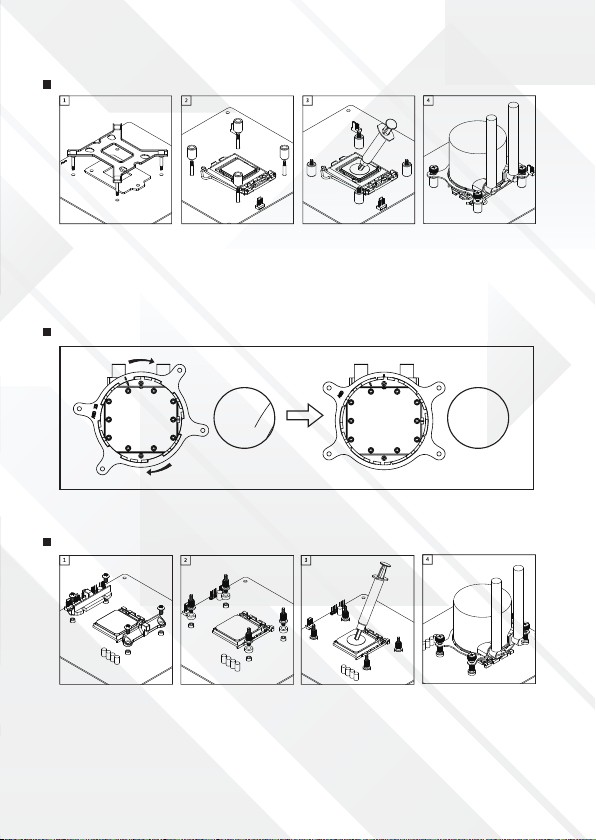
Intel LGA2066/2011
Intel LGA1700
1. Push the screws on the backplate to the outside and then put the backplate from the back of the
motherboard and insert the long screws through the motherboard.
2. Put the LGA1700 standoff onto the long screws of the backplate.
3. Clean the CPU surface and apply a thin layer of thermal grease onto the CPU.
4. Put the pump onto the CPU. Secure the block using the tightening nuts.
Intel mounting
Align the arrows on the bracket and the pump base, turn the bracket clockwise to secure it to the
pump base. *The Intel bracket is universal LGA2066/2011/1700/1200/115X.
1. Push the screws on the backplate to the inside and then put the backplate from the back of the
motherboard and insert the long screws through the motherboard.
2. Put the LGA120/115X standoff onto the long screws of the backplate.
3. Clean the CPU surface and apply a thin layer of thermal grease onto the CPU.
4. Put the pump onto the CPU. Secure the block using the tightening nuts.
Align the arrows on the bracket and the pump base, and then turn the bracket clockwise to secure
it to the pump base.
1. Remove the original retention frame from the motherboard, but keep the backplate.
2. Thread the AM4 standoffs onto the backplate. (Put the plastic insulator if you have between
motherboard and the metal standoffs).
3. Clean the CPU surface and apply a thin layer of thermal grease onto the CPU.
4. Put the pump onto the CPU. Secure the block using the tightening nuts.
Intel LGA1200/115X
AMD mounting
AMD AM4

HUMMER H-240 ARGB lighting connection guide
Connection through motherboard RGB control
Connection through internal RGB controller
ASUS: ADD_HEADER
MSI: JRAINBOW
GIGABYTE: D_LED
ASROCK: ADDR_LED
A) Download RGB Sync software compatible with your motherboard from
its manufacturer’s ofcial website to adjust RGB color / mode.
Switch lighting modes with "M" button
B) Use RGB Splitter to Connect Pump / Fans’
RGB Cables.
M
C
S
Switch color modes with "C" button
Change color speed with "S" button
CAUTION!
Wrong connection
will damage the
device and cause
malfunction!
Aviso importante
Leia este manual cuidadosamente antes de instalar o cooler CPU. A sua correcta instalação permite
obter a melhor performance. A Nox Xtreme não se responsabiliza por quaisquer danos no produto,
ou que este possa causar em produtos terceiros, por instalação incorrecta ou falta de cuidado. É
possível, apesar de improvável, que o cooler CPU cause interferências na motherboard. Se vericar
interferências entre a sua motherboard e o cooler CPU, pare a instalação. Tenha cuidado ao instalar
o radiador. Manuseie o cooler com cuidado, tanto na instalação como na sua remoção. De forma a
prevenir danos no CPU, não movimente o cooler após a sua instalação. Não utilize este produto para
outra nalidade para além da original.
Warranty
Para efeitos de garantia, por favor contacte a loja onde adquiriu o seu cooler Hummer. A loja tratará
de encaminhar o seu processo para o distribuidor Nox em Portugal.
Garantia: 2 anos
URL: www.nox-xtreme.com
Descrição dos componentes
PT
1) Placa traseira LGA 1700/120 [x1]
2) Suporte Intel [x1]
3) Suporte AMD [x1]
4) Porca de aperto [x4]
5) Separador LGA 1700 [x4]
6) Separador LGA1200/115X [x4]
7) Separador AMD [x4]
8) Isolante plástico [x4]
9) Separador LGA20XX[x]
10) Graxa térmica [x1]
11) Parafusomontagem radiador [x8]
12) Parafusomontagem ventilador[x8]
Instalação do radiador e ventoinhas
Ilustração do suporte Intel
Use os parafusos de montagem
do ventilador para xar o(s)
ventilador(es) ao radiador.
Use os parafusos de montagem do
radiador para prendê-lo ao painel
da caixa.
Ilustração da placa traseira da Intel
A placa traseira da Intel foi projetada para soquetes LGA1700 e LGA1200 / 115X. Empurre os
parafusos para fora para LGA1700. Empurre os parafusos para dentro para LGA1200 / 115X.
(Fuera) (Dentro)
Andere Handbücher für H-120
3
Dieses Handbuch passt für folgende Modelle
1
Inhaltsverzeichnis
Sprachen:
Andere Hummer Gefrierschrank Handbücher


