
Hybrid+ MH-07R Bedienungsanleitung

Please read the instruction carefully
before operating the unit.
MH-07R
FM/MW/SW1, 2 WORLD RECEIVER WITH
FLASHLIGHT, CRANKER DYNAMO &
SOLAR POWER SUPPLY
RÉCEPTEUR MONDIAL FM/MW/SW1-2 AVEC LAMPE
TORCHE ET ALIMENTATION PAR DYNAMO À
MANIVELLE OU ÉNERGIE SOLAIRE
User Manual
Manuel d’utilisation
Veuillez lire attentivement ce manuel
avant toute utilisation.
GB / FR / I / E / D / P / NL

SAFETY INFORMATION
GB - 1
If at any time in the future you should need to dispose of
this product please note that Waste electrical products
should not be disposed of with household waste. Please
recycle where facilities exist. Check with your Local Au-
thority or retailer for recycling advice. (Waste Electrical
and Electronic Equipment Directive)
• Clean the player with a soft cloth, or a damp chamois leather.
Never use solvents.
• Make sure that you keep your set away from water and high
temperatures.
• Do not use your system immediately after transporting it from
a cold place to a warm place, as condensation may cause the
system to malfunction.
• The apparatus shall not be exposed to dripping or splashing
and that no objects filled with liquids, such as vases, shall be
placed on the apparatus.
• No naked flame sources, such as lighted candles, should be
placed on the apparatus.
• Attention should be drawn to the environmental aspects of
battery disposal.
• The rating plate is located at the back of apparatus.
• Do not throw batteries in fire!
In full power, the continuous listening of the player may
damage the user’s hearing.
English
5
4
132
6
7
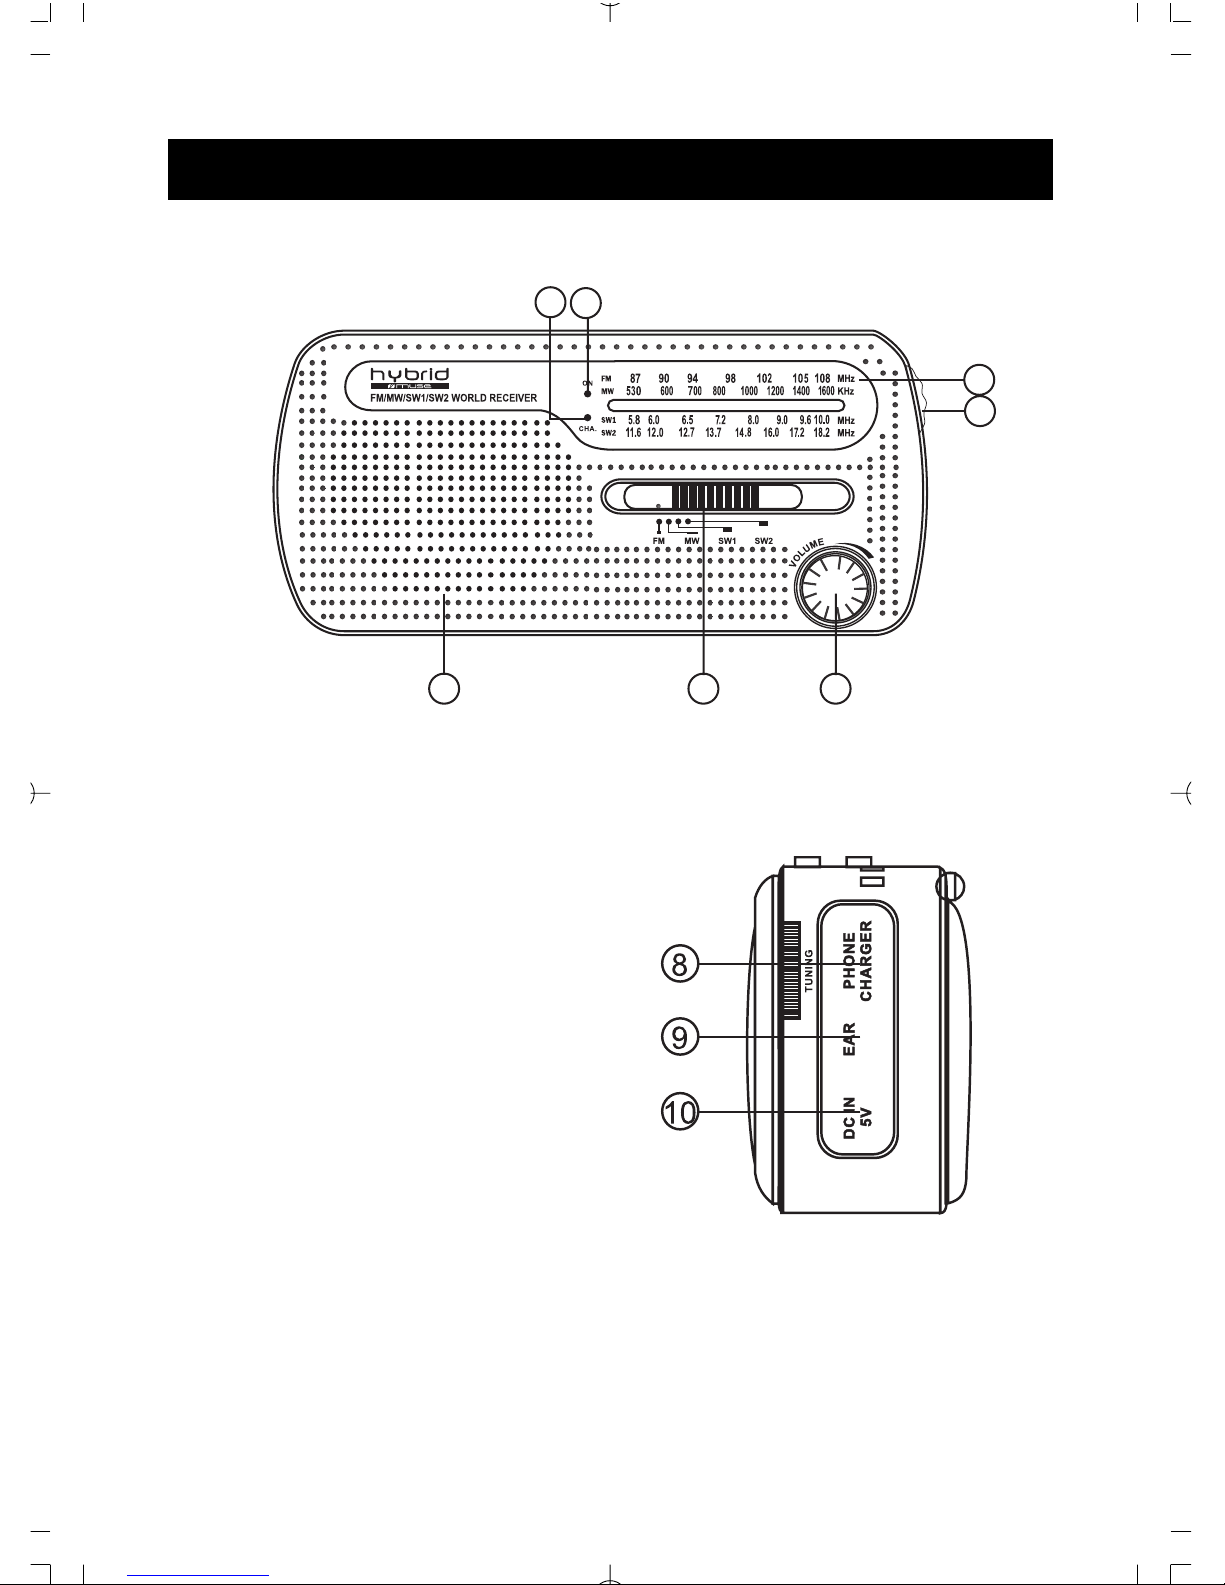
BASIC CONTROLS
FRONT
RIGHT SIDE
1. Speaker
2. Band Switch
3. Volume Knob
4. Tuning Knob
5. Frequency Dial Scale
6. Power Light
7. CHA. Light
8. Phone Charger Jack
9. Earphone Jack
10. DC IN Jack
GB - 2

TOP
REAR
11. Multifunctional Switch
12. Power Switch
13. Solar Panel
14. Strap Hole
15. Telescopic Antenna
16. Battery Compartment (AAA Batteries)
17. Hand Crank
18. Battery Compartment (Ni-MH Battery)
19. Flashlight
GB - 3
12 13 14
11
POWER SUPPLY
* POWERING
BATTERYPOWER
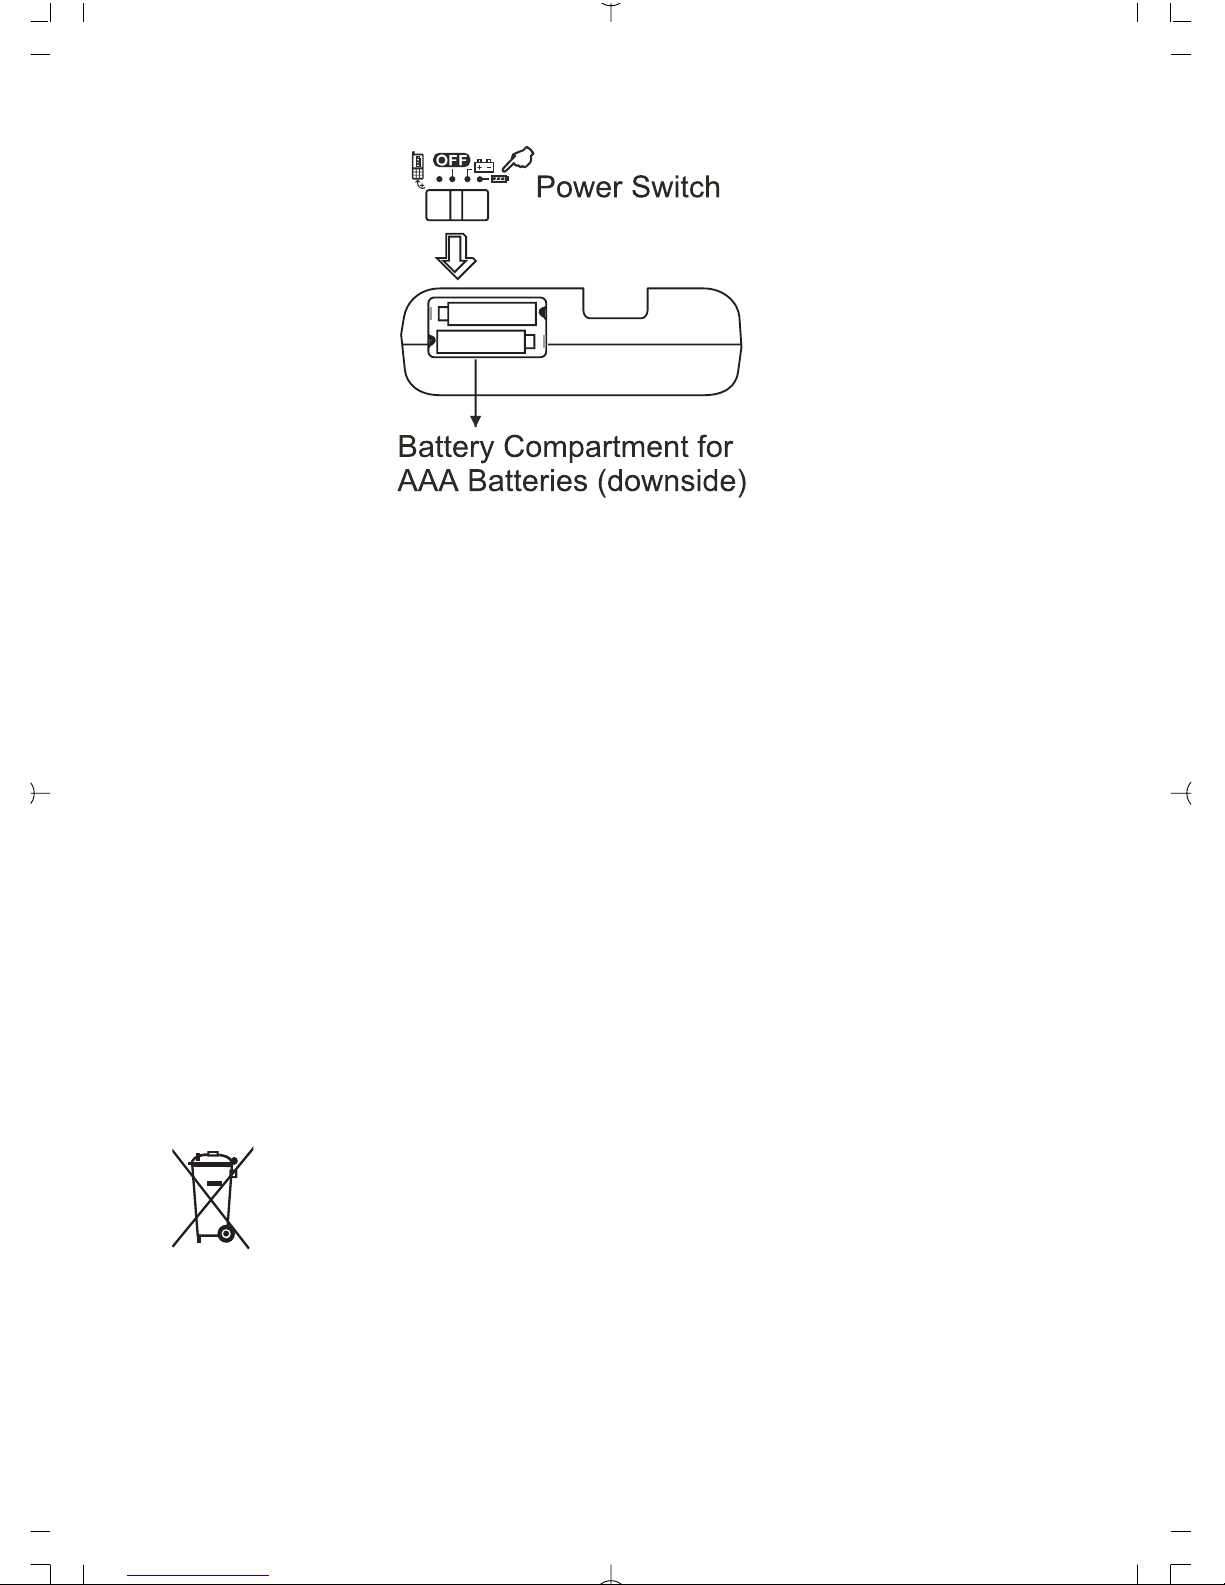
2. The battery compartment which is in the downside of the unit
is for the AAA batteries (alkaline or rechargeable). After install-
ing the batteries, set the <Power Switch> to “ “ position, then
use the unit.
GB - 4
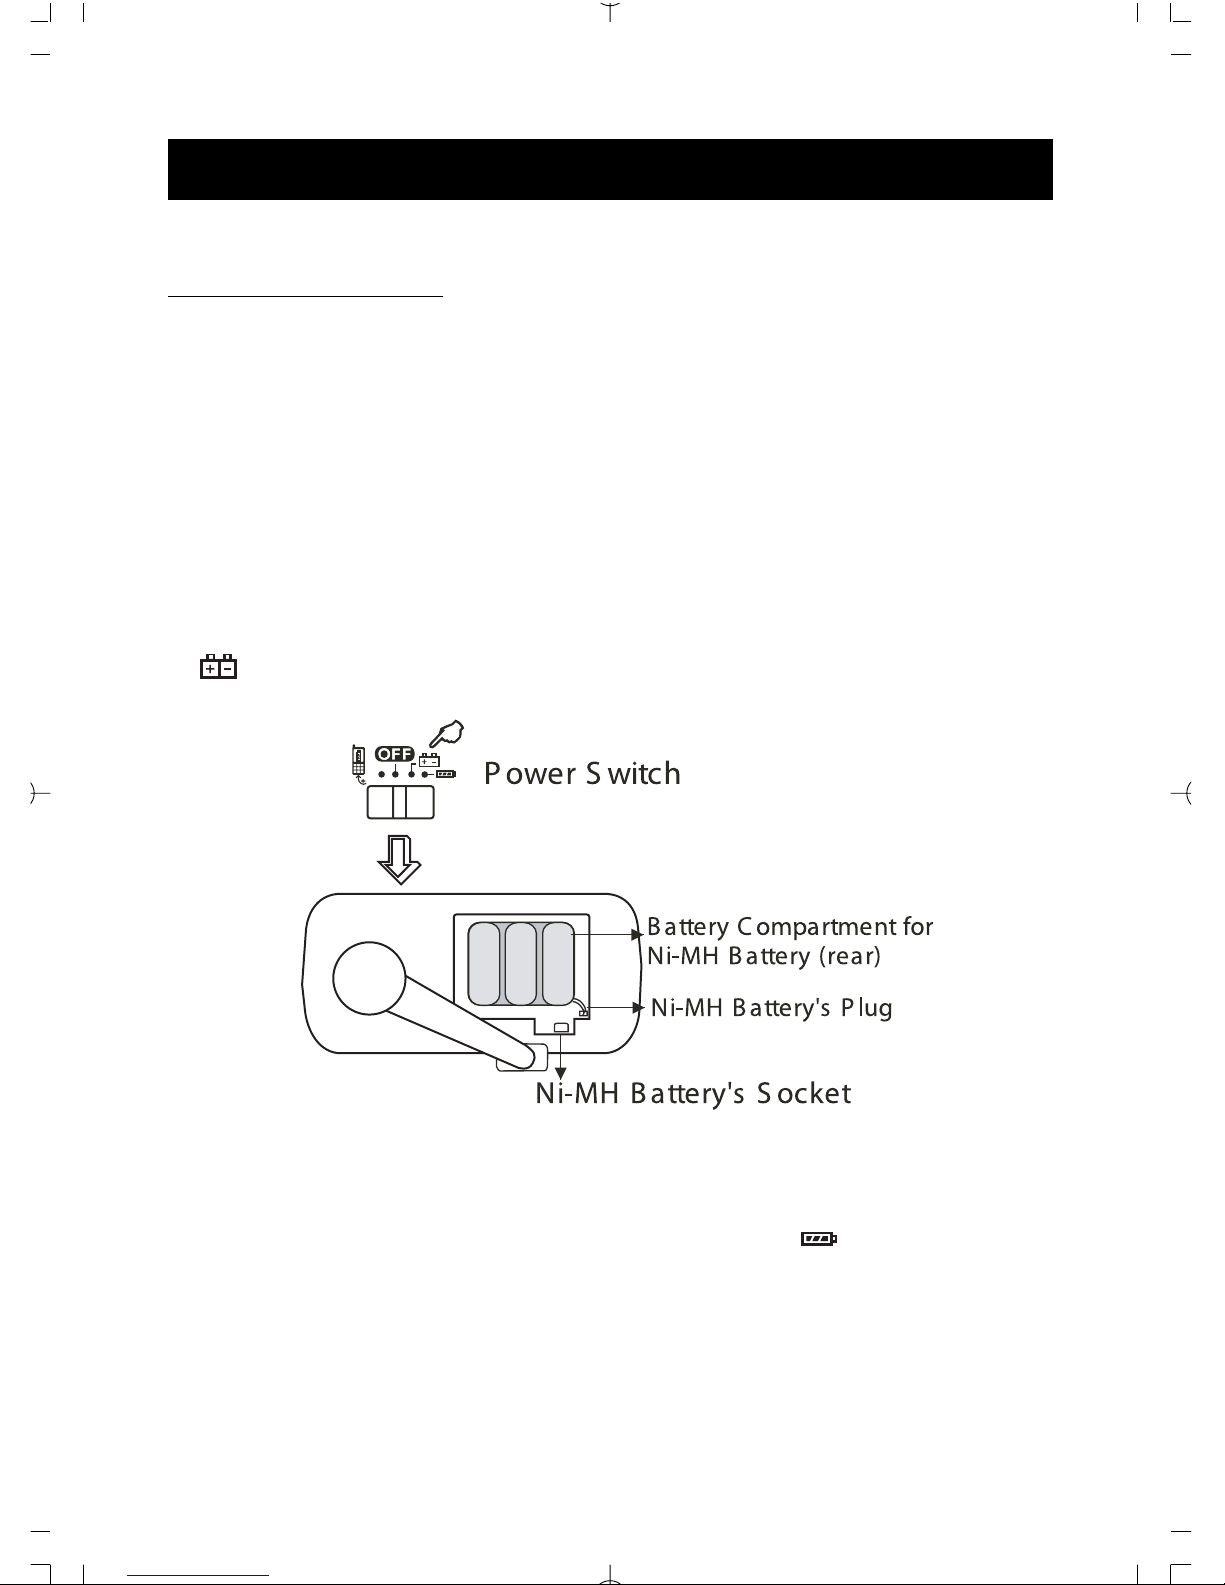
1. The battery compartment which is in the rear of the unit is for
the rechargeable Ni-MH battery. And the rechargeable Ni-MH
battery has been disconnect for transportation purposes. Be-
fore using the unit, please open the battery compartment and
connect the rechargeable battery’s plug into it’s socket accord-
ing to the correct direction. Then set the <Power Switch> to
“ ” position.
NOTE:
The Ni-MH battery and AAA batteries (alkaline or recharge-
able batteries) can supply the power separately.
GB - 5
Battery Precautions
Follow these precautions when using batteries in this device:
Before throwing any batteries away, consult your dis-
tributor who may be able to take them back for specific
recycling.
Use only the size and type of batteries specified.
Be sure to follow the correct polarity when installing the bat-
teries as indicated in the battery compartment. Reversed
batteries may cause damage to the device.
Do not mix different types of batteries together (e.g. Alkaline
and Carbon-Zinc) or old batteries with fresh ones.
If the device is not to be used for a long period of time, re-
move the batteries to prevent damage or injury from pos-
sible battery leakage.
Do not try to recharge batteries not intended to be recharged;
they can over heat and rupture.
Battery shall not be exposed to excessive heat such as
sunshine, fire or the like.
1.
2.
3.
4.
5.
6.
SOLAR POWER
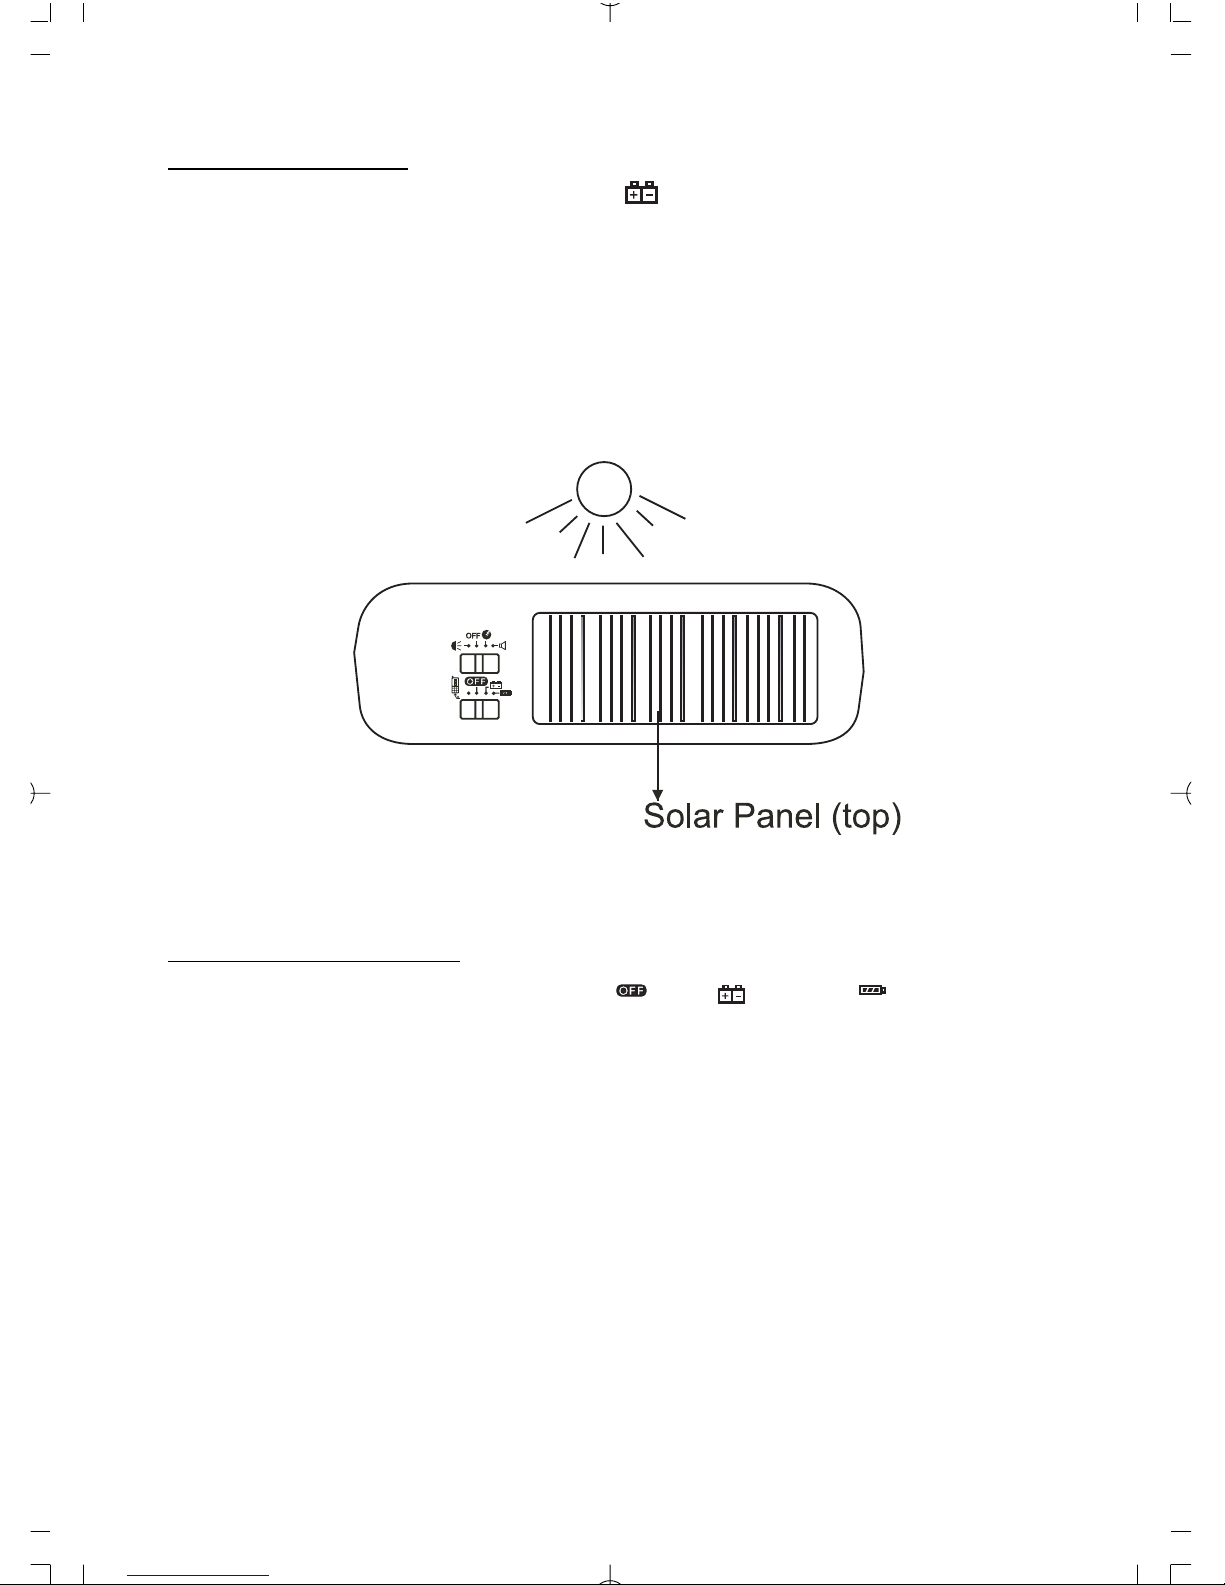
1. Set the <Power Switch> to “ ” position.
2. Put the unit in the sunlight, make the solar panel of the unit is
irradiated directly by the sunlight. If the sunlight is enough strong,
the power light (“ON”) in the front of the unit will be on. Or else,
the power light (“ON”) can not be on and the unit can not work
normally.
GB - 6
* CHARGING NI-MH BATTERY
SOLAR CHARGING
1. Set the <Power Switch> to “ ”, “ ” or “ ” position.
2. Put the unit in the sunlight, make the solar panel of the unit is
irradiated directly by the sunlight. The unit will charge the Ni-
MH battery automatically.
3. While charging, the “CHA.” light in the front of the unit will be
on.

GB - 7
DYNAMO CHARGING
1. Set the <Power Switch> to “ ”, “ ” or “ ” position.
2. Turning the hand crank, the built-in dynamo will start to gen-
erate electricity. The unit will charge the Ni-MH battery
automatically.
3. While charging, the “CHA.” light in the front of the unit will be
on. The lighteness of the charging light shows the charging in-
tensity of the battery power.
ADAPTOR CHARGING (Adaptor not include)
1. Set the <Power Switch> to “ “, “ “ or “ “ position.
2. Plug one port of the matched adaptor into the AC outlet, plug
the other port into the <DC IN Jack> of the unit. The unit will
charge the Ni-MH battery automatically.
3. While charging, the “CHA.” light in the front of the unit will be
on.
GB - 8
NOTE:
1.The longest charging time is 8 hours.
2.You can buy a matched adaptor from the market which is with
5 pin jack, 5V output voltage and 300mA output current or above.
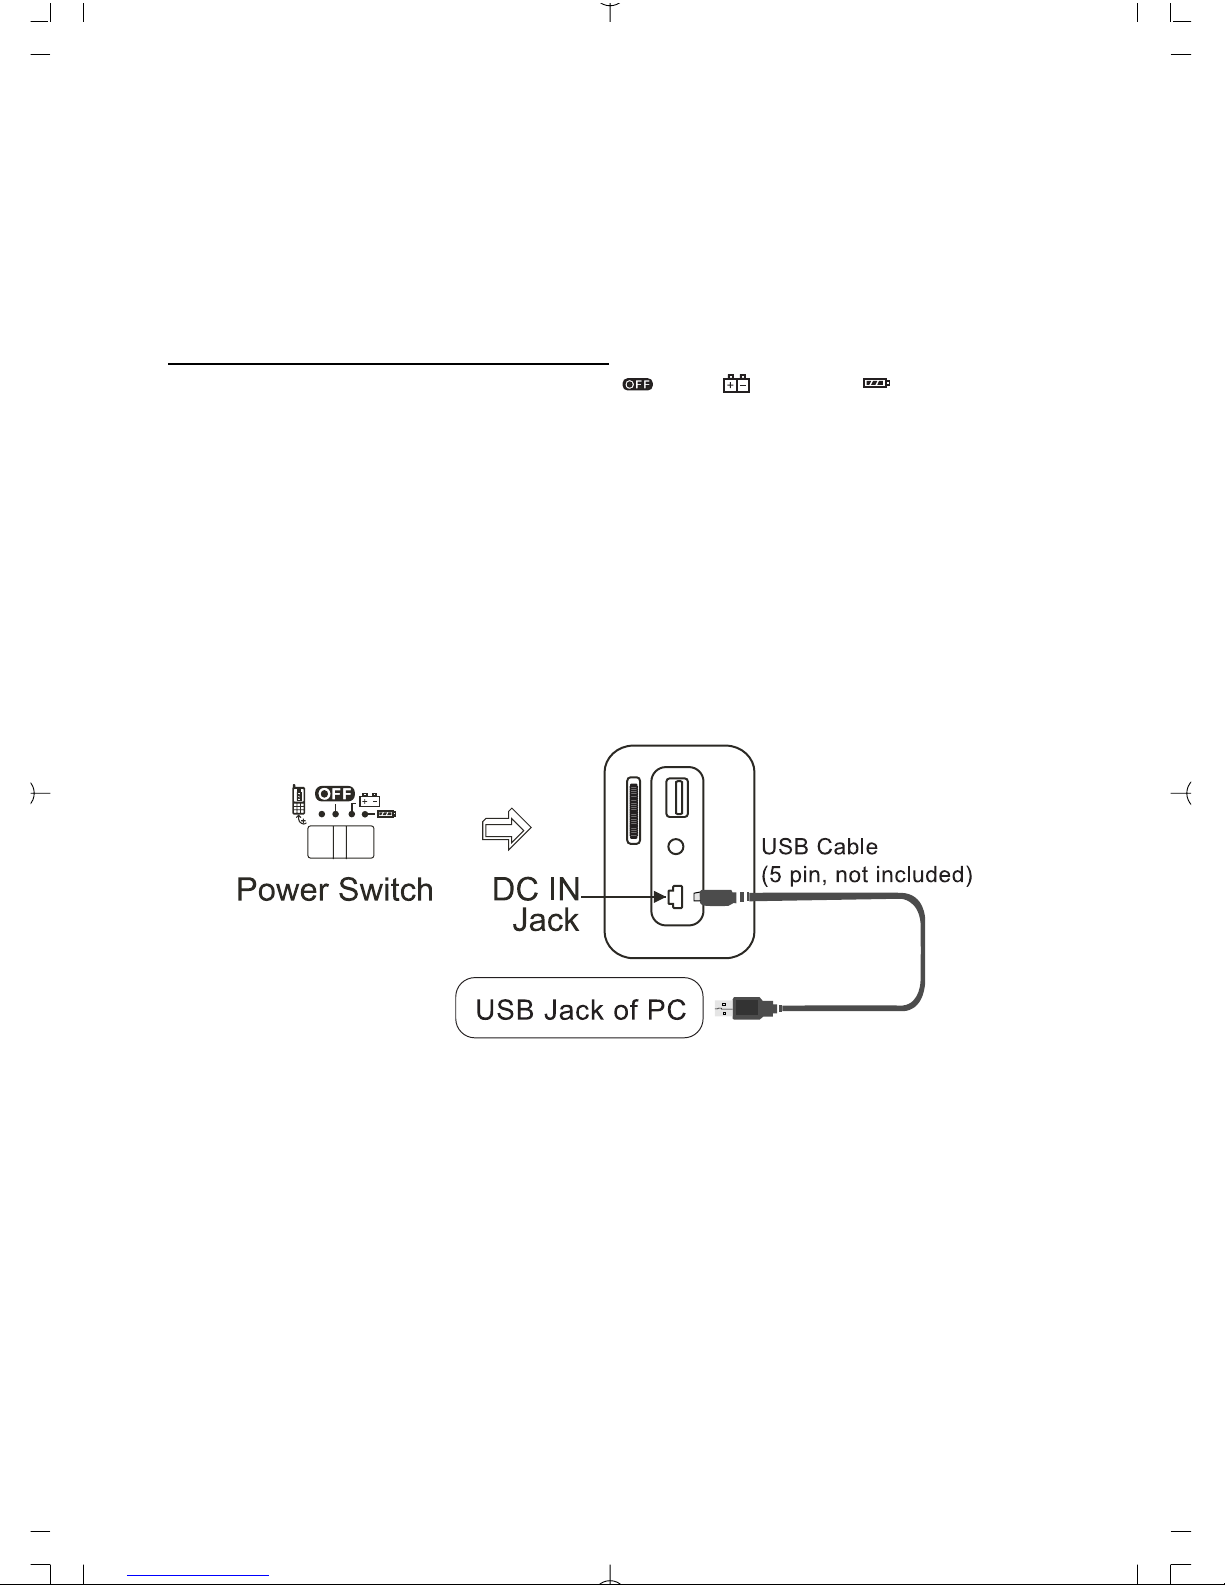
USB COMPUTER CHARGING
1. Set the <Power Switch> to “ ”, “ ” or “ ” position.
2. Connecting the radio and computer.
Method A:
Plug one port of the matched USB cable (5 pin, not included)
into the USB jack of the computer, plug the other port into the
<DC IN Jack> of the unit. The unit will charge the Ni-MH battery
automatically.
GB - 9
NOTE:
The longest charging time is 8 hours.
3. While charging, the “CHA.” light in the front of the unit will be
on.
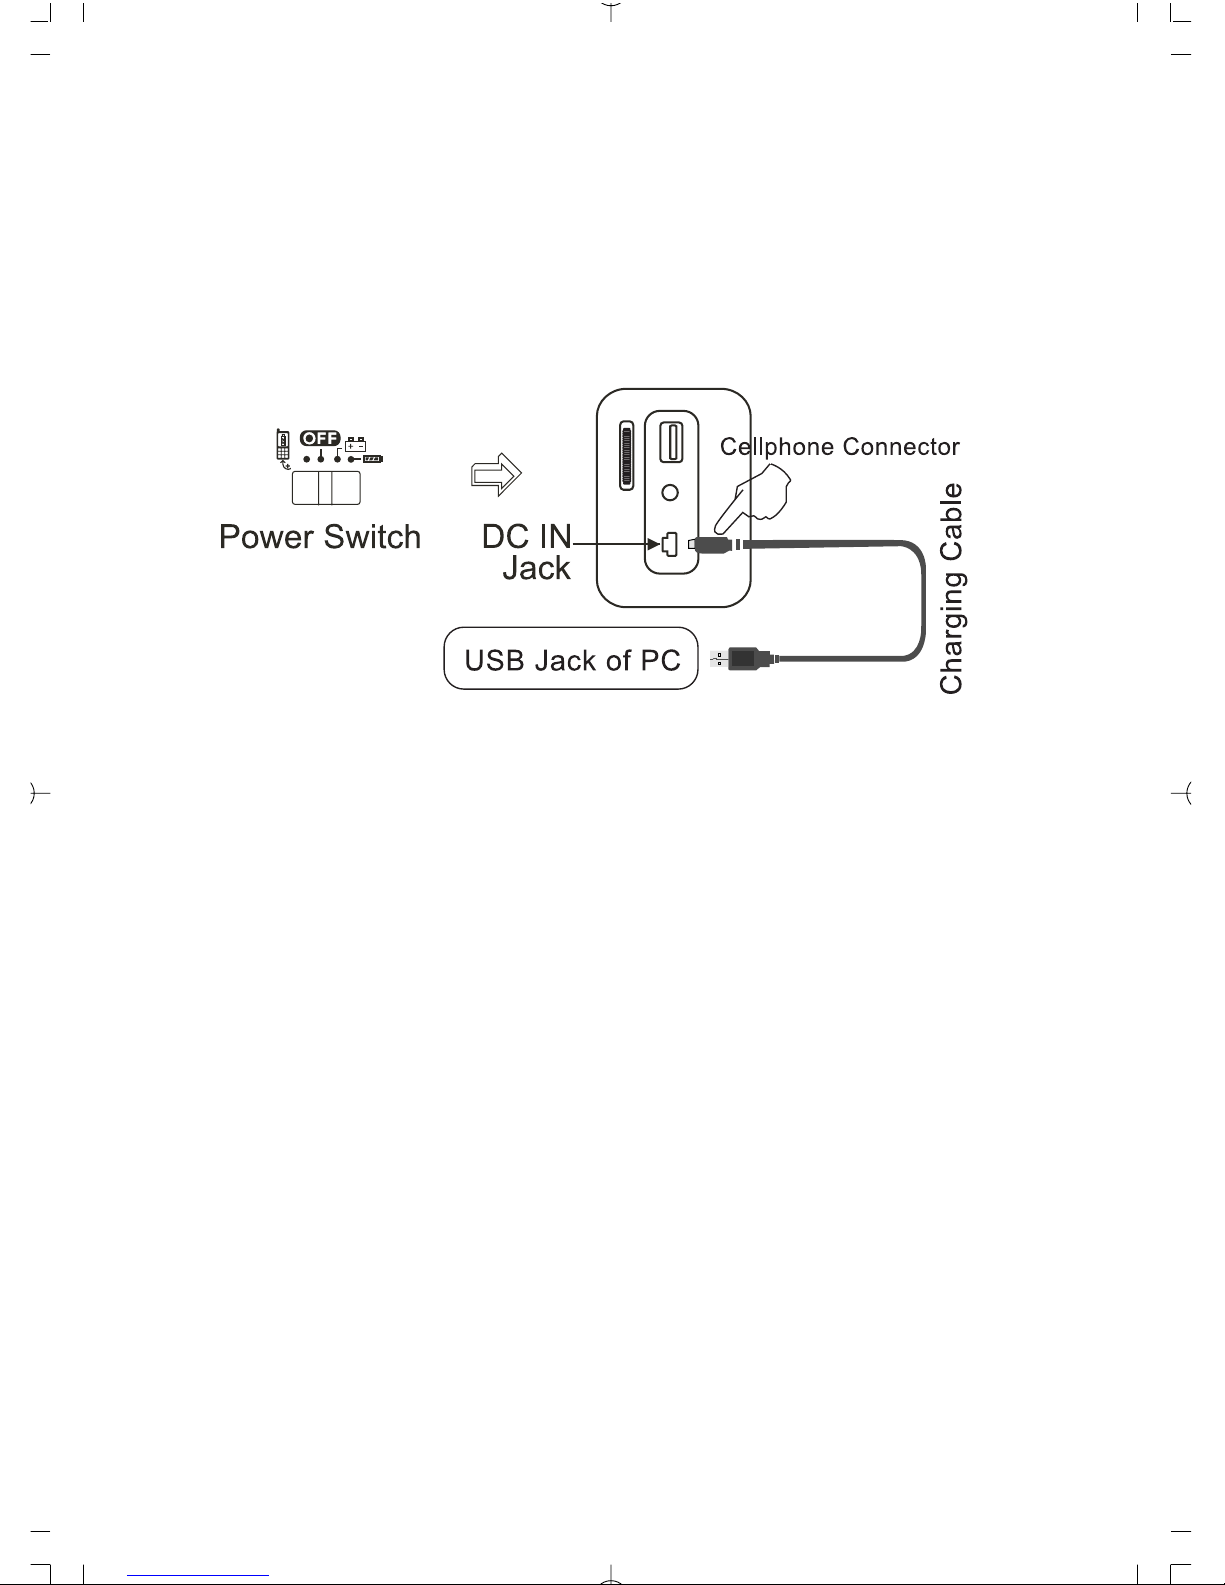
Method B:
Take the included charging cable and plug one port directly into
the USB jack of the compute, connect the other port and the
<DC IN Jack> of the unit via the included cellphone connector.
The unit will charge the Ni-MH battery automatically.
Inhaltsverzeichnis


