Hyundai HYB33 Bedienungsanleitung

BACK-PACK BLOWER
Model HYB33
User Manual


CONTENTS
Page 3
Ver 2
1. SAFETY 4 - 6
2. MACHINE COMPONENT LOCATIONS 7
3. ASSEMBLY AND INITIAL OPERATION 8 - 11
4. OPERATION 11 - 13
5. STORING THE MACHINE 13
6. MAINTENANCE AND REPAIR 13
7. SPECIFICATIONS 14
8.DECLARATIONS OF CONFORMITY 15

1. SAFETY.
1.1. The operator of the machine is responsible for and has a duty of care in making sure that
the machine is operated safely and in accordance with the instructions in this user manual.
Please note the following safety points
1.1.2. The machine should never be left it in a condition which would allow
an untrained or unauthorised person/s to operate this machine.
1.1.3. All due care and diligence should be taken by the operator for the safety of and
with regard to those around whilst using the machine
1.2. Some or all of the following PPE, Warning Signs and symbols may appear throughout this
manual and you must adhere to their warning/s. Failure to do so may result in personal
injury.
Warning Signs and Symbols –FOLLOW safety messages to avoid or reduce risk of injury or death.
DANGER - indicates a
hazard which if not
avoided could result in
serious injury or death.
WARNING - indicates a
hazard which if not
avoided could result in
serious injury or death.
CAUTION - indicates a
hazard which if not
avoided might result
in minor or moderate
injury.
NOTE - indicates a
situation that could
easily result in
equipment
damage.
READ MANUAL
KEEP BYSTANDERS AWAY
KEEP BYSTANDERS 15 m AWAY
TAKE CARE OF OVERHEAD
POWER LINES
PROTECT FROM RAIN & DAMP
KEEP NAKED FLAMES AWAY
FROM FUEL
BE AWARE OF THROWN
OBJECTS
TAKE CARE OF THROWN
OBJECTS
ROTATING CUTTING
BLADES
Page 4
Ver 2

1.3. Carbon monoxide.
1.3.1. Carbon monoxide is a colourless and odourless gas. Inhaling this gas can
cause death as well as serious long term health problems such as brain damage.
1.3.2. The symptoms of Carbon monoxide poisoning can include but not limited to the following;
1.3.2.1. Headaches, dizziness, nausea, breathlessness, collapsing or loss of consciousness.
1.3.2.2. Carbon monoxide symptoms are similar to flu, food poisoning, viral infections and
simply tiredness. It is quite common for people to mistake this very dangerous poisoning
for something else.
1.3.3. To avoid Carbon monoxide poisoning DO NOT Use Petrol/Diesel powered equipment inside
a home, garage, tent, camper van, mobile home, caravan or boat. The list is not exhaustive if
you are in any doubt contact your dealer.
1.3.4. If you think you or someone around you has been affected by carbon monoxide poisoning;
1.3.4.1. Get fresh air immediately, by opening doors and windows, turning off the machine
and leaving the affected area.
1.3.4.2. See your doctor immediately or go to hospital - let them know that you suspect
carbon monoxide poisoning.
1.3.5. DO NOT use in an enclosed area or a moving vehicle.
1.4. General fuel safety.
1.4.1. Fuel Safety additional information can be obtained from the Health and Safety Executive.
1.4.2.
All fuels are flammable.
1.4.3. Keep away from all ignition sources i.e. heaters, lamps, sparks from grinding or welding.
1.4.4. Hot work on tanks that have contained fuel is extremely dangerous and should not be
carried out.
1.4.5. Keep work area clean and tidy.
1.4.6. Clean up all spills promptly using correct methods i.e. absorbent granules and a lidded bin.
1.4.7. Dispose of waste fuels correctly.
Page 5
Ver 2

1.4.7. Dispose of waste fuels correctly.
1.4.8. Petrol safety.
1.4.8.1. Always fuel and defuel in well-ventilated area.
1.4.8.2. Always wear correct, suitable and fit for purpose Personal Protective
Equipment (PPE), suggested items are as follows, but are not limited too.
1.4.8.3.
1.4.8.4.
1.4.8.5.
Respiratory protective equipment should be used when in an
unventilated area.
1.4.8.6. When defueling always use a propriety fuel retriever.
1.4.8.7. Always carry fuel in the correct and clearly marked container.
1.5. Additional Safety guidelines’
1.5.1. To prevent fire.
1.5.1.1. Never add fuel to the fuel tank whilst the engine is running. Wipe away any
spilt fuel or oil with a clean cloth before operating. Keep explosives and any other
flammable products away from the machine at all times.
1.5.1.2. To prevent fire and to provide adequate ventilation, keep the machine at
least one metre away from buildings and other equipment during operation.
1.5.1.3. Operate the machine on level ground. - Do not place the machine indoors
whilst the engine is still hot.
1.5.2. To prevent inhaling exhaust fumes.
1.5.2.1. Exhaust gas contains poisonous carbon monoxide which is harmful to health
and can kill.
1.5.2.2. For this reason, never use the machine in a closed area or areas with poor
ventilation.
1.5.3. To prevent burns.
1.5.3.1. The muffler and the engine body becomes very hot whilst the engine is
running or just after running.
1.5.3.2. To prevent any burns, do not touch these parts during these times.
Page 6
Ver 2

2. MACHINE COMPONENT LOCATIONS
2.1 Main unit.
2.2 Parts.
1. Main unit 2. Blower pipe A 3. Blower pipe B 4. Blower pipe C
5. Blower pipe D 6. Throttle controls 7. Flexible hose 8. Oil container (40:1)
# See note below.
9. Pipe clips 10. Spark plug box 11. Screwdriver 12. Allen key
spanner
# Pre-mix 2-stroke oil with fresh unleaded petrol as follows:
Mineral based 2-stroke oil : 25:1 (40ml of oil per 1 litre of petrol)
Synthetic 2-stroke oil: 40:1 (25ml of oil per 1 litre of petrol)
1. Back pack 2. Blower unit 3. Spark plug cover 4. Air filter cover
5. Recoil starter handle 6. Fuel tank 7. Primer bulb 8. Choke lever
Page 7
Ver 2

3. ASSEMBLY AND INITIAL OPERATION
3.1 Connecting controls and attachment hose.
3.1.1 Connect flexible hose to the main unit by using the 2 pipe clips (9).
3.1.2 Put one pipe clip (9) over flexible hose (7) then push one end over main unit
outlet.
3.1.3 Put the other pipe clip (9) over the other end then push it over the blower pipe
A (2).
3.1.4 Then push the blower pipe B (3) over the spare end of blower pipe A (2),
locate the keyway and then lock in an clockwise direction. Continue to do the same
with blower pipes C and D as required. See picture 1 below.
2. Blower pipe A 3. Blower pipe B 4. Blower pipe C 5. Blower pipe D
6. Throttle controls 7. Flexible hose 9. Pipe clips
3.2 Adjusting the control handle.
3.2.1 Put unit on your back.
3.2.2 Using supplied allen key undo screw (1), slide control handle (2) along the
pleated section until it is in the desired position.
3.2.3 Once in the desired position (example (3)) usIng the supplied allen key re-
tighten the screw.
Page 8
Ver 2

3.3 Adjusting the harness straps.
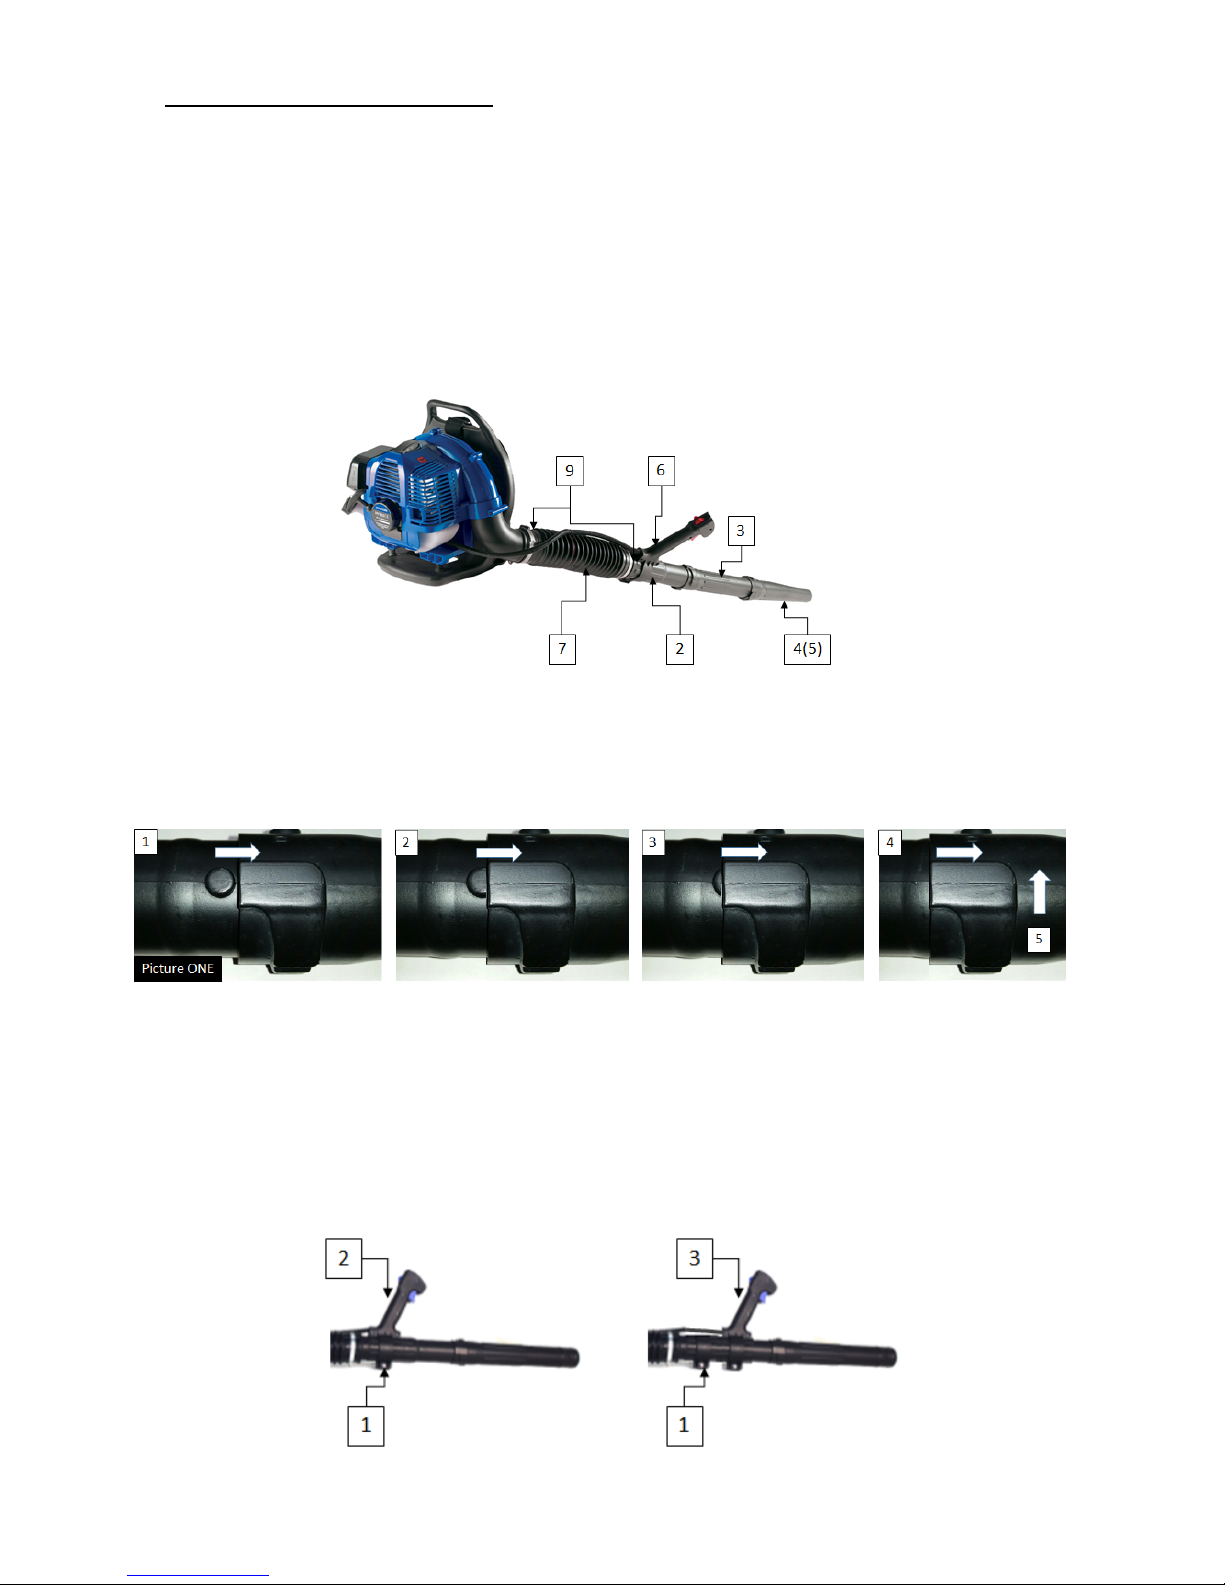
3.3.1 Pull the end of the straps (1) downward to tighten the harness.
3.3.2 Lift the tabs (2) of the two sliding adjusters.
3.3.3 Adjust the straps so that the back plate is held firmly and comfortably against
your back.
3.4 Fuelling.
3.4.1 Your engine requires a mixture of petrol and two stroke oil. The quality of
these constituents and the mixed ratio has a decisive influence on the function and
service life of the engine.
3.4.2 Use only regular unleaded petrol.
3.4.3 Use only quality two-stroke engine oil.
3.4.3.1 Fuel ratios;
3.4.3.1.1 Pre-mix 2-stroke oil with fresh unleaded petrol as follows:
3.4.3.1.1.1 Mineral based 2-stroke oil : 25:1 (40ml of oil
per 1 litre of petrol).
3.4.3.1.1.2 Synthetic 2-stroke oil: 40:1 (25ml of oil per 1
litre of petrol).
3.4.4 Avoid direct skin contact with petrol and avoid inhaling petrol fumes.
3.4.5 Use a container approved for storing fuel. Pour oil into the container
first, then add petrol, and mix thoroughly. Do not mix too much fuel as it will last
from one season to another.
3.4.6 Thoroughly shake the mixture in the container before fuelling your machine.
3.4.7 Pressure may build up in the container so open it carefully.
3.4.8 Clean the fuel tank and container on a regular basis.
3.4.8.1 Dispose of cleaning fluid properly at authorised disposal location.
3.4.8.2 Before refuelling, clean the filler cap and the area around it to ensure
that no dirt falls into the tank.
3.4.8.3 Position the unit so that the filler cap is facing up.
3.4.8.4 Take care not to spill fuel while fuelling and do not overfill the tank.
3.4.8.5 After refuelling, tighten down filler cap by hand as securely as possible.
3.4.9 Change the fuel filter once every year.
3.4.9.1 Drain the fuel tank
3.4.9.2 Use a hook to pull the fuel filter (1) out of the tank.
3.4.9.3 Push the new filter into the hose.
3.4.9.4 Place the filter in the tank.
Page 9
Ver 2

3.5 Starting and stopping the engine.
3.5.1 Observe all safety precautions in this manual.
3.5.2 Before starting: Turn on blower move switch down(1), set throttle (3) to the
fast position.
3.5.2.1 If the engine is cold, close (3) the choke (1).
3.5.2.2 If the engine is hot, open (2) the choke fully. Also use this position
when the engine has been running but is still cold.
3.5.2.3 Press the primer bulb (1) at least 10 times.
3.5.2.4 Put the unit on the ground. Check that bystanders are well clear of the
general work area and the nozzle.
3.5.2.5 Make sure you have a firm footing:
3.5.2.5.1 Hold the unit with your left hand on the housing and put one
foot against the base plate to prevent it slipping.
3.5.2.5.2 Pull the starter grip slowly with your right hand to 20cm and
give it a brisk strong pull.
3.5.2.5.3 DO NOT pull the starter rope out all the way as it might
break.
3.5.2.5.4 DO NOT let the starter grip snap back.
3.5.2.5.5 Guide it slowly back into the housing so that the starter rope
can rewind properly.
3.6 When the engine begins to fire:
3.6.1 If the engine is cold, open the choke and continue cranking until engine
runs.
3.6.2 If the engine is warm, continue cranking until engine runs.
Page 10
Ver 2
Inhaltsverzeichnis
Andere Hyundai Gebläse Handbücher

Hyundai
Hyundai HASBT35 Bedienungsanleitung

Hyundai
Hyundai HYB60 Bedienungsanleitung

Hyundai
Hyundai HYSW1000 Bedienungsanleitung

Hyundai
Hyundai HSEC40V-4A Bedienungsanleitung

Hyundai
Hyundai HSDT55 Bedienungsanleitung

Hyundai
Hyundai HY2189 Bedienungsanleitung

Hyundai
Hyundai WR6022-1800Q Bedienungsanleitung

Hyundai
Hyundai HYBV3000E Bedienungsanleitung

Hyundai
Hyundai HSDT45 Bedienungsanleitung

Hyundai
Hyundai HSEN40V-A Bedienungsanleitung


