
Ivation IVAPACWIFI8K Bedienungsanleitung
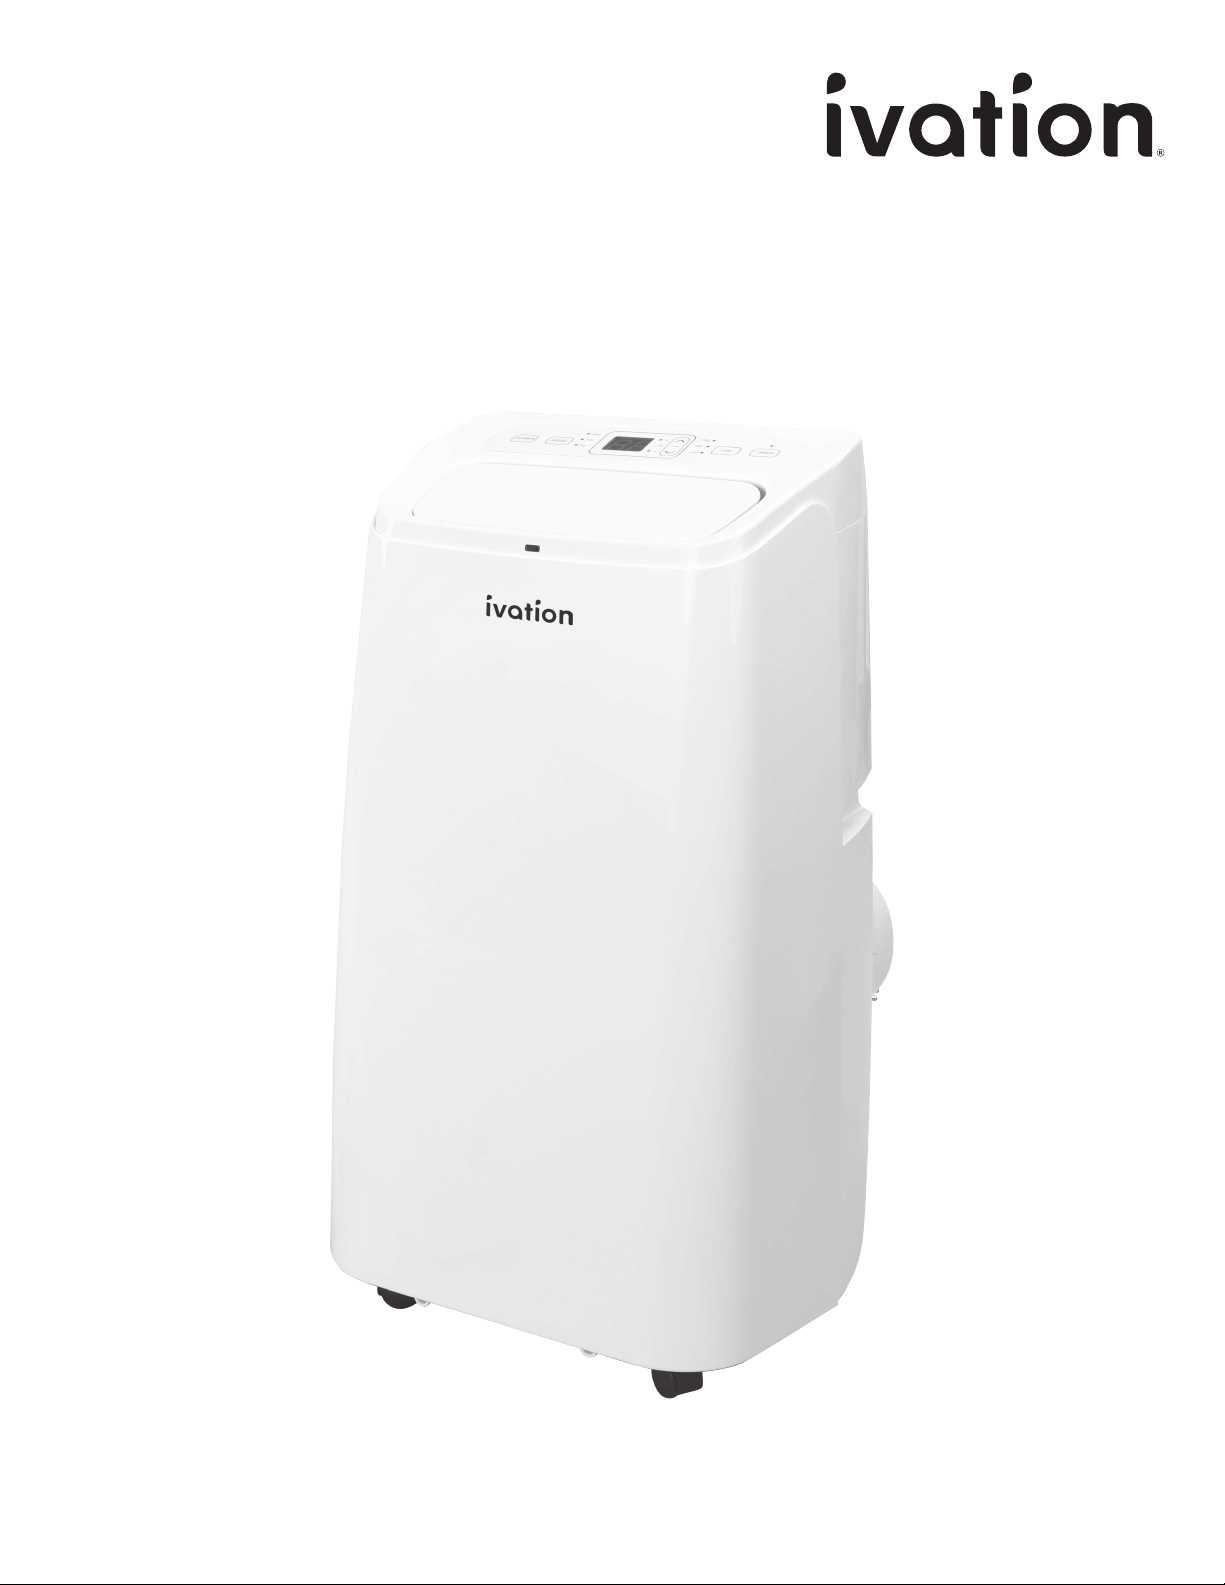
Portable Air Conditioner with Wi-Fi®
User Guide
SKUs: IVAPACWIFI8K / IVAPACWIFI10K / IVAPACWIFI12K / IVAPACWIFI13K

2
INTRODUCTION
INTRODUCTION
Thank you for purchasing the Ivation® Portable Air
Conditioner with Wi-Fi®. This User Guide is intended to
provide you with guidelines to ensure that operation of this
product is safe and does not pose risk to the user. Any use
that does not conform to the guidelines described in this
User Guide may void the limited warranty.
Please read all directions before using the product and
retain this guide for reference. This product is intended for
household use only.
This product is covered by a limited one-year warranty.
Coverage is subject to limits and exclusions. See warranty
for details.
FEATURES
SAFETY PRECAUTIONS
PRODUCT OVERVIEW
INSTALLATION
USAGE
CARE
TROUBLESHOOTING
SPECIFICATIONS
WARRANTY
GET IN TOUCH!
3
4
5
8
9
12
15
16
17
18
TABLE OF CONTENTS

3
FEATURES
FEATURES
• Wi-Fi® connectivity lets you control your air
conditioner from your smartphone
• All-in-one device cools, dehumidifies, and
purifies air
• Air swing function adjusts air outlet direction
• Included remote control for simple operation
• Large, easy-to-read LCD display
• Convenient handles on each side make moving
your air conditioner easy
• Rear hook for safer power cord storage
• High exhaust vent for easy assembly and
better air flow
• Timer switch function allows for automatic
shut o
• Automatic compressor, frost, thermal, and
overflow protection
4
SAFETY PRECAUTIONS
SAFETY PRECAUTIONS
• Keep the air conditioner away from gasoline, flammable
gas, stoves, and other heat sources.
• Do not use insecticide sprays or other flammable
substances near the air conditioner.
• Do not attempt to disassemble, overhaul, or modify the
air conditioner. Doing so can cause machine malfunction,
property damage, or personal injury. In case of malfunction,
contact Ivation® customer service or a qualified professional.
• Do not place liquids or other objects on the air conditioner
to prevent damage from accidental spills.
• Operation and maintenance should only be performed by
adults. Do not allow children to operate or play with the air
conditioner.
• This air conditioner is only suitable for indoor use.
• Do not install or use the air conditioner in bathrooms or
other humid environments.
• Ensure that the air conditioner is properly grounded.
For questions regarding electrical installation, follow the
instructions in this user guide or ask a qualified professional.
• Place the air conditioner in a flat, dry area with at least
20 in. (50 cm) between the air conditioner and walls or
surrounding objects.
• When using the drainage hose, ensure that it is properly
connected with no blockages or bends.
• After installation, ensure that the power plug is intact and
firmly plugged into an appropriate outlet.
• Ensure that the power cord is laid neatly to prevent tripping
or accidently pulling out the power plug.
• Do not power o the air conditioner by pulling out the
power plug.
• Keep the air inlet and outlet free of all obstructions.
• Adjust both wind-guide strips on the air outlet by hand to
avoid damaging them.
• When moving the air conditioner, keep the unit in an upright
position.
• Power o and disconnect the air conditioner before
cleaning or performing maintenance.
• Do not clean the air conditioner with chemical solvents like
gasoline or alcohol.
• Clean the air conditioner with a damp cloth. For deeper
cleaning, use a mild detergent.

5
PRODUCT OVERVIEW
PRODUCT OVERVIEW
1Control panel
2Top cover
3Swing leaf air vent
4Rear housing
5Front housing
6Omni-directional wheel
7Exhaust hose assembly
8Window sealing plate assembly
9Remote control
10
EVA filter housing
11 Power cord hook
12 Handle
13 Exhaust vent
14
Continuous drainage port
15 CON filter
16
Air inlet grill
17 Drainage cover
18 Power cord
19
Power plug
20
Heat preservation sleeve
(not included with all models)
GET TO KNOW YOUR AIR CONDITIONER
12
3
4
5
6
7
8
9
10
11
13
15
17
19
20
12
14
16
18

6
PRODUCT OVERVIEW
PRODUCT OVERVIEW
CONTROL PANEL
1Power button: Power your air conditioner on and o.
2Mode selection button: When powered on, select between cooling, ventilation,
and dehumidification mode.
3LCD display: View selected temperature and operating conditions.
4Down button: Lower your selected temperature or timing value.
5Up button: Raise your selected temperature or timing value.
a. To switch between Fahrenheit (°F) and Celsius (°C), simultaneously press
both the up and down button.
6Fan speed button: Toggle between high, medium, and low fan speeds.
NOTE: Fan speed is not selectable in dehumidifying mode.
7Timer button: Select automated power on and o.
a. When powered o, press the timer button to open the timer menu and use
the up and down buttons to choose when to power on the air conditioner.
b. When powered on, press the timer button to open the timer menu and use
the up and down buttons to choose when to power o the air conditioner.
c. Timing values can be set between 1-24 hour(s) in one-hour increments.
8Wi-Fi indicator light: Indicates whether or not the air conditioner is connected
to Wi-Fi.
1234 8 6 7
5
7
PRODUCT OVERVIEW
PRODUCT OVERVIEW
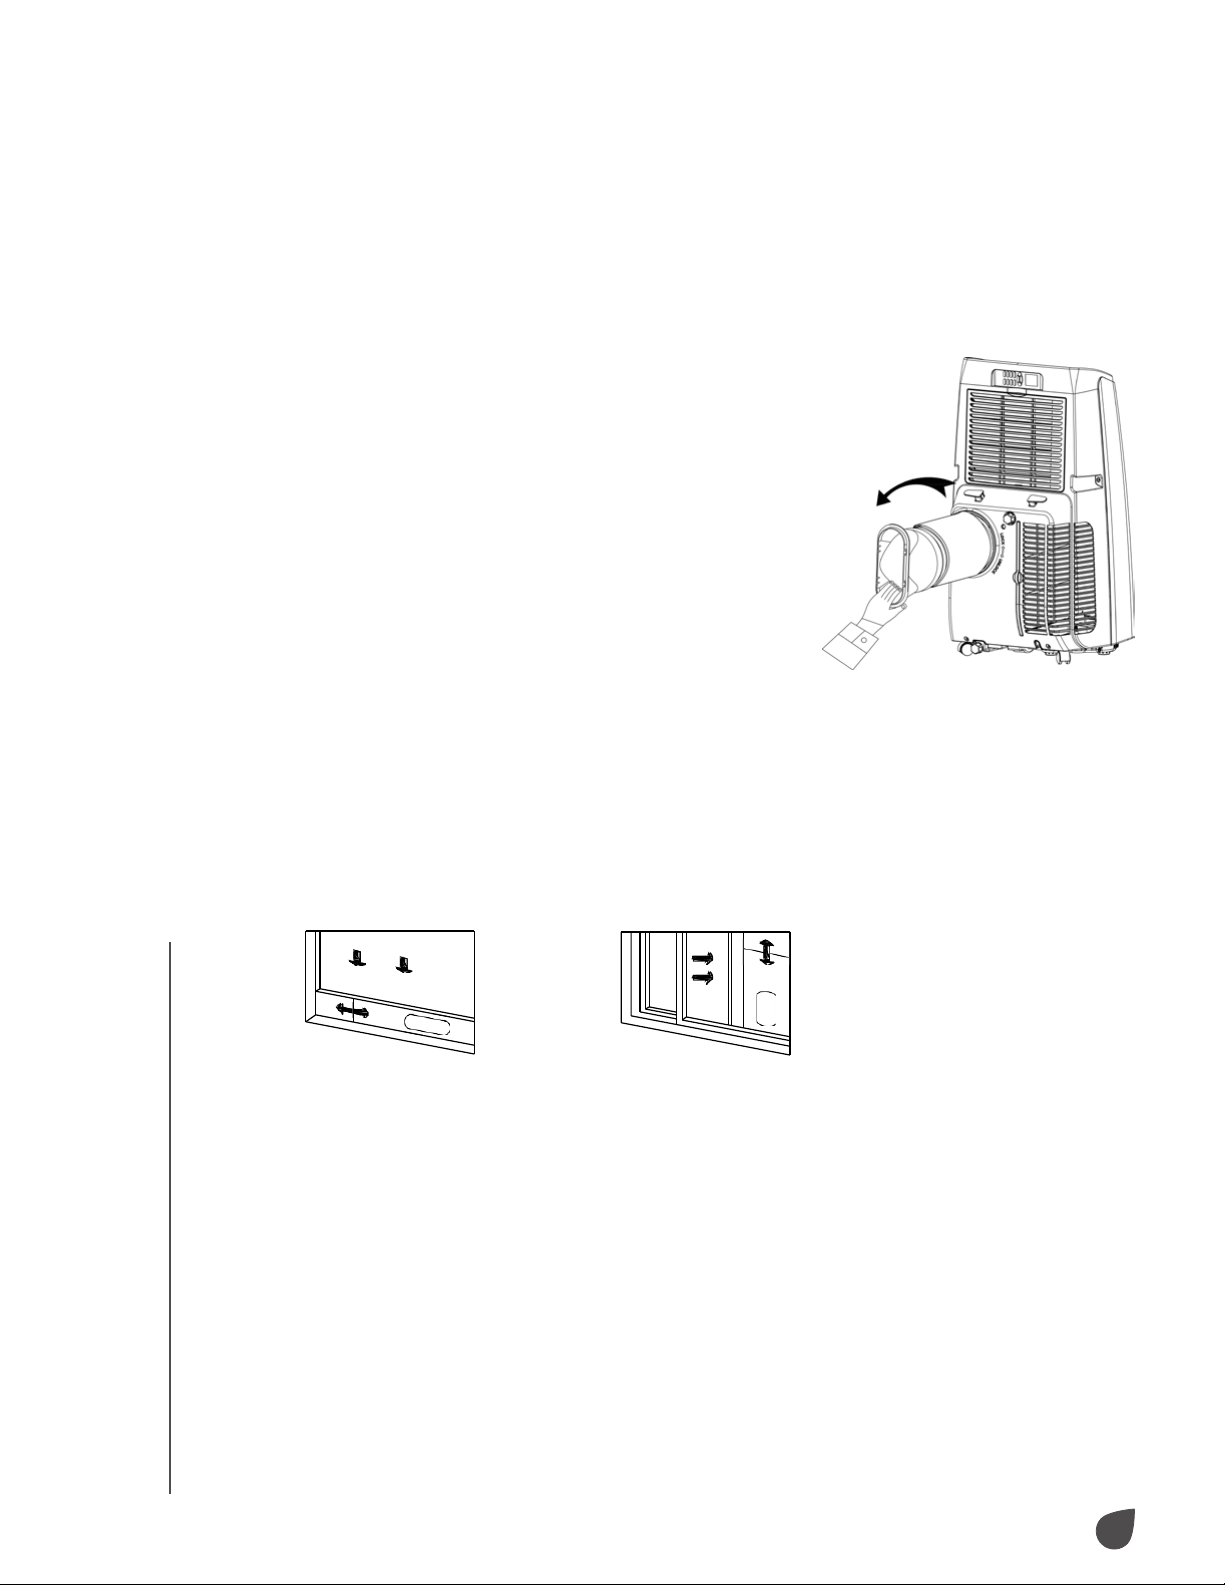
REMOTE CONTROL
1
2
34
8
6
7
5
1Power: Power your air conditioner on and o.
2Mode: Select between cooling, ventilation, and dehumidification mode.
3Up: Raise selected temperature or timing value.
4Down: Lower selected temperature or timing value.
5Fan: Toggle between high, medium, and low fan speeds.
6°C °F: Toggle between Fahrenheit (°F) and Celsius (°C).
7Swing: Select automated power on and o.
8Timer: Set the timing value.
8
INSTALLATION
AIR CONDITIONER PLACEMENT
When selecting a place to install your air conditioner, consider the
following:
• Before powering on your air conditioner, let it stand upright for
at least two (2) hours.
• Keep your air conditioner upright whenever you move it.
• Do not install your air conditioner in bathrooms or other humid
environments.
EXHAUST HOSE ASSEMBLY
• If your air conditioner included a heat
preservation sleeve, place it over the exhaust
hose assembly before attaching it to the unit.
• Align the exhaust hose assembly with
the exhaust vent. Screw the exhaust hose
assembly counterclockwise to fasten into
place.
WINDOW SEALING PLATE ASSEMBLY
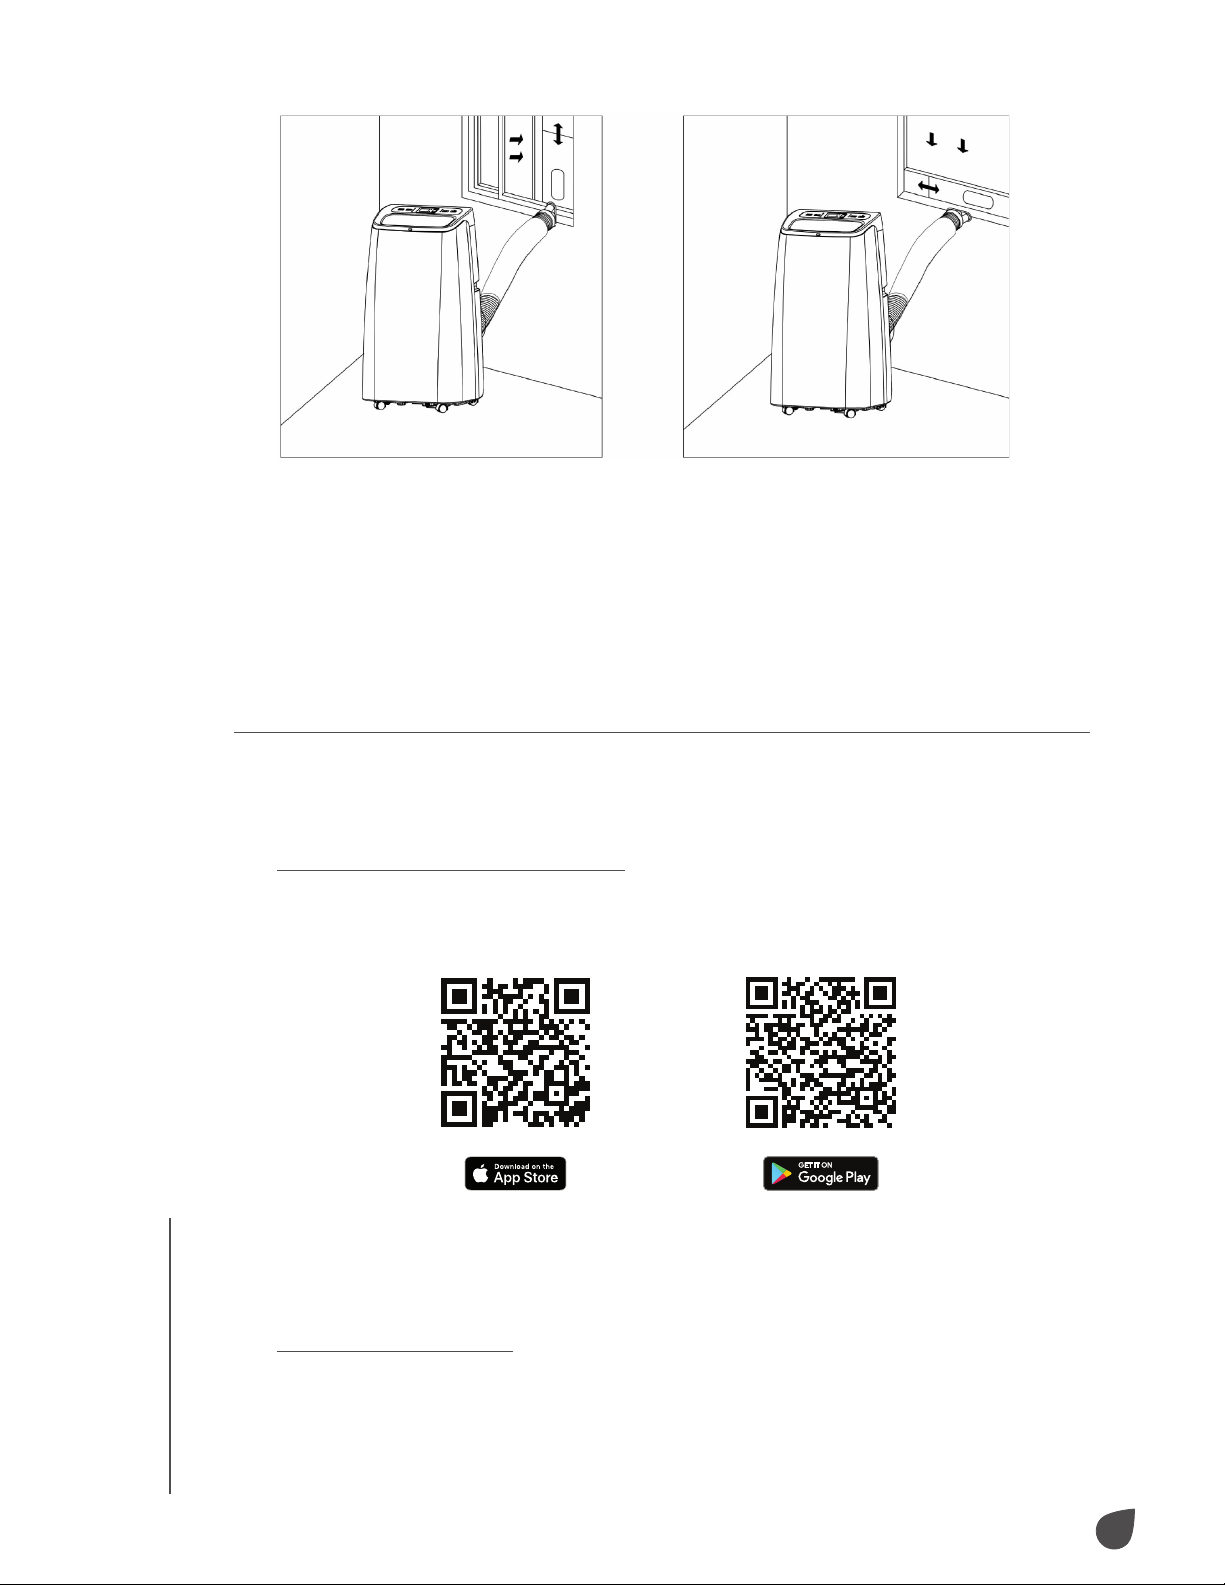
• Open your selected window halfway and mount the window
sealing plate. The window sealing plate can be installed
horizontally or vertically.
• Slide the window sealing plate assembly open until both ends
are in contact with the window frame. Set in place using the
clips.
INSTALLING THE AIR CONDITIONER
• Move your air conditioner with the exhaust hose assembly
installed toward the window. Be sure to leave at least 20" (50
cm) between your air conditioner and walls or surrounding
objects.
• Extend the exhaust hose assembly and snap the flat end of the
hose joints into the window sealing plate assembly.
NOTES: The flat end of the hose joints must be snapped into
place.
Make sure the exhaust hose does not have bends or angles
greater than 45 degrees. Keep the ventilation of the hose
unobstructed.
INSTALLATION
9
USAGE
EXHAUST HOSE NOTE
The exhaust hose length must be between 11" – 59" (28 – 150 cm)
based on your specific model. Do not use extension tubes or hoses
other than the one provided in the package. Keep the exhaust hose
unobstructed to prevent overheating.
USING YOUR AIR CONDITIONER WITH WI-FI®
Download the My Ivation® App
Scan the QR Code below with your smartphone to download the My
Ivation® app in the App Store® or Google Play™.
NOTE: Allow the app to access network and location services for best
use.
Create New Account
• Press “Register” and follow the prompts to register your account.
USAGE
10
USAGE
USAGE
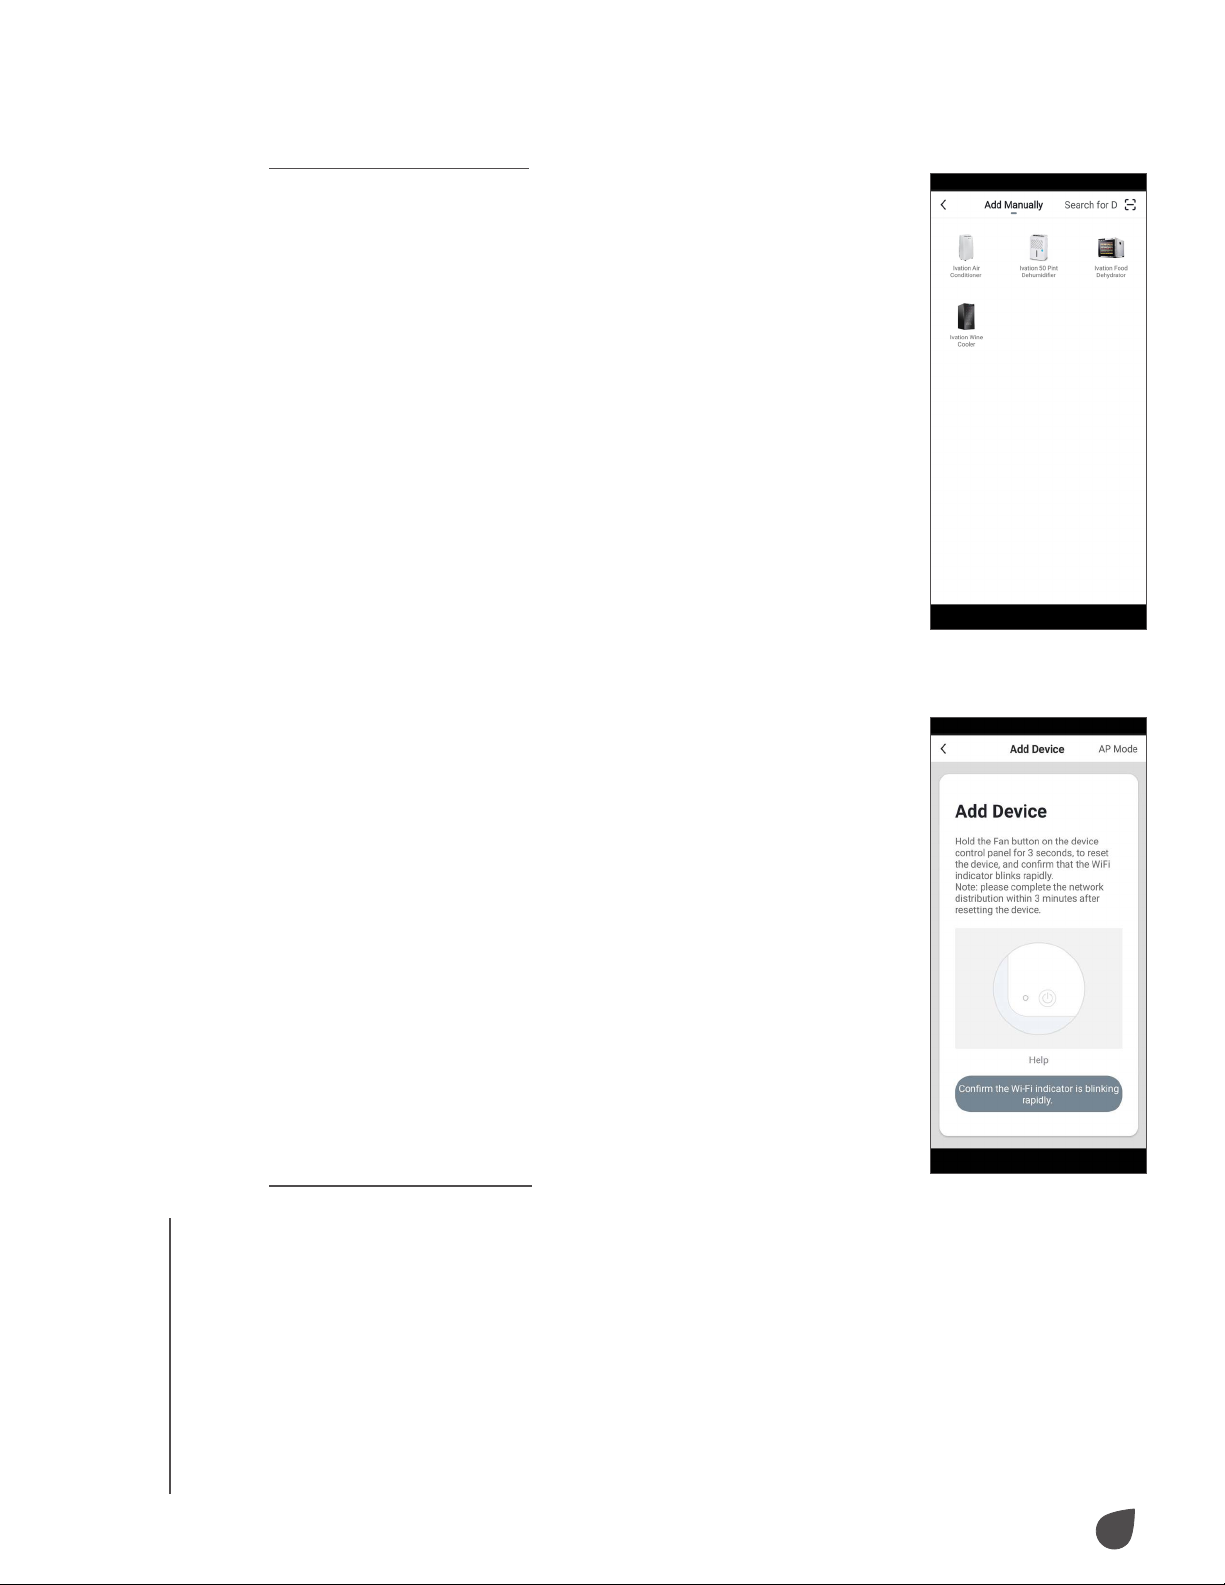
Add Device (EZ Mode)
• Plug the unit into an outlet, but do not power on the
unit. Hold the Fan button for three (3) seconds until
the unit beeps and the indicator light blinks rapidly.
• From the Home Page, press “Add Device” or press +
in the top right corner of the screen. (If you already
have a device added to your account, the “Add
Device” button will not appear.)
• In the app, select your air conditioner model from
the device menu. When the indicator light on the unit
blinks rapidly:
- Press “Confirm”.
- Select your Wi-Fi® network.
- Enter your router password.
NOTE: Connection may take up to 60 seconds.
• Once complete, the indicator light will stop blinking
and remain lit.
• Once the device is added, you can use the menu
of the app to change the name and location of the
device.
• When you are finished, press “Done”.
Add Device (AP Mode)
If you are having trouble connecting to your device
using EZ mode, you may connect to it using AP mode by following the
instructions below.
• Plug the unit into an outlet, but do not power on the unit. Hold the Fan
button for three (3) seconds until the unit beeps and the indicator light
blinks rapidly. Hold the Fan button a second time for three (3) seconds
until the indicator light blinks slowly.
Dieses Handbuch passt für folgende Modelle
3
Inhaltsverzeichnis
Andere Ivation Klimaanlage Handbücher


