jcb TP305 Sitemaster 2 Bedienungsanleitung

TP305
Sitemaster 2
User manual
Thank you for purchasing JCB
ToughPhone TP305 mobile phone

Brief introduction
Thank you for choosing the JCB TP305 GSM cellular phone. You’ll find details of the great
features of the phone in this manual. The TP305 is waterproof IPX7, dustproof IP6X, The
phone is rugged enough to withstand a drop of 1.5m onto a hard surface. It also supports FM
radio, Bluetooth, MMS, LED Torch, Extra Long Battery Life.
Please ensure you read the Important Product Information Guide at the end of this user
manual prior to using the product

Introduction
1 Getting Started
1.1 Battery
1.2 Removing and installing the battery
1.3 Charging the battery
2 Connecting to the network
2.1 SIM card
2.2 Installing and removing the SIM card
2.3 Installing and removing the memory card
2.4 Switching on/off the device
2.5 Unlocking the SIM card
2.6 Unlocking the device
2.7 Connecting to the network
3 Basic Features
3.1 Coverage
3.2 Making DDD
7.2.1 Enter telephone number-by-number keys.
7.2.2 Dialing an extension number
3.3 Making IDD
3.4 Dialing the number in the list
3.5 Making an emergency call
3.6 Answering a call
3.7 Call history
4 Multimedia
4.1 Camera
4.2 Image viewer
4.3 Video recorder
4.4 Video player
4.5 Photo editor
4.5.1 Photo artist
4.5.2 Image tiles
4.6 Audio player
4.7 Sound recorder
4.8 FM radio
4.9 Melody composer
5 Phone Book
5.1 Quick Search
5.2 Add new contact

5.3 Copy all
5.4 Delete
5.5 Caller groups
5.6 Extra numbers
5.7 Phonebook Settings
5.8 Caller Picture
5.9 Caller ringtone
5.10 Caller video
6 Call center
6.1 Call history
6.1.1 Call history
6.2 Call settings
6.2.1 Call settings
6.2.2 Advance settings
6.2.2.1 Black list
6.2.2.2 Auto redial
6.2.2.3 Speed dial
6.2.2.4 Background sound
6.2.2.5 Call time display
6.2.2.6 Call time reminder
6.2.2.7 Auto quick end
7 Organizer
7.1 Bluetooth
7.2 Calendar
7.3 Tasks
7.4 Alarm
7.5 World clock
8 Messages
8.1 SMS
8.2 Write message
8.2.1 Inbox
8.2.2 Outbox
8.2.3 Templates
8.2.4 SMS settings
8.3 MMS
8.3.1 Write message
8.3.2 Inbox
8.3.3 Outbox
8.3.4 Drafts
8.3.5 Templates
8.3.6 MMS Settings

8.4 Chat
8.5 Voice mail server
8.6 Broadcast message
9 File manager
10 Services
10.1 WAP
10.2 Data account
10.2.1 GSM Data
10.2.2 GPRS data:
11 User Profiles
12 Settings
12.2 Phone setup
12.1.1 Time and Date
12.1.2 Schedule Power On/Off
12.1.3 Language
12.1.4 Preferred Input Method
12.1.5 Display setup
12.1.6 Greeting Text
12.1.7 Dedicated key
12.1.8 Auto update of date and time
12.1.9 UART setup
12.1.10 Misc.settings
12.2 Network Settings
12.2.1 Network selection
12.2.2 Preferred networks
12.3 Security setup
12.3.1 SIM security setup
12.3.2 SIM lock
12.3.3 Fixed dial
12.3.4 Barred dial
12.3.5 Change password
12.3.6 Phone lock
12.3.7 Auto Keyboard lock
12.3.8 Change password
12.3.9 Restore factory settings
13 Writing Language/Input Method
13.1 Overview
13.2 Key definitions
13.3 Instructions on input method

13.3.1 e.g. English Writing Language
13.3.1.1 Using the keypad
13.3.2 Number
13.4 Using the keypad
13.5 Symbol
Frequently Asked Questions
Maintenance guideline
Important Product Information Guide

1 Getting Started
1.1 Battery
The battery holds a small amount of charge and can be used immediately after unpacking. It
performs best after three full charge/discharge cycles.
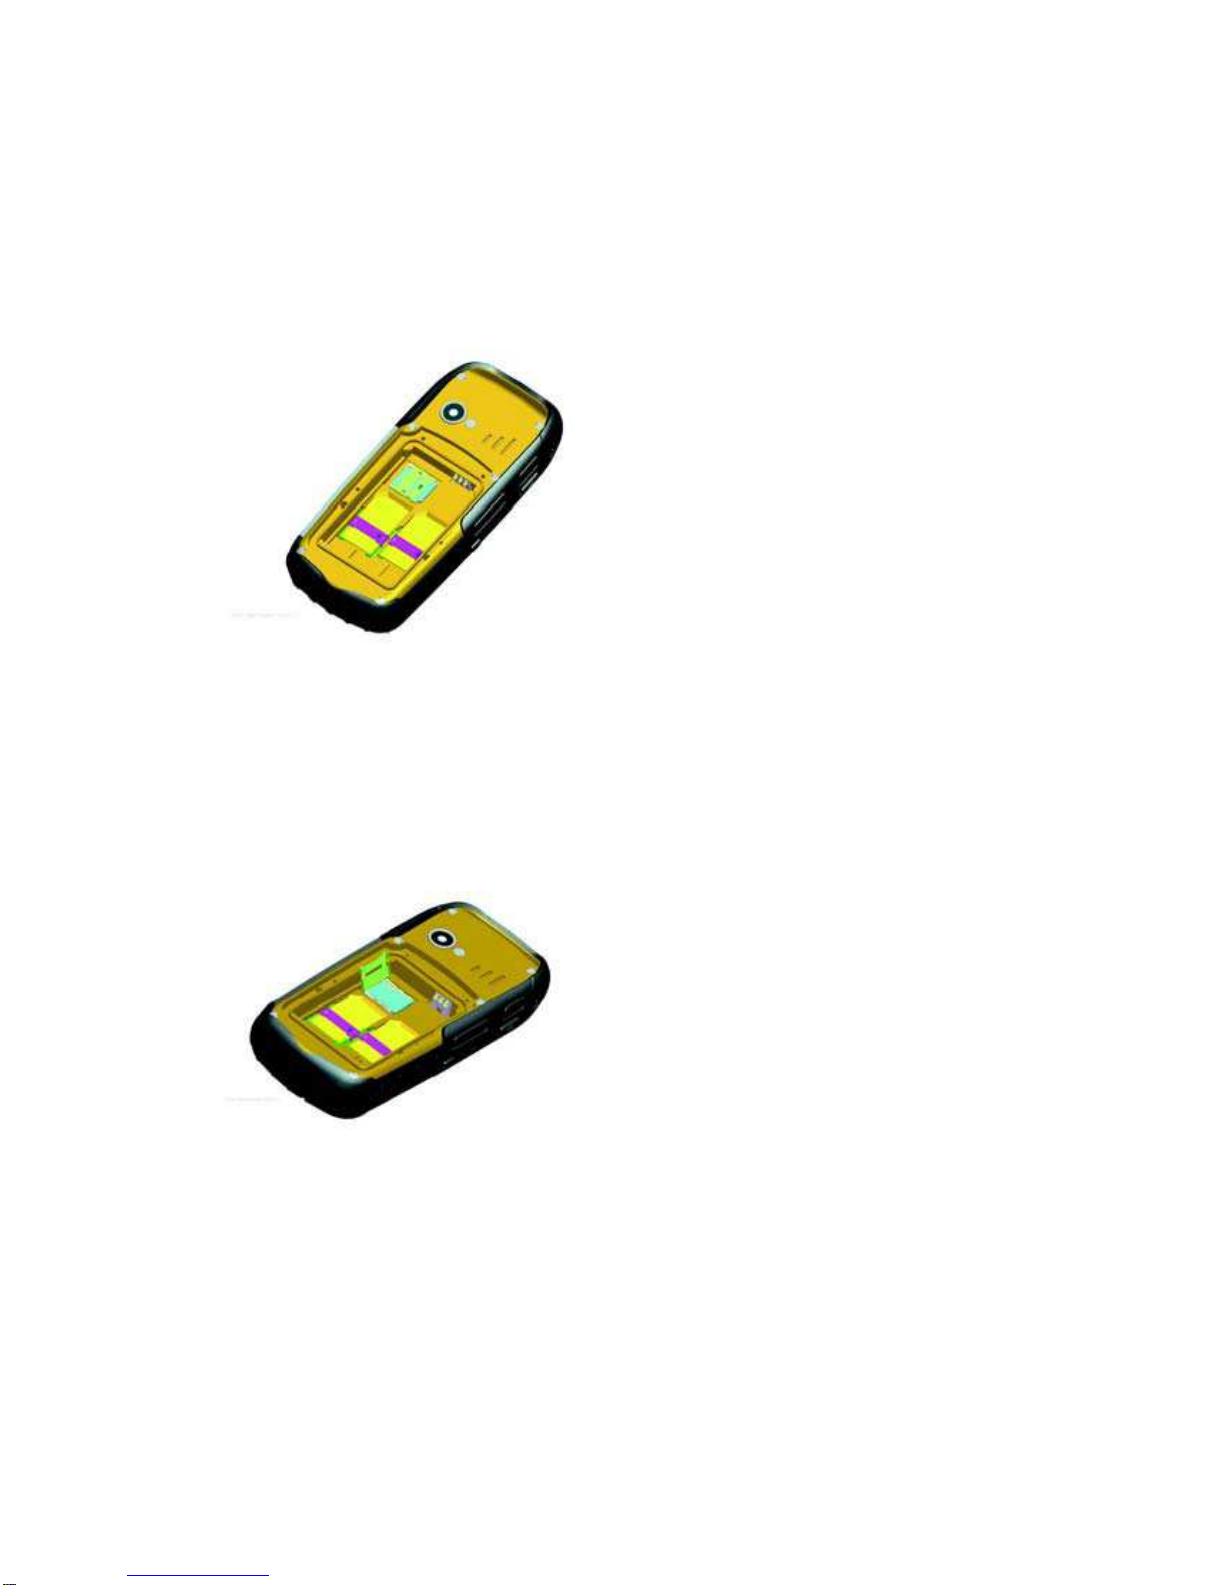
1.2 Removing and installing the battery
To remove the battery, follow the steps below:
A. Loosen the screws by metal screwdriver attached to the Caribena, and remove the battery
cover outwards from the top of the phone;
B. Pull the battery out from the bottom of the phone;
Warning: Power off the device before taking the SIM card out; otherwise, your SIM card may
be damaged.
To install the battery, follow the steps below:
C. Insert the top of the battery into the top metal contacts
D. Slide the back cover onto the phone until it closes in place, tighten screws.
1.3 Charging the battery
In charge mode, the battery indicator flashes. If the device is switched off during charging, a
charging indicator appears on the screen, indicating that the battery is being charged. If the
battery is totally discharged, it may take a few minutes before the charging indicator shows.
When the battery is fully charged, the indicator displays full battery and stops scrolling. If your
device is turned off, an image indicating that the battery is fully charged appears on the screen.
Normally, the charge process takes two and half hours. During the charge process, your
battery, device, and the charger may become warm. This is normal.
When charging is finished, disconnect the AC socket from the charger and your phone.
Note: Please place your phone in a ventilated place with the temperature ranging from -10°C
to +55°C. Use the provided charger only. Using unau thorized chargers may cause danger and
violate the warranty rules of the phone.
2 Connecting to the network
2.1 SIM card
Please insert a valid SIM (subscriber identity module) card into the phone before use.
Do not touch the metal surface of the card in case the information on the card may be lost or
destroyed. Keep the card away from electricity and magnetism.
2.2 Installing and removing the SIM card
Power off your phone; remove the battery; disconnect charger.
Plug SIM card into the SIM slot.
2.3 Installing and removing the memory card
Power off your phone; remove the battery; disconnect charger.
Insert the memory card into the micro USB card slot.
2.4 Switching on/off the device
Press and hold the End key to power on/off your device. The device will automatically test
whether the SIM card is plugged in after power-on. If there is no SIM card, the device will
prompt you to “Insert the SIM card”. Then, the screen will display the following messages in
turn:
Input password –if the password of the phone has been set.
Input PIN –if the password of the SIM card has been set.
Search –the phone starts searching until a proper network is found and connected.

2.5 Unlocking the SIM card
By setting a PIN (personal identification number) code of the SIM card, you can protect your
SIM card from illegal use. If this function is activated and the PIN protection code is set, you
have to input the PIN code to unlock the SIM card for regular use every time you power on
your phone.
Users can clear the code. In this condition, the SIM card cannot be protected from illegal use.
A. Hold the End key to switch on the phone;
B. Input the PIN1 code, press “Clear” to erase the input errors and “Ok” to stop. For example,
to set the PIN1 as
“1234”, input 1, 2, 3, and 4 in turn; then, press “Ok”.
If you enter an incorrect PIN code three times in a row, the network will lock your SIM card and
the phone will ask for PUK1 code.
Note: Your network service provider will set a standard PIN code (4-8 digits) for your SIM card.
Please change it with your private password.
2.6 Unlocking the device
By setting a password for your phone, you can protect your device from illegal use. After this
function is selected, you have to input the password to unlock your phone for regular use.
Users can deactivate the phone lock code. In this case, your device may not be protected from
illegal use.
A. Hold the End key to switch on the phone;
B. Input the phone password. To clear any errors, press “Clear”, to end, press “Ok”.
For example, if the password is set as “1122”, enter 1, 1, 2, and 2 in turn and press “Ok”.
If you forget your phone’s password, please contact with the dealer or the authorized local
customer service center.
2.7 Connecting to the network
After the SIM card is unlocked, the mobile phone will automatically search for the network and
the screen displays a searching mark.
Once connected, the name of the network provider appears at the central top of the text and
image area. Now you are registered on the network.
Note: The prompt of “SOS” (Emergency call available) shown on the screen indicates that your
phone is beyond the network service area or your card is not validated. However, you still can
make an emergency call according the signal strength.
3 Basic Features
3.1 Coverage
Once the name of the network provider appears on the screen, you can make or answer a call.
The signal bar on the upper left corner of the screen shows the strength of your phone’s
connection to the network. Four bars indicates the strongest signal.

3.2 Making DDD
3.2.1 Enter telephone number-by-number keys.
Press the Call key to make a call. To change a phone number, press the right soft key to clear
the number. During dialing, a corresponding animation is displayed. Once the other party
answers, the screen displays the call status. If the number is not in the Phone Book, your
device only displays the other party’s number. Otherwise, the Phone Book name would be
displayed. If the number is saved by your phone, its type (Mobile phone/Home Number/Office
Number, i.e.), email, caller picture, and caller group also display on the screen.
3.2.2 Dialing an extension number
For extension number, you have to dial the telephone exchange; then, press * Key to switch in
a row until “P” shows on the screen. Now you can call an extension.
Allow you to follow the sequence below to call can extension:
Area code, telephone exchange, extension number, and Call key.
3.3 Making IDD
Press * Key and release it to enter the character “+” which replaces the international access
code. This allows you to make a call to any country without knowing the local international
access code.
Follow the sequence below to make an international call: “+”, country code, whole telephone
number, and Call key.
After inputting the access code, enter your required country code and the complete telephone
number.
Omit “0” in front of a city code while dialing the number just as you dial the international call.
3.4 Dialing the number in the list
All calls you have made or received are saved in Call History. The recently dialed, received,
and un-answered numbers are grouped as Calls Dialed, Calls Received, and Calls
Un-answered. When the list is full, old numbers will be deleted automatically. To view the list
follow the sequence below :
A. Press the Call key in standby mode to view all call logs.
B. Press Call key to dial any number in the list directly.
C. When the list appears, press Ok to view details. Then, press Option to select an operation
like saving the number or delete the number.
3.5 Making an emergency call
As long as the network service is available, which can be checked by the signal strength bar at
the bottom left corner of the screen, you can make an emergency call. If your network provider
does not provide roaming service in the area, the screen will only display (Emergency),
indicating that you can make emergency calls only. If you are located in a service area of the
network, emergency calls can also be made without an SIM card.
Andere Handbücher für TP305 Sitemaster 2
1
Inhaltsverzeichnis
Andere jcb Handy Handbücher


Beliebte Handy Handbücher anderer Marken


Point Mobile
Point Mobile PM60 Bedienungsanleitung

Blackbe;rry
Blackbe;rry Q10 Bedienungsanleitung

Blackbe;rry
Blackbe;rry Bold 9900 Bedienungsanleitung

Blackbe;rry
Blackbe;rry STORM 9500 - VERSION 5.0 Bedienungsanleitung

LG
LG LM-K420EMW Bedienungsanleitung

ISAFE MOBILE
ISAFE MOBILE IS655.2 Bedienungsanleitung