Joto E-HP-JCH-51 Bedienungsanleitung

Joto Cap & Flat Press Manual
Model No.: E-HP-JCH-51
OPERATOR’S MANUAL
Bringing images to life
TM
TM
This product is SGS
Electrical Safety Certied

2www.jotoimagingsupplies.com 1-800-565-5686 Blaine, WA | Las Vegas, NV | Antioch TN | Coquitlam, BC | Brampton, ON
Safety Instructions
For Use By Qualied Personnel Only
When using your Heat Press,
basic precautions should always be followed,
including the following:
Read all instructions.
Use heat press only for its intended use.
Always keep the heat press dry. Do not get the heat press wet to reduce the risk of electric shock.
Do not store heat press in a wet/ damp area.
Never pull cord to disconnect the power. Instead, grasp plug and pull to disconnect from power
outlet.
Make sure you protect the power cord by keeping it away from hot surfaces. Avoid placing objects
on top of the cord. This could cause damage to the cord and could be a re hazard risk.
Do not operate heat press with a damaged cord or if the equipment has been damaged. To prevent
risks of injury, please do not disassemble or attempt to repair the heat press by yourself if you are
not qualify to do so. Instead, call or take it to a qualied service person for examination and repair.
Incorrect assembly or repair could increase the risk of re, electric shock, or injury to persons when
the equipment is used.
If heat press being used by or near children, please make sure that it is supervised. Do not leave
equipment unattended while connected.
Metal parts on the press can become hot. Avoid touching the hot metal parts to prevent burns.
Proceed with caution when using the heat press.
To reduce the likelihood of circuit overload, Joto recommends to use a dedicated circuit if possible.
Make sure that the cord is safely secured so it cannot be pulled or tripped over.
If you need to use an extension cord, make sure you use a 20 amperage rated cord. Cords rated
below 20 amperage can overheat. Make sure that the extension cord is safely secured so it cannot
be pulled or tripped over.
Note: This heat press should not be set to exceed 400˚F (200˚C). Setting the press
temperature to above 400˚F (200˚C) may cause a re hazard.
Be careful of the Auto Release feature. Press handle can injure body parts when autoreleasing.
Stand clear of auto-release path.
PLEASE KEEP THE BOX THAT YOUR HEAT PRESS ARRIVED IN,
ALONG WITH ALL ORIGINAL PACKAGING.

3
www.jotoimagingsupplies.com 1-800-565-5686 Blaine, WA | Las Vegas, NV | Antioch TN | Coquitlam, BC | Brampton, ON
Congratulations on your purchase of a Joto 5 in 1 Cap & Flat Press! In order to work
professionally with the machine and start production, please make sure you read this manual
carefully. Reproduction of this manual requires written consent from Joto. Errors and
amendments of technical details excepted, all rights reserved. Joto is not liable for any direct or
indirect damages caused by the use of this product.
Table of Contents
Safety........................................................2
Introduction .............................................3
Flat and Cap Press Overview .................4-5
Machine Parts Diagram ............................6
Platten Overview ......................................7
Setting Up Your Heat Press ......................8
Operating Instructions .............................9
Replacing Elements ................................10
Maintenance ...........................................11
Heat Pressing Guide ...............................12
Expanded View ......................................-13
Circuit Diagram.......................................14
Warranty.................................................15
Contact ...................................................16
This product is SGS
Electrical Safety Certied

4www.jotoimagingsupplies.com 1-800-565-5686 Blaine, WA | Las Vegas, NV | Antioch TN | Coquitlam, BC | Brampton, ON
Technical Specs
Model No.: E-HP-JCH-51
Machine Type: Flat & Cap
Machine Size: 20.70” x 19.68” x 9.84”
(526mm x 500mm x 250mm)
Printable Area Size: 3.14” x 5.11” x 0.39”
(80mm x 130mm x 10mm)
Controller GY-04 Digital Controller
Voltage: 220v/ 1 Phase/ 120v/ 1 Phase
Power: 0.6kw
Time Range:
Maximum Temp:
0~999s
437˚F (225˚C)
Packing Size: 24.40” x 23.62” x 13.77”
(620mm x 600mm x 350mm)
Gross Weight: 55.11lbs (25kg)
Note: This heat press should not be set to exceed 400˚F (200˚C). Setting
the press temperature to above 400˚F (200˚C) may cause a re hazard.
Cap & Flat Press Overview

5
www.jotoimagingsupplies.com 1-800-565-5686 Blaine, WA | Las Vegas, NV | Antioch TN | Coquitlam, BC | Brampton, ON
Cap & Flat Press Overview
TOP VIEW FRONT VIEW
LEFT VIEW RIGHT VIEW

6www.jotoimagingsupplies.com 1-800-565-5686 Blaine, WA | Las Vegas, NV | Antioch TN | Coquitlam, BC | Brampton, ON
Machine Parts Diagram
GY-06 Digital
Controller
Hat Rack
Electromagnetic
Suck Plate
Connecting
screws
Electric Case
Power Cord
Power
Switch
Heater
Socket

7
www.jotoimagingsupplies.com 1-800-565-5686 Blaine, WA | Las Vegas, NV | Antioch TN | Coquitlam, BC | Brampton, ON
Platen Overview
Curvy Heat Platen
Bottom
2.83” x 5.43”
72*138mm
Bottom Flat Heat Platen
5.9”x 5.9”
15 x 15cm
Curvy Heat Platen Bottom
3.93” x 5.43”
100*138mm
Top Flat Heat Platen
5.9”x 5.9”
15 x 15cm
Curvy Heat Platen
Bottom
3.07” x 4.92”
78*125mm
Curvy Heat Platen Bottom
4.01” x 6.35”
102*161.5mm

8www.jotoimagingsupplies.com 1-800-565-5686 Blaine, WA | Las Vegas, NV | Antioch TN | Coquitlam, BC | Brampton, ON
Setting Up Your Cap & Flat Press
Turning On Your Mug Press
Turn the Main Power Switch ON. The
Main Power Switch is at the right side
of the heat press.
Current temperature, set temperature,
current time, set time will display.
How to Read The Display
1.) Left side PV value = Current Temperature
2.) Right side PV value = Current Time
3.) Left side SV value = Set Press Temperature
4.) Right side SV value = Set Press Time
Setting Press Temperature
1.) Press OK to start. Use the up and down
arrows to choose to display in °F or °C.
°F stands for Fahrenheit
°C stands for Celsius
2.) Once selection is made, press OK to save.
3.) Green set temperature value will ash.
Use the up and down arrows to set
press temperature value. Press OK to save.
Setting Press Time
Green Set Time Value will ash
Use the up and down arrows to change
the value.
Press OK to save the value.
Wait until the current
temperature is the same as the set temperature
before using. The press will beep once set temperature
is reached. Close and open the press to stop the beeping.
Note: Setting the press temperature to above 400˚F (200˚C) may cause a re hazard.

9
www.jotoimagingsupplies.com 1-800-565-5686 Blaine, WA | Las Vegas, NV | Antioch TN | Coquitlam, BC | Brampton, ON
Operating Instructions
Pressing a cap
1.) Turn ON the Power Switch.
2.) Set the appropriate Press Temperature, and Time.
3.) Tape your imaged transfer/sublimation paper to your cap/substrate
with heat tape.
4.) Set the pressure. To do this, place a blank cap/substrate into the cap press.
Adjust the pressure knob at the bottom of the press until the cap ts snuggly
when press is closed.
It is recommended that you use medium-high pressure for transfer papers and
transfer vinyls.
For sublimation, light pressure is required. Turn pressure knob counter-clockwise
to raise the base plate (to increase pressure or turn the know clockwise to lower the base
plate (to decrease pressure).
5.) Wait until cap press reaches the set temperature. Once the
press is at temperature, place cap/substrate into the press. Close the press.
6.) Timer will start counting down. The press will beep when the set time has
counted down to 3. The auto-release function will activate once timer reaches
zero.
7.) Peel paper immediately or as suggested by the product instructions.
Note: Do not obstruct the heat press when auto release function is active. Auto
release will be automatically activated after counter reaches zero. Beware of
moving parts.
10 www.jotoimagingsupplies.com 1-800-565-5686 Blaine, WA | Las Vegas, NV | Antioch TN | Coquitlam, BC | Brampton, ON
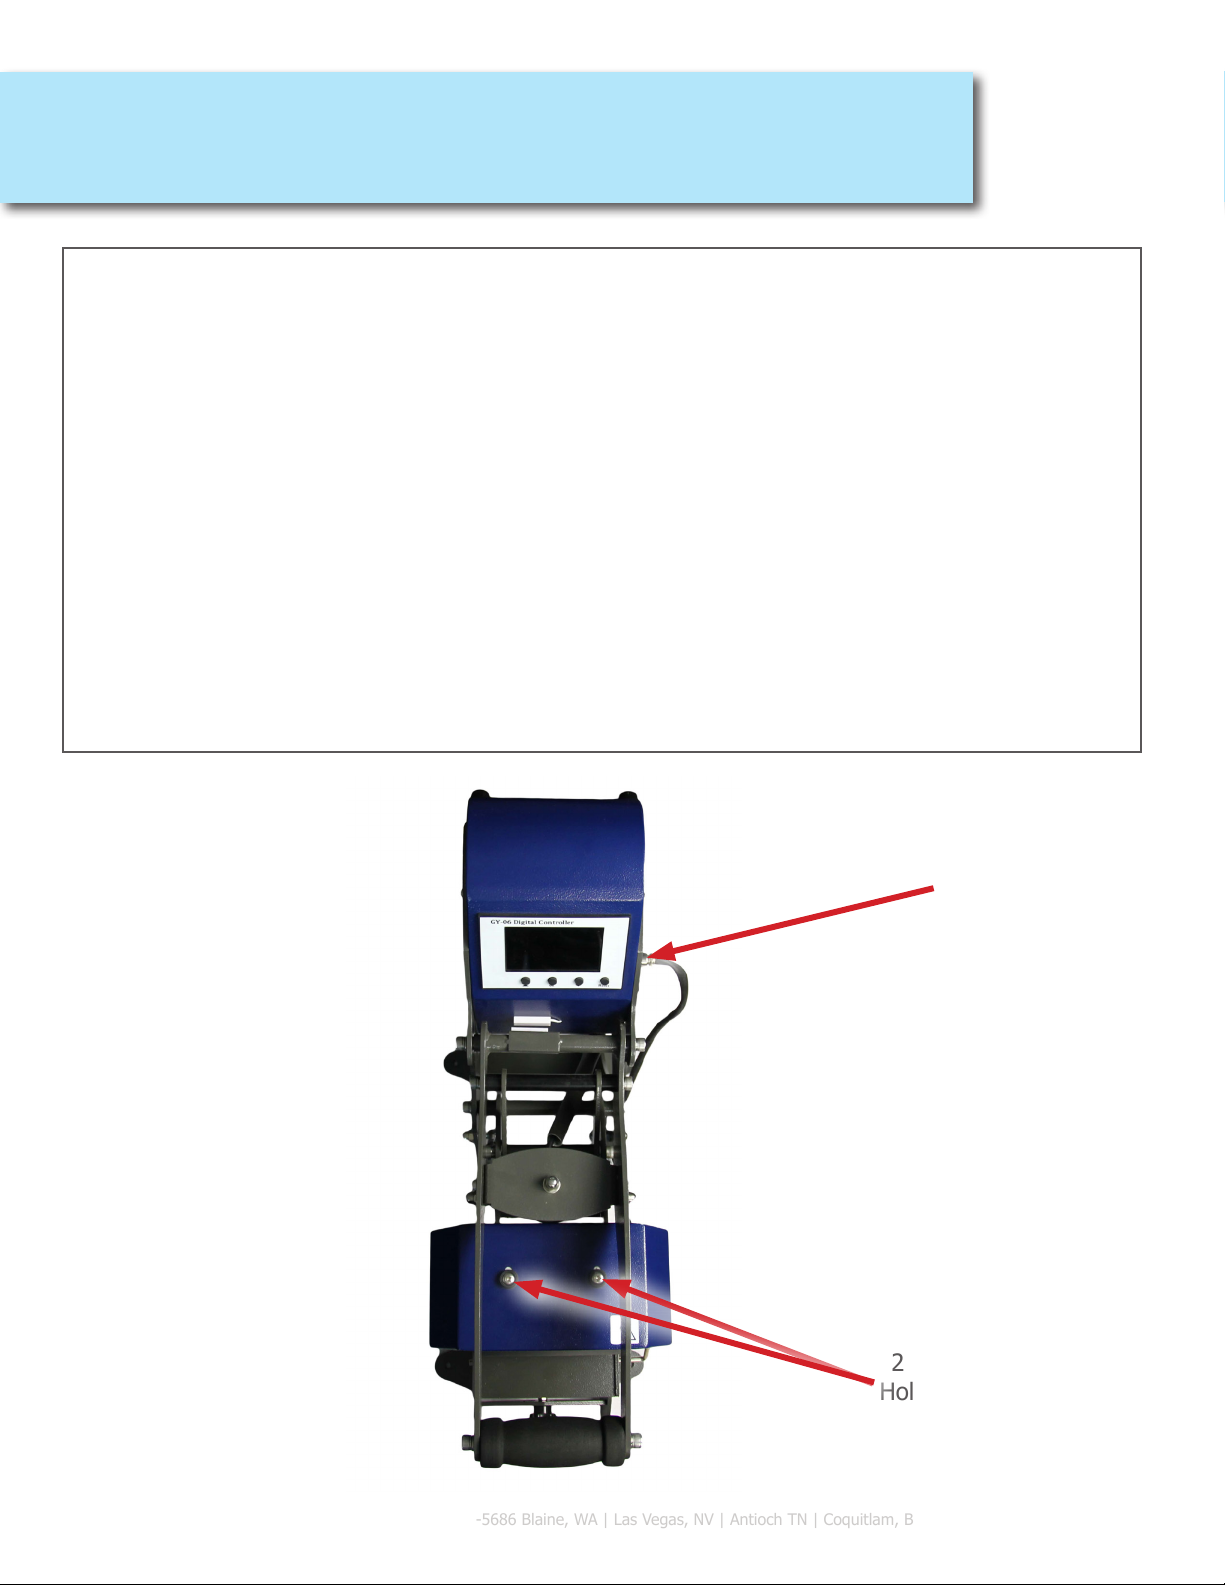
Replacing Platen Element
Replacing your Heat Element
1.) Ensure the power switch is OFF.
2.) Unplug the heat press if it is still plugged in.
3.) Detach the platen element cord from the mug press. Unscrew the ring that holds
the cord in place before detaching. See below diagram for detailed instructions
4.) With the Heat Press open, unscrew the two screws that hold the heat
element in place.
5.) Gently remove the heat element out of the at and cap heat press. Please be careful not
to damage the cord or the mug press.
6.) Gently install the new heat element into the at and cap heat press.
7.) Re-screw the two screws to keep the heat element in place.
8.) Connect the new heat element cord to the heat press.
Ensure that the pattern on the cord matches the socket on the heat press.
Heat Element
Cord and Ring
2 Screws that
Hold Element in
Place
Inhaltsverzeichnis
Andere Joto Elektrowerkzeuge Handbücher

Joto
Joto E-HP-JMP-51N Bedienungsanleitung

Joto
Joto E-HP-JMP-1S7E Bedienungsanleitung

Joto
Joto E-HP-JMP-2S5E Bedienungsanleitung

Joto
Joto E-HP-JLF-3243 Bedienungsanleitung

Joto
Joto E-HP-JAR-1515 Bedienungsanleitung

Joto
Joto E-HP-JAR-DS-1620 Bedienungsanleitung

Joto
Joto MugPress Bedienungsanleitung

Joto
Joto E-HP-JSP-1620 Bedienungsanleitung

Joto
Joto XSTM-40 Bedienungsanleitung

Joto
Joto E-HP-JAR-DS-1620 Bedienungsanleitung


