Laopan MMP 2 Bedienungsanleitung

MMP2 OWNERS MANUAL/ LAOPAN TECH. 20081030
OWNERS
MANUAL

>2<
>3<
PACKAGE CONTENTS 3
OPTIONAL ACCESSORIES 3
INTRODUCTION 4
TECHNICAL SPECIFICATION 5
HARDWARE OVERVIEW 6
SET UP EXAMPLE 6
REMOTE CONTROL 7
ENTERING TEXT OR IP 7
TIME ZONES 12
CONNECT BY FTP 14
USING THE MMP2 14
NAVIGATING START MENU 15
USING WINDOWS MEDIA PLAYER 11 FOR STREAMING 16
WEB BROWSER CONTROL YOUR MMP2
INSIDE
THE LOCAL NETWORK 18
MMP2 CONTROL WITH WEB BROWSER 19
NETWORK SETUP WITH WEB BROWSER 20
NTP/TIMER SETUP WITH WEB BROWSER 21
TOUCH PAD INTERFACE, FILE HANDLING/NAMING 22
SETTING UP MOVIES FOR THE TOUCH INTERFACE 23
TOUCH PAD LABEL INSTRUCTIONS 24
TOUCH PAD DUMMY LABEL 25
BLANK PAGE 26
LAST MINUTE UPDATE !!! 27
FIRMWARE UPDATING 28
TROUBLESHOOTING 29
USEFUL SOFTWARE 30
CONTENTS

>2<
>3<
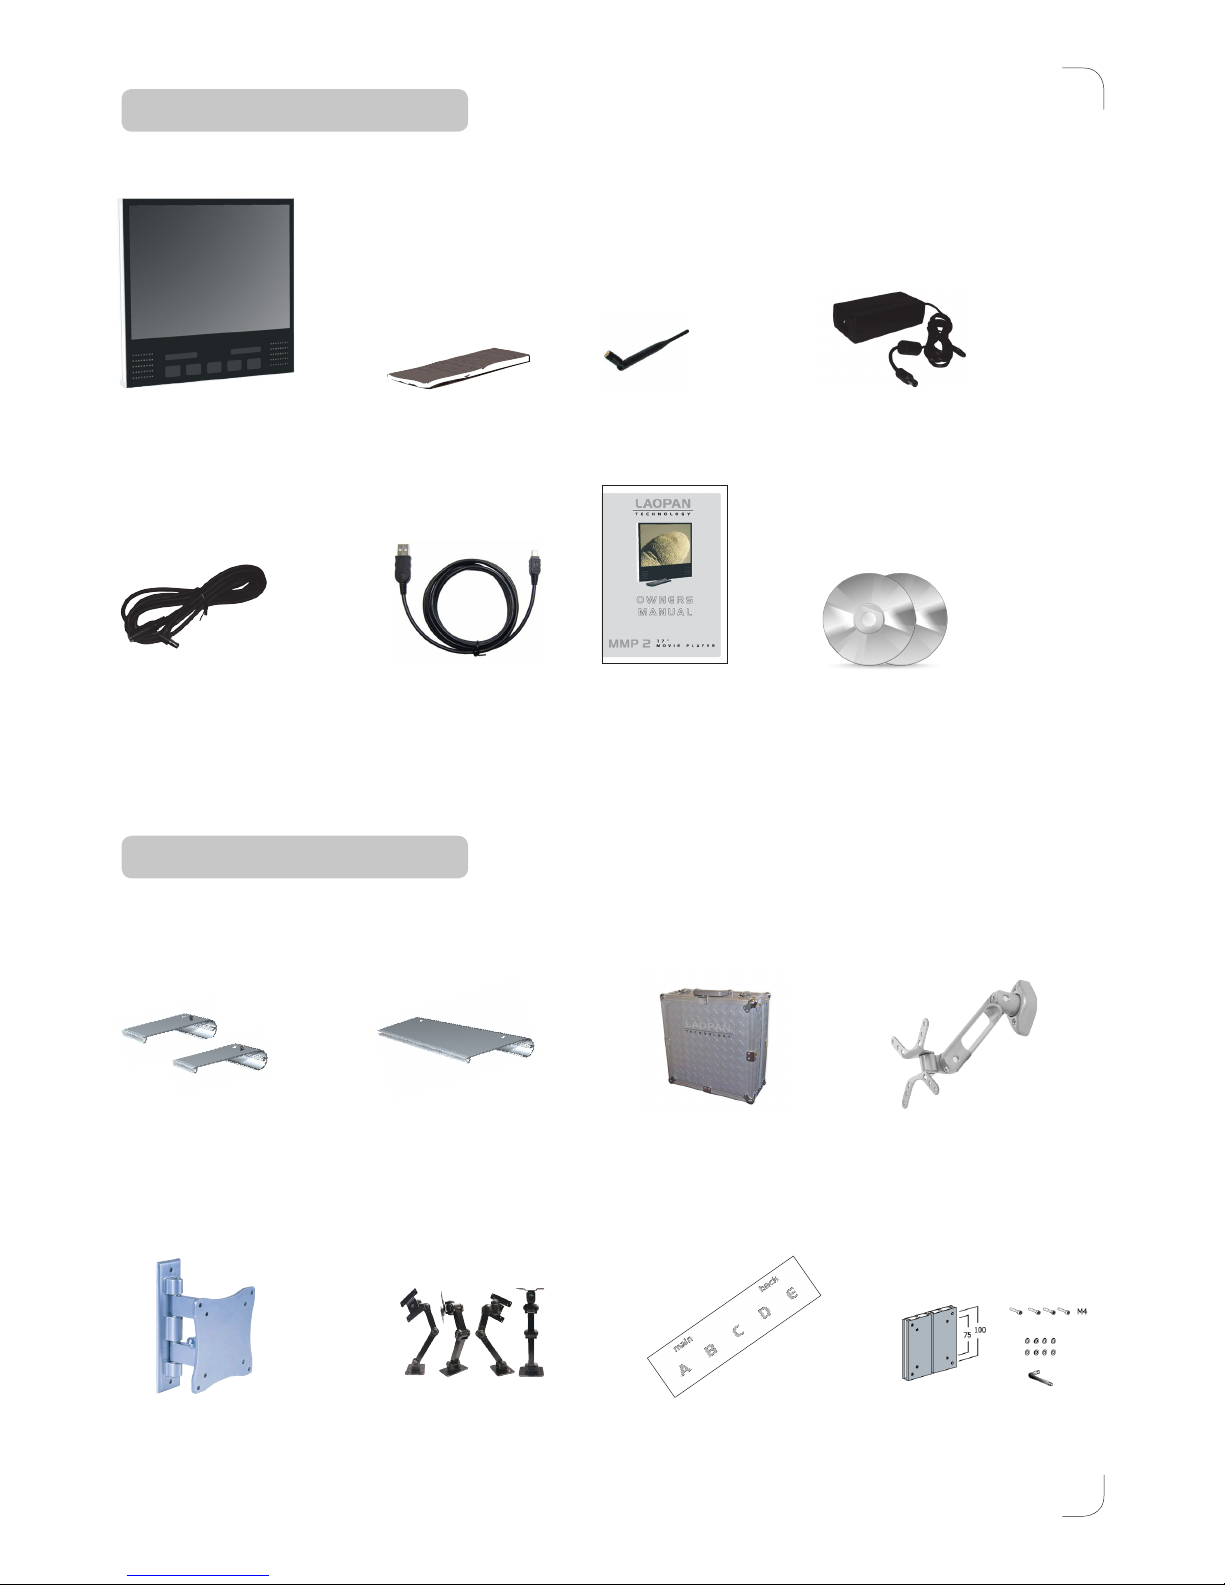
Multi Movie Player 2 Remote Control Power Adapter
Switching 110-240V
Output DC 12V, 4.16 A
12V Extension
cable
2000mm
WLAN Antenna
USB to MINI-USB
cable
1000mm
Owners Manual CD ROM´s
with software
•Multiview
•Schedule maker
Portable Desktop Stand
(fits inside of case)
OPTIONAL ACCESSORIES
OCTANORM Adaptor
(backside mounting)
PARTNR. LAO1
PARTNR. E 186
PACKAGE CONTENTS
Desktop Stand
PARTNR. LAO2
Aluminium Case
PARTNR. LAO3
Ceiling & Wall Mount
PARTNR. LAO4
Wall Mount
PARTNR. LAO5
Touch Pad Label
PARTNR. LAO10
Wall or Desktop Mount
PARTNR. LAO6

>4<
>5<
INTRODUCTION
Congratulations to your ownership of a High-Tech product developed by
the Swedish company LAOPAN Technology.
The MMP2 is designed for Business to Business (B2B) and Business to
Government (B2G) communication.
The stylished rugged aluminium frame not only protects the MMP2 but
also allows you to mount it to any vario or OCTANORM system, by using
the patented OCTANORM tension lock.
For set up examples, please visit our web site www.laopan.se.
The backside has a standard comsumer fitting, the 100x100mm dimen-
sion.
First and foremost the MMP2 is a network digital movie player that plays
Windows Media Video HD content, and WMA music files. It also plays
.avi, .divX, .mpeg1, 2 and 4-movies.
To keep the extraordinary resolution the MMP2 provides, we recommend
decoding your movies in the WMV9-format.
Connect a USB thumb drive for transferring movies.
Since it is networked, you can either use the Ethernet, or the WLAN con-
nection. The WLAN operates within the 802.11g or 802.11b standards,
and the security is WPA2.
A 7 button touch pad interface is hidden between the speakers, of which
allows you to navigate thru a maximum of 155 different movies.
You can connect your laptop and use the MMP2 as an extra TFT screen,
by using the VGA to Mini USB interface. The bundled software allows
you to connect up to a total of 6pcs of MMP2 to a single computer.
A bundled basic software allows you to make a playlist of movies that is
either controlled by number of times played or by a timestamp.

>4<
>5<
TECHNICAL SPECIFICATION
• 100x100mm, M4 fitting on backside
• Aluminium frame makes it compatible with vario display and OCTANORM systems
• Recommended formats are HD WMV9, and WMA
• USB input for thumb drive, up to a total of 16Gb. Must be compatible with Linux OS
• USB to VGA connection, use the MMP2 as a second screen and with the bundled
software up to 6 screens can be connected to a modern PC and work as a video wall
• With just a press of a button you can change the output ratio, from 5:4 to 16:9,
and between the MMP2 video output or Computer input
• 2 GB Internal memory
• RJ 45 Ethernet connection, 10/100
• 12V EXTENSION CABLE good for hiding the cable within an OCTANORM slot.
• WiFi 802.11b/g
• Outdoors 60 - 80m
• Indoors 20 -25m
• WPA2/TKIP.
• 17” AUO TFT screen 1280x1024 pixels (ratio 5:4), 5ms.
• 2 x 3W internal speakers
• Inductive 7 button touch pad hidden behind the front plate
• Slim 38 button remote control
• Export the Configuration Settings for backup or easier multiple MMP2 setup
• Connects to UPnP media libraries for streaming, Windows Media Player 11 compatible
• NTP time setting
• Embedded FTP server
• Embedded HTTP server, control your MMP2 remotely with Internet Explorer
• DHCP or fixed IP address
• Download contents scheduled or manually from FTP server
• Bundled software, MULTIVIEW and SCHEDULE MAKER
• Remote control Auto lock function to prevent unauthorized control
• Poly Carbonate front plate protects the TFT, exchangeable

>6<
>7<
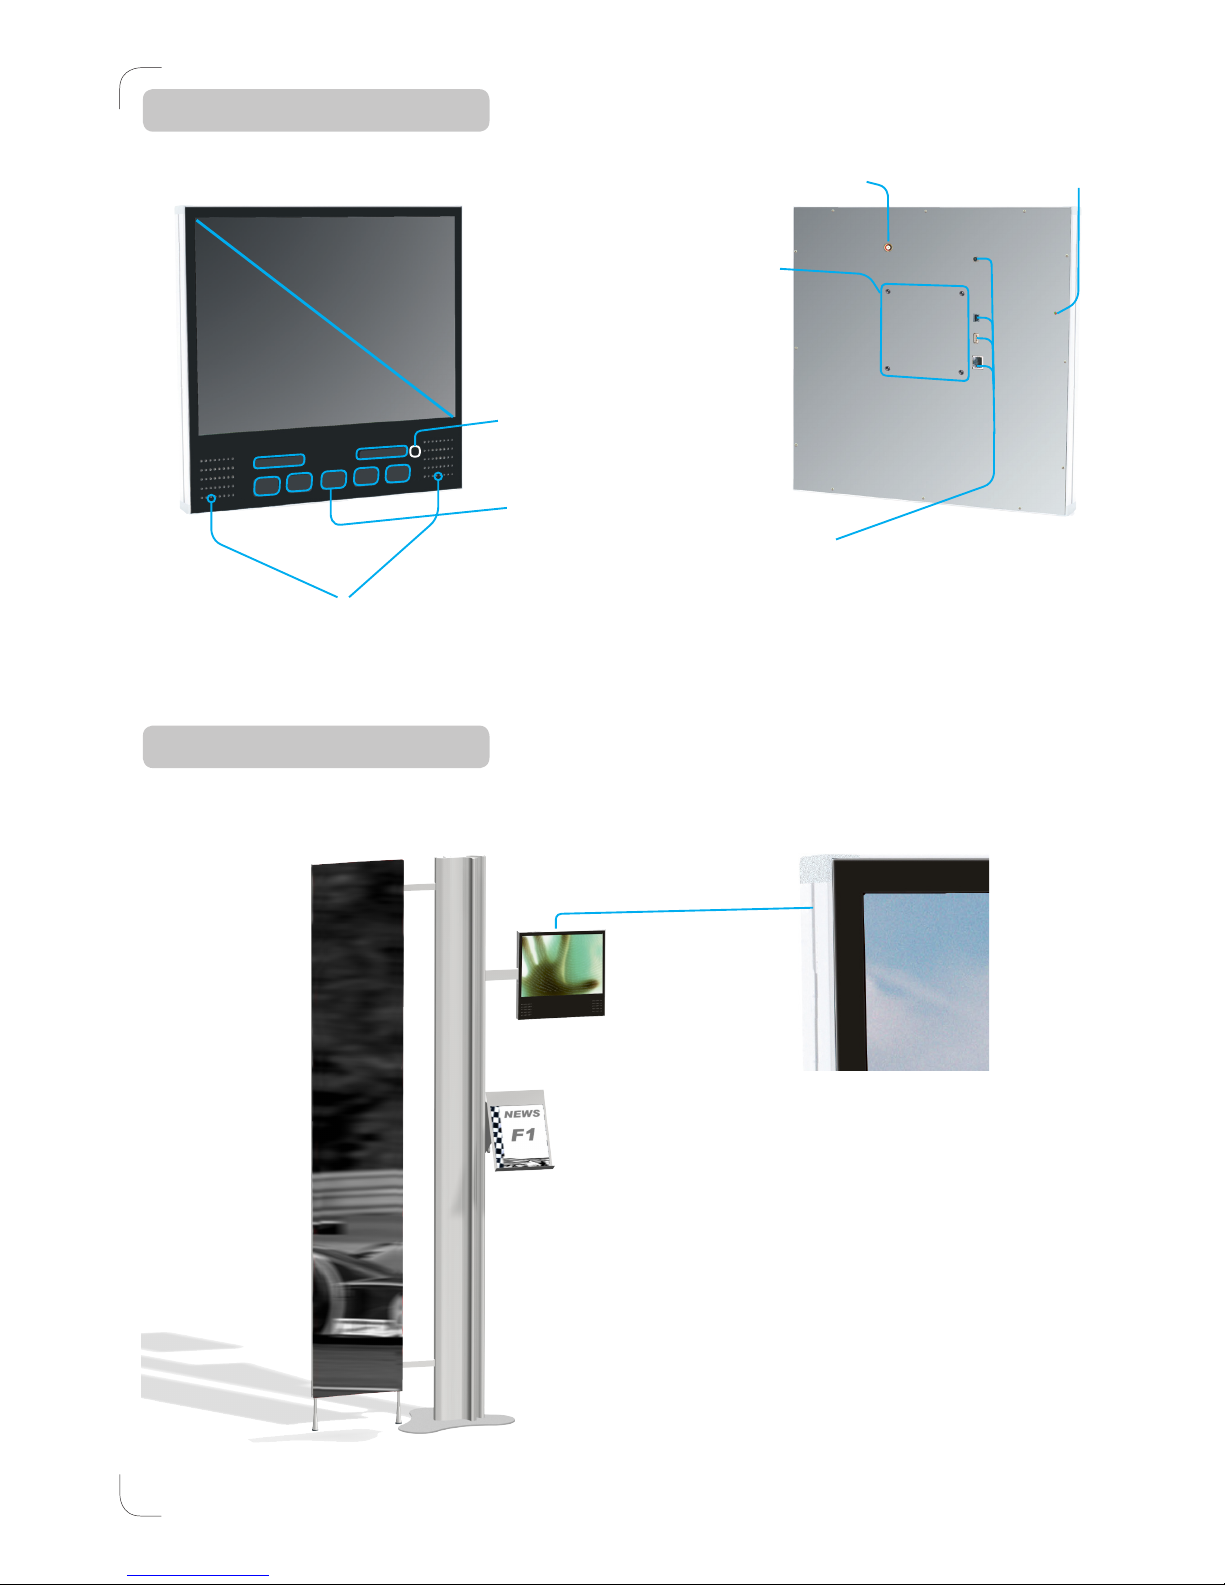
IR Sensor window
(hidden)
17”
5:4
Touch pad interface
(hidden)
Built-in speakers
HARDWARE OVERVIEW
1. 12V Power input
2. Mini USB input for USB to VGA
3. USB input for Thumbdrives
4. Ethernet RJ45 input
WLAN antenna
connector
100x100mm
M4
Power LED
The frame is integrated with an OCTANORM groove, allow-
ing you to use both vario and OCTANORM to create your
unique POS.
SET UP EXAMPLE

>6<
>7<
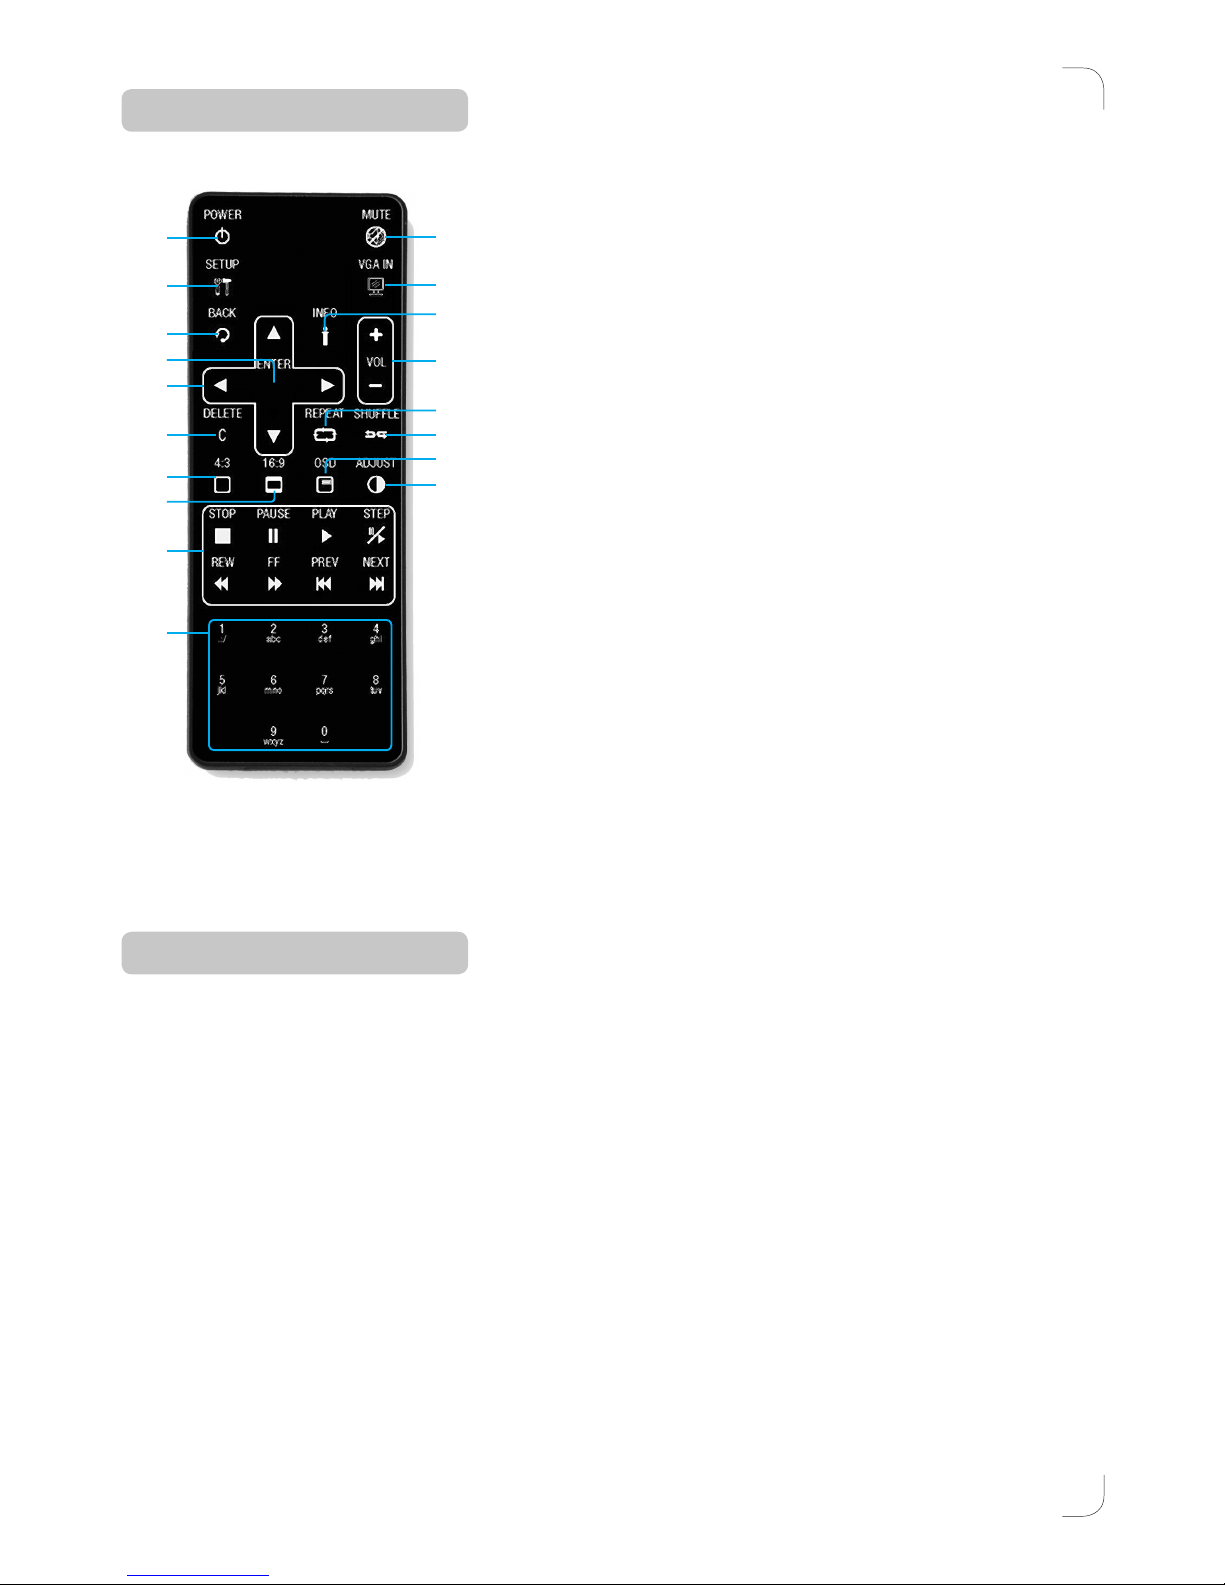
1. Power On/Off (Off = Standby, TFT is Off)
2. Mute sound
3. Setup (will not work in file mode)
4. VGA in, toggle between PC and MMP2 TFT output
5. Back, go back one OSD layer
6. Info, show the information of the file
7. Enter, confirm selection/entry
8. Volume up/down. When in TFT mode it works as 16.
9. Move cursor
10. Delete, last entry or indicated file
11. Repeat One/All/Off
12. Shuffle On/Off
13. Fill whole screen, view 5:4 movies
14. Letter box, view wide screen movies
15. OSD On/Off (On Screen Display)
16. Adjust saturation/color/brightness
17. STOP, PAUSE, PLAY the file being played
STEP, play the movie frame by frame
REWIND, FAST FORWARD; the file being played
PREVIOUS, NEXT; the next file
NEXT and PREVIOUS doubles as PAGE UP and PAGE
DOWN in the file system
18. Alfa numerics, to enter text, symbols and numbers
1
3
5
9
7
10
8
6
4
2
13
14
17
12
11
16
15
18
REMOTE CONTROL
ENTERING TEXT OR IP
You need to press the alfa numeric key several times to enter the corresponding letter.
Wait a second or two to input the next letter, or for a more rapid way, press the right arrow button.
For example; to enter the IP address 192.168.1.80
1. Press “1” once. “1” is displayed and is orange colored.
2. When the color has turned white, press “9” once, and wait for it to turn white.
3. Repeat step 1 and 2 to enter and complete the IP address.
4 When finished, press Setup to exit and save.

>8<
>9<
SETTING UP
In the main menu you can access the Setup menu by navigating to it and pressing the ENTER but-
ton. You can also press the button to go directly to the Setup menu.
NOTE: If a file is being played, you must first press and before pressing the button.
SETUP MENU
There are four sub-groups in the Setup menu;
•Network
•FTP
•Video
•Movie
Use the buttons to navigate the menu and press ENTER to confirm the selection.
Press button to save and quit the Setup screen.
NOTE: Some settings are only implemented if you do a cold reboot. Disconnecting and reconnect-
ing the power cable.
NETWORK WITH
•None If you are using the MMP2 as a stand-alone player
•RJ45 If you have connected the MMP2 to a wired network
•WiFi If you have connected the MMP2 to a wireless network
POWER ON
Press the button on the remote control, then wait for the MMP2 to “boot” up.
A text box will appear reading “ No cable”, and later on “auto adjust”. This is normal during boot
up.
If the Autostart function is ON, (please refer to the SETUP MENU to check the status), the MMP2 will
start playing the first movie after POWER ON.
If the Autostart function is OFF, the start menu will show, enabling you to choose from which me-
dia to play from.
If the MMP2 is configured to connect to a network using DHCP, a pop up window will be displayed
informing you the status of the connection and which IP address the MMP2 has received. IF the
connection can NOT be initiated, a pop up window will inform you of that and try to reconnect for
10 minutes.
POWER OFF
Press the button to put the MMP2 into standby mode. The TFT will be turned off, but the media
player will still be available for receiving commands from a wired or wireless connection. To turn
the MMP2 completely off, please disconnect the power cable.
OPERATING THE MMP2
POWER
SETUP
ENTER
4:3 16:9 OSD ADJUST
STOP PAUSE PLAY STEP
REW FF PREV NEXT
VOL
DELETE
C
REPEAT SHUFFLE
INFO
MUTE
BACK
1
.:/ 2
abc 3
def 4
ghi
5
jkl 6
mno 7
pqrs 8
tuv
9
wxyz 0
[
VGA IN
POWER
SETUP
ENTER
4:3 16:9 OSD ADJUST
STOP PAUSE PLAY STEP
REW FF PREV NEXT
VOL
DELETE
C
REPEAT SHUFFLE
INFO
MUTE
BACK
1
.:/ 2
abc 3
def 4
ghi
5
jkl 6
mno 7
pqrs 8
tuv
9
wxyz 0
[
VGA IN
POWER
SETUP
ENTER
4:3 16:9 OSD ADJUST
STOP PAUSE PLAY STEP
REW FF PREV NEXT
VOL
DELETE
C
REPEAT SHUFFLE
INFO
MUTE
BACK
1
.:/ 2
abc 3
def 4
ghi
5
jkl 6
mno 7
pqrs 8
tuv
9
wxyz 0
[
VGA IN
POWER
SETUP
ENTER
4:3 16:9 OSD ADJUST
STOP PAUSE PLAY STEP
REW FF PREV NEXT
VOL
DELETE
C
REPEAT SHUFFLE
INFO
MUTE
BACK
1
.:/ 2
abc 3
def 4
ghi
5
jkl 6
mno 7
pqrs 8
tuv
9
wxyz 0
[
VGA IN
POWER
SETUP
ENTER
4:3 16:9 OSD ADJUST
STOP PAUSE PLAY STEP
REW FF PREV NEXT
VOL
DELETE
C
REPEAT SHUFFLE
INFO
MUTE
BACK
1
.:/ 2
abc 3
def 4
ghi
5
jkl 6
mno 7
pqrs 8
tuv
9
wxyz 0
[
VGA IN
POWER
SETUP
ENTER
4:3 16:9 OSD ADJUST
STOP PAUSE PLAY STEP
REW FF PREV NEXT
VOL
DELETE
C
REPEAT SHUFFLE
INFO
MUTE
BACK
1
.:/ 2
abc 3
def 4
ghi
5
jkl 6
mno 7
pqrs 8
tuv
9
wxyz 0
[
VGA IN
POWER
SETUP
ENTER
4:3 16:9 OSD ADJUST
STOP PAUSE PLAY STEP
REW FF PREV NEXT
VOL
DELETE
C
REPEAT SHUFFLE
INFO
MUTE
BACK
1
.:/ 2
abc 3
def 4
ghi
5
jkl 6
mno 7
pqrs 8
tuv
9
wxyz 0
[
VGA IN
POWER
SETUP
ENTER
4:3 16:9 OSD ADJUST
STOP PAUSE PLAY STEP
REW FF PREV NEXT
VOL
DELETE
C
REPEAT SHUFFLE
INFO
MUTE
BACK
1
.:/ 2
abc 3
def 4
ghi
5
jkl 6
mno 7
pqrs 8
tuv
9
wxyz 0
[
VGA IN
POWER
SETUP
ENTER
4:3 16:9 OSD ADJUST
STOP PAUSE PLAY STEP
REW FF PREV NEXT
VOL
DELETE
C
REPEAT SHUFFLE
INFO
MUTE
BACK
1
.:/ 2
abc 3
def 4
ghi
5
jkl 6
mno 7
pqrs 8
tuv
9
wxyz 0
[
VGA IN
POWER
SETUP
ENTER
4:3 16:9 OSD ADJUST
STOP PAUSE PLAY STEP
REW FF PREV NEXT
VOL
DELETE
C
REPEAT SHUFFLE
INFO
MUTE
BACK
1
.:/ 2
abc 3
def 4
ghi
5
jkl 6
mno 7
pqrs 8
tuv
9
wxyz 0
[
VGA IN
POWER
SETUP
ENTER
4:3 16:9 OSD ADJUST
STOP PAUSE PLAY STEP
REW FF PREV NEXT
VOL
DELETE
C
REPEAT SHUFFLE
INFO
MUTE
BACK
1
.:/ 2
abc 3
def 4
ghi
5
jkl 6
mno 7
pqrs 8
tuv
9
wxyz 0
[
VGA IN

>8<
>9<
IP ASSIGNED BY DHCP
•On If you have a DHCP enabled router
•Off Enter the necessary information in the ASSIGN IP
ADDRESS menu
ASSIGN IP ADDRESS
If you want to use the MMP2 embedded Local FTP server, you need to enter a fixed IP address,
Mask, Gateway and DNS.
HOW TO GET HOLD OF THE MASK, GATEWAY AND DNS?
1. Click on “START”, select “RUN” and type in “CMD”, then press enter.
The MS-DOS window will appear.
2. Type in “ipconfig” and press “ENTER”. Write down the Mask (Subnet mask), Gateway
(default gateway) and DNS on a piece of paper.
3. Use the remote control to input the information to the MMP2. See section ENTERING
TEXT OR IP on page 7 on how to use the remote.
STREAMING
The MMP2 is capable of detecting shared media libraries on a network, thanks to its UPnP.
This mean it can read the contents on your computer and play that information directly without
copying it to its internal memory. Make sure the bandwidth of the network is enough, as HD con-
tent when played, can demand a lot. For example: (6.75MBps) = 54Mbit
If the connection breaks or you power down the shared PC, the MMP2 will stop playing.
Please read the STREAMING section on page 14 to learn more about how to use this function.
WIFI SSID
Select the SSID that is being used by your wireless network.
NOTE: If your router does not list its SSID, then it is a hidden network, and the MMP2 can not detect
it. You must manually enter your SSID in “WiFi Encryption Setup”.
ENCRYPTION MODE
•Enable
•Disable
WIFI ENCRYPTION SETUP
•SSID Enter your SSID here if it is not already displayed
•PASSWORD Enter the necessary password to use the wireless network
NOTE: Both the SSID and PASSWORD are case sensitive.
WIFI CONNECTION STATUS
Shows the WiFi information; SSID name, quality of reception, channel and connection speed.
MASK GATE DNS

>10<
>11<
MMP2 SERVER Enables the built in FTP server.
•On If On, make sure you have a fixed IP address
•Off
MMP2 SERVER SETUP Please change the User ID and Password.
•Port Default port is “21”
•User ID Default User ID is “root”
•Password Default Password is “admin”
FTP AUTO DOWNLOAD Auto download content to your MMP2 via FTP
•On
•Off
FTP DOWNLOAD SETUP Type in the following information;
•Server IP Domain name or IP address of the remote FTP server
•Port The default is 21
•User ID User ID of the Remote FTP server
•Password Password of the Remote FTP server
•FTP Path Enter the folder path you want to access
For evaluation, you can use our demo videos, available at
FTP://213.142.22.10 1 kalkon /MMP2/1/
NTP SERVER Network Time Protocol (please see the figure on
•On page 16 and 17 for an overview of time zones)
•Off
NTP/TIME SETUP Settings when the MMP2 is to download new content
•NTP Server Default (GMT +/- 0) 204.152.184.72 (England)
•Local Time Default +8 (Taipei)
•Auto Download Time Hour/Min./Seconds 20.00.00
NOTE: On page 16 and 17 you can see all the different time zones
WEB BROWSER CONTROL Use I.E. to connect and send commands to the MMP2
•On
•Off
WEB BROWSER CONTROL SETUP
•Port Default port is “80”
•User ID Default User ID is “root”
•Password Default Password is “admin”
PASSWORDUSER IDPORT
PASSWORDUSER IDFTP ADDRESS FTP PATH
Inhaltsverzeichnis