Luce LCTV-2201A Bedienungsanleitung

LCTV- 2201A
TFT-LCD Monitor
Owner's Guide to Operation

LCTV-2201A
COLOR TFT- LCD TV Monitor
OPERATION MANUAL
CONTENTS
……………3,4
……………5
………………………6
……………………7
……8
……………………9
……………10,11,12
……………………………17
…………………………16
……………………………15
…………………………14
…………………13
SAFETY PRECAUTIONS
SUPPLIED ACCESSORIES
PREPARATION
Remote Control
Cable Connection
LOCATION OF USERS CONTROL
BASIC OPERATION
Monitor Installation
OSD USAGE
Basic OSD usage
Basic Setup
PC Setup
Video Setup
……………………………………18
…………………………20
……21
…………………………22
TV Setup
PIP
OSD Setup
Before Calling for repair service
LCTV-2201A
Available PC VGA Mode ……………23
SPECIFICATIONS
…………………………………19
Zoom

SAFETY PRECAUTIONS
Improper use can result in electric shock and/or fire. In order to prevent potential danger,
please observe the following instructions when installing, operating and cleaning the
product. To ensure your safety and prolong the service life of your color TFT-LCD TV
monitor product, please read the following precautions carefully before using the product.
ŊAll operating instructions must be read and understood before the product is operated.
ŊThese safety and operating instructions must be kept in safe place for future reference.
ŊAll warnings on the product and in the instructions must be observed closely.
ŊAll operating instructions must be followed.
ŊDo not use attachments not recommended by the manufacturer. Use of inadequate attachments
can result in accidents.
ŊThis product must be operated on a power source specified on the specification label. If you are
not sure of the type of power supply used in your home, consult your dealer or local power
company. For units designed to operate on batteries or another power source, refer to the
operating instructions.
ŊThe power cords must be routed properly to prevent people from stepping on them or objects
from resting on them. Check the cords at the plugs and product.
ŊIf you plan to use a 12V DC power supply unit other than the AC adapter supplied with the
product, make sure the power supply unit provides stable voltage with minimum fluctuations.
ŊDo not overload AC outlets or extension cords. Overloading can cause fire or electric shock.
ŊNever insert an object into the product through vents or openings. High voltage flows in the
product, and inserting an object can cause electric shock and/or short internal parts. For the
same reason, do not spill water or liquid on the product.
ŊDo not attempt to service the product yourself. Removing covers can expose you to high voltage
and other dangerous conditions. Request a qualified service person to perform servicing.
ŊIf any of the following conditions occurs, unplug the power cord from the AC outlet, and request
a qualified service person to perform repairs.
a. When the power cord or plug in damaged.
b. When a liquid was spilled on the product or when objects have fallen into the product.
c. When the product has been exposed to rain or water.
d. When the product does not operate properly as described in the operating instructions.
Do not touch the controls other than those described in the operating instructions.
Improper adjustment of controls not described in the instructions can cause damage,
which often requires extensive adjustment work by a qualified technician.
e. When the product has been dropped or damaged.
f. When the product displays an abnormal condition. Any noticeable abnormality in the
product indicates that the product needs servicing.
ŊIn case the product needs replacement parts, make sure that the service person uses placement
parts specified by the manufacturer, or those with the same characteristics and performance as
the original parts. Use of unauthorized parts can result in fire, electric shock and/or other danger.
ŊUpon completion of service or repair work, request the service technician to perform safety
checks to ensure that the product is in proper operating condition.
ŊWhen mounting the product on a wall or ceiling, be sure to install the product according to the
method recommended by the manufacturer.
3


SAFETY PRECAUTIONS(Continued)
ŊUnplug the power cord from the AC outlet before cleaning the product. Use a damp cloth to
clean the product. Do not use liquid cleaners or aerosol cleaners.
ŊUnplug the power cord from the AC outlet if you do not use the product for considerably long
time.
ŊDo not use the product near water, such as bathtub, washbasin, kitchen sink and laundry tub,
swimming pool and in a wet basement.
ŊKeep the product away from direct rays of the Sun-light.
ŊDo not place the product on an unstable cart, stand, tripod or table. Placing the product on an
unstable base can cause the product to fall, resulting in serious personal injuries as well as
damage to the product. Use only a cart, stand, tripod, bracket or table recommended by the
manufacturer or sold with the product. When mounting the product on a wall, be sure to follow
the manufacturer's instruction. Use only the mounting hardware recommended by the
manufacturer.
ŊWhen relocating the product placed on a cart, it must be moved with the utmost care. Sudden
stops, excessive force and uneven floor surface can cause the product to fall from the cart.
ŊThe vents and other openings in the cabinet are designed for ventilation. Do not cover or block
these vents and openings since insufficient ventilation can cause overheating and/or shorten
the life of the product. Do not place the product on a bed, sofa, rug or other similar surface,
since they can block ventilation openings. This product is not designed for built-in installation;
do not place the product in an enclosed place such as a bookcase or rack, unless proper
ventilation is provided or the manufacturer's instructions are followed.
ŊThe LCD panel used in this product is made of glass. Therefore, it can break when the product
is dropped or applied with impact. Be careful not to be injured by broken glass pieces in case
the LCD panel breaks.
ŊKeep the product away from heat sources such as radiators, heaters, stoves and other heat-
generating products (including amplifiers).
ŊThe LCD Panel is a very high technology product with 4,915,200 thin film transistors, giving you
fine picture details. Occasionally, a few non-active pixels may appear on the screen as a fixed
point of blue, green or red. Please note that this does not affect the performance of your
product.
4

TM390 ... XGA
TM400 ... SXGA
LCTV-2201A
TFT-LCD Monitor
SUPPLIED ACCESSORIES
Make sure the following accessories are provided with the product.
Operation Manual (x1) Monitor Driver Diskette (x1)
Remote Control (x1)
Wall Mount Bracket (x1) Screws (x4)
Wall Mount Latch(x1)
PC VGA Cable (x1) PC Stereo Cable (x1) Video Sound Cable (x1)
S-Video Cable (x1)
Composite Video Cable (x1)
Option
AC Adapter (x1)
AC Cord (x1)
Size AAA Battery (x2)
5
Option
Owner's Guide to Operation

PREPARATION
Improper use of batteries can result in a leakage of chemicals and/or explosion. Be sure to follow
the instructions below.
• Place batteries with their terminals corresponding to the (+) and (-) indications.
• Different types of batteries have different characteristics. Do not mix batteries of different types.
• Do not mix old and new batteries. Mixing old and new batteries can shorten the life of new
batteries and/or cause old batteries to leak chemicals.
• Remove batteries as soon as they are non-operable. Chemicals that leak from batteries can
cause a rash. If chemical leakage is found, wipe with a cloth.
• The batteries supplied with the product may have a shorter life expectancy due to storage
conditions.
• If the remote control is not used for an extended period of time remove batteries from the
remote control
1 Open the battery cover.
Batteries for Remote Control
If the remote control fails to operate LCD TV Monitor functions, replace the batteries in the remote
control.
2 Insert batteries (two Size-AAA batteries, Supplied with product).
3Close the battery cover
ŊPlace batteries with their terminals corresponding to the (+) and (-) indications in the
battery compartment.
Remote Control
ŊUse the remote control by pointing it towards the remote sensor window.
Objects between the remote control and sensor window may prevent proper operation.
Cautions regarding batteries
!
Cautions regarding use of remote control
ŊDo not expose the remote control to shock. In addition, do not expose the remote control to
liquids, and do not place in an area with high humidity.
ŊDo not install or place the remote control under direct sunlight. The heat may cause deformation
of the unit.
ŊThe remote control may not work properly if the remote sensor window of the main unit is under
direct sunlight or strong lighting. In such case, change the angle of the lighting or LCD TV
monitor set, or operate the remote control closer to the remote sensor window.
!
6

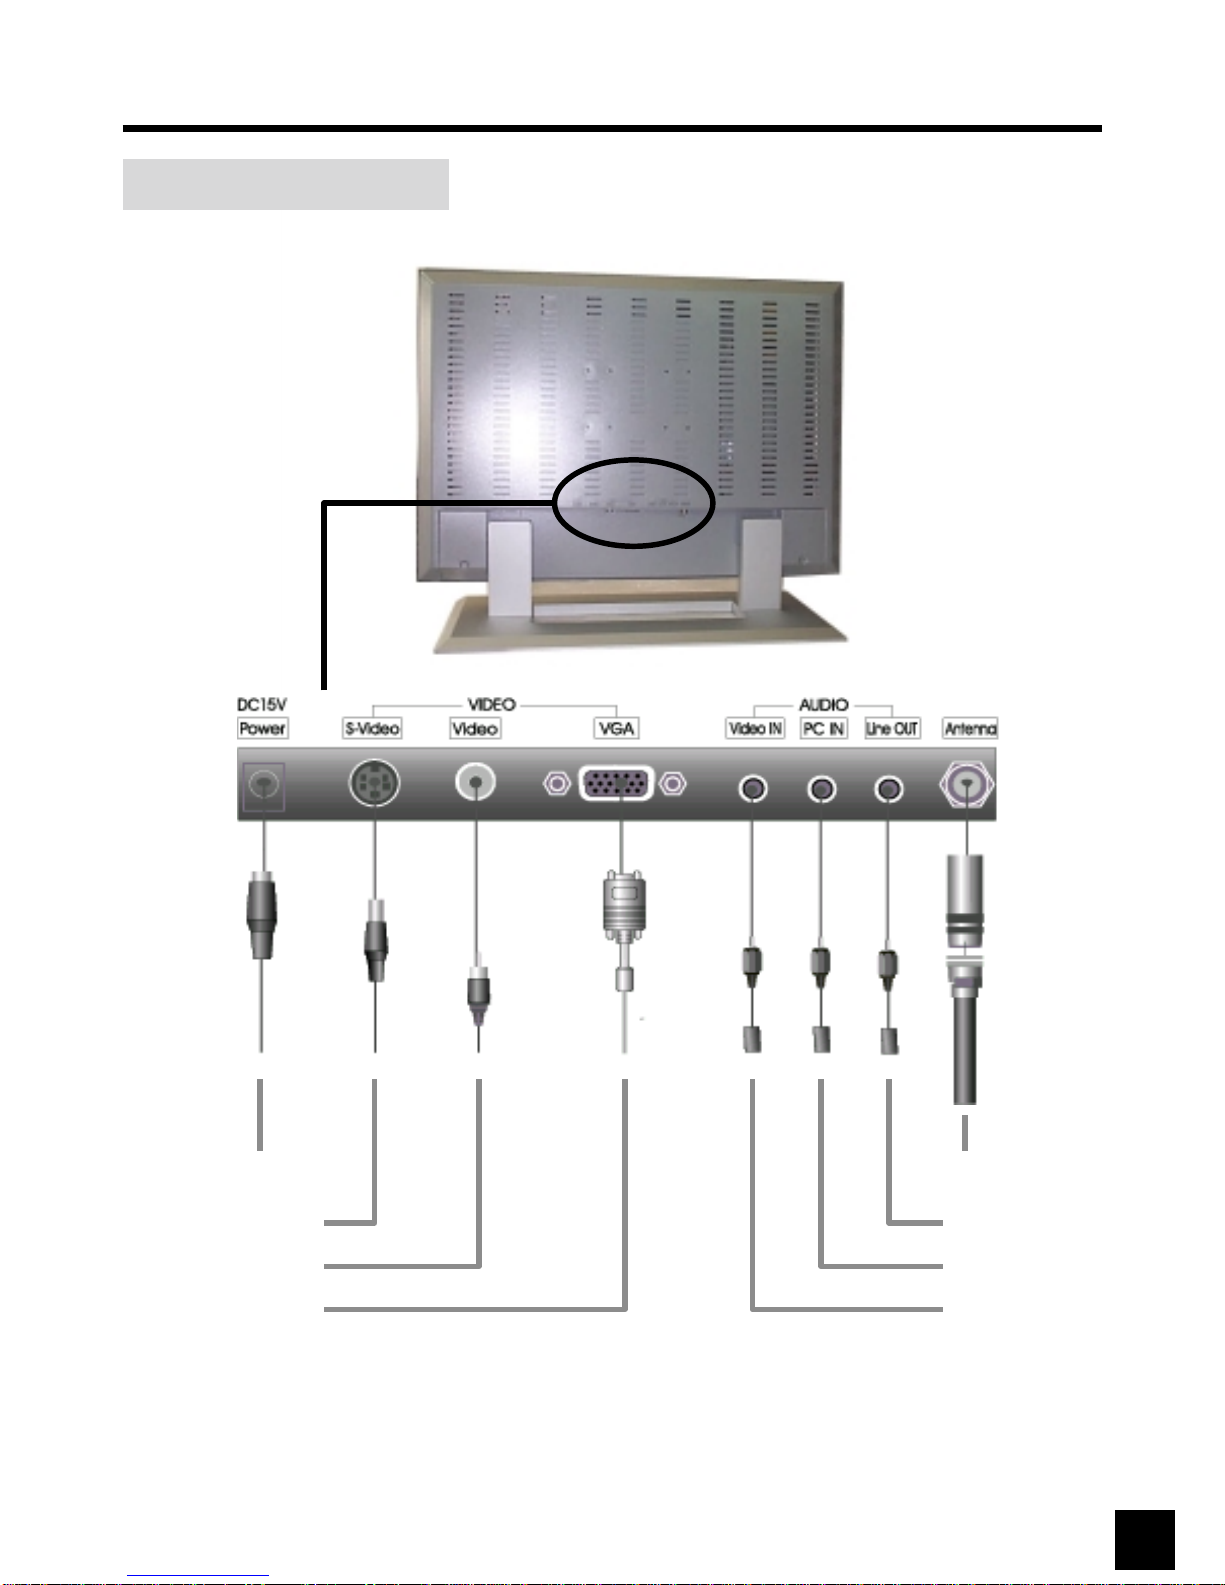
PREPARATION(Continued) Cable Connection
ANALOG RGB (PC)
VIDEO
S-VIDEO
Power input (DC 15V)
VIDEO SOUND
PC SOUND
Sound out
TV Antenna
Rear view of main unit
7

LOCATION OF USERS CONTROL
Control Panel (C/P) on the front of main unit
Remote control (R/C)
Power
Channel select
Auto Program
Menu
Sound mute
Press - Stops sound
Press again -
Returns sound to
previous level.
Signal source select
Select item
Display
Press - Display receiving channel
number at TV mode or signal
source name at another mode.
Press again - Removes displayed
channel number.
Exit - Exit the OSD menu or move
to previous menu.
Ch (ŏ
ŏŏ
ŏ)/(ő
őő
ő)
ŏSelects next higher channel.
őSelects next lower channel.
Vol (ŏ
ŏŏ
ŏ)/(ő
őő
ő)
ŏIncrease volume (up)
őDecrease volume (down)
Power
Menu
Signal source select
Power Indicator
Channel up / Move up
8
Channel Add / Erase
Press - Memory current channel
Press again - Erase current channel
Press to select channels over 99
- Channel number 100 ~ 125
Menu Source ő
őő
őCH ŏ
ŏŏ
ŏő
őő
őVOL ŏ
ŏŏ
ŏ
Channel down / Move down
Decrease volume
Increase volume

BASIC OPERATION
POWER On / Off / Standby
1Press the Power button to turn on the main unit.
2The power indicator lights green.
3Press again the Power button to turn off.
Switching PC / TV / VIDEO / S-VIDEO Mode
1Press the PC/TV to
select TV mode.
Press the PC/TV
again to select PC
mode.
Remote Control (R/C)
1Press the Source to
display OSD menu for
source select.
3Press the Menu to select
the source.
Ŋ
ŊŊ
Ŋby Control Panel (C/P)
4If you don't want to change
source, select Exit or
current source.
2Press the Video to
select composite
video mode.
3Press the S-Video
to select separate
video mode.
2Press the Chŏ
ŏŏ
ŏ/ő
őő
őto move
the cursor to the desired
selected source.
S-Video
Video
PC/TV
Control Panel (C/P)
Ŋ
ŊŊ
Ŋby Remote Control (R/C)
1Press the Power button to turn on the main unit.
2Power indicator changes from red to green.
3Press again the Power button then the power
indicator changes from green to red and main
unit turns into standby mode.
Available Mode Ŋ
ŊŊ
ŊYes / ŋ
ŋŋ
ŋNo
Ŋ
ŊŊ
ŊPC Ŋ
ŊŊ
ŊVideo Ŋ
ŊŊ
ŊS-Video Ŋ
ŊŊ
ŊTV
Power
Power Indicator
9
After power failure, press source button of C/P to restore display
or press the power button of R/C
Note:

3Select [Settings] in [Display Properties]
window.
4Click [Advanced...].
5Select [Monitor] in the window shown
above.
6Set [Refresh Frequency:] at 60Hz.
7Finally, click [Properties].
1Double click [Control Panel ] icon
from [My Computer] folder.2Double click [Display] icon from
[Control Panel] folder.
Monitor Installation Available Mode Ŋ
ŊŊ
ŊYes / ŋ
ŋŋ
ŋNo
Ŋ
ŊŊ
ŊPC ŋ
ŋŋ
ŋVideo ŋ
ŋŋ
ŋS-Video ŋ
ŋŋ
ŋTV
10
Inhaltsverzeichnis