
Lumberjack YTL-590-111 Bedienungsanleitung

9 TON LOG SPLITTER
INSTRUCTION MANUAL
ASSEMBLY AND OPERATING INSTRUCTIONS
This safety alert symbol identifies important safety messages in
this manual. Failure to understand and follow safety, assembly
and operating instructions could result in serious injury or death.
REV100821 LS0900

‐2‐
Table of Contents
Important Safety Information..................................................................................................... 3-5
Intended Use................................................................................................................3
Personal Protective Equipment........................................................................................ 3
General Safety.................................................................................................................. 4
Work Area.......................................................................................................................... 4
Preparing Logs for the Splitter............................................................................................ 4
Operation of the Log Splitter............................................................................................... 4
General Repair............................................................................................... 4
Maintenance Safety......................................................................................... 5
Fire Prevention.................................................................................................................... 5
Safe Transport..................................................................................................................... 5
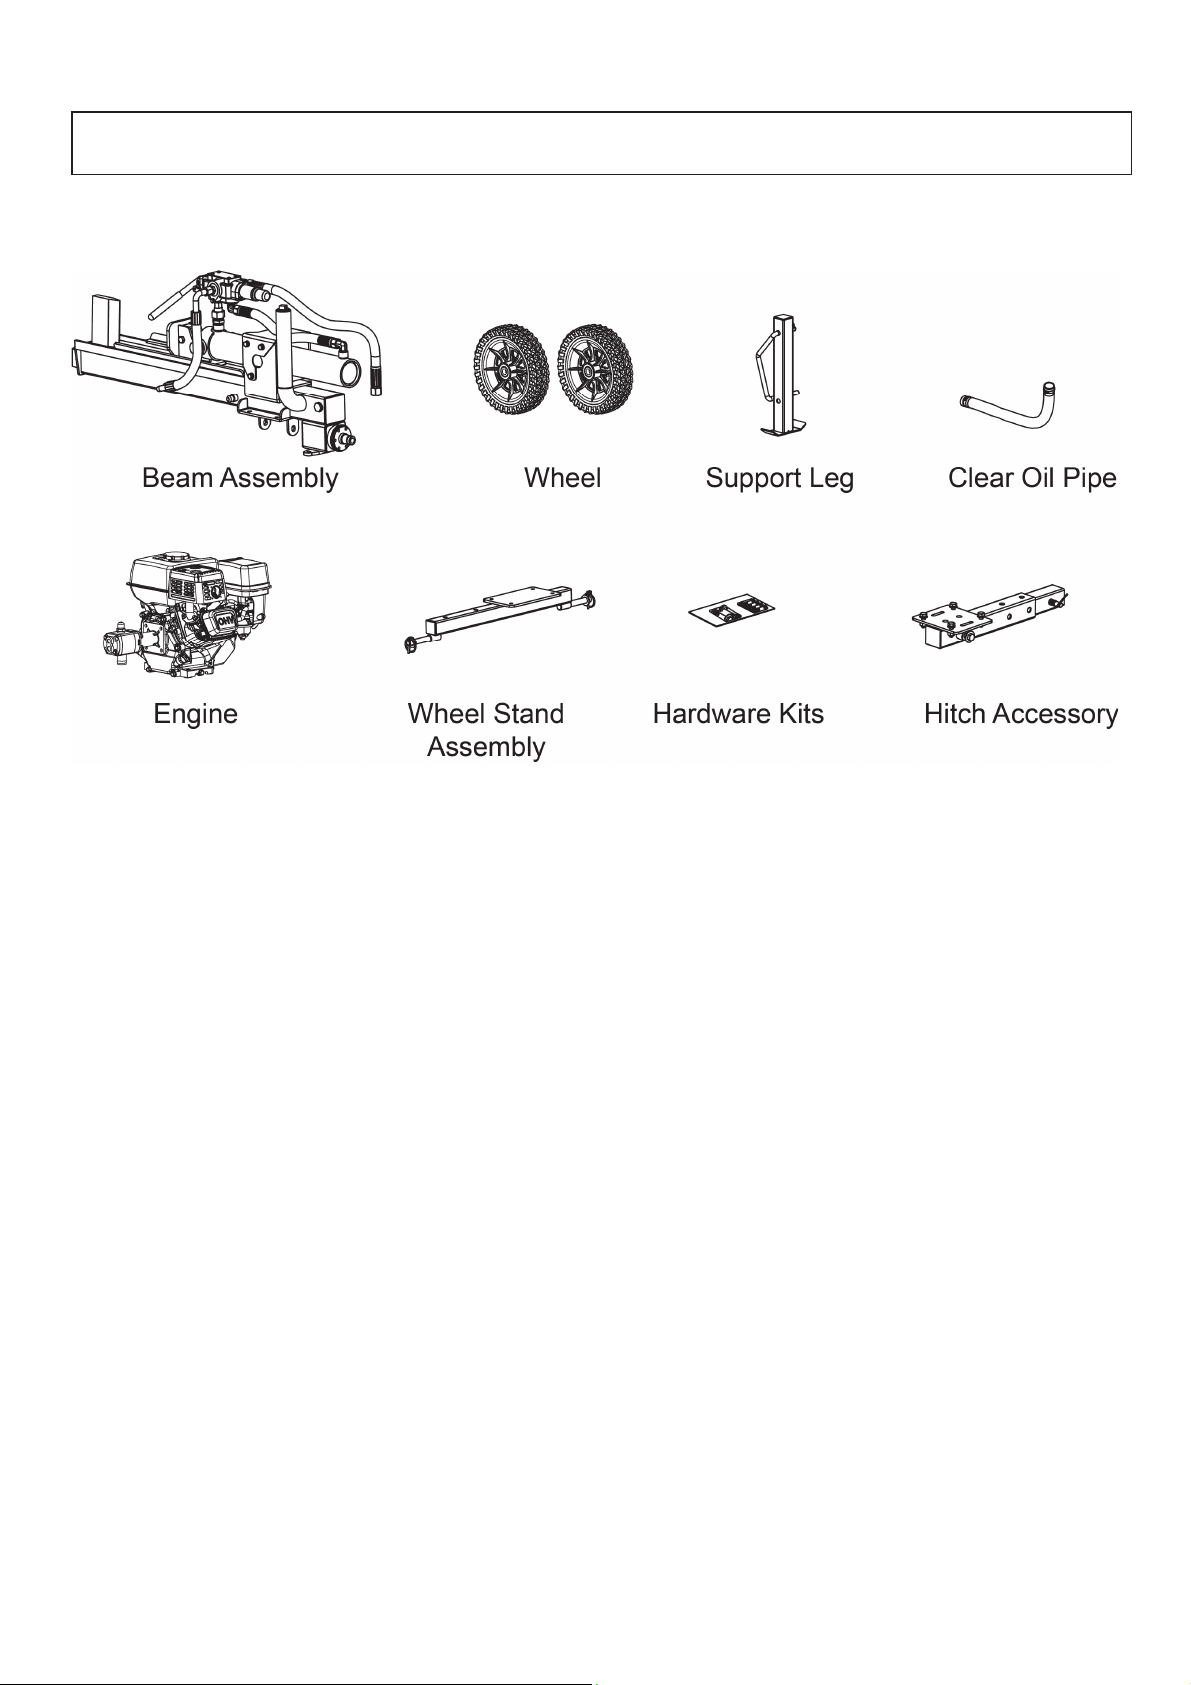
Package Contents................................................................................................................. 6
Assembly Instructions................................................................................................................. 7-12
Controls and Features Identification…………………………………………………………………….13
Operating Instructions............................................................................................................. 14-16
Maintenance and Storage............................................................................................................. 17
Troubleshooting…………...........................................................................................................18-20
Specifications................................................................................................................................ 21
Drawing and Parts List.............................................................................................................. 22-24
Limited Warranty………….............................................................................................................. 25

‐3‐
WARNING: Read and understand all instructions and safety information in this manual and on
safety decals before assembling and/or operating the log splitter. Failure to understand and follow
all instructions and safety information may result in serious injury or death. Persons who have not
read the manual should never operate the log splitter. A log splitter can be dangerous when
assembled and/or used improperly. Do not operate the log splitter if you have any questions
concerning safe operation. Please call the customer support department at 1-888-723-6534 for
answers to any questions regarding safe operation of the log splitter.
WARNING: This product can expose you to chemicals including lead and lead compounds which are
known to the State of California to cause cancer and birth defects or other reproductive harm. For
more information, go to www.P65Warnings.ca.gov
INTENDED USE
NEVER use the log splitter for any purpose besides splitting wood. The log splitter is designed only for splitting wood.
Using the log splitter for any other purpose can result in serious injury or death and may void the warranty.
PERSONAL PROTECTIVE EQUIPMENT
BEFORE operating the log splitter always be sure to put on appropriate safety gear, including eye protection
(goggles), steel-toed shoes and tight-fitting gloves (avoid loose cuffs and draw strings). Also, the use of proper hearing
protection (headphones) is required when operating the log splitter.
SAFETY DECALS
ALWAYS check that all safety warning decals are in good condition and readable. Immediately replace any missing or
damaged decals. Please call the customer support department at 1-888-723-6534 to obtain replacement decals.
DANGER
WARNING
CAUTION
IMPORTANT SAFETY INFORMATION
DANGER indicates a hazardous situation which, if
not avoided, will result in serious injury or death.
WARNING indicates a hazardous situation which, if
not avoided, could result in serious injury or death.
CAUTION indicates a hazardous situation which, if
not avoided, could result in minor or moderate injury.
NOTICE is used to address important information not
related to personal injury.
This is the safety alert symbol. It is used to alert you to
potential personal injury hazards. Obey all safety messages
that follow this symbol to avoid possible injury or death.
NOTICE

‐4‐
GENERAL SAFETY
• ALWAYS keep the operator’s manual in the canister for reference. Review the manual periodically and whenever
questions arise.
• ALWAYS keep all bystanders and pets a minimum of 10 feet away from your work area when operating the log
splitter. Only the operator should be near the log splitter during use.
• NEVER activate the control valve until all people are clear of the work area.
• NEVER wear loose clothing or jewelry when operating the log splitter. Keep clothing and hair away from all moving
parts when operating the log splitter.
• NEVER allow adults without proper instruction and operational knowledge to use the log splitter.
• NEVER operate the log splitter when under the influence of drugs, alcohol or medication or when otherwise not
alert enough to operate the log splitter.
• DO NOT allow children to play on, stand upon, climb on or operate the log splitter at any time.
WORK AREA
• NEVER operate the log splitter on wet, icy, slippery or unstable ground.
• NEVER operate the log splitter in an enclosed area. Exhaust fumes
contain the deadly poison carbon monoxide.
• ONLY operate the log splitter with adequate lighting in the work area.
• ONLY operate the log splitter on level ground. Operating on a slope may
cause the log splitter to move and/or logs to
fall off the log splitter.
• ALWAYS keep the work area free of debris. Remove any split wood
around the log splitter immediately to avoid tripping.
PREPARING LOGS FOR THE SPLITTER
Before placing logs on the log splitter, log ends should be cut as squarely as possible. The square shape of the log
helps prevent the logs from moving during splitter operation. The maximum log length is 20 inches.
OPERATION OF THE LOG SPLITTER
• ONLY operate the log splitter from the operator zone as shown in the diagram. Operating the log splitter outside the
operator zone can result in serious injury or death.
• ALWAYS chock the wheels to prevent the log splitter from moving while operating the log splitter.
• ALWAYS know how to stop the log splitter and disengage the controls before operating the log splitter.
• NEVER attempt to split a log against the grain.
• NEVER attempt to split two logs at the same time.
• NEVER step over the log splitter during operation.
• NEVER reach or bend over the log splitter to pick up a log while splitter is in use.
• NEVER attempt to load the log splitter when the wedge is in motion.
• NEVER place hands or feet between the log and splitting wedge during forward or reverse stroke, as this could result
in serious injury or death.
• NEVER use your foot, a rope or any extension device to operate the control lever on the valve. Only use hands to
operate the control levers.
• NEVER touch the muffler and other hot areas of the engine. Allow time for the engine to cool down before touching.
• NEVER move the log splitter while the engine is running.
• NEVER leave the log splitter running unattended, even for a short period of time. Before leaving the log splitter
always turn off the engine.
GENERAL REPAIR
• NEVER operate the log splitter if it is in poor mechanical condition or needs repairs.
• NEVER alter/modify the log splitter as any alterations/modifications may make the log splitter unsafe and void the
warranty.
• NEVER perform any service or repair on the log splitter without first removing the spark plug wire.
• NEVER tamper with the engine settings. The maximum engine speed is preset by the manufacturer and conforms
with safety limits. Refer to the engine owner’s manual for the particular log splitter.
• ALWAYS perform all recommended maintenance procedures before using the log splitter.
• ALWAYS check the level of hydraulic oil and engine oil before operating the log splitter.
• NEVER attempt to remove stuck logs while the log splitter is running.
• ALWAYS replace all damaged or worn parts immediately with parts approved by the manufacturer.
• ALWAYS check regularly that all nuts, bolts, screws, hydraulic fittings and hose clamps are tight.
• ALWAYS be sure any and all replacement parts meet the manufacturer’s specifications.
IMPORTANT SAFETY INFORMATION

‐5‐
MAINTENANCE AND SAFETY
• The mechanical and hydraulic systems of the log splitter require careful inspection. Be sure to replace any damaged
hydraulic hoses or components immediately to ensure safe operation of the log splitter.
• NEVER check for leaking hydraulic fluid by using your hands. Leaking hydraulic fluid under pressure can potentially
penetrate the skin causing SERIOUS INJURY or even DEATH. Leaks can be safely detected by holding a piece of
cardboard over the suspected leak and looking for discoloration.
• NEVER remove the cap from the hydraulic tank while the log splitter is running. The tank contains hot oil under
pressure which could cause serious injury if released from the tank.
• NEVER adjust the relief valve setting on the log splitter. The pressure relief valve on the log splitter is preset by the
manufacturer. Only a qualified service technician should perform any adjustments.
• ALWAYS immediately seek medical attention if injured by escaping hydraulic fluid. Serious infections or reactions
can develop if proper medical treatment is not quickly administered.
• ALWAYS check the system is not under any pressure by shutting off the engine and moving the valve control handle
back and forth. Check for pressure before loosening or removing any hydraulic fitting.
• ALWAYS keep the beam and wedge free of debris buildup.
FIRE PREVENTION
• ONLY refuel the log splitter in clear areas with no gas fumes and no spilled gas.
• NEVER operate the log splitter near flames, sparks or smoke. Hydraulic oil and gasoline are flammable and
potentially explosive.
• NEVER add fuel to the log splitter while the engine is hot or running. Allow the engine to cool completely before
refueling.
• If gasoline spills, move the log splitter away from the area of the spill and avoid creating any source of ignition.
• ALWAYS securely replace the gas cap.
• ALWAYS clean wood debris from the muffler area of the engine.
• ALWAYS store gasoline in an appropriate, tightly sealed container. Store the gas container in a cool, dry place and
away from any heat sources.
IMPORTANT NOTE: SPARK ARRESTOR-REGULATION:
As a precautionary measure against possible flying sparks, always have a Class B fire extinguisher on hand when
operating the log splitter in dry areas. The log splitter is equipped with an internal combustion engine that generates
heat and potential flying sparks. Only use the log splitter on or near any unimproved, forest-covered, brush-covered or
grass-covered land if the engine’s exhaust system is equipped with a spark arrester in compliance with any applicable
local or state laws. Spark arresters should be effectively maintained and serviced. In the state of California, a spark
arrester is required by law and other states have similar laws. Federal laws will apply when operating the log splitter
on federal land. Always research and comply with applicable state, local and federal laws and regulations. A spark
arrester muffler is optional and available as an accessory at your nearest engine dealer.
SAFE TRANSPORT
• NEVER tow the log splitter behind a vehicle as the wheels and log splitter orientation are incompatible with towing.
Attempting to tow the log splitter may damage or destroy the wheels or other parts of the log splitter.
• To safely transport the log splitter secure it on top of a trailer or other transporting vehicle.
• NEVER move the log splitter over hilly or uneven terrain without the proper vehicle and adequate help for safe
movement.
• NEVER exceed the weight capacity of hitch or load limits of the transporting vehicle.
• ALWAYS use caution when transporting the log splitter and check carefully that the log splitter is securely attached
to the transporting vehicle.
• ALWAYS confirm hitch accessory tightness before and after transporting the log splitter.
• ALWAYS disconnect the log splitter from the carrying vehicle before operating.
• ALWAYS check for and replace a damaged hitch.
• ALWAYS turn the fuel shut off valve on the engine to the “OFF” position before transporting the log splitter. Failure
to turn off the engine before transport can flood the engine and damage the engine.
IMPORTANT SAFETY INFORMATION
‐6‐
PACKAGE CONTENTS

‐7‐
TOOLS REQUIRED
Screw Driver
Hammer
Band Cutter
13mm, 17mm and 24mm Wrenches
Large Adjustable Wrench
STEP 1: Attach the Wheel Stand Assembly to the Beam Assembly
1.1 Remove the valve handle fix pin from the valve, then reinstall the pin with the handle in a vertical
position.
1.2 Attach the wheel stand assembly (#21) to the beam assembly using the hex bolts M10x65 (#46), large
flat washers Ø10 (#47), flat washers Ø10 (#26) and the lock nut M10 (#29).
STEP 2: Attach the Wheels
2.1 First remove the O lock ring (#45) and the flat washer Ø16 (#20), then attach the wheel (#1) to the
wheel stand (#21) using the flat washer Ø16 (#20) and the O lock ring (#45). Repeat the same
process on other side to attach the second wheel.
Note: The protruding part is on the inside of the wheel.
A
SSEMBLY INSTRUCTIONS
‐8‐
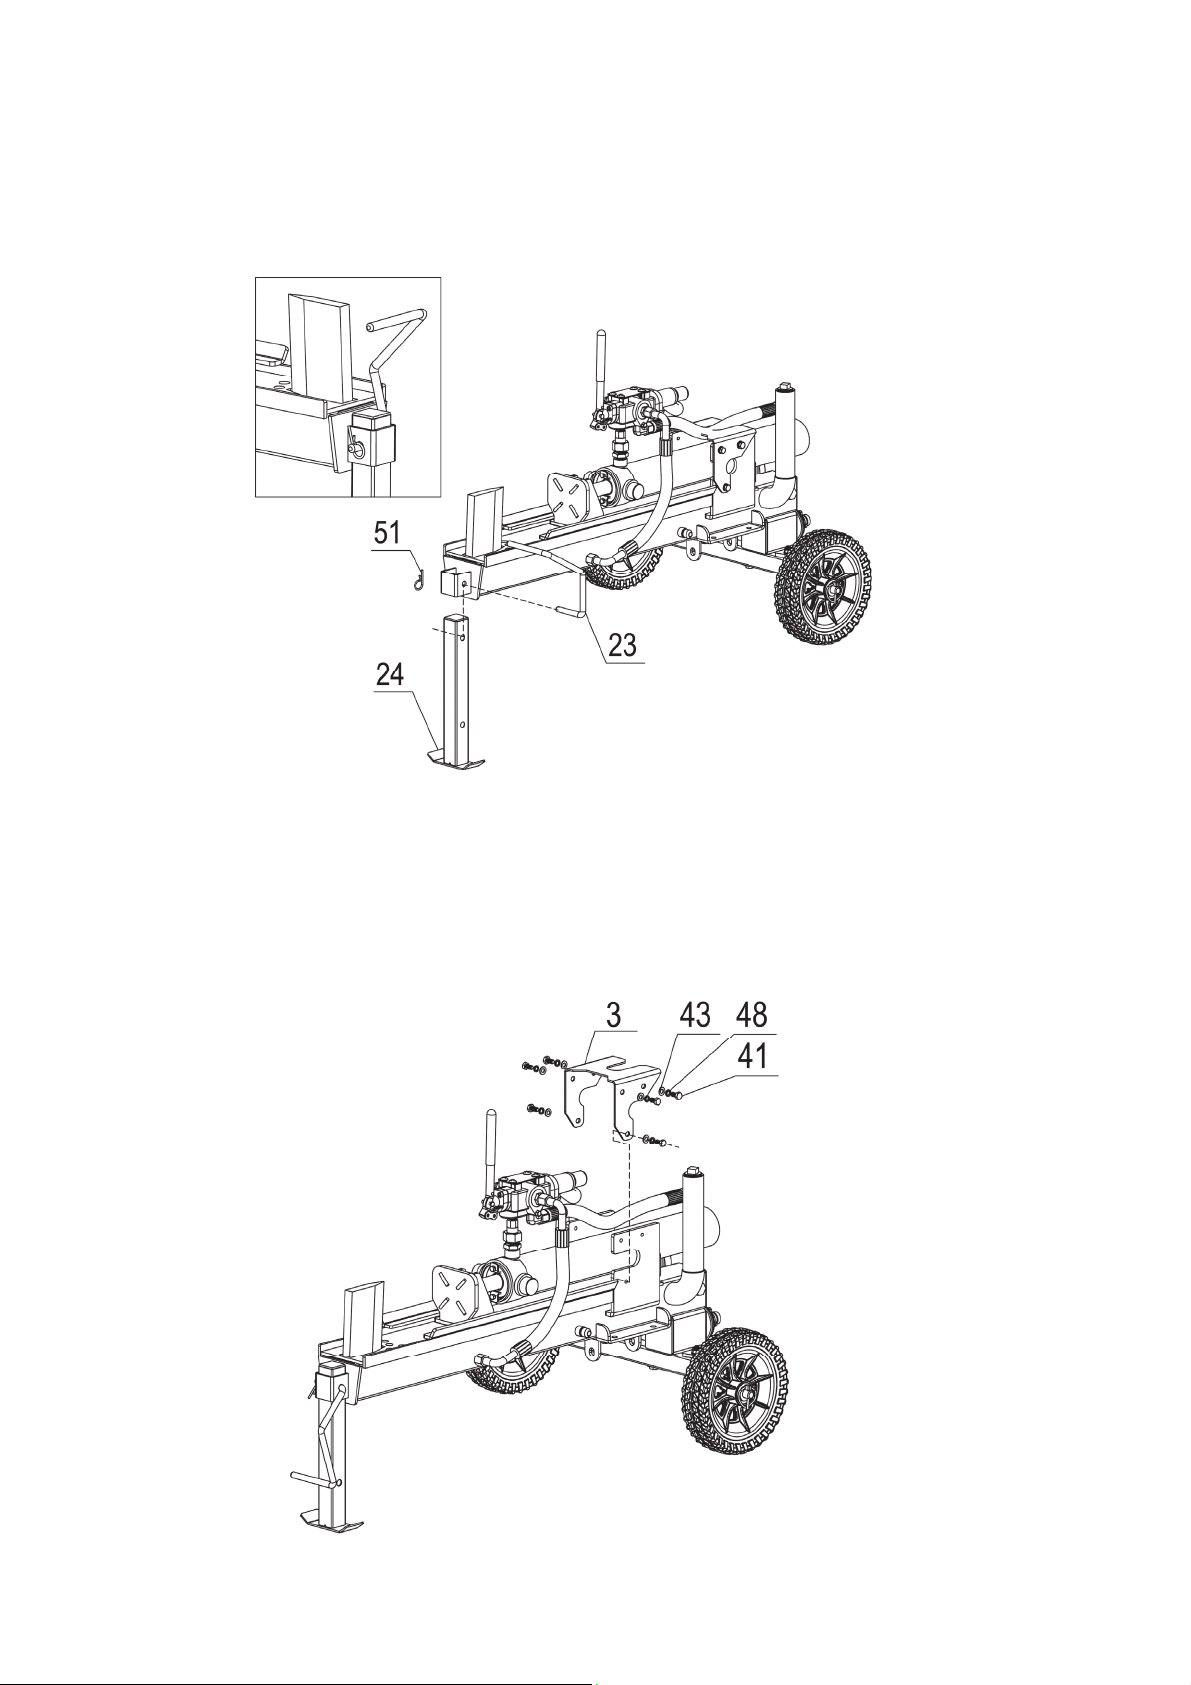
STEP 3: Attach the Support Leg
3.1 Attach the support leg (#24) to the square tube on the beam assembly, then insert the handle (#23)
into the hole in the direction shown in the figure. Finally, insert the R pin (#51) from the bottom up into
the hole to secure the leg.
STEP 4: Remove the Cylinder Cover
4.1 Remove the cylinder cover (#3) from the beam assembly. Do NOT discard the hex bolt M8x16 (#41),
the lock washer Ø8 (#48) or the flat washer Ø8 (#43).
‐9‐
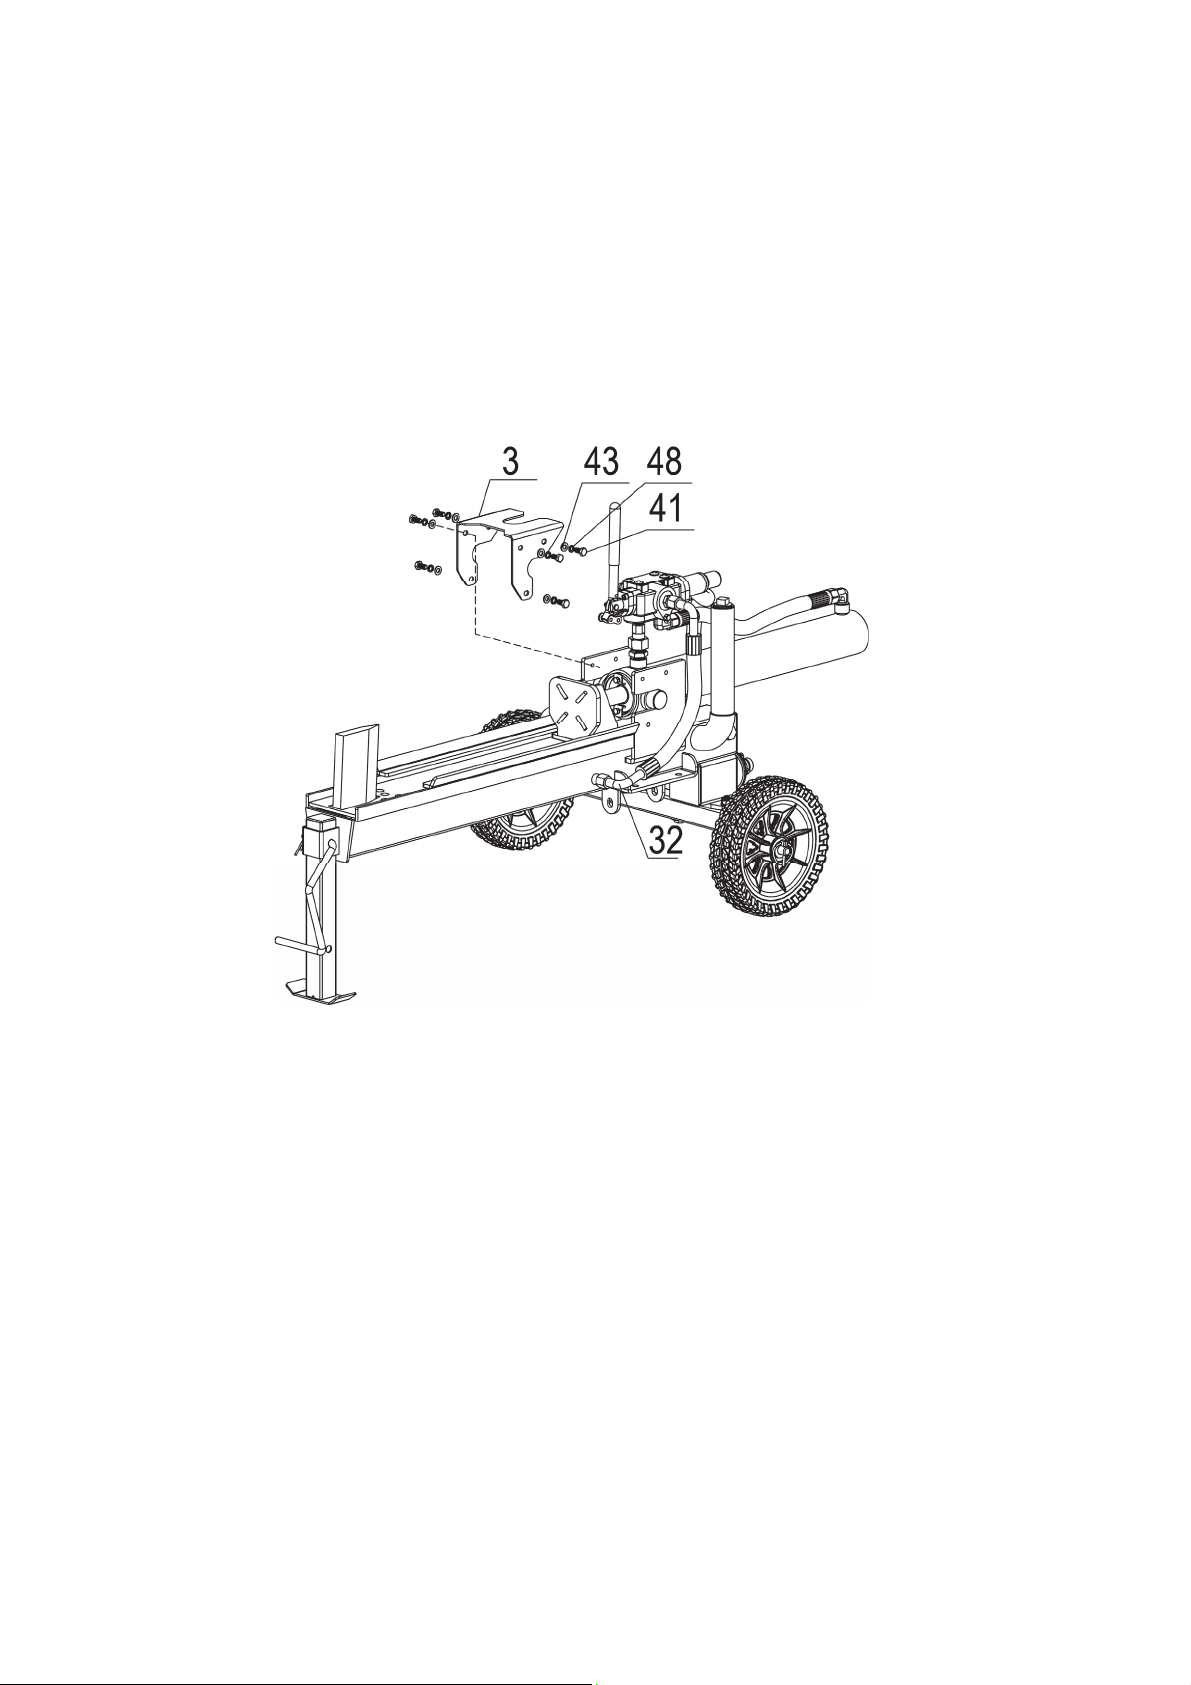
STEP 5: Attach the Cylinder Cover and the Hydraulic Hose
5.1 Pull the cylinder assembly back until the two mounting ears on the cylinder snap into the groove, then
re-install the cylinder cover (#3) into its’ original position and tighten it with the hex bolt M8x16 (#41),
the lock washer Ø8 (#48) and the flat washer Ø8 (#43).
5.2 Remove the plug from the hydraulic hose, then install the hydraulic hose (#32) onto the beam. To
properly attach the hose, screw in a few teeth by hand into the correct location then tighten it with a
wrench.
A small amount of oil may leak from the hoses when the plugs are removed. To prevent oil
from dripping on the ground, use a small pail to catch any oil and put down cardboard.
STEP 6: Attach the Engine to the Mounting Plate
6.1 Attach the engine (#20) to the mounting plate using the hex bolt M8x40 (#49), the flat washer Ø8
(#43), the lock washer Ø8 (#48) and the lock nut M8 (#27).
6.2 Remove the plugs from the hydraulic hose and the gear pump connector. Attach the hydraulic hose
(#34) to the connector of the gear pump (#44). When attaching the hose hand screw in a few teeth
then tighten it with a wrench.
6.3 Remove the plug from the gear pump connector, then attach one side of the clear oil pipe (#31) to the
connector of the gear pump (#44). Remove the film bag from the opening of the oil filter mounting
plate, then attach the other side of the clear oil pipe to the opening of the oil filter mounting plate.
Secure the clear oil pipe with the clamp (#15).

‐10‐
STEP 7: Add Engine Oil
7.1 Make sure the log splitter is on a flat, level surface.
7.2 Remove the oil fill cap/dipstick before adding the engine oil.
7.3 Refer to the separate owner’s engine manual to determine the amount of SAE10W-30 engine oil
needed; add the correct amount of engine oil and replace the oil fill cap/dipstick.
7.4 Check the engine oil level daily and add more engine oil to maintain proper levels as needed.
NOTE: During the break-in period, engine may use oil quickly so check the engine oil level often.
CAUTION
DO NOT attempt to crank or start the engine before properly filling with the recommended type
and amount of engine oil. Failure to follow instructions regarding engine oil may damage or
destroy the log splitter and will void the log splitter’s warranty.
Inhaltsverzeichnis
Andere Lumberjack Holzspalter Handbücher

Beliebte Holzspalter Handbücher anderer Marken


Scheppach
Scheppach OX 3-1000 Montageanleitung

Swisher
Swisher 21200 Bedienungsanleitung

Elem Garden Technic
Elem Garden Technic FBHT65-22TCH Bedienungsanleitung

Champion Power Equipment
Champion Power Equipment 90720 Handbuch

Boss Industrial
Boss Industrial ES5T20 Bedienungsanleitung

Villager
Villager LSP 12 T Bedienungsanleitung


