
Lyngdorf Audio MP-40 Bedienungsanleitung

[Skriv tekst]
August 2018
LYNGDORF AUDIO MP-40
OWNER’S
MANUAL

2
Table of contents
Compliance ......................................................................................................... 4
Introduction ......................................................................................................... 5
Pre-installation .................................................................................................... 6
Unpacking the product .................................................................................... 6
Inventory .......................................................................................................... 6
Operating voltage ............................................................................................ 6
Ventilation requirements .................................................................................. 6
Home automation system integration ................................................................. 7
IP control ............................................................................................................. 7
Preparing the MP-40 for mounting in a rack ....................................................... 7
Rear Panel .......................................................................................................... 8
Remote control .................................................................................................... 9
How to pair remote control in RF mode ............................................................ 10
Switching remote between RF and IR mode .................................................... 10
Setup procedure ............................................................................................... 10
Installation via installer menu ............................................................................ 11
Installation via web interface ............................................................................. 11
HOME screen .................................................................................................... 11
SETUP .............................................................................................................. 12
Source ............................................................................................................... 12
Add/edit Source ................................................................................................ 12
Arrange ............................................................................................................. 13
Delete ................................................................................................................ 13
Speakers and room ........................................................................................... 13
RoomPerfect™ .................................................................................................. 16
Adjust subwoofer ........................................................................................... 17
How to set up RoomPerfect™ ....................................................................... 17
RoomPerfect™ preparations ......................................................................... 17
Placing the microphone in the focus position ................................................ 17
Volume setting ............................................................................................... 18

3
Measuring the focus position ......................................................................... 18
Measuring random room positions ................................................................ 18
Room measurements above 90% RoomKnowledge ..................................... 20
Video setup ....................................................................................................... 21
Video output .................................................................................................. 21
Video input ..................................................................................................... 22
Audio Setup ...................................................................................................... 22
Audio Processing ........................................................................................... 22
Voicing Setup .................................................................................................... 23
Creating voicings ........................................................................................... 24
Zone B setup ..................................................................................................... 25
System configuration ......................................................................................... 25
General setup ................................................................................................ 25
Trigger In setup ............................................................................................. 26
Trigger Out setup ........................................................................................... 26
Network configuration .................................................................................... 26
Streaming setup ............................................................................................ 27
Streaming playback ....................................................................................... 27
Factory Reset ................................................................................................ 28
Software Update ............................................................................................ 28
Troubleshooting ................................................................................................ 29
Network Setup ................................................................................................... 31
Connecting to MP-40 with a network cable ................................................... 31
Trademarks ....................................................................................................... 33
Service information ........................................................................................... 34
4
Compliance
WEEE
The European Parliament and the Council of the European Union have issued the Waste Electrical and
Electronic Equipment Directive. The purpose of the Directive is to prevent waste of electrical and electronic
equipment and to promote reuse, recycling, and other forms of waste recovery. Lyngdorf products and the
accessories packed with them are subject to the WEEE Directive. Please dispose of any waste materials in
accordance with your local recycling regulations. Products and equipment which must be collected for reuse,
recycling, and other forms of recovery are marked with the icon of the crossed-out waste receptacle.
FCC
Lyngdorf products and accessories comply with parts 15 and 68 of the FCC rules. Operation is subject to the
following two conditions: (1) this device may not cause harmful interference; and (2) this device must accept
any interference received, including any interference that may cause undesired operation.
Changes or modifications not expressly approved by the party responsible for compliance could void the
user’s authority to operate the equipment. Equipment marketed to a consumer must be capable of complying
with the necessary regulations in the configuration in which the equipment is marketed.

5
Introduction
The MP-40 is an advanced processor with full support of the latest Dolby® Atmos, DTS:X and Auro-3D®
surround sound formats. The processor can decode 10 discrete channels from the source and features 16
balanced XLR outputs for the discrete channels, additional subwoofer outputs as well as channels designed
as matrixed/mixed from the discrete channels. Whatever your setup is, the MP-40 will provide the optimal
performance due to its bass-management and room correction system, RoomPerfect™.
Both Dolby, DTS and Auro provides modes for processing legacy formats or for upmixing the sound into all
your speakers. This is referred to as POST PROCESSING, and it can be set on a Source or controlled from
your remote control.
The MP-40 will support any setup from the simplest stereo setup to the most advanced 3D surround setup,
and we have made great efforts for having a simple user interface, where all settings are displayed and
arranged for easy installation.
Please read through this manual for understanding the functions available – or as later reference. The latest
version of this manual is available for download from www.lyngdorf.com
Enjoy!

6
Pre-installation
Please read all material carefully prior to installation. If you need additional assistance, contact your Lyngdorf
Audio representative or visit www.lyngdorf.com.
Unpacking the product
Carefully remove the unit and accessory kit from the carton and check for shipping damage. Contact the
shipper and your Lyngdorf Audio representative immediately, if the unit bears any sign of damage.
Note: Keep the shipping carton and all packing material for future use. If this unit
is shipped for service without the original packing, damage could occur and void
the warranty.
Inventory
Check the list below to ensure that all necessary product components have been delivered. Report all
discrepancies to your Lyngdorf Audio representative immediately.
• Owner’s manual
• Power cord
• Remote
• Microphone
• Microphone stand
• Microphone cable
• Rack ears
Operating voltage
Lyngdorf Audio products must be connected to the mains power system only. The MP-40 will automatically
detect voltage between 100-240v.
Ventilation requirements
The MP-40 does not have a built-in fan, nor does it require special measures to ensure proper heat
dissipation. It should be placed according to these guidelines:
• It should always have at least one inch / 25mm of free space on all sides.
• It should be placed in an environment free of excessive heat.
• In a rack system, the MP-40 should be placed at the bottom of the rack, still with at least one inch /
25mm free space on all sides.

7
Home automation system integration
The MP-40 is compatible with home automation systems via the RS232 and network connector on the rear
socket panel. The MP-40’s IR and trigger connections can also be programmed for use in a home
automation system.
IP control
Access the MP-40 by going to http://mp40.local in your browser.
Pressing the OK button on the remote and toggling through the information, you will see the IP address
allocated to the MP-40.
Open a TCP connection on port 84 and use the same protocol as on the serial interface. Use Telnet, Putty,
or a similar program to open the TCP connection.
If you do not know the IP address of the MP-40 on your local network, the MP-40 supports Apple´s Bonjour
Discovery service, which must be on the computer with which you wish to set up the MP-40. The software is
built-in as part of the Apple OS X operating system (not iOS devices). For Windows operating systems, the
software can be found at http://www.apple.com/support/bonjour/
Preparing the MP-40 for mounting in a rack
The MP-40 processor is equipped from the factory with feet for free-standing placement.
To install the MP-40 in a rack:
1. Turn the MP-40 upside-down and place it on a stable, even surface.
2. The screws used to fasten the rack brackets to the bottom of the MP-40 are in the holes designated
for the brackets when the product leaves the factory.
3. Fasten the brackets for rack mounting to the MP-40.
4. If so required, the feet can be removed
5. Mount the MP-40 in a rack.

8
Rear Panel
On the back of the MP-40, you will find a range of inputs and outputs:
• 16 x Differential balanced audio outputs (configured for 11.1 plus 4 auxiliary)
• 3 x HDMI inputs and 1 x HDMI outputs, all 4K / HDR compatible (HDMI 2.0b / 18 Gbps)
• 1 x HDBaseT™ output
• 2 x USB A connectors, for music file playback, backup, software updating, etc.
• 1 x Streaming USB B audio input
• 1 x RJ45 Network connector (LAN)
• 1 x Microphone input for the RoomPerfect™ room correction microphone
• 1 x SD card slot for storing backup data
• 3 x IR inputs
• 1 x Trigger input and 4 x trigger outputs
• 1 x RS-232 connector for serial control of the unit
• 4 x Optical, 1 x AES/EBU and 3 coaxial digital audio inputs
• 1 x Coaxial digital audio output (for zone B)
Note: The processor can decode maximum 12 speaker channels plus create
additional four auxiliary channels, like subwoofer outputs or Top Middles as a mix
of Top Fronts and Top Rears.
Note: Differential balanced output connection means that PIN 1 is Shield/Ground,
PIN2 holds audio signal and PIN 3 holds an inverted audio signal. If your power
amplifier requires a single ended (RCA) connection, you must ensure that the
PIN 3 is disconnected (lifted). PIN 3 in the MP-40 connector may not be
connected to ground.
9
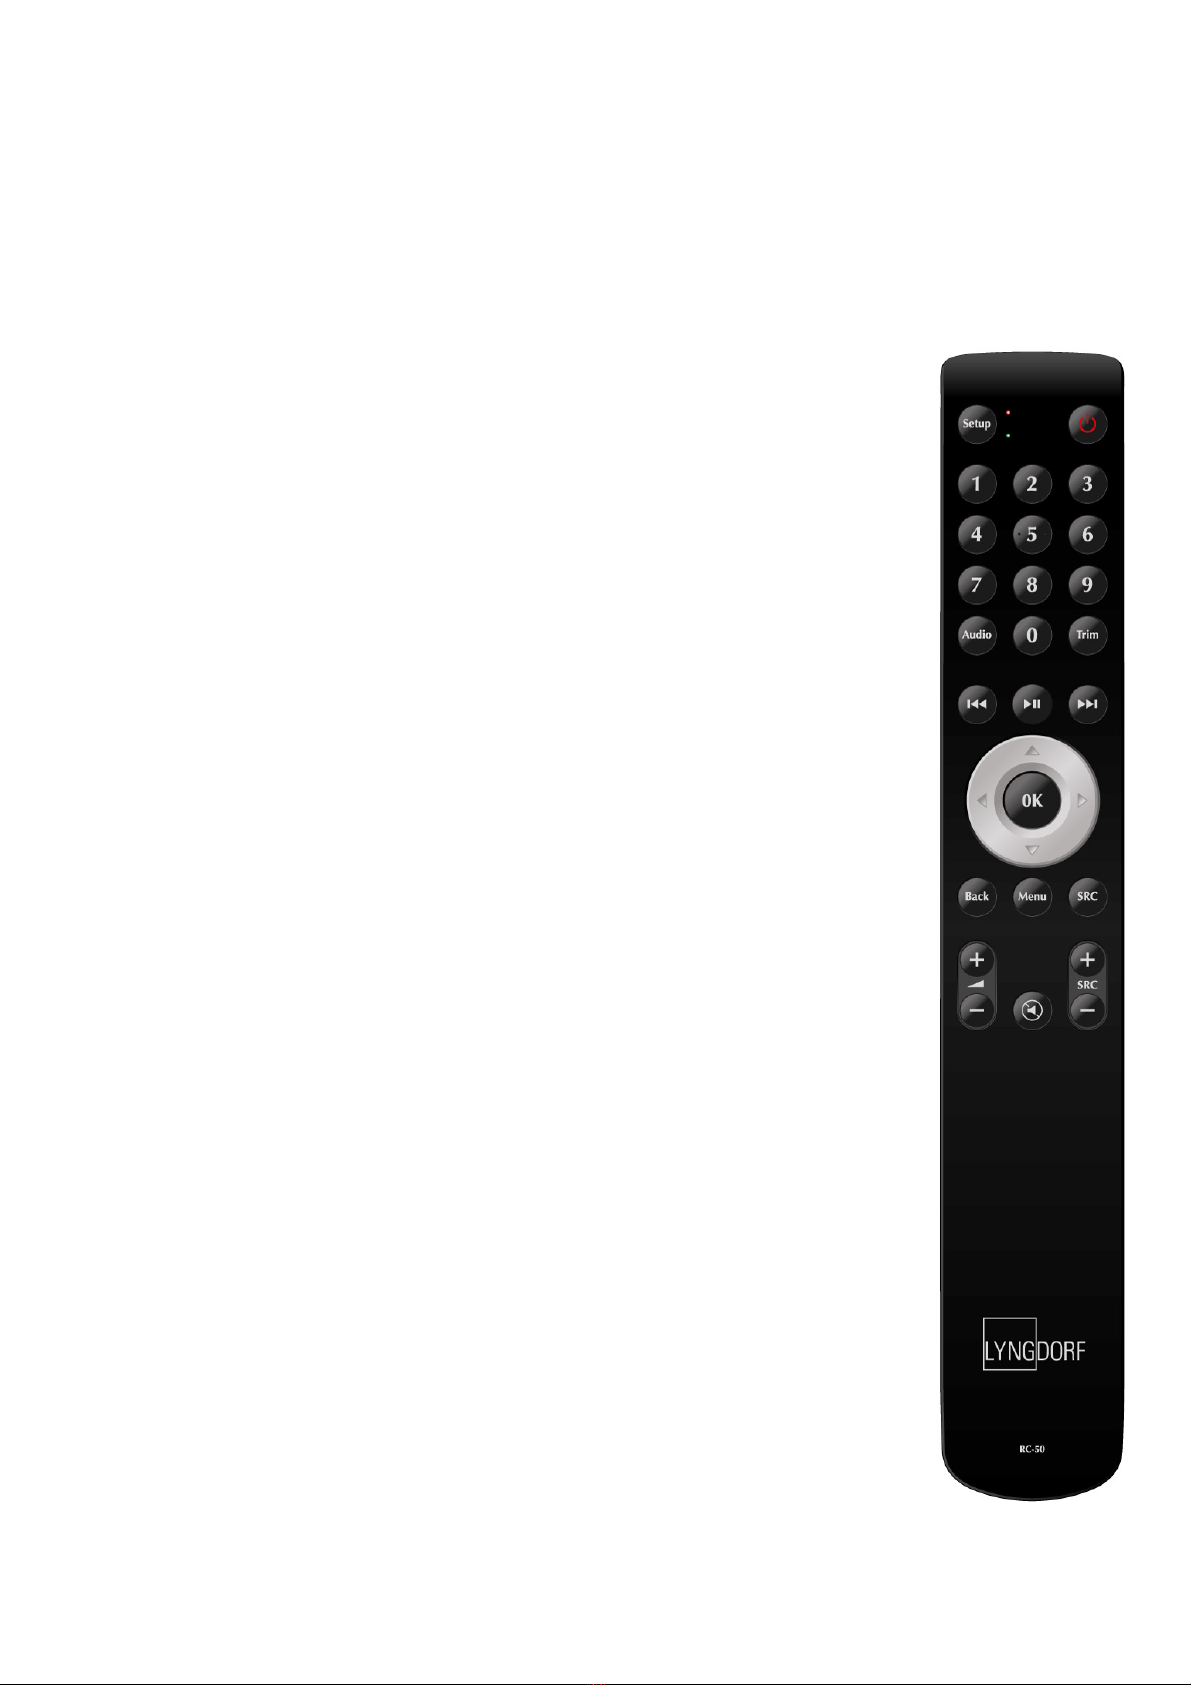
Remote control
The MP-40 comes with a dedicated remote control, which can operate both with radio frequencies (RF) and
infrared control (IR)
Setup Access the installation menu.
Standby Turn the MP-40 on and into standby.
Audio Access the post-processing menu.
Trim Access to miscellaneous audio adjustments.
Up/Down Move up and down in menus.
Browse available settings in a menu.
Toggles between the available RoomPerfect™ filters.
Left/Right Move left and right in menus.
Toggle between neutral and the available voicings.
OK Activate the info screen, indicating the status of the unit.
Select a menu and store a selected setting.
Back Return to the previous menu.
Menu Access the user menu.
SRC Access the source menu list.
Source -/+ Toggle between active sources.
Volume +/- Turn volume up and down.
Mute Mute and restore the sound.
Play/Pause Play/pause the currently playing track in the media player.
Skip Forward/ Skip in the current playlist in the media player.
Backwards

10
How to pair remote control in RF mode
The MP-40 remote has both an IR and RF mode, and is by default set to IR.
To pair the RF remote control to the MP-40:
1. Turn on the MP-40.
2. Hold down Play/Pause and OK until the remote control´s green LED flashes.
3. Release the buttons.
4. Point the remote control at the MP-40 and hold it within 30cm / 1 foot of the front panel; when the
green LED stops blinking, the remote is connected.
5. The remote is now RF paired to the MP-40.
To reset the pairing of the remote control, press Back and OK until the red LED flashes twice.
Switching remote between RF and IR mode
To switch the remote from IR to RF mode, hold down OK and 2. The LED will flash green twice.
To switch the remote from RF to IR mode, hold down OK and 1. The LED will flash red twice.
If you press a button on the remote and the red LED at the top turns on, then you
are in IR mode. If it turns green you are in RF mode.
Setup procedure
Set up the MP-40 surround sound processor by following these steps:
1. Connect the speaker to the power amplifiers.
2. Connect all external equipment, audio & video, home automation system, mains, etc. to the MP-40.
3. Switch on the MP-40 and all connected equipment.
4. Access the setup menu via the web interface or the Installer Menu on the screen.
5. Go to “Speaker and Room” and set up the system.
6. Connect the amplifiers to the specified outputs.
7. Select and press “Verify speakers.”
8. Adjust level(s) on your subwoofer(s) by the feature ‘Adjust Sub’.
9. Run RoomPerfect™ Guided Setup.
10. Set up video sources, audio, zone b, etc.
11. Save and back up settings.
Inhaltsverzeichnis
Andere Lyngdorf Audio Aufnahmegeräte Handbücher


Beliebte Aufnahmegeräte Handbücher anderer Marken


Strymon
Strymon NIGHTSKY Bedienungsanleitung

Mitsubishi Electric
Mitsubishi Electric 16CH DIGITAL RECORDER DX-TL5000U Bedienungsanleitung

Tews Technologies
Tews Technologies TPMC465 Bedienungsanleitung

Honeywell
Honeywell Excel 50 Bedienungsanleitung

SeaLevel
SeaLevel COMM+8.LPCI Bedienungsanleitung

Arturia
Arturia AUDIOFUSE STUDIO Bedienungsanleitung


