MedeScan JH-908 Bedienungsanleitung

Instruction Manual Model: JH-908
Please read this user manual thoroughly and
completely before using the product.
HEARING AID
VER: 909G-20220120-V01
1639
Life cycle of product is three years
1300 736 330
www.medescan.com.au
Visit our YouTube channel for our latest easy to follow
instructional videos. Simply search for Medescan on YouTube
and subscribe to our channel for the latest products and
instruction videos.
You can also scan the QR code for instant access.
Designed in Australia
Made in China

-1- -2-
CONTENTS
03
06
07
08
09
10
13
12
11
15
21
22
24
27
29
30
31
32
19
16
I.IMPORTANT SAFETY INSTRUCTIONS
1.CONTRAINDICATION
2.WARNINGS
3.NOTICE
II.DO NOT USE IF ANY OF THE FOLLOWING APPLY TO YOU
III.MATTERS NEEDING ATTENTION, WARNINGS AND TIPS
IV.HOW TO USE YOUR DEVICE
1.QUICK GUIDE
2.HOW TO APPLY DOMES
3.WEARING/REMOVE HEARING AID
4.TURN ON/TURN OFF
5.VOLUME ADJUSTMENT
6.HEARING AID CHARGING
7.HOW TO USE THE CHARGING CASE
8.CLEANING
V. MAINTENANCE AND CLEAN
VII.HEARING AID CARE
VII.TROUBLESHOOTING GUIDE
VIII.TIPS FOR BETTER COMMUNICATIO
IX.TECHNICAL SPECIFICATION
X. ACCESSORIES LIST
XI.NORMALIZED SYMBOLS
XII.MAINTENANCE, STORAGE, AND DISPOSAL
XIII.WARRANTY

-3- -4-
I.IMPORTANT SAFETY INSTRUCTIONS
1. CONTRAINDICATION
The device should not be used in the following situations:
- Patients with chronic suppurative otitis media (CSOM),congenital
ear atresia, or any type of ear discharge
- Anyone under 36 months old
2. WARNINGS
- Keep small parts (hearing instrument, ear domes, battery or other
detachable parts) that can be swallowed out of children’s reach.
Dropping, immersing in liquid, exposure to strong electromagnetic
fields or excessive heat will damage the hearing aids. Remove
devices prior to any type of X-ray, MRI, or CT scan. If parts become
stuck in the ear canal, seek medical assistance - do not attempt to
remove by yourself.
3. Notice
- Do not use at high volume for extended periods of time - ear injury
can result.
- If you experience any pain or strong discomfort using the devices,
remove and consult a doctor.
- Routine maintenance to keep the device clean is required.
Ensure that ear domes are free of debris and moisture at all times.
- Avoid shocks or dropping the product.
- Do not store or use the product in environments of high humidity
or temperature (such as sauna room), to avoid damage.
- Batteries should be properly recycled and not disposed in the
trash.
- Keep the devices away from small children. Injury or damage may
result.
- Do not set volume levels too high. Listening with high-output
devices for extended periods at high volume levels can cause
further hearing damage.
- Do not share your hearing aids with others. Using a hearing aid
configured for someone else can result in hearing damage or injury.
- Monitor for any unusual skin reaction. If you notice any allergic
reaction (itchiness, swelling, or rash), stop wearing the hearing
aids and consult a medical specialist.
- Do not touch the hearing aids to any type magnet or magnetized
object. Your hearing aids are delicate electronic instruments and
may be damaged by contact with strong magnetic fields.
- Do not attempt to open or repair the devices yourself. Damage
can result and will void the warranty.
- Do not store your devices in a hot/humid locations. You should
Warning
Read all the information in this instruction manual and any other
literature included in the box before using the device.
Warning

-5-
II. DO NOT USE IF ANY OF THE FOLLOWING APPLY
TO YOU:
never leave your hearing aids near heating appliances or in direct
sunlight.
- Do not leave your hearing aids in the car as inside temperatures
can reach dangerous levels which could damage the devices.
- Do not use the hearing aids together with a cell phone earpiece
directly - excessive noise and distortion may result. Instead, use
via Bluetooth pairing with your cell phone. Radio wave emissions
from mobile phones can cause noise in the hearing aids or result in
reduced volume.
- Please contact the MANUFACTURER:
• For assistance, if needed, in setting up, using or maintaining
your devices or
• To report any unexpected operation or events
1) Congenital atresia of external ear or deformity of any part of the
ear canal
2) Deafness is unstable, and the degree of hearing loss often
fluctuates
3) Persistent headaches, dizziness, earaches, tinnitus or other
symptoms that are not suitable for adaptation
4) Sudden onset of hearing loss within the past 3 months; rapid
progressive deafness; unilateral hearing loss or other acute ear
disease;
5) Effusion (secretions/discharge) in the ear and/or frequent
purulence (pus)
6) Central deafness (central nervous system) or non-organic
deafness
7) Patients with acute otitis externa and tympanitis
8) Patients with acute and chronic suppurative otitis media (in the
period of purulent infection)
9) Patients who are allergic to the materials of this product
Specific warnings / statements
Keep small parts away from and out of children´s reach to avoid
accidental ingestion
Warning not to use in explosive or oxygen-enriched atmospheres, as
doing so may damage the device
Warning that it should only be used by intended person as using
hearing aids designed for someone else may result in hearing
damage
-6-

1. Do not immerse the hearing aid in any liquid. Remove the
hearing aid before swimming or bathing. After swimming or
washing, wait for the ear canal to dry before wearing the hearing
aid.
2. After removing the hearing aid at night, it should be placed in a
case with a desiccant if possible, protected from light, high
temperature and high humidity environment.
3. The external surfaces of the hearing aid should be kept clean,
and earwax in the ear domes should be cleaned out daily
4. Applicable objects: Suitable for people with air-conducting
hearing loss of about 30-50dB
5. When you do not use hearing aids, please charge the product
regularly to avoid battery damage; the recommended charging
time interval of hearing aids is ≤28 days
-7- -8-
III. Matters needing attention, warnings and tips IV.HOW TO USE YOUR DEVICE
1. Microphone
2. Multi-function Button
(ON/OFF, Volume Control)
3. Ear Dome
4. Charging Contacts
1
2
4
3

-9- -10-
1.【QUICK GUIDE】2.【HOW TO APPLY DOMES】Step 2: Hold on to the end of the hearing aid and push firmly to
ensure that the dome is fastened securely.
Notes:
After the ear dome is installed, pull the ear dome gently to see if it
is firmly installed and ensure the ear dome does not fall off easily.
L M S
Please follow these steps to mount domes, because Incorrect
dome replacement could result in the dome being left in the ear
when you remove the hearing aid.
Step 1: Choose a suitable size ear dome.
1.Charging your hearing aids
* Before using your hearing aid for the first time, it is recommended
to charging when it light in green and the green light turn off
indicates charging is complete.
2.Turn ON/OFF
Long press the “Multi-function button” for three (3) seconds to Turn
it ON/OFF
3.Volume Adjustment
Short press “Multi-function button” to increase or decrease the
volume
1 2
Multi-function Button
(ON/OFF,Volume Control)

-11- -12-
3.【WEARING/REMOVE HEARING AID】4.【TURN ON/TURN OFF】3.1 Wearing hearing aid
Step 1: Hold the hearing aid body (hard part), place in the ear
(Make sure it is in right direction like picture).
Step 2: Move the body slightly into auricle for holding.
3.2 Removing the hearing aid
Step 1: Grasp the protruding hearing aid and remove it.
Notes: For comfort, always turn off your hearing aids before you
wear or remove them.
Turn On: Long press the “Multi-function button” for three (3)
seconds and the hearing aid will be power ON with the prompt tone
of " Beep ".
Turn Off: Long press the “Multi-function button” for three (3)
seconds and the hearing aid will be power OFF with the prompt
tone of " Beep ".
*Note:
1.It may be in few circumstances that the ear dome remain
attached to the auditory meatus after the hearing aid is taken out.
In that case, please ask a professional doctor to take the ear dome
out.
2. Before the hearing aid is appropriately secured, it may give out
the creak sound, which is a normal phenomenon. The creak sound
can be used as a reference to determine whether the hearing aid is
secured. If the hearing aid gives out squeaking, please check if it is
taken on correctly; if so, but the squeaking remains, please replace
with the other set of ear dome. When the hearing aid is not in use,
please turn it off without delay.
3. When the hearing aid is not functioning properly, please check
the “Troubleshooting Guide”. If none of the solutions work, please
contact our after-sales service team.
12

-13- -14-
5.【VOLUME ADJUSTMENT】The hearing aid has 6 volume levels.
5.1 Short press “Multi-function button” to increase or decrease the
volume.(Short Press once)
5.2 When the volume is the highest, one additional pressing on the
key will reset the volume to the lowest level, so on and so forth. The
hearing aid can automatically record the previously tuned volume
level.
Note: You will hear a "Beep" when you turn the volume up or down.,
and when the volume is adjusted to highest level, it will give out the
prompt tone of "Beep-Beep".
The hearing aid can’t automatically record the previously tuned
volume level when the hearing aid is Low Power.
Multi-function button
(ON/OFF,Volume Control)
Micro USB Cable
1. Lip
2. Hearing aid charging indicator
3. Charging case charging indicator
4. Hearing aid charging contacts pin
5. Hearing aid charging insert
6. Micro USB connection to external power supply
1
2
3
4
56

6.【HEARING AID CHARGING】7.【HOW TO USE THE CHARGING CASE】-15- -16-
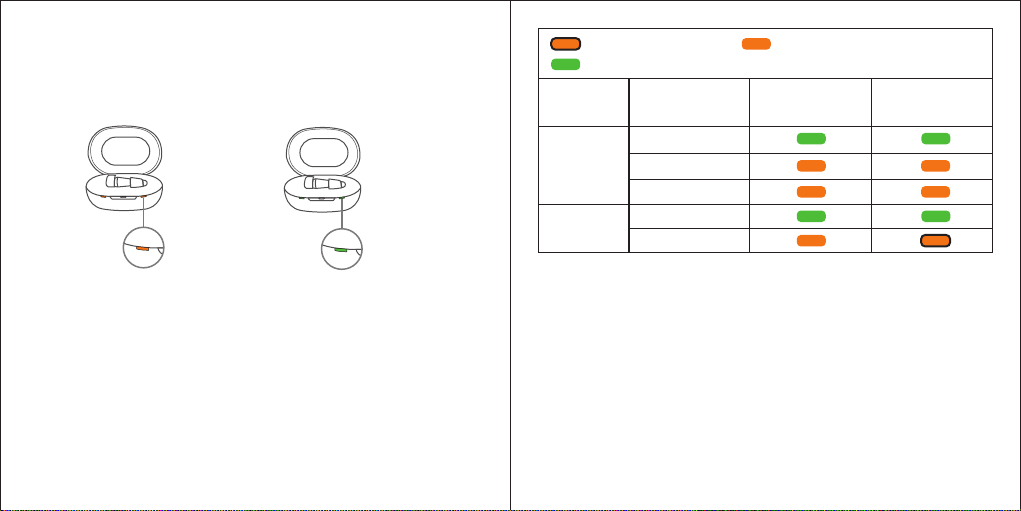
Hearing aid charging:
Put the hearing aid back into the correct slot of the charging case,
they will automatically charging . (Please make sure that the
hearing aid is in turn-off state when charging.) Orange light will
indicate hearing aids are charging. After fully charged, they will
light in green and the green light turn off indicates charging is
complete.
(See details in table for Charging Indicator Changes of the
Charging Case)
7.1. Please make sure that the hearing aid is in power-off state
when charging. Plug the small Micro-USB cable tip into the USB
charging port of the Case. Plug the large USB-A end into a USB-A
power source such as a wall charger or your computer, close the lid
and place it steadily.
7.2 The indicator light will show the charging status of the battery
until the hearing aid is fully charged. When the case is charging,
the indicator shows a orange solid light, and fully charged the
indicator light will shows a solid green light will be constant and the
light turning off indicates charging is complete.
Correct
Charging Fully Charged
Wrong

-17- -18-
7.3 With the hearing aids in the case, all charging will automatically
turn off when the case and hearing aids are fully charged. The case
will continue charging with or without the case lid closed but it is
recommended to close the lid when charging overnight to keep out
dust and moisture.
7.4 The charging process will automatically stop when the case
and hearing aids are fully charged, so the hearing aids can be
safely left in the charger. Place it on a flat even surface away from
exposure to moisture, dust, or extreme temperatures.
*Note: The fully charged case offers 3 full charging cycles for a pair
of hearing aids.
*Note:
1.Charging Case Low Power: The charging case indicator will
change orange when the charging case battery drops below 10%,
please charge the case.
2.When the case is fully charged, the indicator will show a solid
green light will be constant and the light turn off indicates charging
is complete.
3.When the hearing aid and case is not functioning properly, please
check the “ Troubleshooting Guide”. If none of the solutions work,
please contact our after-sales service team.
Charging Indicator Changes of the Charging Case
Flashing
Flash
Solid Orange Light
Solid Green Light
Hearing aid
Charging
(Charging
Case is not
charging)
Charging
Case
Charging
100%
10-99%
100%
0-99%
0-10%
Charging state
Hearing aid
charging
indicator
Charging
indicator of
the charging case
Charging Fully Charged
Inhaltsverzeichnis
Beliebte Hörgerät Handbücher anderer Marken

Advanced Bionics
Advanced Bionics Slim HP Standard Bedienungsanleitung

Widex
Widex DREAM440 THE DREAM SERIES Bedienungsanleitung

Phonak
Phonak myPilot Bedienungsanleitung

NIKEN
NIKEN NK-401 Bedienungsanleitung
ON Semiconductor
ON Semiconductor Ezairo 7111 Pre Suite Bedienungsanleitung

Sonetik
Sonetik GOHEAR Bedienungsanleitung