
Mio MioCARE+ A105 Series Bedienungsanleitung
Disclaimer
Notes
A105 Series
User Manual
1
en
Welcome
Thank you for purchasing a Mio product. This Quick Start Guide guides you through the successful
setup of your device and familiarizes you with the basic skills of using the device.
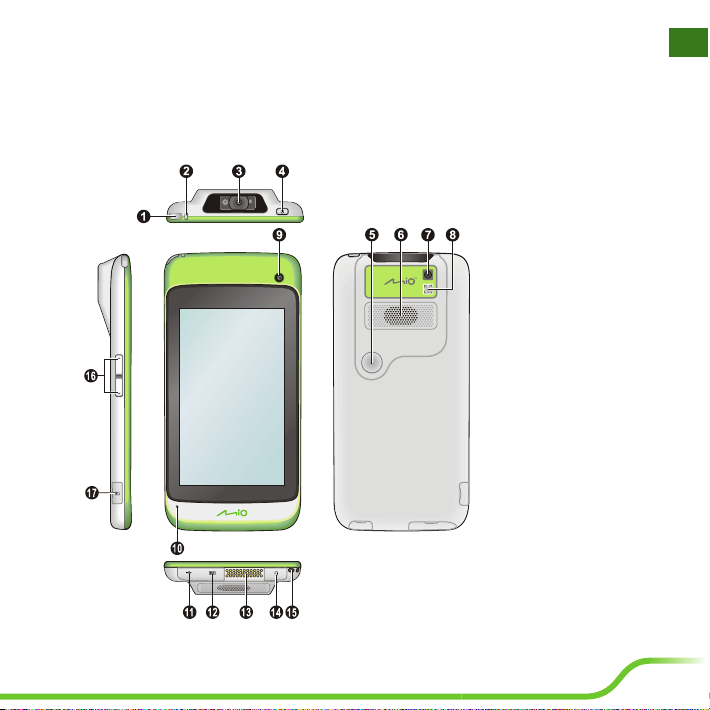
Knowing your device
1. LED indicator 1
(Barcode reader status)
2. LED indicator 2
(Battery charge status)
3. Barcode reader
4. POWER button
5. Barcode reader button
6. Speaker
7. Rear camera
8. Flash
9. Front camera
10. Microphone
11. Micro-USB port
12. HD connector
13. Dock connector
(selected models only)
14. Headphone socket
15. Lanyard holder
16. Volume buttons
17. Memory card slot

2
en
3
Getting started
Charging the battery
Your device has an internal battery that may not be fully charged when you purchase it. You should
charge the battery for at least 8 hours before you start using it for the very first time.
To charge the battery, plug the home charger cable into the Micro-USB connector on the bottom of
your device and the mains power charger into the power socket.
1
3
2
CAUTION!
For optimal performance of the lithium battery, note the following:
•Do not charge the battery where the temperature is high (e.g. in direct sunlight). The battery
will stop charging when the ambient temperature is less than -10ºC (14ºF) or more than 60ºC
(140ºF).
•Recharge the battery when it is nearly discharged. When recharging, make sure that the battery
is fully charged. Doing so can extend the battery life.
•If the device has not been used for over a month or if you find the discharge/recharge time has
been shortened, be sure to fully discharge the battery first before recharging it. You are also
advised to fully discharge and recharge the battery once every 1~2 months.
•Failure to follow the battery usage instructions can cause damage to your device, battery and
even bodily injury or property damage and will void the warranty.
2
3
en
Performing the initial start-up
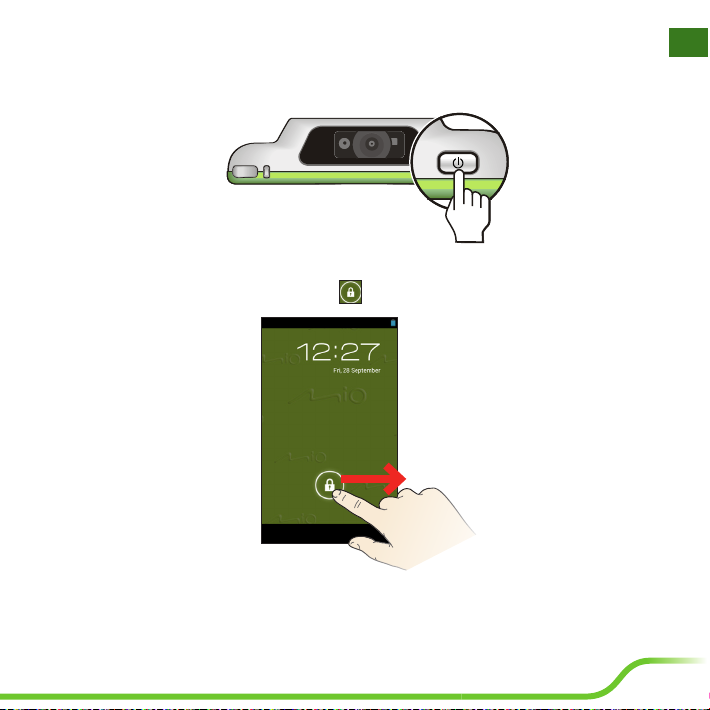
1. Press and hold the POWER button until the device turns on.
2. The Home screen will be displayed and the device is in Lock mode by default.
3. To unlock the device, drag the Lock icon ( ) to the right. You can now use your device.

4
en
5
Installing the memory card
1. Open the cover on the left side of the device to locate the memory card slot.
2. Hold the microSD card by the edges and gently insert it into the slot with the
label facing the back of your device.
CAUTION! Do not apply pressure to the centre of the memory card.
3. To remove a card, gently push the top edge of the card inwards to release it,
and pull it out of the slot.
IMPORTANT! Before removing the memory card, you are recommended to
unmount it from the system. To unmount the memory card, tap Storage >
Unmount SD card from the Settings menu.
Connecting your device to a computer
Connect the Micro-USB end of the USB cable to your
device and the other end to a USB port in your computer.
Tip: If this is the first time you connect the device to your
computer, you need to install the USB driver on your
computer when prompted. The device’s USB driver is
available from Mio’s website: http://miocare.mio.com/
CAUTION!
The IEC 60529/IP54 is a European system of test specification standards for classifying the degree
of protection provided by the enclosures of electrical equipment. An IP54 designation means that
the unit withstands dust protected (Ingress of dust is not entirely prevented, but it must not enter
in sufficient quantity to interfere with the satisfactory operation of the equipment; complete
protection against contact), and water splashing for up to 5 minutes (water volume: 10 litres per
minute, Pressure: 80-100kPa). Mio guarantees this grade provided the battery door and all jack
covers are properly and securely closed. This device is not IPX7/IPX8 grade; immersion in water
or water-pressure such as washing the unit with running water may cause damage to the unit and
voids warranty.

4
5
en
Operating basics
Using the POWER button
•Turning on the device
Press and hold the POWER button until the device turns on.
•Switching on/off the screen
Your device will automatically switch off the screen after 1 minute (by default) of inactivity.
You can manually switch off the screen by pressing the POWER button briefly.
To turn the screen on, press the POWER button briefly and then unlock the device by dragging
the Lock icon ( ) to the right.
•Turning off the device
If you are not using your device, follow these steps to turn the device
off:
1. Press and hold the POWER button for 2 seconds to open the
options window.
2. Tap the Power off option and then tap OK to turn the device off.
•Using the device in Aeroplane mode
When you are in an aeroplane or in the area where the use of wireless
radio is prohibited, enable the Aeroplane mode. Many of your
devices applications will continue to work (e.g. playing games or
listening music) but all wireless radios, including wireless network
and Bluetooth, on the device are turned off – it cannot send or receive
data.
1. Press and hold the POWER button for 2 seconds to open the
options window.
2. Tap Aeroplane mode. The Aeroplane mode icon ( ) appears in
the status bar indicating that Aeroplane mode is on.
6
en
7
Navigating on the screen
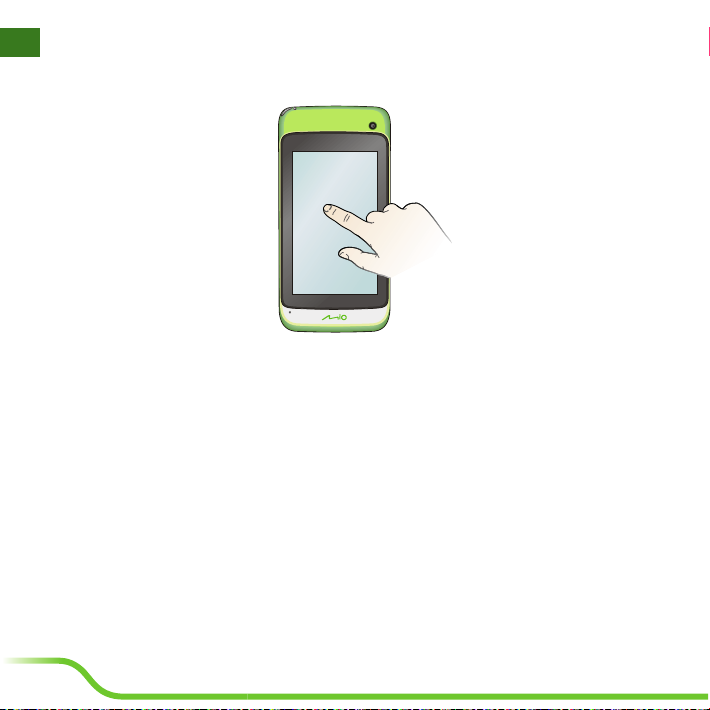
To operate your device, touch the screen with your fingertip. You can perform the following actions:
•Tap
Touch the screen once with your fingertip to open items or select onscreen buttons or options.
•Tap and hold
Tap and hold on the desired item to open the pop-up menu that contains the available options
for the item.
•Drag
Tap and hold on the item and then move it to the target position without releasing your fingertip.
•Slide
Drag to the left/right (or the top/bottom) to switch to the next/previous item on the list.
•Multi-touch gestures
Move your fingertips apart or together on the screen to zoom in or out while viewing a picture or
a web page.
•Rotating the screen
For most applications, you can automatically change the screen orientation (from portrait to
landscape, and vise versa) by turning the device sideways.
6
7
en
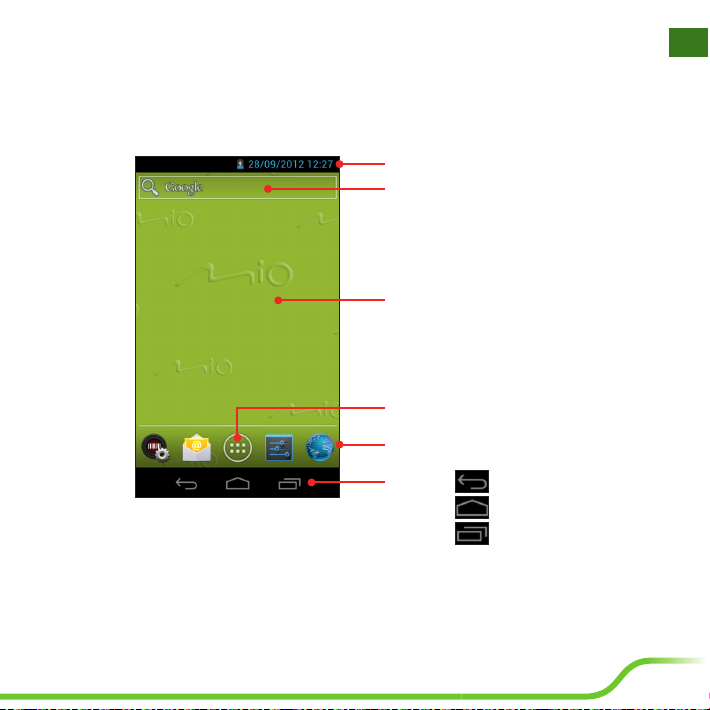
Home screen
The Home screen is your starting place for tasks, providing quick access to frequently used
applications and settings.
Tip: To display the Home screen, tap the HOME button at any time.
Status Bar
Desktop
Quick Launcher
All Applications button
Shortcuts/widgets
Soft keys: BACK
HOME
RECENT APPS

8
en
9
Customising your device
You can customize the device through the Settings menu, including personalising the Home screen,
changing the display and sound settings, configuring the connection settings, and more.
Accessing the Settings menu
From the desktop, do one of the following to access the Settings menu:
•Tap the All Applications button ( ) > Settings.
•Tap from the Quick Launcher.
Getting connected
Your device can access the Internet through wireless networks. You can also connect to the other
devices to share files via Bluetooth.
•WLAN
WLAN is a term used for certain types of wireless local area networks, which lets you access
the Internet through a wireless connection. To use WLAN on your device, you need access to a
wireless access point.
1. From the Settings menu, tap the WLAN OFF/ON button to turn WLAN on.
2. The device will automatically scan for available wireless networks. Tap the WLAN item to
display the network names and security settings (Open network or Secured with WEP) of the
detected wireless networks.
3. Tap a wireless network to connect.
•If you selected an open network, you will be automatically connected to the network.
•If you selected a network that is secured with WEP, enter the key and then tap Connect.

8
9
en
4. When your device is connected to a wireless network, the WLAN icon ( ) will appear in
the Status Bar indicating the signal strength (number of bands that light up).
The next time your device connects to a previously accessed secured wireless network, you will
not be prompted to enter the WEP key again, unless you reset your device to its factory default
settings.
•Bluetooth
Bluetooth on your device operates in three different modes:
•Off: (default) Bluetooth is turned off. You cannot send/receive data using Bluetooth.
•Discoverable: Bluetooth is turned on, and all other Bluetooth-enabled devices can detect your
device.
Tip: From the Settings menu, tap Bluetooth > Menu button ( ) > Visibility timeout to set
the discoverability timeout.
•On: Bluetooth is turned on, and the device will be able to detect the other Bluetooth-enabled
devices, but not vice versa.
To turn Bluetooth on, tap the Bluetooth OFF/ON button from the Settings menu. When
Bluetooth is turned on, the Bluetooth icon ( ) appears in the Status Bar.
To pair the Bluetooth devices:
1. When Bluetooth is enabled, the device will automatically scan for available Bluetooth devices.
Tap the Bluetooth item to display the list of in-range Bluetooth devices.
Tip: Tapping SEARCH FOR DEVICES allows you to scan the in-range Bluetooth devices again.
2. Tap a device from the list to initiate pairing.
3. When prompted, enter the PIN code and then tap OK.
4. On the other device, enter your device’s PIN code to accept the pairing.
5. Once the pairing is completed, you can now start sharing data between the devices.
Inhaltsverzeichnis
Andere Mio Handy Handbücher


Beliebte Handy Handbücher anderer Marken


Point Mobile
Point Mobile PM60 Bedienungsanleitung

Blackbe;rry
Blackbe;rry Q10 Bedienungsanleitung

Blackbe;rry
Blackbe;rry Bold 9900 Bedienungsanleitung

Blackbe;rry
Blackbe;rry STORM 9500 - VERSION 5.0 Bedienungsanleitung

LG
LG LM-K420EMW Bedienungsanleitung

ISAFE MOBILE
ISAFE MOBILE IS655.2 Bedienungsanleitung