
MIXVIBES DVS ULTIMATE Bedienungsanleitung

DVS ULTIMATE
Quick Start Guide

C
M
J
CM
MJ
CJ
CMJ
N
vibe-watermark-bright.pdf 03/04/2009 16:07:52vibe-watermark-bright.pdf 03/04/2009 16:07:52
Contents
1 Welcome 3
2 U-MIX44 Description 4
3 Connections 5
4 Software and ASIO driver installation 7
5 Install Wizard 9
6 Getting started 11
6.1 Customizing the interface 11
6.2 MIDI Configuration 12
6.3 Importing Audio 12
6.4 Loading Tracks 13
7 First Mix with MIXVIBES DVS ULTIMATE 14
8 Troubleshooting 15
9 Frequently Asked Questions 16
10 U-MIX44 Specifications 18
2 / 19

C
M
J
CM
MJ
CJ
CMJ
N
vibe-watermark-bright.pdf 03/04/2009 16:07:52vibe-watermark-bright.pdf 03/04/2009 16:07:52
1 Welcome
Thank you for choosing MIXVIBES DVS ULTIMATE. MIXVIBES DVS ULTIMATE is a compact
plug and play digital vinyl system that includes MIXVIBES DVS software and the U-MIX44
audio interface.
Take a few minutes to run through this quick start guide and you’ll be on your way to
making great mixes on MIXVIBES DVS ULTIMATE in no time at all!
We invite you to be a part of the MIXVIBES community to share your experiences with
other DJs, find help and advice, and check for available updates. See you online on the
forum1or on the website2!
Minimum System Requirements
•Windows® XP SP2 or Windows® Vista SP1 or Windows® 7
•Processor Intel® Pentium III 1GHz or equivalent
•512 MB RAM (1 GB recommended)
•One available USB port
•Hard drive space for music
Box Contents
•MIXVIBES DVS and ASIO driver installation disc
•U-MIX44 audio interface
•2x control CDs
•2x control records
•Set of RCA cables
•Keyboard stickers
•This quick start guide
1http://forum.mixvibes.com
2http://www.mixvibes.com
3 / 19
C
M
J
CM
MJ
CJ
CMJ
N
vibe-watermark-bright.pdf 03/04/2009 16:07:52vibe-watermark-bright.pdf 03/04/2009 16:07:52
2 U-MIX44 Description
C
M
J
CM
MJ
CJ
CMJ
N
panel.pdf 15/07/2009 14:39:07panel.pdf 15/07/2009 14:39:07
Top panel
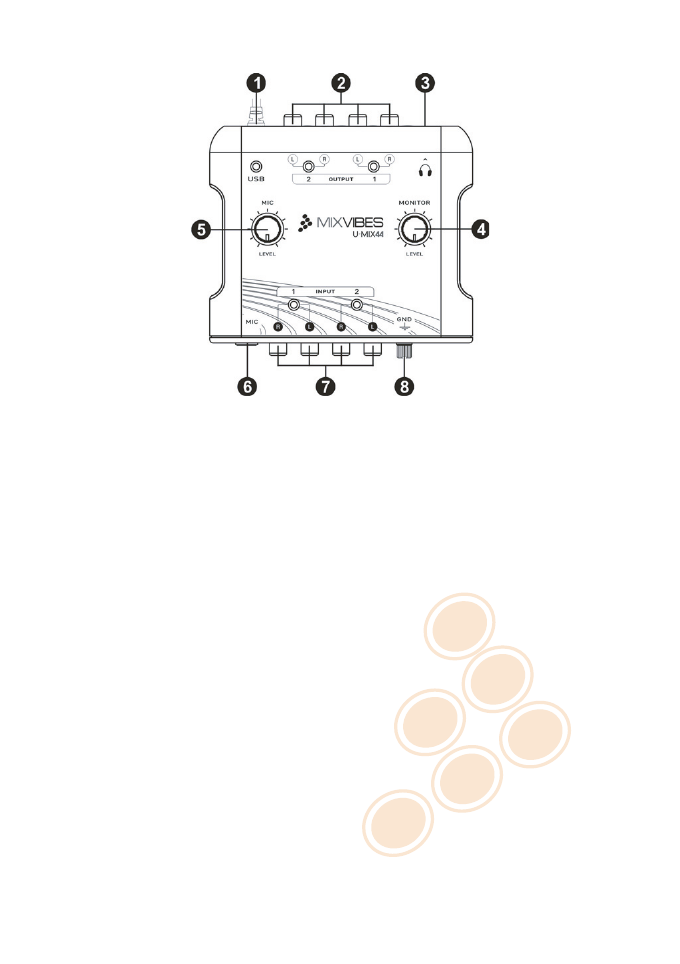
1USB cable: Connect the USB cable to the computer.
2
4 RCA output channels: You can use these outputs to connect an external mixer
or your sound system (amplifier, powered speakers, or home stereo).
3
Headphone output connector: Monitor the outputs 3/4 through the headphone
output. This connector is particularly useful if you use a MIDI controller and the
internal mixer.
4
Control of the headphone output: The headphone output level can be adjusted
with the control knob.
5
Gain control for the microphone input: Control the input level of the microphone.
6
Microphone input connector: Connect your microphone to this balanced 1/4”
connector.
7
4 RCA input channels: You can use these inputs to connect your turntables,
CD/MP3 players, mixer unit, effect player, cassette deck play and radio player
etc.
8
Grounding screw: When you use a turntable, connect the ground lead from your
turntable to the grounding screw to help prevent hum.
4 / 19
C
M
J
CM
MJ
CJ
CMJ
N
vibe-watermark-bright.pdf 03/04/2009 16:07:52vibe-watermark-bright.pdf 03/04/2009 16:07:52
3 Connections
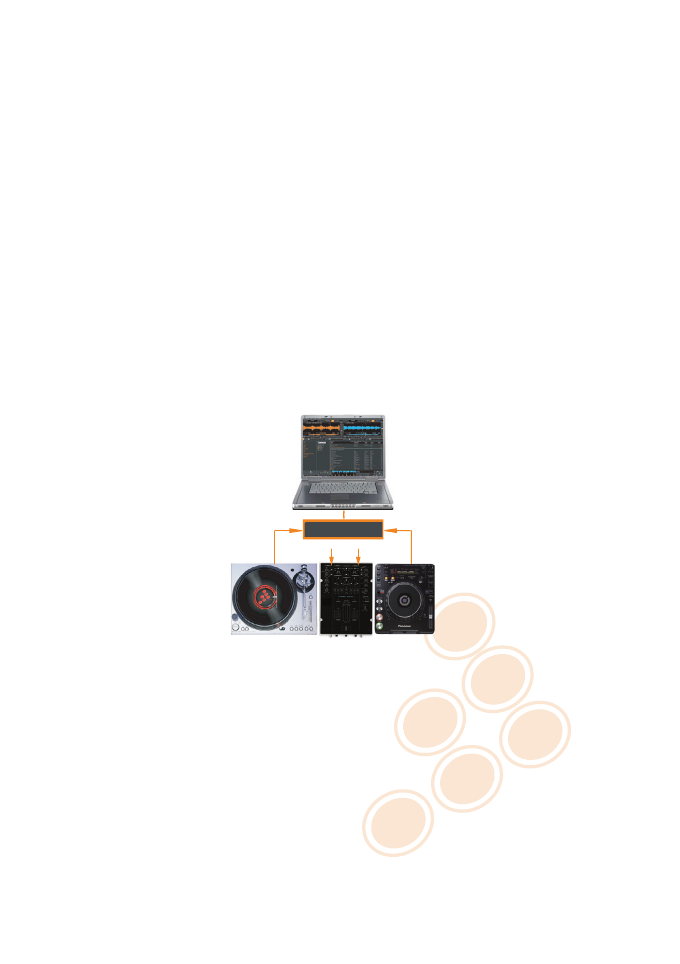
Follow the instructions below to use MIXVIBES DVS and the U-MIX44 with a pair of decks
and an external mixer.
1
If you are using vinyl,
plug the ground of your turntable to the ground
lug on the U-MIX44 or on your DJ mixer.
2Connect the outputs of your decks
(vinyl or CD)
to the RCA inputs of
your U-MIX44
plugging the left deck into the inputs 1/2 and right deck into the
inputs 3/4. Match the left channel (usually white) with the white RCA sockets on
the U-MIX44, and right (usually red) with the red sockets.
3Connect the outputs of your U-MIX44 to the line inputs of your mixer
.
Using the included RCA cables, connect the outputs 1/2 into a line input of your
mixer, then repeat for the outputs 3/4, into another available line input of your
mixer.
4Connect the U-MIX44 to a free USB slot of your computer.
line line
Mixer
(optional)
Classic turntable
or CD player
Classic turntable
or CD player
U-MIX44
Classic turntable
C
M
J
CM
MJ
CJ
CMJ
N
connections_pack.pdf 08/10/2009 16:54:21connections_pack.pdf 08/10/2009 16:54:21
Connections
5
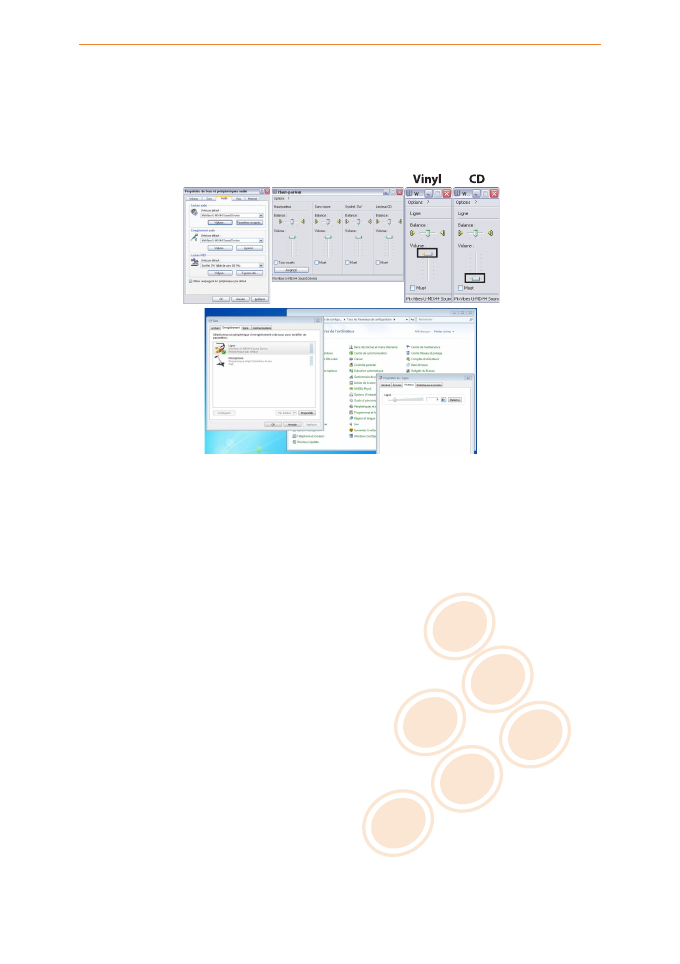
After the system has recognized and installed your U-MIX44 you should
adjust
the output and input volumes in the Windows audio settings
. Example
Windows XP: [Start > Control panel > Sounds and audio devices > ’Audio’ tab].
Select
MixVibes U-MIX44 Sound Device
in ’Sound Playback’ and ’Sound Recording’.
•
Set the output level: click on ’Volume’ under the item ’Sound Playback’
and maximise all faders.
5 / 19
C
M
J
CM
MJ
CJ
CMJ
N
vibe-watermark-bright.pdf 03/04/2009 16:07:52vibe-watermark-bright.pdf 03/04/2009 16:07:52
3 Connections
•
Set the input level: click on ’Volume’ under the item ’Sound Recording’
and maximise the fader if you use a control vinyl or minimise the fader if
you use a control CD.
C
M
Y
CM
MY
CY
CMY
K
audio.pdf 24/03/2010 12:53:26
C
M
Y
CM
MY
CY
CMY
K
audio2.pdf 23/03/2010 18:24:23
Audio Volumes
Follow the instructions below to use MIXVIBES DVS and the U-MIX44 with a MIDI controller
and the integrated mixer.
1Connect outputs 1/2 of your U-MIX44 to your sound system
(amplifier,
powered speakers, or home stereo).
2Connect your headphones to headphones output of your U-MIX44.
3Connect the U-MIX44 to a free USB slot of your computer.
4
After the system has recognized and installed your U-MIX44 you should
adjust
the output volume in the Windows audio settings
. Example Windows
XP: [Start > Control panel > Sounds and audio devices > ’Audio’ tab]. Select
MixVibes U-MIX44 Sound Device
for ’Sound Playback’ then set the output level by
clicking on ’Volume’ under the item ’Sound Playback’ and maximise all faders.
5Connect the MIDI controller to your computer
. Refer to your MIDI con-
troller’s owner’s manual for details.
6Turn on your MIDI controller.
6 / 19
C
M
J
CM
MJ
CJ
CMJ
N
vibe-watermark-bright.pdf 03/04/2009 16:07:52vibe-watermark-bright.pdf 03/04/2009 16:07:52
4 Software and ASIO driver installation
First, make sure you are in possession of the MIXVIBES U-MIX44 audio interface and that
you have an available USB port on your computer.
1Check that your U-MIX44 audio interface is plugged into an active USB port.
2
Place the MIXVIBES DVS CD in your CD-Rom and autorun should start. If the
installation does not start automatically double click on the « install_dvs.exe »
file in the root of your CD-ROM.
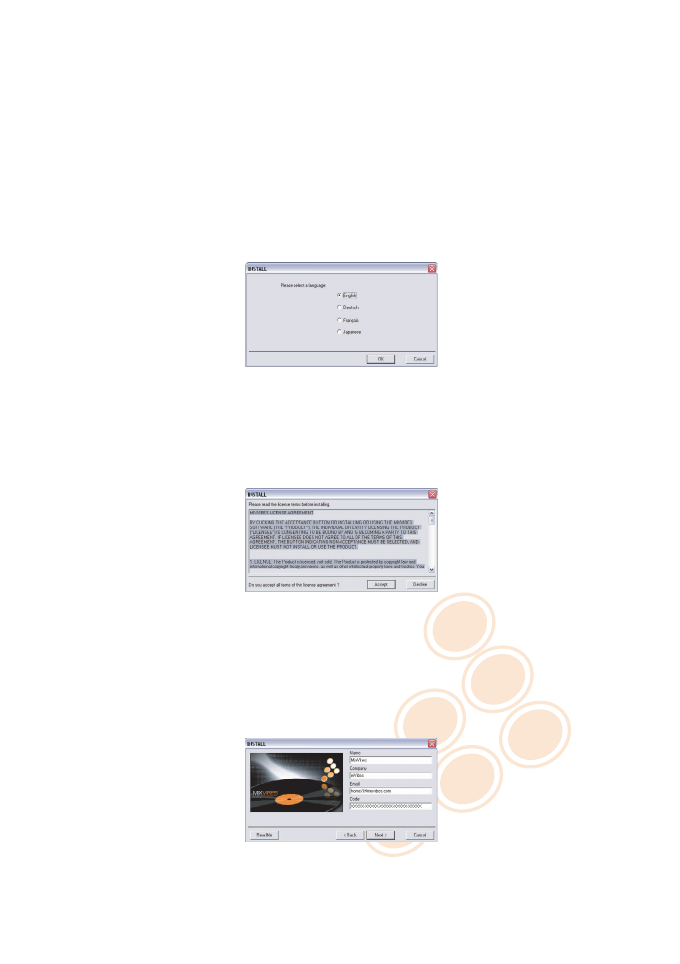
3Choose the installation language and click OK.
C
M
J
CM
MJ
CJ
CMJ
N
install1.pdf 06/04/2009 14:27:32install1.pdf 06/04/2009 14:27:32
Language Selection
4Please read and validate the user agreement by clicking Accept.
C
M
J
CM
MJ
CJ
CMJ
N
install2.pdf 06/04/2009 14:28:10install2.pdf 06/04/2009 14:28:10
End-User License Agreement
5
Enter your Name, Company (if applicable), e-mail address, the code in uppercase
(serial number) supplied in the box and click Next.
C
M
J
CM
MJ
CJ
CMJ
N
install3.pdf 06/04/2009 14:28:47install3.pdf 06/04/2009 14:28:47
License key
7 / 19
C
M
J
CM
MJ
CJ
CMJ
N
vibe-watermark-bright.pdf 03/04/2009 16:07:52vibe-watermark-bright.pdf 03/04/2009 16:07:52
4 Software and ASIO driver installation
6
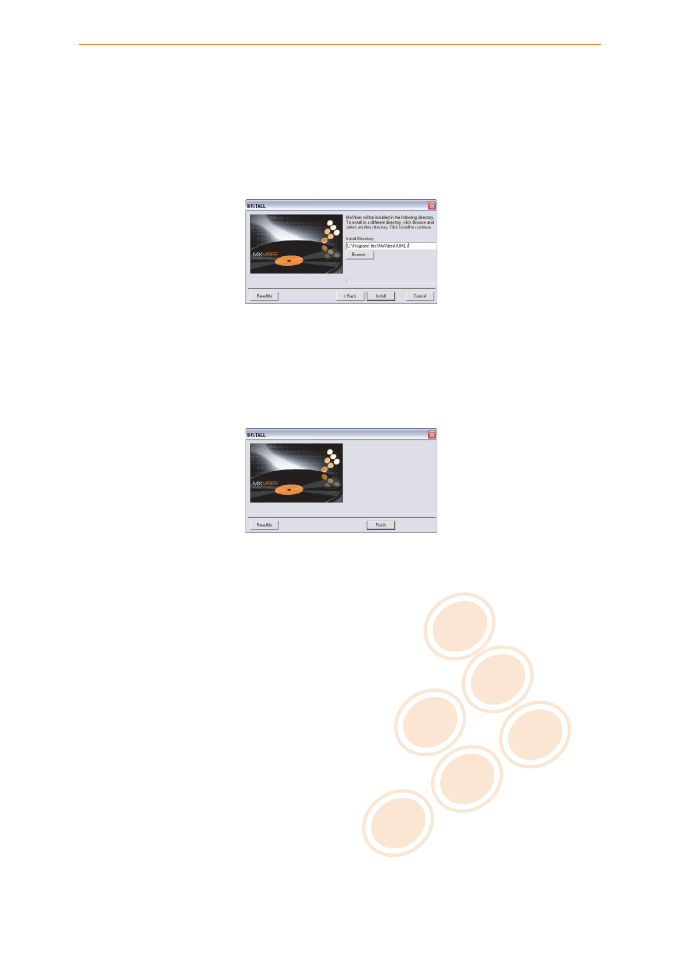
Select the folder you want to install MIXVIBES DVS into. You can keep the
default folder, or choose a new one by typing directly into the box or clicking
on ‘Browse..’. Press
Install
to begin installation.
Be patient, the installation
process can take a few minutes.
C
M
J
CM
MJ
CJ
CMJ
N
install4.pdf 06/04/2009 14:31:24install4.pdf 06/04/2009 14:31:24
Choose Install location
7Click Finish to end the installation process.
C
M
J
CM
MJ
CJ
CMJ
N
install5.pdf 06/04/2009 14:31:54install5.pdf 06/04/2009 14:31:54
Finish Installation
Congratulations, your MIXVIBES DVS ULTIMATE is now installed and ready for use.
Please
register on our forum in order to register your product and to check for the
latest download version of MIXVIBES software.
To launch MIXVIBES DVS, go to
[Start > All Programs > MixVibesDVS7]
and click on
MixVibes DVS or double-click on the MIXVIBES DVS shortcut on your desktop.
8 / 19
C
M
J
CM
MJ
CJ
CMJ
N
vibe-watermark-bright.pdf 03/04/2009 16:07:52vibe-watermark-bright.pdf 03/04/2009 16:07:52
5 Install Wizard
The install wizard launches automatically when running MIXVIBES DVS for the first time.
The install wizard can be launched manually in [Preferences > Install Wizard].
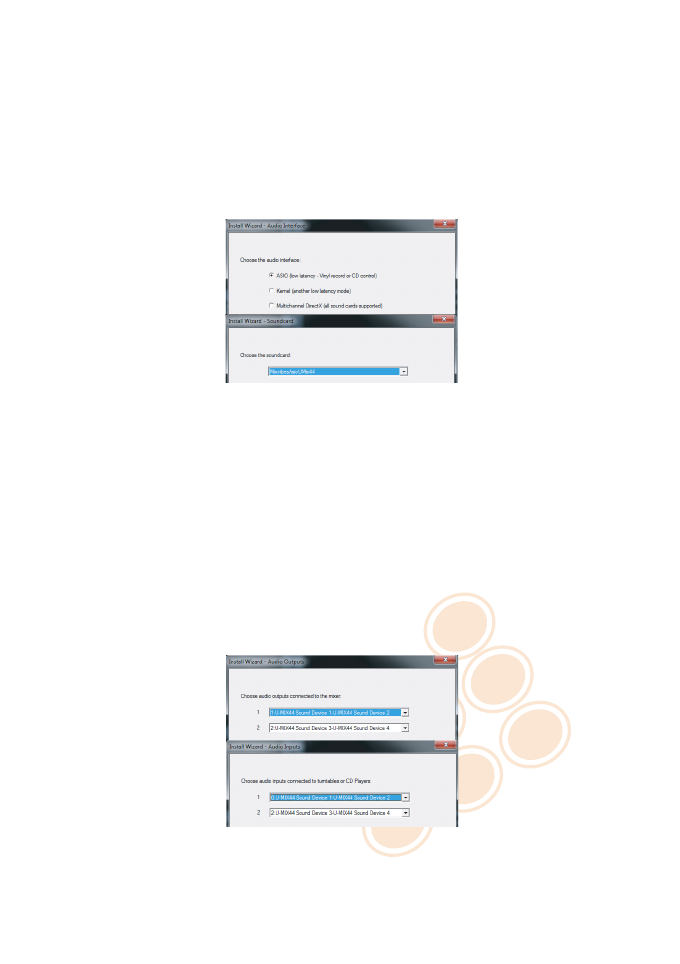
1Select the skin. Comments will help you select the skin.
2Choose the ASIO mode.
3Select MixVibesAsioUMix44 as your ASIO driver.
C
M
Y
CM
MY
CY
CMY
K
installwizard1.pdf 02/02/2010 16:57:14
MixVibes ASIO U-MIX44
4
Select the
U-MIX44 audio outputs
. Choose
U-MIX44 sound device 1 - U-MIX44
sound device 2
on the first line for stereo out 1 and choose
U-MIX44 sound device
3 - U-MIX44 sound device 4 on the second line for stereo out 2.
5
Select the
U-MIX44 audio inputs
corresponding to the decks that will playback
the control vinyl/CDs. Choose
U-MIX44 sound device 1 - U-MIX44 sound device 2
on the first line for stereo input 1 and choose
U-MIX44 sound device 3 - U-MIX44
sound device 4 on the second line for stereo input 2.
C
M
Y
CM
MY
CY
CMY
K
installwizard2.pdf 02/02/2010 16:56:41
Audio inputs and outputs
9 / 19
C
M
J
CM
MJ
CJ
CMJ
N
vibe-watermark-bright.pdf 03/04/2009 16:07:52vibe-watermark-bright.pdf 03/04/2009 16:07:52
5 Install Wizard
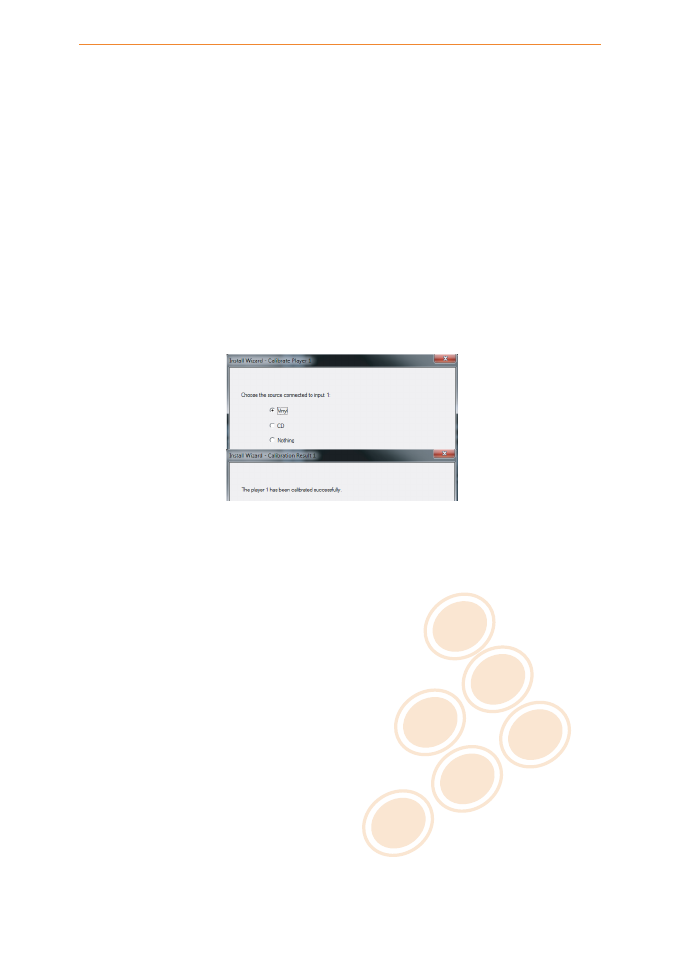
6Select the Control Media that you will be using: vinyl or CD.
7
Start
playback of the control records
making sure that the pitch is set to
zero on your decks and the playback direction is forward. If your decks have a
Master Tempo function or any on-board effects, make sure they are also disabled
as those will interfere with the calibration, and with the time code in general.
Click the Next button.
8
You must see the message
Player has been calibrated successfully
. If you
don’t see this message, you must know that time code quality can be affected
by improper connections, bad grounding, or if any effects or Master Tempo are
active on the deck playing back the time code.
C
M
Y
CM
MY
CY
CMY
K
installwizard3.pdf 02/02/2010 16:56:37
Inputs and Outputs
9Repeat steps 6, 7 and 8 for the second control media.
10 Click Finish to end the install wizard process.
If you use control medias, check that the
vinyl buttons
are
activate
on the both players.
If you use an external mixer, check that the
player 1 output is on 1
and the
player 2
output is on 2.
10 / 19
Inhaltsverzeichnis
Andere MIXVIBES DJ-Equipment Handbücher


Beliebte DJ-Equipment Handbücher anderer Marken


thomann
thomann Stairville DJ Lase 40-G MK-III Bedienungsanleitung

Eagletone
Eagletone 6 Eyes Flower Bedienungsanleitung

EuroLite
EuroLite FLD-1508 Bedienungsanleitung

Technical Pro
Technical Pro LG8xSEA Bedienungsanleitung

JB Systems
JB Systems Lounge Laser DMX Bedienungsanleitung

Lightmaxx
Lightmaxx Vega Halo 90 Bedienungsanleitung

Elation
Elation FUZE WASH Z350 Bedienungsanleitung

Maverick
Maverick MK3 WASH Bedienungsanleitung

Infinity
Infinity TF-260C7 Fresnel Bedienungsanleitung

Chauvet
Chauvet EVE E-50Z Bedienungsanleitung

Eliminator Lighting
Eliminator Lighting E 138 Bedienungsanleitung

EuroLite
EuroLite Mini Multicolor LED Flashing Light SC Bedienungsanleitung