Moza Slypod Bedienungsanleitung

User Manual
用户手册
Slypod Remote Controller
1
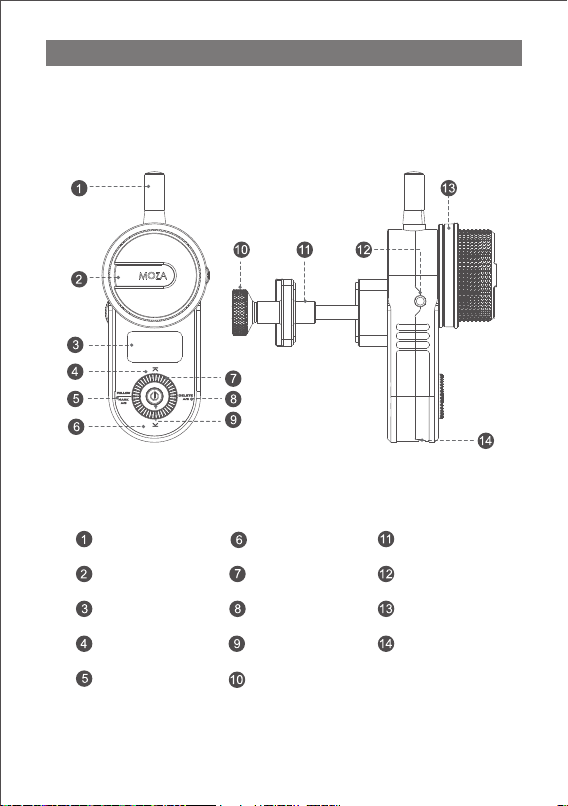
MOZA Slypod Remote Controller
Remote Controller
Mark Ring
Multi-CAN Port
Antenna
Wheel
OLED Display Screen
Power ButtonUp Button
Down Button
Mark / Follow Button
DEL / Shutter Button
Dial
USB Port
Knob Screw
Support Rod Clip

3
UP/DOWN Mode
Long press the top button to enter the UP mode, the Slypod extends; the Slypod will
stops extending when releasing the button. Rotate the dial to adjust the extending
speed while in motion. Turn the dial clockwise to increase the speed; turn the dial
counterclockwise to decrease the speed.
Long press the down button to enter the DOWN mode, the Slypod retracts; the
Slypod will stop retracting when releasing the button. Rotate the dial to adjust the
retracting speed (while retracting). Turn the dial clockwise to increase the speed; turn
the dial counterclockwise to decrease the speed.
Pairing
a. Turn off the Slypod
b. Turn on the remote controller, enter the menu interface, and select
Wireless>Pair>Pairing
c. Press the power button of Slypod, after the light ring flashes, the controller
screen will displays "Pair OK!". Keep holding the power button until the Slypod is
turned on, the pairing is complete.”
Connecting to the Slypod
Status Display
Note: After the pairing is completed, please start the route calibration on
the remote controller before controlling the Slypod. Please refer to page 11.
Route Calibration Status
Wireless Connection Status
Remote Controller Battery Level
Moving Position
Slypod Battery Level
Route Bar
Moving Speed
Modes Display
Modes Operations

2
Installation
a.Loosen the knob screw on the rod clip.
b.Attach the support rod into the clip.
c. Tighten the knob screw.
Connect the remote controller to the charger via a USB-C cable, then the
charging and battery level icon will be displayed on the screen. After the battery
is fully charged, the icon will disappear.
Turn On: Press the power button for 3 seconds until the MOZA icon appears on the
screen. Turn Off: Press the power button for 3 seconds in power-on state.
Note: the diameter range of the support rod should be 15mm to 32mm.
Power On/Off
Charging
Buttons Operations
Getting Started
Interface
Operations
Up Button
Down Button
Mark / Follow
Button
DEL / Shutter
Button
Power
Button
Main
interface
1× click Down mode Follow mode Take photo
————BTM mode ——
UP mode
TOP mode
Move up
Enter menu
2× click
Press for 3s
Move down Mark A,B point
Delete A,B point
Power off
Menu 1× click
Option-up Option-down Return Enter the
next menu Confirm
Note:The right button(DEL/Shutter button) is used to control the camera
when connected to the Slypod via a camera control cable to take photos.
(Control cable optional for purchase)

4
MARK Mode
In FOLLOW mode, set the A-B endpoint as shown in the picture, and Slypod will
move within the range of the route marked by the remote controller.
Set the A-B Endpoints
a. Control the remote controller to move to the endpoint A with the wheel;
b. Press the MARK button until “A” appears on the route bar, then turn the wheel
to move the remote controller to the endpoint B;
c. Release the MARK button to complete the A-B endpoints setting.
Cancel the A-B Endpoints
With the white A-B endpoints bar displayed on the screen, long press the DEL
button to cancel the A-B endpoints.
FOLLOW Mode
Press the left button to enter the FOLLOW mode, rotate the wheel, and Slypod will
follow the handwheel to relative position.
Rotate the wheel clockwise to control Slypod to extend in real time; rotate the
wheel counterclockwise to control Slypod to retract in real time.
TOP/BTM Mode
Double press the top button to enter TOP Mode. Use the remote controller to
control the Slypod to extend continuously. Turn the dial to adjust the speed of
movement.
Turn the dial clockwise to increase the speed. Turn the dial counter-clockwise to
reduce the speed.
Double press the down button to enter BTM Mode. Use the remote controller to
control the Slypod to retract continuously. Turn the dial to adjust the speed of
movement.
Turn the dial wheel clockwise to increase the speed. Turn the dial counter-clock-
wise to reduce the speed.
Note: To switch from other modes to UP/DOWN mode, please press the
up/down button in the menu interface.

5
Motor>: AUTO Mode Settings
Dir: set the movement direction of the Slypod through the remote controller,
press the power button to switch direction.
Range: set the movement length of the Slypod through the remote controller,
turn the dial to adjust the length value. (Total length is 280mm)
Time: set the movement time of the Slypod through the remote controller, turn
the dial to adjust the movement time. (Maximum setting time is 2000s, long press
the right button of the dial to increase the route time quickly)
Run: press the power button to start or stop moving.
AUTO Mode
Press the power button to enter the menu, right click to select Motor> to enter the
AUTO mode, the movement direction and speed of the Slypod can be set through
the remote controller.
Menu Introduction
Function>Wheel Calibrate>
The remote controller controls the movement of Slypod through the wheel. Under
normal circumstance, the value is the smallest when turning the wheel
counter-clockwise to the endpoint, and the value gets the largest when turning
the wheel clockwise. If the wheel is abnormal, calibration is required.
a. Turn the wheel to the starting position, and click the right button of the dial to
confirm.
b. Turn the wheel to the end position, and click the right button of the dial to
confirm;
Wheel Calibrate >
Brightness :050
1.Turn to the st
arting position;
Click [>] to con
firm.
2.Turn to the en
d position;Click
[>] to confirm.
Dir : UP
Range 25
Time 1s
Run Run
Time [ 1s]

6
Please download the MOZA Master (1.2.0 version or above) software from
Gudsen MOZA official website to upgrade. Please install related drivers before
running the MOZA Master software, for specific operations, please contact the
MOZA after-sale service or refer to the relevant tutorial documents on the official
website.
SPECS
Firmware Upgrade
Weight
Dimension 38*92*48mm
208g
Working Voltage 3.7V
Battery Capacity 750mAh
Upgrade / Charging Port USB-C
Working Temperature 0-50℃
The remote control can be upgraded independently. Operation steps:
a. Turn off the remote controller;
b. Connect the remote controller to computer with Type-C cable.
c. Long press the up button and don’t release, click the power button. “Boot
Mode” will pop up on the screen, the controller enters the upgrade mode.
d. Open the MOZA Master software. Click the corresponding device in the device
list to enter the upgrade interface.
e. MOZA Master software will automatically downloads the latest version of
firmware when connected to the Internet. After the firmware download is
complete, click the "Upgrade" button.
f. Do not operate the remote controller during the firmware upgrade.
g. Restart the remote controller after firmware upgrade.
c. Click the left button to stop the calibration, or click the power button to return
to the main interface.
Brightness>:Brightness Adjustment Screen
After Brightness is selected, turn the dial to adjust its value from 0 to 100. The
higher the value, the higher the brightness of the screen.
About >:
Display the firmware version information of the remote controller.

7
认识MOZA Slypod 遥控器
遥控器
标记环
Multi-CAN接口
天线
手轮
OLED显示屏
开关键UP键
DOWN键
MAKE键/FOLLOW键
DEL键/拍照键
拔盘
USB-C接口
管夹锁紧螺丝
管夹

8
安装
a. 将管夹锁紧螺丝拧松;
b. 将管夹套入安装遥控器的圆管上;
c. 拧紧管夹锁紧螺丝。
使用USB-C线将遥控器连接到充电器,遥控器的显示屏会显示充电图标和电量,电池充满
后,充电图标消失。
长按电源键3秒,屏幕上显示MOZA图标则开机成功。开机状态下,长按电源键3秒即关机
注意: 遥控器的管夹能夹持在直径为15mm到32mm的圆管上。
开机、关机
充电
按键功能定义
入门
界面 操作 上( ) UP
下( )
DOWN 左(FOLLOW) 右 ( )DEL 电源
主界面
单击 UpDn模式 FOLLOW模式 拍照
————BTM模式 ——
UpDn模式
TOP模式
向上运动
进入菜单
双击
长按3s 向下运动 标记A,B点 删除A,B点 关机
菜单 单击 选择条上移 选择条下移 返回 进入下一级 确认
注意:遥控器右键可控制使用相机控制线与Slypod连接的相机拍照。(相机控制线
需另购)

9
手动模式
长按上键,进入UP模式,遥控器控制Slypod向上运动;松开按键,Slypod停止向上运动
。旋转拨盘调节运动速度。顺时针旋转拨轮,速度增加;逆时针 旋转拨轮,速度减小。
长按下键,进入DOWN模式,遥控器控制Slypod向下运动;松开按键,Slypod停止向下
运动。旋转拨盘实时调节运动速度。顺时针旋转拨轮,速度增加;逆时针 旋转拨轮,速度
减小。
配对
a. 保证Slypod处于关闭状态;
b. 打开遥控器,进入菜单,选择Wireless>Pair>Pairing;
c. 按下Slypod开机键,Slypod上电(灯环闪烁)后,遥控器屏幕会显示“Pair OK!", 保
持Slypod开机键按住直至魔杖完成开机后,配对完成。
连接Slypod
状态显示
注意:配对成功后,需要先进行遥控器的行程校准,才能正常控制Slypod。参考第
11页
注意:从其他模式切换到手动模式时,需要单击菜单上键/下键进入UpDn模式
行程校准状态
无线连接状态
遥控器电量
运动位置显示
伸缩杆电量
行程显示条
运动速度显示
模式显示
操作教程
Andere Handbücher für Slypod
2
Inhaltsverzeichnis
Beliebte Fernbedienung Handbücher anderer Marken

Panasonic
Panasonic EUR7622KB0 Bedienungsanleitung

Bang & Olufsen
Bang & Olufsen Beo4 Bedienungsanleitung

Sunwave Tech.
Sunwave Tech. RemoteComm SRC-7000 Bedienungsanleitung

Multiplex
Multiplex PROFI TX 9 Bedienungsanleitung

One Remote
One Remote RMB4 Bedienungsanleitung

FUTABA
FUTABA 9ZAP - PART2 Bedienungsanleitung


