Mytee Air Hog 7303LX Bedienungsanleitung

13655 Stowe Dr. Poway, CA 92064
P: (858) 679-1191
F: (858) 726-6005
www.mytee.com
Air Hog™Model:
7303LX
User Manual
REV. 2/15/23

2
Introduction
Dear Customer:
Congratulations on the purchase of your new Air Hog™ Vacuum Booster.
As technology continues to develop you can work condently knowing that both
Mytee and its employees are equally dedicated to developing with the industry and its
advances.
Like any other piece of machinery or technology, the 7303LX also requires proper
maintenance and care to keep the product working over extended use. Neglecting your
machine, abusing it or not operating it properly can void its warranty and prevent the
machine from performing to the quality and standard you’d expect out of the Mytee
line.
If you have any warranty concerns or questions, please review this manual thoroughly
or do not hesitate to contact your distributor. If there are questions regarding main-
tenance, replacement, or ordering parts please contact an authorized Mytee Service
Center. To see an updated list please visit our website at http://www.mytee.com/
support/service-centers.
Before using your Mytee product, please read this manual thoroughly.
Sincerely,
Mytee Customer Care Dept.

3
Table of Contents
1
2
3
4
5
Important Safety Information 4
At a Glance 6
1.1 - Technical Specications 6
1.2 - Included with the Air Hog™ 6
1.3 - Air Hog™ Front View 7
1.4 - Air Hog™ Rear View 8
1.5 - Switch Plate 9
Machine Operation 10
2.1 - Powering the Air Hog™ 10
2.2 - Connecting Hoses 10
2.3 - Air Hog™ Booster Congurations 10
2.4 - Using the Air Hog™ as a Stand-Alone Extractor 10
2.5 - Emptying the Recovery Tank 10
2.6 - Setting Up the Air Hog™ as a Booster 11
2.7 - Setting Up the Air Hog™ as a Stand-Alone Extractor 12
Machine Maintenance 13
3.1 - Filter Maintenance 13
Accessories for your Air Hog™ 14
Troubleshooting 15

4
Important Safety Information
Please read and understand this manual completely before
operating this machine.
Grounding Instructions
This machine must be grounded. If it should malfunction or
break down, grounding provides a path of least resistance for
electrical shock. This machine is equipped with a cord having
an equipment-grounding conductor and grounding plug. The
plug must be plugged into an appropriate outlet that is properly
installed in accordance with all local code and ordinances. Do
not remove ground pin; if missing, replace plug before use.
Improper installation of the equipment-grounding conductor can
result in a risk of electric shock. Be sure to check with a qualied
electrician or service person if you are in doubt as to whether
the outlet is properly grounded. If the plug will not t in the outlet
do not modify the plug or the machine’s cord, instead have a
proper outlet installed by a qualied technician.
This machine is for use on a nominal 120-volt circuit and with a
grounding plug similar to the one in Figure 1 below. If a proper
outlet is not available, follow the illustrations of Figure 2 & 3
to install a temporary-grounding plug. This temporary work-
around should be used only until a proper outlet (Figure 1) can
be installed by a qualied electrician. When and if this type of
adapter is employed, screw the adapter’s extended tab into
place with a metal screw. However, grounding adapters are not
approved for use in Canada.
Again, be sure to check the grounding pin for damages and
replace if necessary.
The Green, or Green-Yellow, wire in the cord is the grounding
wire. When replacing a plug, this wire must be attached to only
the grounding pin.
DO NOT use extension cords.
Please Note for America use only.
Parts and Service
Please contact Mytee service personnel or a Mytee authorized
Service Center using Mytee original replacement parts and
accessories if repairs need to be performed. When and if calling
Mytee for support, please have your Model and Serial Number
available for faster assistance.
Name Plate
The Model and Serial Number are located on the lower half of the
back of the machine near the power plug and will be required for
ordering replacement parts. You can use the space provided in
this manual to note down both for future referencing.
Unpacking the Machine
When your new machine is delivered, please carefully inspect
both the shipping carton and the machine for damages. If
damage is evident, save both the shipping carton and machine
so that the delivering carrier can inspect it. Contact the carrier
immediately to le a freight claim if there has been any damage.
Caution and Warnings
Symbols
Mytee uses the symbols below to signal potentially dangerous
conditions. Always read this information carefully and take the
necessary steps to protect personnel and property.
Is used to warn of immediate hazards that will cause severe
personal injury or death.
Is used to call attention to a situation that could cause severe
personal injury.
Is used to call attention to a situation that could cause minor
personal injury or damage to the machine or other property.
When using an electrical appliance, basic precautions should
always be followed, including the following: Read all instructions
before using this machine. This product is intended for commer-
cial use only.
To reduce the risk of re, electrical shock, or injury:
1. Read all instructions before using equipment.
Figure 1
Grounding Pin
Grounded Outlet
Grounded Outlet Box
Adapter
Tab for Grounding
Screw
Metal
Screw
Figure 2 Figure 3

5
Important Safety Information
2. Use only as described in this manual. Use only manufacturer’s
recommended attachments.
3. Always unplug power cord from electrical outlet before at-
tempting any adjustments or repairs.
4. Do not unplug by pulling on cord. To unplug, grasp the plug,
not the cord.
5. Do not pull or carry by cord. Do not close a door on cord or
pull cord around sharp edges or corners.
6. Do not run appliance over cord. Keep cord away from heated
surfaces.
7. Do not use with damaged cord or plug. If cord is damaged,
repair immediately.
8. Do not use outdoors or on wet surfaces and/or standing
water.
9. Always unplug or disconnect the appliance from power
supply when not in use.
10. Do not allow to be used as a toy. Close attention is
necessary when used by or near children.
11. Do not use in areas where ammable or combustible
material may be present.
12. Do not leave the unit exposed to harsh weather elements.
Temperatures below freezing may damage components and
void warranty.
13. Use only the appropriate handles to move and lift unit. Do
not use any other parts of this machine for this purpose.
14. Keep hair, loose clothing, ngers, and all parts of the body
away from all openings and moving parts.
15. Use extra care when using on stairs.
16. To reduce the risk of re or electric shock, do not use this
machine with a solid-state speed control device.
17. The voltage and frequency indicated on the name plate
must correspond to the wall receptacle supply voltage.
18. When cleaning and servicing the machine, local or national
regulations may apply to the safe disposal of liquids which
may contain: chemicals, grease, oil, acid, alkalines, or other
dangerous liquids.
19. Do not leave operating unattended.

6
1 - At a Glance
1.1 - Technical Specications
1.2 - Included with the Air Hog™
Recovery Tank 7 Gallons
Vacuum Dual Mytee® Hybrid Ametek vacuum motors
CFM 225-250
Water Lift 182”
Pump-Out GPM 3.3
Power Consumption Cord 1: 15 amps @ 115V 60Hz
Cord 2: 15 amps @ 115V 60Hz
Machine Weight 40 lbs.
Machine Dimensions 23” x 12” x 26.5”
Power Cord Dual 25’ 12/3
H141V Cu-Lynx™ (2” Female
Cu-Lynx™ x 1.5” Female Hose)
H110V Cu-Lynx™ (2” Female
Cu-Lynx™ x 2” Female Hose)
H136V Cu-Lynx™ (2” Male
Cu-Lynx™ x 2” Female Hose)
2x G201 Rear Vacuum Port Caps G076 Mesh Filter Bag

7
1 - At a Glance
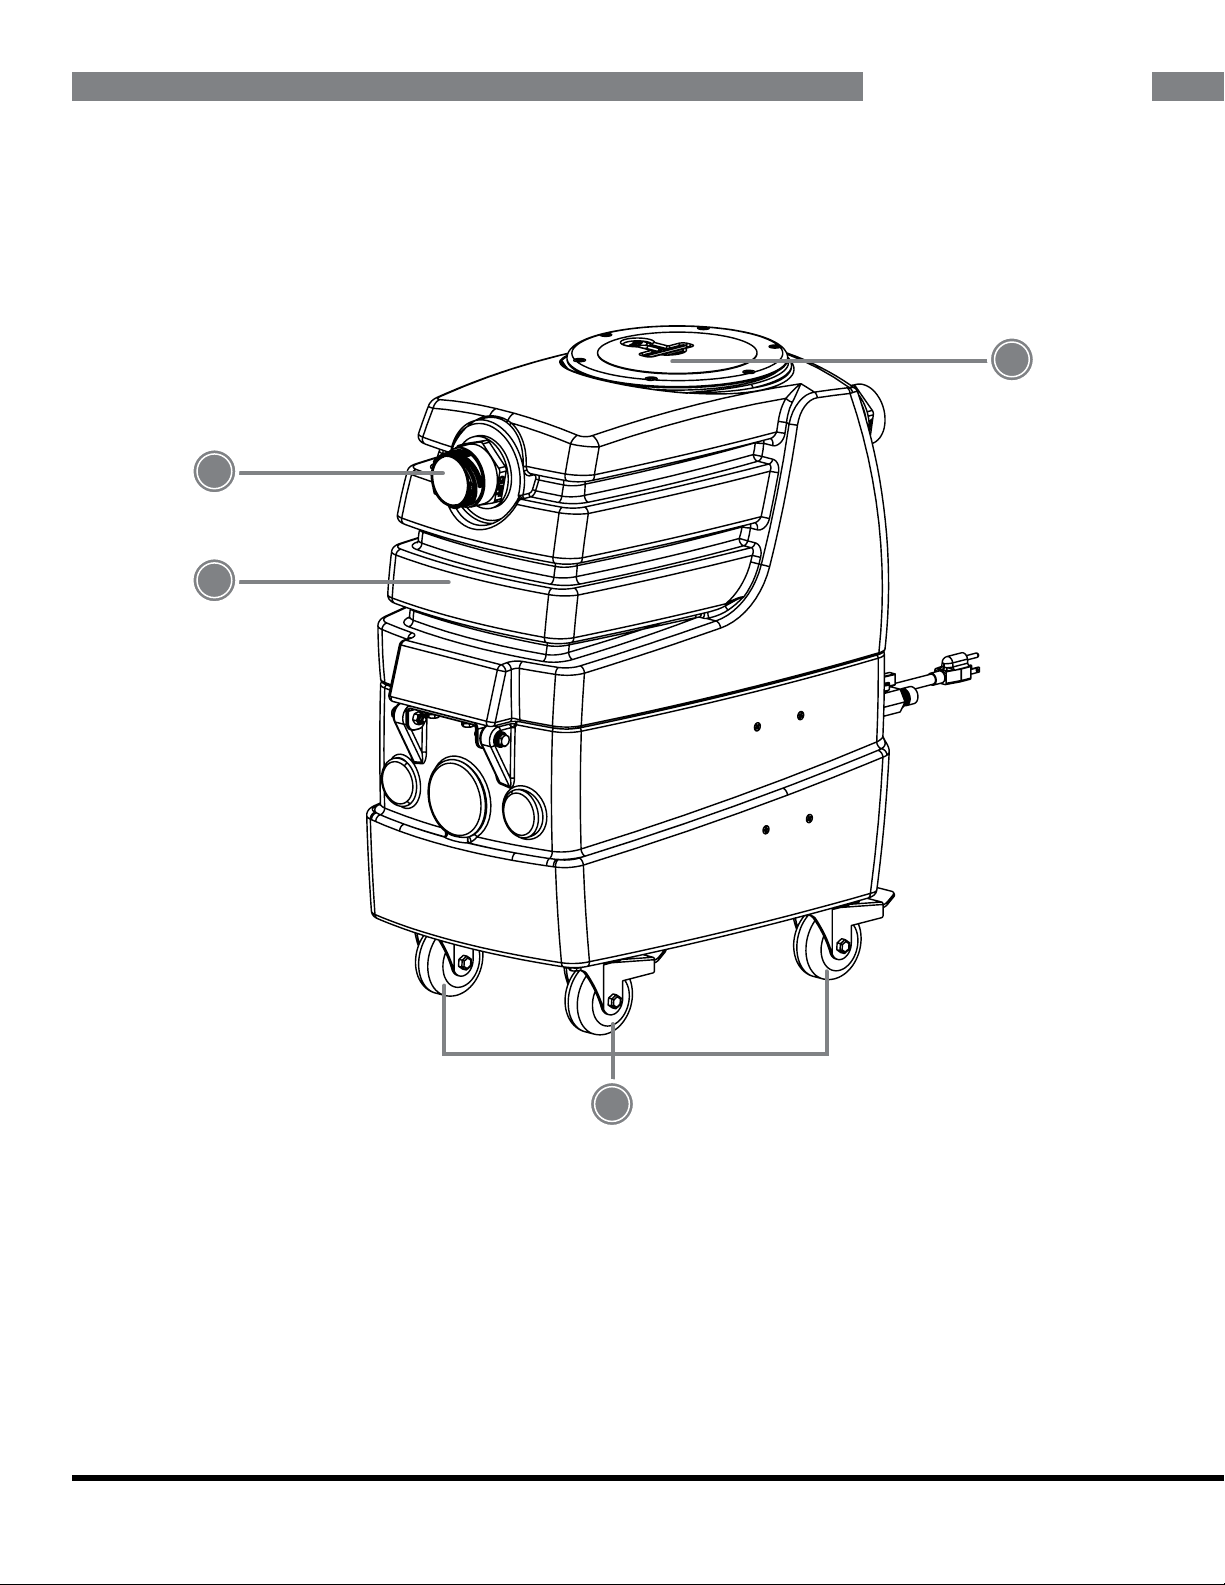
1. 2” Male Cu-Lynx™ Starter
2. 7 Gallon Recovery Tank
3. 3” Locking Casters
4. See-Thru Recovery Tank Lid
1.3 - Air Hog™ Front View
1
2
3

4

8
1 - At a Glance
1. Rear Booster Ports with Cu-Lynx™ Plugs
2. Pump-Out Valve & Garden Hose Quick Connection
3. Power Cord Pigtails
4. Switch Plate
5. Rear Latch For Opening Machine
1.4 - Air Hog™ Rear View
5
2
1
3
4

9
1 - At a Glance
1.5 - Switch Plate
1. Vacuum Switch 1
2. Vacuum Switch 2
3. Pump-Out Switch
4. Dual Circuit Indicator Light
123
4

10
2 - Machine Operation
Before Operating
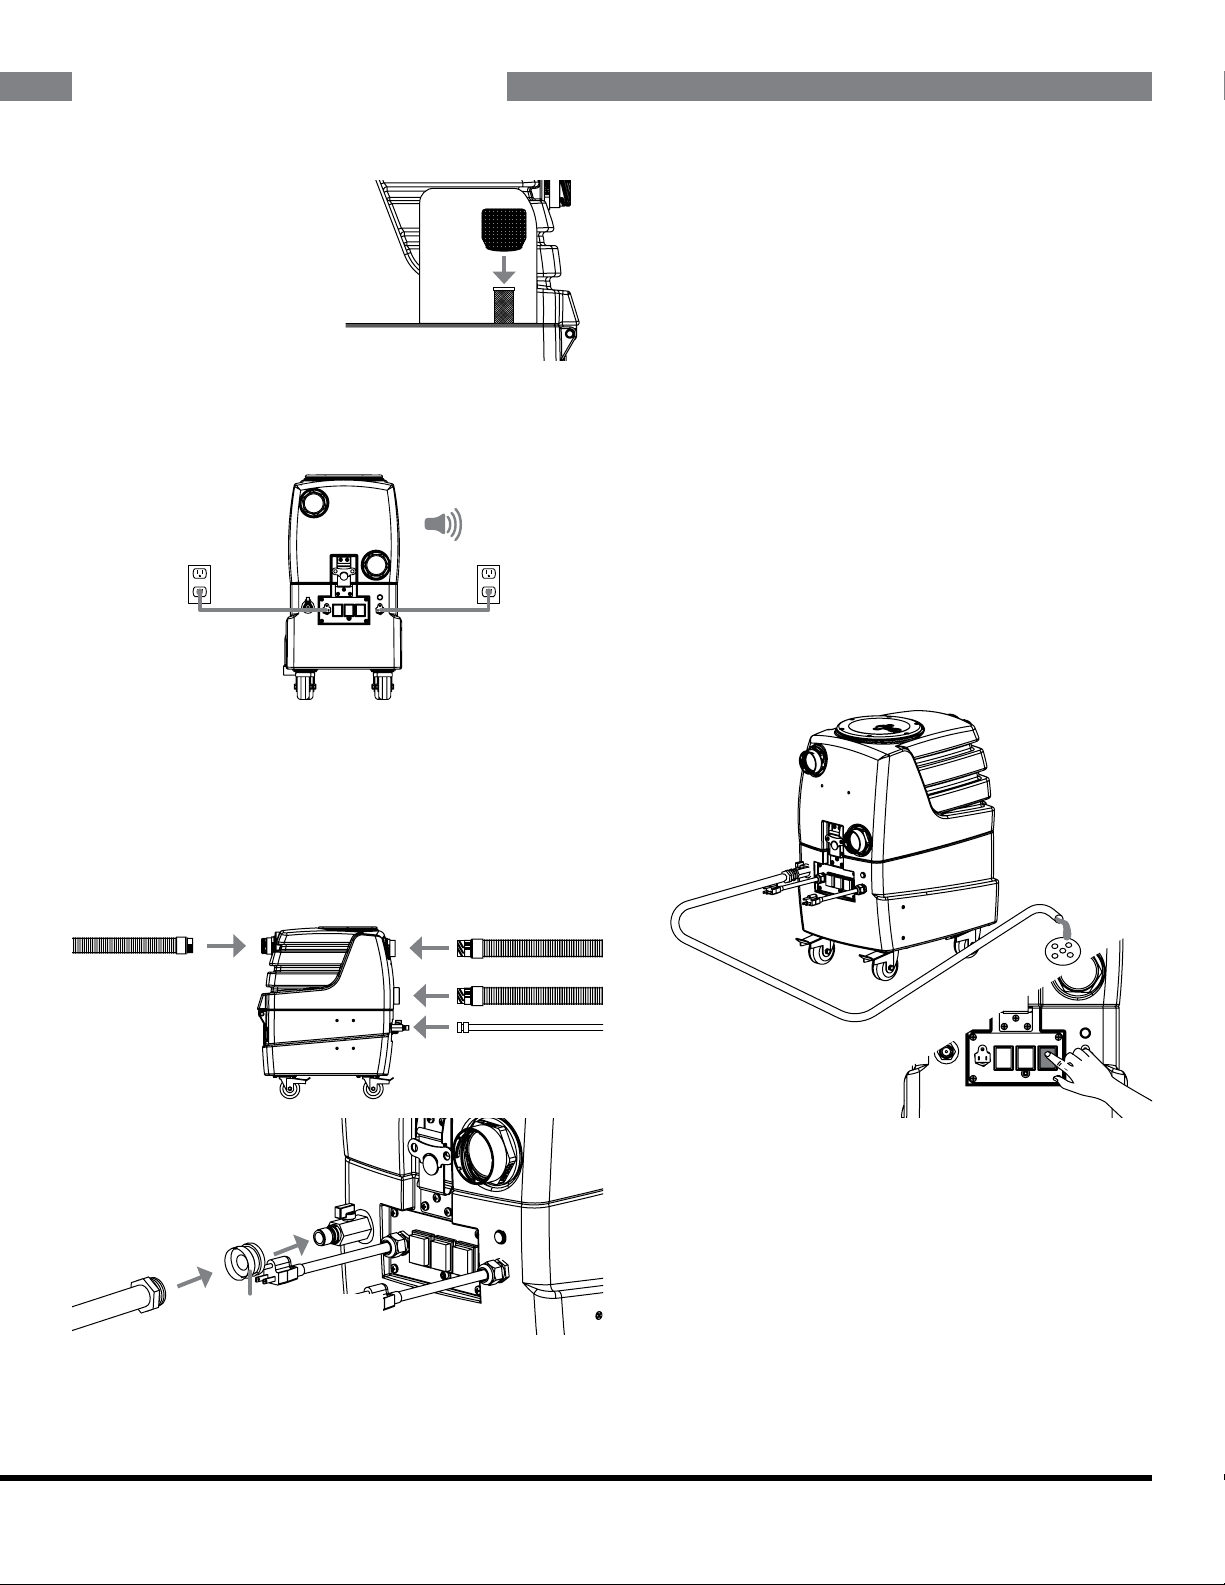
Take the included mesh lter
bag and place it over the
pump-out lter inside the
recovery tank. This lter helps
prevent any solid debris from
damaging the pump-out.
2.1 - Powering the Air Hog™
Each power cord on the Air Hog™ requires a grounded 15 amp
outlet. The dual circuit indicator light and tone will activate when
this is achieved. ♦
2.2 - Connecting Hoses
Use the included H141V or H110V female Cu-Lynx™ Hose
Connectors to connect 1.5” or 2” vacuum hose to the
Cu-Lynx™ starter on the front of the Air Hog™. The included
H136V male Cu-Lynx™ Connector can be used
to connect 2” vacuum hose to either rear booster port.
To attach a garden hose for use with the pump-out, thread the
included garden hose quick connect onto the garden hose. The
hose can then easily snap onto the Air Hog’s™
pump-out tting. ♦
2.3 - Air Hog™ Booster Congurations
The Air Hog™ can be set up as a booster in multiple
congurations on its own or daisy-chained with other
Air Hogs™. See page 11 for more details. ♦
2.4 - Using the Air Hog™ as a Stand-Alone
Extractor
The Air Hog™ can also be set up as a stand-alone
extractor. See page 12 for more details. ♦
2.5 - Emptying the Recovery Tank
The recovery tank can be emptied using the pump-out feature.
Attach a garden hose to the pump-out tting, place the other end
of the hose in a drain or receptacle, and press the PUMP-OUT
switch on the switch plate. ♦
Garden hose quick
connect
Andere Handbücher für Air Hog 7303LX
1
Inhaltsverzeichnis
Andere Mytee Schrubber Handbücher

Mytee
Mytee 1000DX-200 Speedster Bedienungsanleitung

Mytee
Mytee PowerGlide HD-17 Bedienungsanleitung

Mytee
Mytee Prep Center S 80-120 Bedienungsanleitung

Mytee
Mytee S-300 TEMPO Bedienungsanleitung

Mytee
Mytee Spyder HP60 Bedienungsanleitung

Mytee
Mytee Spyder HP60 Bedienungsanleitung

Mytee
Mytee UltraGlide RD-13 Bedienungsanleitung

Mytee
Mytee T-REX Bedienungsanleitung

Mytee
Mytee S-300H Tempo Bedienungsanleitung

Mytee
Mytee Flood Hog 7000LX Bedienungsanleitung